Saturday, October 31, 2015

Soccer Coach Thank You!


We are so blessed to have community members and parents step up to coach our youth sports!  They spend hours with our kids during the soccer season and coach their hearts out, in this case with fourth graders.  In case you haven’t watched most fourth grade recreational leagues . . . they are still at the “bunch soccer ball” stage for game strategy.  Our boys had a wonderful mom who LOVES soccer and plays adult league as their head coach this year.  It is the end of the season and time to thank the coaches who give so much of themselves and their time!  I volunteered to make the thank you cards.  I couldn’t resist making a soccer themed card similar to her favorite ball!


A recent video at Imagine Crafts Blog highlighted the use of Ink Potion No. 9 and the Kaleidacolor ink pad.  I’ve used the brayer technique with Kaleidacolors before, but with the Ink Potion No. 9 spritz, the colors are so much more vibrant and blend so much better on the glossy card stock.  If you’ve not noticed, soccer balls come in all colors now and the Kaleidacolor Spectrum made for a great background on this soccer ball.  After inking the glossy card stock it was die cut using the Quickutz Soccer ball die.  Black card stock is die cut for the pentagon portion of the soccer ball. 


 I also decided to participate in Week #385 over at Sketch Saturday because they have great sketches AND I was the winner over there last week.  I didn’t have to scroll very far down in the archives to find this great sketch to incorporate a round soccer ball!

I used a scrap of the Kaleidacolor Spectrum glossy cardstock to die cut the Spellbinders Phrase Set One sentiment “Thanks”.  It is backed with black and blue cardstock trimmed to size.  Boxer Scrapbook’s Soccer Clear Stamps provided the soccer goal, which is stamped on blue card stock in Tsukineko Memento Tuxedo Black.  Green cardstock is die cut with Lawn Cuts Stitched Hillside Borders.  The layers are adhered to the card front and the sentiment panel is adhered with dimensional foam adhesive.  I was able to crank out two thank you cards for the coaches in no time!

I would like to enter this card in the following challenges:
(I like brights!  The brilliant color cheers me up!)

Thursday, October 29, 2015

A Quick and Fun Birdday Card!


When pressed for time and in need of a quick birthday card . . . it is a sketch challenge to the rescue!  Sketch Saturday supplied the sketch for this fun card.


A scrap kit from the card-making box supplied the papers by My Mind’s Eye Penny Lane in Free Bird Robins Egg.  The paper was trimmed to match the sketch.  The Hero Arts OWH Missing You toucan image was stamped on white card stock with Tsukineko Memento Tuxedo Black and colored with Chameleon Aqua Marine BG4 and Seville Orange OR4.  The image was die cut with the corresponding die.  The Happy Birdday is stamped with Tsukineko Memento Luxe Rich Coco.  All the lower layers are edged with Tsukineko Memento Luxe Rich Cocoa ink as well.  The layers were adhered together and the toucan is raised with dimension foam adhesive.  

I would like to enter this card in the following challenges:
 

Wednesday, October 28, 2015

Birds of a Feather Thinking of You


The theme for our challenge at Ruby’s Rainbow Challenges this fortnight is Birds of a Feather, RRC#116.  Do stop by and check out the wonderful creations of the Design Team.


My current stamp stash had little in the way of bird stamps, but I did have several feather stamps to work with that I’ve had around since 1998!  The first thing that popped into my head was to use metallic embossing powders on the stamped images, and this is what was so fun to create.

The feathers are all from Where the Rubber Meets the Road purchased at a stamp convention in Portland.  That is a story for another time!  The images are stamped in Tsukineko Briallance Galaxy Gold on cream card stock and are heat embossed with bronze and gold opaque embossing powders.  The feathers were fussy cut, then colored with Decorator Chalks using a Tsukineko Fantastic Brush Tip tool. 

The card base is Kraft card stock trimmed to 5 ¾” x 9 “ and folded in half.  I used one sheet of Coordinations Black Magic and trimmed the backing layer to 4 ¼ “ x 5 ½”.  It was pressure embossed with Sizzix Damask #3 so the image is “debossed”.  Using a brayer and Memento Tuxedo Black the raised portion is distressed.  Spellbinders Medallion Two is die cut and pressure embossed and then sanded to allow the color to show through.  A die cut of the same in Kraft backs the medallion.  These small sets offer great versatility in layering.  The center circle is die cut and pressure embossed before inking the edges with Tsukineko Versa Magic in Midnight Black.  The sentiment by Inkadinkado is from the Just Saying set. The various layers are adhered together with dimensional foam adhesive between the top layers.

Tuesday, October 27, 2015

Fall Happy Birthday using RRBC Sketch


It is time for a new challenge over at Retro RubberChallenge Blog, and this go around it is a fun sketch.  Stop by the blog and check out the complete line up of the Mod Squad’s take on this sketch.


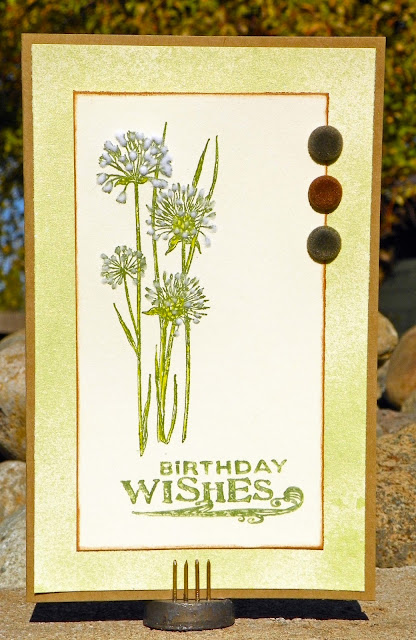
I choose to flip the sketch on its side and make a birthday card for fall.  I started with a very old (late 90’s) Magenta dandelion image and a simple Scrappy Cat Birthday Wishes set that I’ve had for five or six years.   


At first I tried an ink color and didn’t like the results, so I went with a tried and true way to get an ink color from my marker set!  I used the brush tip end of the Tsukineko Memento Dual Tip Marker in Bamboo Leaves and colored directly on the rubber of the stamp, then used the moisture of my breathe to make sure the ink was still wet just before stamping.  This technique works best on rubber stamps, but can be successfully used on some photopolymer stamps as well.  (Test it before you stamp on your project!)  I was able to get a good image with the Scrappy Cat set.  After stamping on cream card stock trimmed to 3” x 5 ½” I colored the small sections of dandelions with Tsukineko Memento Dual Tip Marker in Pear Tart.  With a little bit of Designer Dries Clear adhesive I added some Recollections Snow flocking to mimic the dandelion seeds.  The edges are inked with Tsukineko Versa Magic in Gingerbread.

The border is cream card stock trimmed to 4”x 6 ½” and is liberally spritzed with Imagine Crafts Fireworks in Bamboo Leaves.  If you look closely you can see the shimmer in the color.  The top two layers are adhered together before placing the flocked brads by Creative Imaginations through both layers.   The base card from Kraft card stock is trimmed to 6 ¾” x 8 ½” and folded in half.  The top layers are adhered to the front.

Please do come by and share your project using the sketch above over at Retro Rubber Challenge Blog.  We ask that you use a stamp older than a year and have some fun with your retro rubber!

I would like to enter this card in the following challenges:


Wednesday, October 14, 2015

Celebrate Autumn RRC #115


Celebrate Autumn

Autumn Leaves is a wonderful challenge at Ruby’s Rainbow Challenges for this time of year in the Northern Hemisphere.  Here in Central Oregon we don’t always get leaves changing color as the weather can be a bit erratic and change swiftly.  But this year is an exception and we have wonderful fall colors all around us. 
In the bright sunlight the leaves really shimmer!
 
The perfect solution to represent Autumn leaves is a shaker card.  This was made simple by the use of Impression Obession’s Shake It circle.  The leaves die cut from a variety of Quickutz leaf dies.  The paper is spritzed on both sides with Tsukineko Fireworks in Dandelion, Lady Bug, and Tangelo.  The circle from Spellbinders Standard Circles Small is die cut through both layers of the frame, which are two colors from the Coordinations Distress Collection.   The top card stock is pressure embossed with Cuttlebug Polka Dots and then distressed with a sanding block to bring out the texture.  The Classic Scalloped Circles Small is a great mat for the circle and the stamped sentiments.   After it is die cut it is pressure embossed using the tan embossing mat.  The edges are sanded to distress the scalloped circle just a bit.   

The shaker portion is raised from the front surface of the card.
The stamp the sentiment I used Technique Tuesday’s Borderline: Same Time Next Year set.   What is wonderful about the clear stamps is that they can be gently bent into shape to stamp a circular border.  Once they are in the correct shape on the acrylic block it is easy to stamp a border around the scalloped circle and inside the shaker area on the base card stock.  I drew a light pencil line on the base Kraft card stock before I stamped the images.  Both images are stamped in Tsukineko StazOn Saddle Brown. (Mostly because that is what was sitting on my desk at the time!)  The inside sentiment was stamped four times, and the outside almost three, with a portion masked off to not over stamp.

Once the stamping was complete I placed the small die cut leaves inside the Shake It circle and adhered it into place.  (They came with adhesive already in place, how great is that?)  The successive layers were adhered into place with the larger leaves adding to the frame around the scalloped circle.

Thanks for stopping by and come and join the fun at Ruby’s Rainbow Challenges and create an Autumn Leaves project and share it with us. 

Selected as Top Three!

I would like to enter this card in the following challenges:
Ike’s World Challenge Blot #48 Autumn Colors

http://alwaysplayingwithpaper.blogspot.ca/
Typically color, but for this card monochrome shines through!


Tuesday, October 13, 2015

Happy Halloween for RRBC25


We have a really fun challenge over at Retro Rubber BlogChallenge for the next two weeks.  Show us your Spooky images and share in the creativity!


I am not a super big fan of decorating for Halloween, and my stamp images reflect that as well.  However I do have these two really fun dancing skeletons that have been around for at least 10 years.  With a little research I determined the stamps were made by Stamp Franscisco.


Since skeletons are best shown in white, I stamped the images on black card stock with Tsukineko Versa Magic Cloud White and heat embossing them with detail white embossing powder.  I used card stock left over from a Halloween layout that was perfect for this card, My Minds Eye Night Light in Dotted Corn to frame the image.  Bazzill card stock in burnt orange backs the Dotted corn perfectly.  Both were trimmed to size and the smaller oval from Spellbinders Petite Ovals Small was die cut through both layers.  The larger oval was die cut from the Dotted Corn in a second step.  The sentiment is from Rubber Stampede set that was originally mounted on foam and purchased from Michaels at least 18 years ago.  It is stamped in Tsukineko Versa Magic Cloud White and heat embossing them with detail white embossing powder.  The deckle torn edges were inked two at a time and also heat embossed.  With the sentiment I was purposely not as careful with the embossing powder to give it a more rustic look to match the design of the card.  The black card stock is adhered to an A2 size Kraft card stock base.  The frames are adhered with dimensional foam adhesive.

Please come around and check out the rest of the Mod Squad’s creations at Retro Rubber Blog Challenge and join us with your own Spook Us project.

I would like to enter this card in the following challenges:

Saturday, October 10, 2015

Fall Birthday ATC


It is fun creating Artist Trading Cards for a Birthday Swap, and this one was no exception!  Part of the fun is finding bits and pieces from other projects or practice projects that just flow together.


The base is another section of Kraft card stock pressure embossed with Teresa Collin’s Woodgrain Cottage and inked with Tsukineko StazOn Saddle Brown.  The practice project was created with Provo Craft Slab patterned paper die cut Heartfelt Creations Decorative Blossom Corner. 

The flower is created with Spellbinder Rose Creations that is stamped with Heartfelt Creations Botanical Floral Precut set with Tsukineko Versa Magic Shara Sand.  The petals are colored with Chameleon’s OR4 Seville Orange and then sprayed with Tsukineko Spritz in Gold.  The “leaves” are Heartfelt Creations Christmas Poinsettia and Sun Kissed Fleur die.  The leaves are stamped in Versa Magic Sage; heat embossed with clear embossing powder and colored with Chameleon OL3 Olive Green.  The flower is held together with a green glitter brad from my stash.

To finish the ATC I used green card stock die cut with Spellbinder’s Labels Eight.  The Happy Birthday sentiment is by Imaginisce from the Snag ‘em Stamps All Kinds of Happy Collection.  It is stamped in Tsukineko StazOn Saddle Brown. 

I would like to enter this ATC in the following challenges:

Sunday, October 4, 2015

Housewarming Card


Just a quick post this afternoon to share a card I made for a friend’s housewarming.  He is an older gentleman who has a definite style and would appreciate a handmade card.


I started with an A2 size card in white and topped it with Core’dinations Black Magic red card stock from a 6” x 6” stack.  It was pressure embossed with Darice’s Brick Pattern embossing folder and sanded to have the color show through.  Does a great job of imitating bricks I think!  The red side of the card stock was stamped with Technique Tuesday’s “Home is where the heart is” stamp set in Tsukinkeo Tuxedo Black.  To make the house (from the same set) pop a bit more on the design it is stamped on white card stock and fussy cut.  These panels are adhered with dimensional adhesive. 

Thanks for stopping by and have a great fall!  I would like to enter this card in the following challenges: