Showing posts with label Double Page Layout. Show all posts

Thursday, June 23, 2022

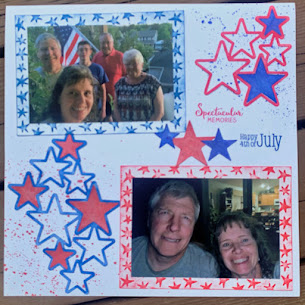
Fourth of July Layout Made Easy with Memento inks and Fireworks!

Today I will share how easy it is to create a very cohesive layout using just two ink colors and the matching Fireworks! colors for an amazing Fourth of July scrapbook layout.  With just white cardstock, an embossing folder, a large die cut, and stamps this layout is perfect for Independence Day.

Skill:  Beginner

Time:  2 hours

 Directions:

Step 1:


Trim white cardstock to 1" on each edge larger than the photos.  Pressure emboss with Star Blanket.  Ink raised portion of embossed areas and edges with Memento Danube Blue or Lady Bug.  For my layout I trimmed two sections 5" x 7", three sections 4" x 5", and one section by 4" x 4" to back my phtotos.

Step 2:


Die cut two sets from Spellbinders Cascading Stars die and remove the stars.  Trim one outline die cut into a section of five stars, with the other being four stars.  Use Jumbo Dauber to tap Memento Danube Blue over one die cut and the smaller portion of the trimmed die cut.  Tapping the ink onto the paper keeps from damaging the die cut, which can occur if a rubbing motion is used.  The larger portion of the trimmed die cut is inked in Memento Lady Bug.  Continue to add ink until it is the desired hue. 

Step 3:


The splatter method is used with Fireworks! to add some interest to the white background.  Shake the bottle to distribute glimmer and then remove spritzer nozzle and gently tap the top to splatter ink from the outside of the spray tube.  Continue to tap until the desired amount of ink is on the paper.  I choose sections where the die cuts would be eventually placed.  I alternated the color choices from the die cut color.  This is the lower right corner of the right page.  

Step 4:


The left side of the layout shown completed with splattered Fireworks! in Memento Lady Bug and Danube Blue.

Step 5:


Determine placement placement of elements to add stamped sentiments.  Place on layout and remove other elements.  Use a stamp platform to stamp sentiments in proper position.

Step 6:

On the right page the stamped elements are determined, then half are removed before stamping to allow for clean stamping of correct colors.  The remaining elements are added and stamped.  It was easier to stamp all the images Memento Lady Bug at one time, then follow with images in Memento Danube Blue.

Step 7:


Spritz Fireworks! into a plastic tray or surface.  Place die cut stars from step 2 face down on the Fireworks! ink to add color.  Use tweezers to move around in the ink and add more ink to tray as needed.  About a third of the stars were inked with Fireworks! in Lady Bug the remaining in Fireworks! Danube Blue.

Step 8:


Determine correct placement of Fireworks! stars in the die cut.  I rotated the star until it fit properly into the die cut area.  Not all the stars are identical, so taking the time to find the right one was worth the effort for a seamless look.   

Step 9:

Adhere elements to layout.  Tear It! tape was used to adhere the photos to the textured mats.  The die cuts are adhered with On Point! glue.  The small dots around the star frames keep the layout clean and smudge free.  


Art Supplies

Imagine:

Memento--Lady Bug and Danube Blue

Fireworks!--Lady Bug and Danube Blue

Jumbo Dauber

Tear It! Tape

On Point Glue

Other:

White Cardstock

Cuttlebug Star Blanket embossing folder

Spellbinders Cascading Stars

Technique Tuesday Spectacular Memories

Hero Arts CL493 Holiday Sentiments

Tweezers

Die Cut machine

Stamp Platform

Monday, May 4, 2020

Stick It Down Double Page Drill Team Reunion

Hello all!  A few months back I attended an All Class Reunion for my High School located in Kodiak, Alaska.  We had four members from our junior year that were all on Drill Team Together.  These photos were perfect for this month's sketch from Stick It Down!


I choose to use school colors of Blue and Gold to scrapbook the page and add embellishments that represented our High School and mascot, the Kodiak Bear!


  • The base cardstock is two toned, so the die cuts and journal strips are the reverse of the base cardstock trimmed from behind the patterned paper.
  • Core'dinations Yellow Small Dots, and Dark Blue large dots, Darice Yellow Stripes and Dark Blue Plaid, along with some ancient Provocraft Slab II Yellow Plaid are used to create the sketch.
  • Blue ribbon from my stash adds the final background section.
  • The Bear is did cut from a file from the Silhouette Store.
  • The KHS emblem is designed from the Varsity font also from the Silhouette Store.
  • The title is die cut with a font on my Scan N Cut.
I am so pleased that I had so many patterns to work with on this sketch, why don't you give it a try and join us at Stick It Down! this month!

Monday, April 6, 2020

April SID sketch, State Wrestling

How much our everyday life has changed in the last few weeks.  I pray that you and your loved ones are safe and healthy as we weather this pandemic together.  We over at Stick It Down will continue to provide inspiration with our monthly sketches for cards, single page layouts, and double page layouts.  April's double page layout features a large photo.


My choice was to use a photo I purchased from the professional photographers at my older son's state tournament appearance.  I also went for a really BIG title.  I am happy to report that my son was pleased with the layout.


  • I have a collection of wrestling related papers from Stamping Station AKA Scrapbook Customs.  If you have need for a particular sport this is a great place to purchase theme related papers.
  • I keep the cardstock simple and used school colors of red, black and white.  
  • The smaller team photo is backed with Darice Large Black Dot.  The photo was taken from a distance on a balcony above the event center main floor.  I am still pleased that I captured this moment.
  • The wrestlers and singlet cut files are purchased on Esty from PenAndPosh
  • The white script is from Silhouette Sweet Tea font and the red is a font on my Brother ScanNCut.  
During this time we are all dealing with a myriad of emotions depending on our situation.  For me and my family I am at home on 6 acres with my husband, two sons, and four German Shepherds.  We have plenty of chores and activities to keep us sane and happy.  My husband is able to work from home, but as a substitute teacher my services are not required.  I am the family errand runner, so am taking great care to stay safe and clean! 

Do take some time to be crafty!  For many of us it is an escape and therapy!


Thursday, March 12, 2020

NW Duals

Wrestling is a sport that I have thousands of photos . . . when the boys were younger I could distill a season down into a layout or two.  For John's senior season I decided to scrap each event in it's own layout.  Even with that I must select down to a few photos of some very intense minutes. 


Mountain View colors are red and black, so an easy choice to stay in that color scheme.  I ordered a batch of Darice papers as I knew with three kids to go through Mountain View I would use them frequently for sports and school events.  
  • Each photo is backed with Bazzill red cardstock and the background is Bazzill black cardstock. 
  • Three patterns of Darice papers are used:  Large Black Dots, Red Plaid, and Red Stripe
  • Since I wanted to layer the patterned papers a frame of grey cardstock helped define and separate the two. 
  • The red stripe is punched with the Paper Studio Pennant punch.
  • Paper Studio Wrestling stickers are backed with the grey cardstock and fussy cut.  They blended into the background too much otherwise.  
  • The title font is Recollections, and stood out much better on the red plaid than on the black back ground.  
  • Journaling was also printed out on the grey cardstock.  
I am happy to have another layout completed.  Sometimes not doing all the wrestling layouts at the same time helps my creativity.  Thanks for stopping by, and know that your comments are always appreciated!  

Wednesday, March 11, 2020

No River Required

I often create layouts in duplicate or triplicate for my kids' albums.  This was the case for this layout, three kids with memories to preserve, so three layouts. 


I found several patterned papers I wanted to use that were great colors for the photos, but I only had one sheet of each.  So the challenge was to create a layout that would use one third each.  I think I accomplished my goal! 

Several years ago I purged all my printed magazines as they were taking up room on my shelves and not being used.  Before I did that though, I salvaged articles and ideas for layouts that appealed to me.  This layout is based on an article from Creating Keepsakes Nov/Dec 2010, about using scraps. 

  • My Minds Eye Lime Twirl collection stripes and darker blue patterned paper, and Creative Imaginations Blue Scroll were used.  Bottom rectangles are 2" x 3".  
  • Top strip is 1" backed by 1 1/2" white cardstock.
  • Four punches were used to created the different size circle.  The punches are fast, compared to die cutting!  EK Succes, Fiskars, Marvy and McGill are all represented.
  • Bazzill green is the background, Darice Persimmon is the orange.
  • The journal strips are inked in Memento Danube Blue and written in Zig Writer Navy.  
  • The title was cut on my Brother Scan N Cut.  
A bit time consuming to create three of the same, but I am very pleased with the results.  Thanks so much for you comments and time to stop by!

Monday, March 9, 2020

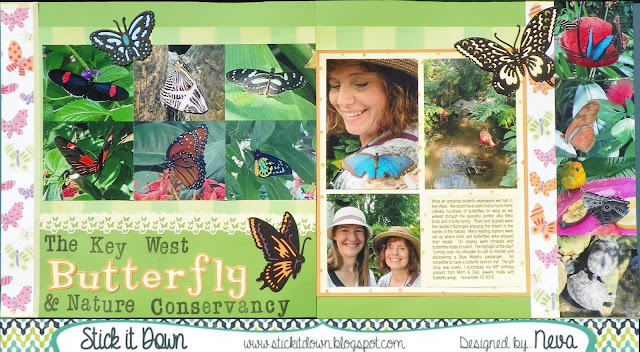
Butterflies for SID March Double Page Reveal

Even though my photos were taken last fall (in Florida) they are perfect for a spring green layout.  We have several fun sketches for you over at Stick It Down.  Not only a double page, but also a single page, and card sketch to play along with for the month.  Check it out!


For my layout I choose to add more photos, by making them smaller.  There are too many wonderful things to share from this experience at The Key West Butterfly and Nature Conservancy.  (At least I had the long title!)


I tried several different colors of background cardstock before I finally decided on the green.  With the bright colors of the butterflies and fun patterned paper I think it holds the layout together.
  • A very old collection by Me & My Big Ideas by Ellen Krans (2006) had all the selections of coordinated paper to make it easy to put together.  
  • Paper Studio light yellow washi adds a dash of pastel to the eges of the butterfly paper.
  • I love butterflies, and sometimes (well often!) will buy a stamp or die just because it is a butterfly.  The Cuttlebug Anna Griffin Butterfly Trio was just such a purchase.  Look how wonderful they are as embellishments for this layout.  If you look closely some of the highlights are colored through the die with Writer Chalk Collection markers.  I also backed each butterfly with a matching die cut by scanning on my Brother Scan N Cut and die cutting coordinating cardstock to put behind the butterflies.
  • Another butterfly tool in my stash is the Tonic Butterfly border punch.  I just had to use it in this layout as an add on embellishment.  The top edge is punched with EK Bubble edge border punch.   
  • The title is a combination of Stampabilities Vintage Type alpha stamped in Tuxedo Black Memento Luxe and Quickutz Tangerine & Shadow.
  • The yellow and orange dot patterned paper is backed with orange cardstock, and the journaling is printed on yellow cardstock that is the exact color of the patterned paper.
Do come and check out the blog and give one of our sketches at Stick It Down a try.  It will be fun!

Thanks for stopping by your comments always make me smile!

Saturday, February 29, 2020

MOPS Play Day

Another layout featuring my younger son in his preschool days.  We had a group over for a time to play and socialize.

 
  • This layout features Echo Park All About a Boy collection kit, the same one as yesterday's layout featured.  The bright colors and boy themed embellishments make for a quick layout.
  • The background is Kraft cardstock which is a nice contrast to the fun colors of the patterned papers.
  • If you look really close you can see that I was able to turn other letters into the "a"s that I needed for the title.  I choose "g" and added the bottom serif from the "z".  
Thanks for stopping by!  I've had a little more time to scrap and am glad to have the opportunity!

Friday, February 28, 2020

Gymnastics

Well not exactly full on gymnastics, but more pre-school time at the gymnastics gym!  I played along with at sketch challenge over at 2PeasRefugees.

  • Dark Blue cardstock creates a base for a layout that features bits and scraps from the Echo Park All About a Boy collection kit.
  • Stickers from the element sheet and die cuts from the spinner patterned paper came in handy as embellishments.
  • Making Memories Dot Style Creative Letters stickers stand out nicely against all the patterns in the layout.
This was fun to put together using as many scraps as I could.  Collections allow me to do this, and Echo Park makes great collections!

Great memories from when my son was small and learning all kinds of new things!

Thursday, February 27, 2020

Kindermusik

It is super fun to scrap photos that are now (yikes) ten years old.  They are good memories that help when parenting a teen gets tough!

 The left side is inspired by the sketch challenge over at Scrap Your Stash.  The sketch is altered for 4 photos on the right side.
.

  • I started with light blue cardstock as a base and added a colorful music patterned paper I have in my stash for who knows how long?  There was no identifying printing on the paper to even know who made it, but it was perfect for this layout!
  • I has some great scraps from Bo Bunny Toy Box, Circles (which I think count as polka dots) and Cheerful.  The small 4 represents how old my son was in the photos, and is from the B side.
  • The yellow strips is also a B side pattern as is the two color small strips.  I think they all coordinate together well.
  • To add both washi tape an follow the idea of the sketch I added lime green washi by Paper Studio.  It did take a few minutes to miter the corners.  
  • The tag was cut with Paper Studio's Tag punch.  A small remnant of ribbon from my stash tops the tag.
  • The Musical die cuts are from the Silhouette store.
  • David Walker Creative Imaginations letter stickers create the two titles. 
  • Journaling was completed with a Zig Writer in Splash.  
 Thanks so much for stopping by!  It is therapeutic to share my crafting with the blogsphere!   
 

Saturday, February 1, 2020

Stick It Down Double Page for February

This month we have a great couple of sketches over at Stick It Down.  As always we have a Double Page, Single Page and a Card Sketch for you to play along with during February.  I am debuting the Double Page sketch with my take on the sketch.


As you can see the design is perfect for a Valentine's Layout.  But I decided to go a different route, one that show cases my stateroom from my recent scrapbooking cruise.


 I had never been on a cruise before, so everything was documented, including our 170 square foot cabin. 
  • I matched some DCWV light mint green cardstock to the Carta Bella Ahoy There collection for the base of the layouts.
  • The B side of Waves and the B side of Let's Sail were trimmed to fit the sketch.
  • I purchased the cruise ship cut file from the Silhouette Store and cut it with my Brother Scan N Cut.  Not wanting the place all those tiny little pieces with a second cut in black, I then traced the outline of the ship, scanned and then cut the result.  I never did figure out how to accomplish the same thing in the software!  Hum, something new to learn!
  • The Nautical embellishments were also purchased from the Silhouette Store and cut from coordinating cardstock.  
  • The Memories by the sea title is from Quick Quotes and is inked with the darkest ink on the Kaleidacolor Denim set with an Ink Dauber.
  • The remaining part of the title is die cut using Honey Classic, Honeybee Classic and Santa's Workshop all by Quickutz.  The die cuts are inked with Kaleidacolor Denim as well.
  • My Sea Pass fit great with the theme and was used as part of the embellishment cluster  
I have many more layouts to work on to document this really fun experience from last November.  I hope to do it again someday!

Please do check out the sketches over at Stick It Down, and come play along!  We would love to see what you create!

Monday, January 6, 2020

Hoover Dam Double Page layout for Stick It Down

Hello everyone!  So glad to be back into the swing of things and crafting!  We have a great set of sketches to start the new year and decade over at Stick It Down.  Go check them out!  This is the double page sketch for January. 


I am really loving how it worked so well with photos from my recent trip to Las Vegas, where we drove over to tour the iconic Hoover Dam.  I actually ordered some of the photos taken at the Dam . . . that would feature different backgrounds.  You can only order the photos in this size so it was perfect for this sketch!

 Hoover Dam was built in the era when Art Deco was the style.  All of the art and interior motif was incredibly well preserved Art Deco, a testament to a great aesthetic!

I started with paper purchased at ScrapbooksRus in Las Vegas, Scrapbook Customs Old Antique and Old Antique Words.  The title was printed for me, yeah!    To keep with the Art Deco theme I choose Spellbinders Moroccan Accents and Moroccan Motifs and die cut grey and blue cardstock embellishments.   To trim the corners of the grey cardstock journaling blocks I pulled out the ancient Fiskars Nostalgia Corner Edger.   A little journaling and the layout is complete.  Now to print and scrap all the other great photos I took during the tour!

Thanks for stopping by and please do come play with our sketch this month.  It is really a quick and easy sketch to complete over at Stick It Down

Monday, December 2, 2019

December Stick It Down Double Page

Here we are with the last sketch of the year for Stick It Down.  A great one for all those Christmas photos you undoubtedly have!


Here is my version of the sketch, which I recreated for four double page spreads.  I was able to use a two sheets of Kraft cardstock and three sheets of patterned paper for all four layouts!  I am really pleased with the embellishments I stamped to match.


Monday, November 4, 2019

November Stick It Down Double Page Sketch

Normally I like to use the sketch within the season, but I just happened to have the exact number of photos already printed for this layout that fit this month's Stick It Down sketch perfectly!  So a summer themed boy layout it is!


My photos aren't the exact size, and I moved them around just a bit, but I do love the gears as embellishments!


I had purchased specific patterned paper to complete this layout and the sketch was helpful in stretching the paper over two duplicate layouts, one for each boy's album.
  • Two sheets of American Crafts Bicycles were trimmed in the direction that matched the layout.
  • Core'dinations Light Aqua Plaid was trimmed for the layouts.
  • Craft Smart Embossed Cardstock was a perfect color match and one sheet was trimmed for the layouts.    
  • Using Sizzix Tim Holtz Alterations Gadget Gears and Spellbinders Donna Salazar Sprightly Sprckets I die cut a variety of gears for embellishements.  I used the Craft Smart Embossed Cardstock, a sheet of coordinating light aqua cardstock from my stash, and DCWV Metallic Silver cardstock to create the gears.  
  • Since the background was white I used the light aqua cardstock from my stash and stamped Recollections Grunge Alphabet with Memento Luxe Teal Zeal to create the title.  My Brother Scan N Cut made quick work of electronically die cutting the letters.  
  • I added the journaling underneath the title, as there was a fun story to go with these photos.  The man who was the biggest "master mechanic" did so just for fun, Dad got in on the action a little too, but Kurt just enjoyed teaching a 10-year-old how to fix a flat!
This layout was a bit time consuming to complete, but once done I am really pleased with the results.  Do give this sketch a try, or one of the other sketches over at Stick It Down.  Thanks for stopping by Snippets of Time to Craft!  

Friday, October 25, 2019

Fremont Street Experience

When in Las Vegas, taking in the craziness that is Fremont Street Experience is part of the fun.  I had read about Fremont Street Experience and wanted to see the lighted dome . . . little did I know this was not the only aspect of Fremont Street that people went to see!  I was advised by a local to wear shoes . . . as it is usually crowded and dirty, and to be prepared to see all kinds of characters!


We went right as the light shows started, but it was not as crowded or crazy.  We got the tame version, which was fine by me and my husband.  We saw many other street performers, a few that were not suitable for my scrapbook pages.  Notice the blue circles on the street, those are scheduled assigned spots where the performers can stand.

I used purple cardstock as a base to match the purple in the printed Old Antique Words by Scrapbook Customs for ScrapbooksRUs.  Two different colors of grey cardstock are used to complement the colors.  I trimmed 1 1/4" strips and die cut the edges with Spellbinders Classic Bracket.  Not much of the strip shows from behind the photos on the right side, but I wanted more of the printed paper to show.  Sizzix Thinlits by Jen Long Just a Note font is used to die cut both titles.

With so many photos I decided to keep the embellishments to a minimum.  I am pleased with the outcome of the layout.

Thanks so much for stopping by and sharing your thoughts here at Snippets of Time to Craft!  Have a blessed day!

Wednesday, October 23, 2019

Las Vegas Sights!

My husband and I recently traveled to Las Vegas for my Kodiak High School All Class Reunion.  We are not gamblers or drinkers, but we did enjoy seeing the sights and eating great food!  One of our stops was to a BRICK AND MORTAR local scrapbook store, ScrapbooksRUs.  I was able to find great papers to scrapbook our trip.  They are all custom papers by Scrapbook Customs that ScrapbooksRUs carries in the store.  The owner knew immediately we were from out of town and greeted us by saying "Where are you visiting from?".  The give away?  My spouse was with me as we came in the store.  Thank you dear husband for going to the scrapbook store with me!


I had too many photos to fit on a double page layout, but not enough to create another page or two.  So lift up the flap and see six more photos!


There were lots of colors in the Vegas Sights print, so I choose from those to complement the photos.  The Vegas Sights is two sided, and the B side is featured as the strips along the A side.  The yellow cardstock behind the Las Vegas Strip die cut is fussy cut to trim it down (literally) in size.

Thanks so much for stopping by and taking a look!  Have a wonderful day!

Tuesday, October 15, 2019

Back to School 8th Grade

Another year for Back to School for my youngest.  His last as a middle schooler.  I managed to get photos with his brother and with us, his parents.  A big plus was the photo of him at the back of the bus with his friends.


I started with a sketch challenge over at 2peasrefugees and choose complementary colors to my son's shirt and My Minds Eye Academy collection.
  • I am surprised that I have used so much yellow cardstock in my recent scrapbooking and this layout really called for yellow to match the big yellow school bus!
  • A large circle is cut from Darice Dark Blue Plaid and backed with a dark blue cardstock from my stash.  I have found the best tool for large circles in my Creative Memories XXXXX.
  • A stripe of Bus paper and red School Phrases paper go across the bottom of both sides of the layout.   
  • Each of the photos are backed with blue cardstock.  
  • I stamped the embellishment images from The Paper Company Studio with StazOn Black Tuxedo and water colored each with Memento inks in Rhubarb Stack, Paris Dusk, Dandelion, London Fog, and Peanut Brittle.  I colored a little of each from the Memento Dual Tip Pen on my craft mat and added a spritz of Ink Potion #9.  All the images are die cut with my Brother Scan N Cut.  YEAH, no more fussy cutting!
  • I purchased two files from the Silhouette online store to create the title and subtitle.  The yellow is trimmed from behind the circle mats, and the shadow red is from my stash.  
Thanks so much for visiting my blog, your comments are appreciated! 

Monday, October 14, 2019

Bicycles

One of my favorite paper companies right now is Echo Park.  They have such delightful collections, and they can be mixed with other collections easily like I have in this layout.


I primarily used That's My Boy by Lori Whitlock for Echo Park and added in another sheet from Jack and Jill, also by Lori Whitlock for Echo Park. 
  • I wanted to use the journal card with a bicycle, so I incorporated the matching pattern from the collection on the right side.
  • Photos are backed with one paper that is represented by a vertical strip on the opposing page. My Boy and You Rock are used both A and B sides.  
  • The Jack and Jill Bicycles was perfect for this layout and I had one sheet.  I made duplicate layouts for both boys so it was stretched between 4 pages. 
  • I didn't want the bicycle sticker to float, so it is grounded by the small section of Boy Stripes.
  • That's My Boy Element Stickers and Alpha Stickers are used to finish the embellishments, title and subtitle.   
Another fun memory scrapbooked and in the album!  Thanks for stopping by Snippet of Time the Craft, and as always your comments are appreciate!

Saturday, October 12, 2019

Styling

It is not often that I am able to used purple on a boys layout, but withe the purple drapes the boys wore during their professional haircuts was a perfect opportunity to use a favorite collection by Basic Grey from 2008, Euphoria. 


Euphoria was a collection I like so much I bought EVERYTHING!  Many elements show up on this page. 
  • Spellbinders Labels Four Grand is used to die cut bracket shapes used in the background.
  • Several papers from the collection are used in this layout: Elation, Frenzy, Trance, and Delirium.  This layout was completed in duplicate, so I was careful with the use of my papers.
  • Sticker letters, Chip Stickers, and Buttons from the collection are used to complete the layout embellishments.
  • I can never leave button holes empty, so white craft thread is used to tie up the buttons.
  • All the edges are inked in Versa Magic Eggplant.  It helps to delineate and add depth to the page.  
  • Journaling is completed in Zig Writer Orchid.  
Thanks for checking out this fun layout that documents one of the few times my boys had professional haircuts.  Have a wonderful weekend!

Friday, October 11, 2019

Aviation Museum

The first summer our boys were home from Russia we took a road trip to Oshkosh, Wisconsin for the annual EAA Airventure convention.  We've been many times since, but this layout hold particular joy as my young son was so enthralled with all the interactive exhibits related to aircraft and piloting.  You can just see his amazement in the photos.  


The bright orange in his shirt was great to match the All About a Boy collection by Lori Whitlock for Echo Park
  • Matching Blue cardstock is used for the base layer.
  • Super hero is trimmed to 9 1/2" x 12", split to 5" on the left and 7" on the right.  The corners are rounded.   
  • Games is trimmed to 7" x 7" on the left, and 5" x 7" on the right.  
  • Curious is trimmed to 1 1/2" x 7"on the left and 1 1/2" x 5" on the right and layered below Games.  
  • Various embellishments are selected from the collection Sticker Elements, Alpha Stickers, and Chipboard Accents and added to complete the layout.  
  • Journaling on the journal card is completed in Zig Writer Blue.  
Sometimes using one collection really simplifies putting together a great layout, and Echo Park collections are great for this purpose.  Both A and B sides are all coordinated and the patterns repeat in the embellishments. 

Thanks so much for stopping by and know that your comments are appreciated!

Thursday, October 10, 2019

Lava Cast Forest

Now that life is not so busy (well not really) I do have time to share a few layouts that I've worked on over the summer!

This layout was photo heavy so I kept the paper selections and embellishments simple to highlight the fun photos of the kids in the lava tubes.
  • The base is Kraft card stock with sections of ancient Provo Craft Paper Slab patterned papers layered along the edges. 
  • Bazzill Bacis Just the Edge Cardstock Strips are layered over the top.
  • Several sentiments from the Jillibean Soup by Hampton Art's set Enjoy are stamped in VersaFine Vintage Sepia.  Enjoy is die cut with the matching die, and the remainder I cut into embellishment strips.   The edges are inked with Vintage Sepia.  Echo Park Jungle Safari Enamel Drops are added to the ends of the embellishments. 
  • The journaling fills the two empty spots and is done in Zig Writer Chocolate.
  • The title is die cut from matching green and cream cardstock with Quick Kutz Frankie Classic. 
Thanks so much for stopping by!  I hope you enjoy this memory from almost 9 years ago.  It holds a special place in my heart as my dear friend has graduated to heaven, and I am thankful that I can document this time that she spent with our family.