Tuesday, October 25, 2022

A 90's Thank You

We have been working through the decades at Retro Rubber Challenge Blog during the challenges of the year, now up for your crafting pleasure, the 90's.


I went to my card kit scraps that I keep from finished projects and found a few that would fit the 90's color scheme.

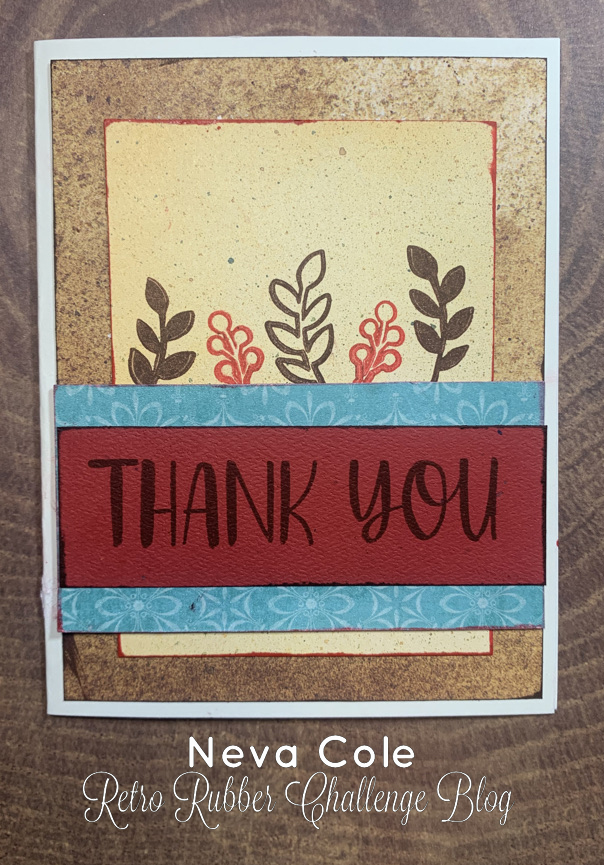
  • Trim brown cardstock to 4" x 5 1/4".  Edge with Versa Fine Clair in Pinecone.
  • Trim gold cardstock to 3" x 4 1/4" and edge with Delicata Ruby Red.
  • Trim patterned teal paper to 2" x 4" and edge with Delicata Ruby Red.
  • Trim red cardtock to 1 1/4" x 4 and stamp sentiment from Recollections Clear Thank You Stamps form 2019 in Versa Fine Clair in Pinecone.  The edges are also inked in Versa Fine Clair in Pinecone.
  • Determine placement of sentiment strips and stamp leaf and berry images from Recollections Clear Thank You Stamps form 2019.  Delicata Red for the berries, and Versa Fine Clair Pinecone for the leaves.
CHALLENGE GUIDELINES
  • We require stamps older than one year.  If we feel you are using newer stamps, you may be disqualified from the challenge without notification.
  • New papers/dies are OK – but you must use at least one stamp older than a year and describe the age in your blog post.
  • Please note that all challenges require the use of at least one stamp older than a year.
  • Post your new creation to your blog or online gallery.   Use keyword RRCB193.  No backlinking. 
  • Link back to the blog using the Linky Tools by the due date. 
  • You may enter no more than 5 times. 
  • Feel free to combine our challenge with a maximum of 10 challenges.  Entries linked to more than 10 challenges will be disqualified without notification.
  • If your project is posted on a private group site such as Split Coast Stampers or a photo sharing site not all DT members may be able to comment.   Thank you for understanding.
  • Turn off Word Verification.  We love to comment but word verification can make that difficult.

This was a very fun to create from the scraps in my card making file.  Please join us at Retro Rubber Challenge Blog and show us your 90's booyah style!

Friday, October 21, 2022

Versa Clair Fine creates a beautifully Stamped Sunflower


Versa Clair Fine is now my favorite pigment ink!  So versatile and allowed me to create a beautifully colored card in just a few steps.  This is one of the few cards that my husband has asked me to specifically make for a friend, it was easy to do with just a few inks, stamps, and dies!

Skill:  Intermediate

Time:  2 hours

 Directions:

Step 1:

 
Stamp sunflower images on yellow cardstock with Versa Fine Clair Cheerful and heat emboss with clear embossing powder.  Stamp leaf images on light green paper in Versa Fine Clair Green Oasis and heat emboss with clear embossing powder.  Die cut with matching dies.

Step 2:

Place flowers and leaves face down in matching shaping mold and mist lightly with water.  As the images are heat embossed, they will stay sharp and crisp.  Close mold and pressure emboss.

 
Step 3:
Remove flowers and leaves from mold and set aside to dry.  Once dry assemble flowers with On Point Glue, adding black glitter to centers.  (Not shown)  Set aside to dry.

Step 4:

Ink the edges of an A7 size card with and ink dauber and Versa Fine Clair Green Oasis.  Set aside to dry, as the ink is very juicy.

Step 5:

Sunflowers are a rustic flower, so corrugated cardstock seemed to be a good choice for a background.  Versa Fine Clair in Cheerful and Summertime are inked randomly on the corrugated cardstock with ink daubers.

Step 6:

 Ink the sentiment with Versa Fine Clair in Green Oasis and heat emboss with clear embossing powder.  Die cut with die from the Eyelet Frame Gateway set.  I trimmed off a portion of the sentiment, then edged the sentiment with Versa Fine Clair in Summertime.

Step 7:


Die cut a Border from the Regal Boarder set using light orange paper.  Gently shade the edges with Versa Fine Clair Summertime and an ink dauber.   
 
Step 8:
Adhere corrugated cardstock to base card with Tear It Tape!  Adhere border with On Point Glue  Adhere flowers with Tear It Tape!

Art Supplies

Imagine:

Versa Fine Clair--Cheerful, Green Oasis, Summertime

Embossing Powder--Clear

On Point Glue

Tear It! Tape
 
Ink Dauber

Other:

Light yellow, light orange and light green cardstock

Corrugated kraft cardstock   

Heartfelt Creations--Rustic Sunflower Stamp/Die/Shaping Mold, Regal Borders and Pockets Die, Eyelet Frame Gateway Die, Heartfelt Expressions stamp

Black Glitter

Die Cut machine

Stamp Platform

Thanks for stopping by!  The post from Oct. 11 you can see another way that I used these beautiful sunflowers, and the card looks totally different!

Tuesday, October 11, 2022

Anything Goes at Retro Rubber

 Everyone's favorite, Anything Goes for the next two weeks at Retro rubber.

I had a need for a quick birthday card for my mother-in-law.  Since we still have sunflowers blooming, I went with that theme.  I also had a few spares from another card that will publish on Oct. 21 for Imagine Crafts Design Team.  If you are interested in the tutorial to make the flowers you can check back later!

  • Heartfelt Creations Sunflowers stamps, dies, and shaping mold are used to create the flowers.  VersaFine Clair in Cheerful is used for the flowers and Green Oasis for the leaves, both on complementary colored cardstock.  A quick heat emboss with clear embossing powder allows a mist of water in the shaping process.
  • The background is stamped with the leaves in VersaFine Green Oasis, then pressure embossed with xxxx die.
  • The Sentiment is from Heartfelt Creations and is stamped in VersaFine Cheerful on white cardstock and heat embossed before being die cut with a Spellbinders Standard Circle Large.  The edges are inked slightly with an ink dauber in VersaFine Clair Cheerful as is the card base.  
  • After the flowers are dry, they are layered together, and wet glue is added to the center along with some black glitter.  
  • The card is assembled using dimensional foam tape and glue dots to hold the flowers and leaves in place.
Thanks so much for stopping by!

CHALLENGE GUIDELINES

  • We require stamps older than one year.  If we feel you are using newer stamps, you may be disqualified from the challenge without notification.
  • New papers/dies are OK – but you must use at least one stamp older than a year and describe the age in your blog post.
  • Please note that all challenges require the use of at least one stamp older than a year.
  • Post your new creation to your blog or online gallery.   Use keyword RRCB193.  No backlinking. 
  • Link back to the blog using the Linky Tools by the due date. 
  • You may enter no more than 5 times. 
  • Feel free to combine our challenge with a maximum of 10 challenges.  Entries linked to more than 10 challenges will be disqualified without notification.
  • If your project is posted on a private group site such as Split Coast Stampers or a photo sharing site not all DT members may be able to comment.   Thank you for understanding.
  • Turn off Word Verification.  We love to comment but word verification can make that difficult.