Showing posts with label family. Show all posts

Thursday, June 23, 2022

Fourth of July Layout Made Easy with Memento inks and Fireworks!

Today I will share how easy it is to create a very cohesive layout using just two ink colors and the matching Fireworks! colors for an amazing Fourth of July scrapbook layout.  With just white cardstock, an embossing folder, a large die cut, and stamps this layout is perfect for Independence Day.

Skill:  Beginner

Time:  2 hours

 Directions:

Step 1:


Trim white cardstock to 1" on each edge larger than the photos.  Pressure emboss with Star Blanket.  Ink raised portion of embossed areas and edges with Memento Danube Blue or Lady Bug.  For my layout I trimmed two sections 5" x 7", three sections 4" x 5", and one section by 4" x 4" to back my phtotos.

Step 2:


Die cut two sets from Spellbinders Cascading Stars die and remove the stars.  Trim one outline die cut into a section of five stars, with the other being four stars.  Use Jumbo Dauber to tap Memento Danube Blue over one die cut and the smaller portion of the trimmed die cut.  Tapping the ink onto the paper keeps from damaging the die cut, which can occur if a rubbing motion is used.  The larger portion of the trimmed die cut is inked in Memento Lady Bug.  Continue to add ink until it is the desired hue. 

Step 3:


The splatter method is used with Fireworks! to add some interest to the white background.  Shake the bottle to distribute glimmer and then remove spritzer nozzle and gently tap the top to splatter ink from the outside of the spray tube.  Continue to tap until the desired amount of ink is on the paper.  I choose sections where the die cuts would be eventually placed.  I alternated the color choices from the die cut color.  This is the lower right corner of the right page.  

Step 4:


The left side of the layout shown completed with splattered Fireworks! in Memento Lady Bug and Danube Blue.

Step 5:


Determine placement placement of elements to add stamped sentiments.  Place on layout and remove other elements.  Use a stamp platform to stamp sentiments in proper position.

Step 6:

On the right page the stamped elements are determined, then half are removed before stamping to allow for clean stamping of correct colors.  The remaining elements are added and stamped.  It was easier to stamp all the images Memento Lady Bug at one time, then follow with images in Memento Danube Blue.

Step 7:


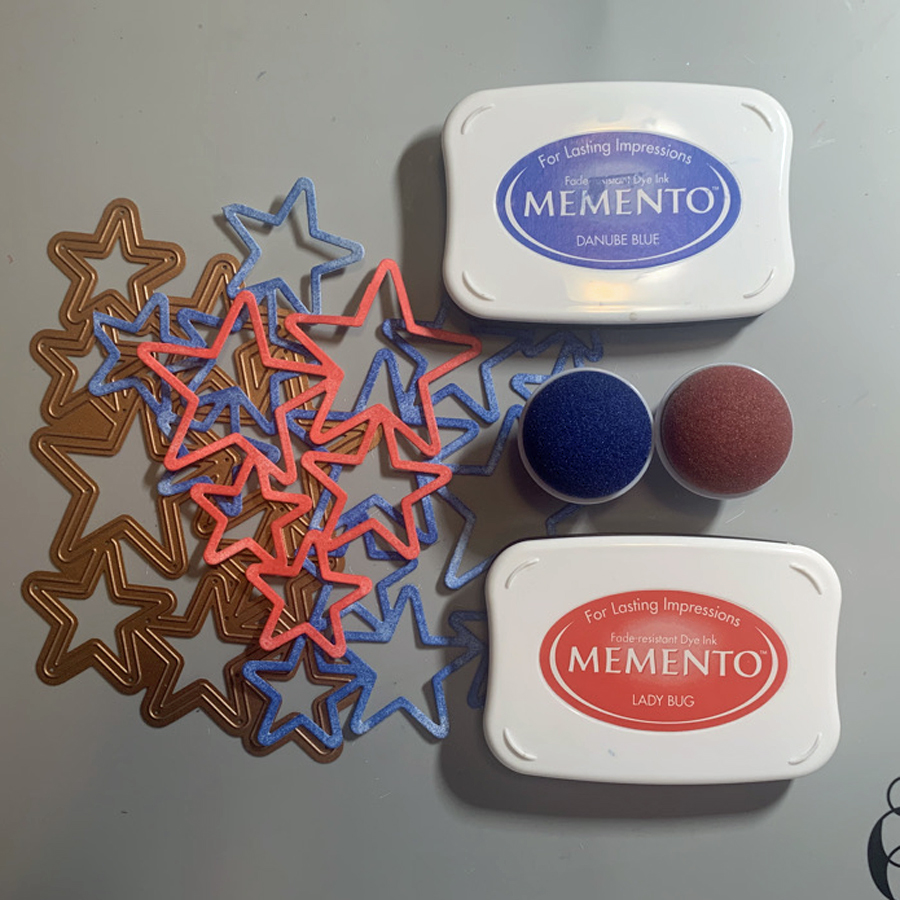
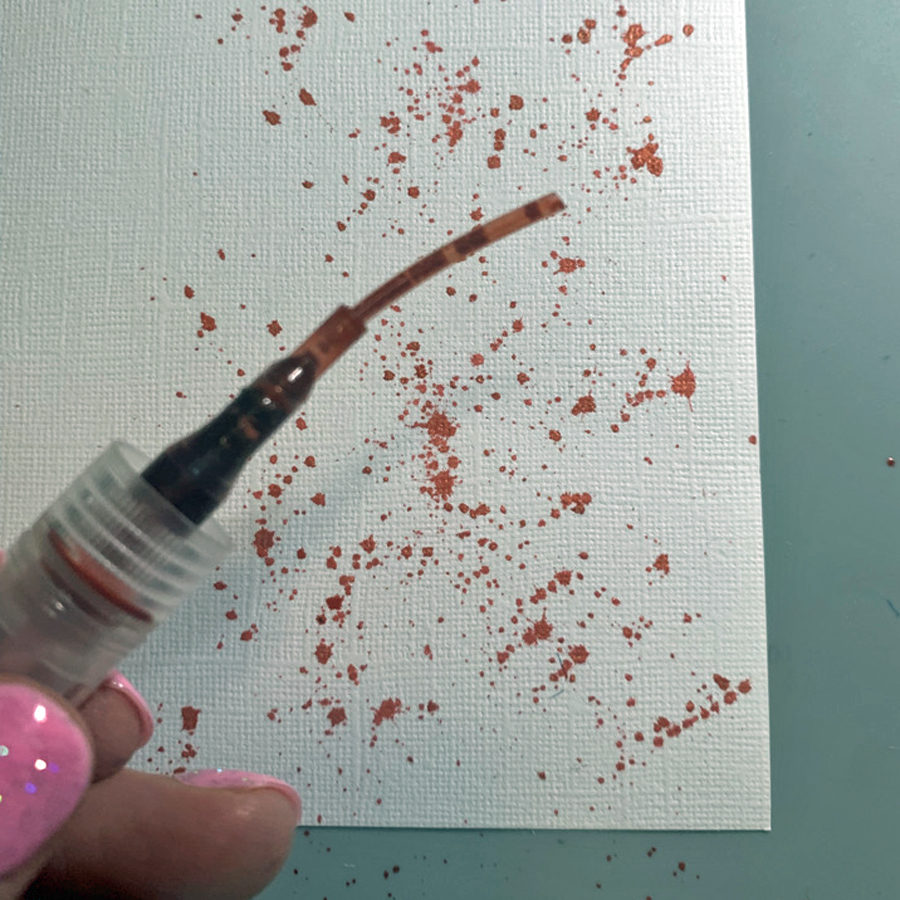
Spritz Fireworks! into a plastic tray or surface.  Place die cut stars from step 2 face down on the Fireworks! ink to add color.  Use tweezers to move around in the ink and add more ink to tray as needed.  About a third of the stars were inked with Fireworks! in Lady Bug the remaining in Fireworks! Danube Blue.

Step 8:


Determine correct placement of Fireworks! stars in the die cut.  I rotated the star until it fit properly into the die cut area.  Not all the stars are identical, so taking the time to find the right one was worth the effort for a seamless look.   

Step 9:

Adhere elements to layout.  Tear It! tape was used to adhere the photos to the textured mats.  The die cuts are adhered with On Point! glue.  The small dots around the star frames keep the layout clean and smudge free.  


Art Supplies

Imagine:

Memento--Lady Bug and Danube Blue

Fireworks!--Lady Bug and Danube Blue

Jumbo Dauber

Tear It! Tape

On Point Glue

Other:

White Cardstock

Cuttlebug Star Blanket embossing folder

Spellbinders Cascading Stars

Technique Tuesday Spectacular Memories

Hero Arts CL493 Holiday Sentiments

Tweezers

Die Cut machine

Stamp Platform

Tuesday, November 3, 2020

Anything Goes for Retro Rubber Anniversary Card

 We have the ever popular Anything Goes for our challenge for the next two weeks over at Retro Rubber Challenge Blog.

We have very simple rules:  1) Use a stamp older than a year, give it some inky love!  2)  Tell us how old the stamp is or give us your best guess  3)  Enter up to ten challenges including ours.


Today I am featuring a card I made for my husband for our 15th Anniversary.  I used the colors from our wedding and the paper selection is what I used when I scrapped our wedding.


  • The sentiment is from Technique Tuesday Inspired Dragonfly released in 2016 and Unity Stamp Company's . . . no remedy for love released in 2015.  It is stamped on Coordinations Light Icy Indigo in Versa Color Grape.  Spellbinders Labels 25 is used to die cut the sentiment and the edges are inked in Versa Color Grape.
  • Canson Silver paper is die cut with Impression Obession DIE 056-I.  
  • Coordinations Groovy Grape is pressure embossed with Sizzix Textured Impressions Confetti Hearts.  
  • Silver sheer edged ribbon is adhered around the embossed layer and adhered to Coordinations Deep Racy Raspberry.  The additions embellishments are adhered to the layers.
  • The base card is Coordinations Light Icy Indigo.

Thanks so much for stopping by and do come play along with us at Retro Rubber Challenge Blog.

Friday, April 17, 2020

Guest Designer for Single Page at Stick It Down

I am excited to give a single page layout a sketch with our team over at Stick It Down.  I had just two photos printed from an event and decided this would be a great way to showcase them since a long title was perfect for the layout.


My version is from a fall event, and the colors are very vibrant for the season.


  • The Quick Quotes Autumn Brilliance Collection was perfect, I used I used two sides of one paper and one side of two more of the collection.
  • A Plaid ruler for tearing paper made quick work of tearing the edges.
  • During the quarantine I am learning how to use my Brother ScanNCut and Canvas Studio.  It was easy to create my own wavy edged circle frames.
  • The title font is a Silhouette font, ZP Whiplash.  
I hope you enjoy my interpretation of the single page sketch!  So come a play along with us over at Stick It Down!

Thursday, March 12, 2020

NW Duals

Wrestling is a sport that I have thousands of photos . . . when the boys were younger I could distill a season down into a layout or two.  For John's senior season I decided to scrap each event in it's own layout.  Even with that I must select down to a few photos of some very intense minutes. 


Mountain View colors are red and black, so an easy choice to stay in that color scheme.  I ordered a batch of Darice papers as I knew with three kids to go through Mountain View I would use them frequently for sports and school events.  
  • Each photo is backed with Bazzill red cardstock and the background is Bazzill black cardstock. 
  • Three patterns of Darice papers are used:  Large Black Dots, Red Plaid, and Red Stripe
  • Since I wanted to layer the patterned papers a frame of grey cardstock helped define and separate the two. 
  • The red stripe is punched with the Paper Studio Pennant punch.
  • Paper Studio Wrestling stickers are backed with the grey cardstock and fussy cut.  They blended into the background too much otherwise.  
  • The title font is Recollections, and stood out much better on the red plaid than on the black back ground.  
  • Journaling was also printed out on the grey cardstock.  
I am happy to have another layout completed.  Sometimes not doing all the wrestling layouts at the same time helps my creativity.  Thanks for stopping by, and know that your comments are always appreciated!  

Wednesday, March 11, 2020

No River Required

I often create layouts in duplicate or triplicate for my kids' albums.  This was the case for this layout, three kids with memories to preserve, so three layouts. 


I found several patterned papers I wanted to use that were great colors for the photos, but I only had one sheet of each.  So the challenge was to create a layout that would use one third each.  I think I accomplished my goal! 

Several years ago I purged all my printed magazines as they were taking up room on my shelves and not being used.  Before I did that though, I salvaged articles and ideas for layouts that appealed to me.  This layout is based on an article from Creating Keepsakes Nov/Dec 2010, about using scraps. 

  • My Minds Eye Lime Twirl collection stripes and darker blue patterned paper, and Creative Imaginations Blue Scroll were used.  Bottom rectangles are 2" x 3".  
  • Top strip is 1" backed by 1 1/2" white cardstock.
  • Four punches were used to created the different size circle.  The punches are fast, compared to die cutting!  EK Succes, Fiskars, Marvy and McGill are all represented.
  • Bazzill green is the background, Darice Persimmon is the orange.
  • The journal strips are inked in Memento Danube Blue and written in Zig Writer Navy.  
  • The title was cut on my Brother Scan N Cut.  
A bit time consuming to create three of the same, but I am very pleased with the results.  Thanks so much for you comments and time to stop by!

Saturday, February 29, 2020

MOPS Play Day

Another layout featuring my younger son in his preschool days.  We had a group over for a time to play and socialize.

 
  • This layout features Echo Park All About a Boy collection kit, the same one as yesterday's layout featured.  The bright colors and boy themed embellishments make for a quick layout.
  • The background is Kraft cardstock which is a nice contrast to the fun colors of the patterned papers.
  • If you look really close you can see that I was able to turn other letters into the "a"s that I needed for the title.  I choose "g" and added the bottom serif from the "z".  
Thanks for stopping by!  I've had a little more time to scrap and am glad to have the opportunity!

Friday, February 28, 2020

Gymnastics

Well not exactly full on gymnastics, but more pre-school time at the gymnastics gym!  I played along with at sketch challenge over at 2PeasRefugees.

  • Dark Blue cardstock creates a base for a layout that features bits and scraps from the Echo Park All About a Boy collection kit.
  • Stickers from the element sheet and die cuts from the spinner patterned paper came in handy as embellishments.
  • Making Memories Dot Style Creative Letters stickers stand out nicely against all the patterns in the layout.
This was fun to put together using as many scraps as I could.  Collections allow me to do this, and Echo Park makes great collections!

Great memories from when my son was small and learning all kinds of new things!

Thursday, February 27, 2020

Kindermusik

It is super fun to scrap photos that are now (yikes) ten years old.  They are good memories that help when parenting a teen gets tough!

 The left side is inspired by the sketch challenge over at Scrap Your Stash.  The sketch is altered for 4 photos on the right side.
.

  • I started with light blue cardstock as a base and added a colorful music patterned paper I have in my stash for who knows how long?  There was no identifying printing on the paper to even know who made it, but it was perfect for this layout!
  • I has some great scraps from Bo Bunny Toy Box, Circles (which I think count as polka dots) and Cheerful.  The small 4 represents how old my son was in the photos, and is from the B side.
  • The yellow strips is also a B side pattern as is the two color small strips.  I think they all coordinate together well.
  • To add both washi tape an follow the idea of the sketch I added lime green washi by Paper Studio.  It did take a few minutes to miter the corners.  
  • The tag was cut with Paper Studio's Tag punch.  A small remnant of ribbon from my stash tops the tag.
  • The Musical die cuts are from the Silhouette store.
  • David Walker Creative Imaginations letter stickers create the two titles. 
  • Journaling was completed with a Zig Writer in Splash.  
 Thanks so much for stopping by!  It is therapeutic to share my crafting with the blogsphere!   
 

Wednesday, January 29, 2020

Blankies Layout

Hello all, I am finally having some time to do some scrap layouts.  Not usually a single page gal, I choose a single page sketch for these precious photos of my boys almost 10 years ago!


I am like many scrapbookers, and have a huge stash of patterned papers.  I found a few that are almost vintage to create this layout.
  • My Mind's Eye Lime Swirl from 2006, and Magnolia from 2008, and Art Imaginations Blue Scroll from 2005 all coordinated together.  
  • Wanting to go a bit mixed media I splattered some Fireworks! in Bahama Blue and Summer Sky on white cardstock.  After it was dry, it was die cut with Spellbinders Cascading Stars.  One of the things I like about this die is you can use all the parts!
  • The title is die cut from a light blue cardstock using an installed font on my Brother Scan N Cut DX.  
  • A few bits of ribbon from my stash are tied into bows.
  • Everything is mounted on Core'dinations Distress Collection Blue cardstock.
  • The final embellishments are Spiegelmom Scraps Southern Blue Bells sequins.  
I was inspired by Sketches in Thyme:


I would also like to submit to the following challenges:


Monday, December 2, 2019

December Stick It Down Double Page

Here we are with the last sketch of the year for Stick It Down.  A great one for all those Christmas photos you undoubtedly have!


Here is my version of the sketch, which I recreated for four double page spreads.  I was able to use a two sheets of Kraft cardstock and three sheets of patterned paper for all four layouts!  I am really pleased with the embellishments I stamped to match.


Monday, November 4, 2019

November Stick It Down Double Page Sketch

Normally I like to use the sketch within the season, but I just happened to have the exact number of photos already printed for this layout that fit this month's Stick It Down sketch perfectly!  So a summer themed boy layout it is!


My photos aren't the exact size, and I moved them around just a bit, but I do love the gears as embellishments!


I had purchased specific patterned paper to complete this layout and the sketch was helpful in stretching the paper over two duplicate layouts, one for each boy's album.
  • Two sheets of American Crafts Bicycles were trimmed in the direction that matched the layout.
  • Core'dinations Light Aqua Plaid was trimmed for the layouts.
  • Craft Smart Embossed Cardstock was a perfect color match and one sheet was trimmed for the layouts.    
  • Using Sizzix Tim Holtz Alterations Gadget Gears and Spellbinders Donna Salazar Sprightly Sprckets I die cut a variety of gears for embellishements.  I used the Craft Smart Embossed Cardstock, a sheet of coordinating light aqua cardstock from my stash, and DCWV Metallic Silver cardstock to create the gears.  
  • Since the background was white I used the light aqua cardstock from my stash and stamped Recollections Grunge Alphabet with Memento Luxe Teal Zeal to create the title.  My Brother Scan N Cut made quick work of electronically die cutting the letters.  
  • I added the journaling underneath the title, as there was a fun story to go with these photos.  The man who was the biggest "master mechanic" did so just for fun, Dad got in on the action a little too, but Kurt just enjoyed teaching a 10-year-old how to fix a flat!
This layout was a bit time consuming to complete, but once done I am really pleased with the results.  Do give this sketch a try, or one of the other sketches over at Stick It Down.  Thanks for stopping by Snippets of Time to Craft!  

Tuesday, October 15, 2019

Back to School 8th Grade

Another year for Back to School for my youngest.  His last as a middle schooler.  I managed to get photos with his brother and with us, his parents.  A big plus was the photo of him at the back of the bus with his friends.


I started with a sketch challenge over at 2peasrefugees and choose complementary colors to my son's shirt and My Minds Eye Academy collection.
  • I am surprised that I have used so much yellow cardstock in my recent scrapbooking and this layout really called for yellow to match the big yellow school bus!
  • A large circle is cut from Darice Dark Blue Plaid and backed with a dark blue cardstock from my stash.  I have found the best tool for large circles in my Creative Memories XXXXX.
  • A stripe of Bus paper and red School Phrases paper go across the bottom of both sides of the layout.   
  • Each of the photos are backed with blue cardstock.  
  • I stamped the embellishment images from The Paper Company Studio with StazOn Black Tuxedo and water colored each with Memento inks in Rhubarb Stack, Paris Dusk, Dandelion, London Fog, and Peanut Brittle.  I colored a little of each from the Memento Dual Tip Pen on my craft mat and added a spritz of Ink Potion #9.  All the images are die cut with my Brother Scan N Cut.  YEAH, no more fussy cutting!
  • I purchased two files from the Silhouette online store to create the title and subtitle.  The yellow is trimmed from behind the circle mats, and the shadow red is from my stash.  
Thanks so much for visiting my blog, your comments are appreciated! 

Monday, October 14, 2019

Bicycles

One of my favorite paper companies right now is Echo Park.  They have such delightful collections, and they can be mixed with other collections easily like I have in this layout.


I primarily used That's My Boy by Lori Whitlock for Echo Park and added in another sheet from Jack and Jill, also by Lori Whitlock for Echo Park. 
  • I wanted to use the journal card with a bicycle, so I incorporated the matching pattern from the collection on the right side.
  • Photos are backed with one paper that is represented by a vertical strip on the opposing page. My Boy and You Rock are used both A and B sides.  
  • The Jack and Jill Bicycles was perfect for this layout and I had one sheet.  I made duplicate layouts for both boys so it was stretched between 4 pages. 
  • I didn't want the bicycle sticker to float, so it is grounded by the small section of Boy Stripes.
  • That's My Boy Element Stickers and Alpha Stickers are used to finish the embellishments, title and subtitle.   
Another fun memory scrapbooked and in the album!  Thanks for stopping by Snippet of Time the Craft, and as always your comments are appreciate!

Sunday, October 13, 2019

Back to School 2010

Although we are in October, in a way it's still back to school time!  This layout is from 2010, when my older son dropped off his supplies for fifth grade.  He was in a blended fourth/fifth grade and had the same teacher for both years. It made for an easier transition into US schools.


I used bits and pieces I had left over from previous layouts from Appleton collection by Scenic Route.  I also play along with a sketch challenge over at 2peasrefugees, a just for fun forum about scrapbooking.
  • The background paper is White Lined Paper (yes, really that is the name!) also by Scenic Route.  
  • I wanted to bring out the primary colors in the paper so I used Memento Dandelion ink to color the Technique Tuesday Tile Fundamental Superstars.
  • Appleton Chipboard embellishments are added.
  • The circles are die cut with Spellbinders Circles Small.
  • A bit of the background paper was trimmed underneath the elements and used as journal strips.  The journaling is done in Zig Writer Blue Jay.
  • The title is from the Scan N Cut library, and was perfect to finish off this fun layout from a few years back!
As always know that I appreciate your visit to my blog, please leave a comment if you are so inclined!  

Saturday, October 12, 2019

Styling

It is not often that I am able to used purple on a boys layout, but withe the purple drapes the boys wore during their professional haircuts was a perfect opportunity to use a favorite collection by Basic Grey from 2008, Euphoria. 


Euphoria was a collection I like so much I bought EVERYTHING!  Many elements show up on this page. 
  • Spellbinders Labels Four Grand is used to die cut bracket shapes used in the background.
  • Several papers from the collection are used in this layout: Elation, Frenzy, Trance, and Delirium.  This layout was completed in duplicate, so I was careful with the use of my papers.
  • Sticker letters, Chip Stickers, and Buttons from the collection are used to complete the layout embellishments.
  • I can never leave button holes empty, so white craft thread is used to tie up the buttons.
  • All the edges are inked in Versa Magic Eggplant.  It helps to delineate and add depth to the page.  
  • Journaling is completed in Zig Writer Orchid.  
Thanks for checking out this fun layout that documents one of the few times my boys had professional haircuts.  Have a wonderful weekend!

Friday, October 11, 2019

Aviation Museum

The first summer our boys were home from Russia we took a road trip to Oshkosh, Wisconsin for the annual EAA Airventure convention.  We've been many times since, but this layout hold particular joy as my young son was so enthralled with all the interactive exhibits related to aircraft and piloting.  You can just see his amazement in the photos.  


The bright orange in his shirt was great to match the All About a Boy collection by Lori Whitlock for Echo Park
  • Matching Blue cardstock is used for the base layer.
  • Super hero is trimmed to 9 1/2" x 12", split to 5" on the left and 7" on the right.  The corners are rounded.   
  • Games is trimmed to 7" x 7" on the left, and 5" x 7" on the right.  
  • Curious is trimmed to 1 1/2" x 7"on the left and 1 1/2" x 5" on the right and layered below Games.  
  • Various embellishments are selected from the collection Sticker Elements, Alpha Stickers, and Chipboard Accents and added to complete the layout.  
  • Journaling on the journal card is completed in Zig Writer Blue.  
Sometimes using one collection really simplifies putting together a great layout, and Echo Park collections are great for this purpose.  Both A and B sides are all coordinated and the patterns repeat in the embellishments. 

Thanks so much for stopping by and know that your comments are appreciated!

Thursday, October 10, 2019

Lava Cast Forest

Now that life is not so busy (well not really) I do have time to share a few layouts that I've worked on over the summer!

This layout was photo heavy so I kept the paper selections and embellishments simple to highlight the fun photos of the kids in the lava tubes.
  • The base is Kraft card stock with sections of ancient Provo Craft Paper Slab patterned papers layered along the edges. 
  • Bazzill Bacis Just the Edge Cardstock Strips are layered over the top.
  • Several sentiments from the Jillibean Soup by Hampton Art's set Enjoy are stamped in VersaFine Vintage Sepia.  Enjoy is die cut with the matching die, and the remainder I cut into embellishment strips.   The edges are inked with Vintage Sepia.  Echo Park Jungle Safari Enamel Drops are added to the ends of the embellishments. 
  • The journaling fills the two empty spots and is done in Zig Writer Chocolate.
  • The title is die cut from matching green and cream cardstock with Quick Kutz Frankie Classic. 
Thanks so much for stopping by!  I hope you enjoy this memory from almost 9 years ago.  It holds a special place in my heart as my dear friend has graduated to heaven, and I am thankful that I can document this time that she spent with our family. 

Monday, October 7, 2019

Carving Pumpkins for Stick It Down

Stick It Down has a really fun sketch for the double page layout this month!  (We also have sketches for the single page as well as a card so check it out!)

It has a decidedly fall theme that can be switched out for your favorite season or theme.  I had some photos from last fall to scrap, so I went with the pumpkins and Halloween theme.


Searching through my stash I found a great collection by Imaginisce, Hallowhimsy Collection that was perfect for putting together this layout.
  • The background is part of the collection with the subtle spider webs.
  • Both sides of several sheets are used to create the coordinating tags to match the tag from my stash.  A 1/2" circle punch and the Cropidile is used to create the reinforcement holes.    The edges are inked with Delicata Black Shimmer to add definition.  
  • My new Brother Scan N Cut came in handy with all the pre-loaded Halloween images.  I used all of them in smaller sizes to create the die cuts. 
  • For the title I down loaded Silhouette's "Carving Pumpkins" file.  To help is stand out a bit more I outlined it in Black Zig writer.   
  • To add the border I used Paper Studio Pumpkins washi tape.  
  • The dotted tag needed a little sprucing up so I added Happy Halloween washi tape on a diagonal.  
I had a lot of fun creating this layout with the sketch this month.  It is a great way to incorporate several themed papers together, or to use up scraps from a collection.  Thanks so much for stopping by and come play along with us at Stick It Down this month!

Monday, September 9, 2019

Stand Up Paddleboarding for Stick It Down

The summer just sped by and here we are starting fall!  I wanted to celebrate summer a little longer so my September layout for Stick It Down features photos from our camping trip at Dillon Reservoir in Colorado.


Dillon Reservoir is the highest in the US at 9017 feet, hence part of the title.  It has several campgrounds, but may be better known for Summit County  and home to several ski resorts.  This layout is to celebrate the new sport I took up this year, and paddling on Dillon was one of the highlights of the summer.  

  
  • I wanted to keep the focus on the photos so I keep the design true to the sketch but clean and simple.
  • FYI, all the photos except the one of me were taken through my dry bag!  
  • The background is a blue cardstock from a Michaels blue combo pack.  Perfect color to match the color the sky!
  • I went shopping around on Etsy for SVG cut files to match the scenery.  The mountains are from thesvgearth Mountain SVG Bundle.  The Trees are from MandarinSVG Forest SVG, and the SUP are from SmilingWild SUP silhouette SVG.
  • Each file is cut on my Brother Scan N Cut after being sized to fit the layout.  Each color of cardstock is from my stash.
  • The Mountains and Trees are shaded with Square Pastels.
  • The papers are all Provo Craft from their ancient stabs bought at Michaels more than 15 years ago, except the evergreen trees.  It was in my stash and has no label. 
  • I got out my trusty Quickutz from the tall but slender Abigail font for the main title.  The dates are a mix of Olivia and Stiletto (for the slash and dash).  
  • Since I had so much to say I really wanted to type my journaling . . . MSW didn't do the trick so a quick tutorial on Youtube and PSE came in really handy!
Do check out the rest of  the Stick it Down Double Page Layouts and the fun sketches for single page and cards too!

Thanks for stopping by and enjoy the fall!

Monday, August 5, 2019

5th Birthday for Stick It Down Double Page Reveal

This is a great sketch that can be easily manipulated to add a few more photos.  Head on over the Stick It Down and check out the rest of the Design Team's layouts! SID also has single page and card sketches to play along with every month.


I had more photos than what the sketch called for, so I sized them down and put together the layout.


  • I choose Echo Park Paper Company's Happy Birthday Boy Collection to highlight all the bright colors in my photos.
  • Both sides of Age is Just a number is trimmed for the numbers and orange sections.
  • Birthday Hats is also used along with the Element Stickers.
  • I found some aqua colored cardstock in my stash that was a perfect match to the color scheme to use as the background for the layout.
  • The "5th" is a very old sticker font by Pebbles.
  • I had a rather long story to tell so the journaling is done on the computer.
Thanks for stopping by and do enter in and join the fun at Stick It Down!