Showing posts with label TBT. Show all posts

Thursday, March 5, 2015

TBT Paper Tole featuring Magenta Stamps


Splitcoast Stampers featured tutorial this week is One Layer Paper Tole.  Paper Tole has existed for a very long time; my first experience was with using pre-printed cards and fussy cutting layers.  The next step was to repeatedly stamp an image and fussy cut various layers to create dimension.  

Created in 2000

This card was created with a Magenta stamp, one of my favorite companies in the early 2000s.  The center image was stamped three times, heat embossed and water colored with Jacquard Pearl Ex pigments.  It is hard to see the shimmer in a photo.  The various layers are fussy cut.  The background is stamped with the same image.  Various colors of handmade paper and card stock back the central image.  At the time the only dimensional adhesive we had was home repair chalking!  The various layers are raised with the chalking allowed to cure.  It was a little stinky!


Created 2000

This second card uses smaller Magenta images and embossing powder layers technique on the backing layers.  The center image is stamped once, colored with colored pencils and a Dove blender, then fussy cut before adhering with the chalking.

Thanks for stopping by my Throw Back Thursday post.  It is fun to share my creative work that still resides in my “idea archive” drawer.

Thursday, February 26, 2015

Throw Back Thursday Niagara Falls Die Cut Layout

Created in 1999
In the summer of 1998 I made a trip to Toronto, Ontario, Canada.  During that trip I was able to take a tour to Niagara Falls.  The Canadian side of the falls is a celebration to the engineering feat of harnessing the falls for hydroelectric power.  These are just a few of the photos I took on that memorable day.

I wanted the photos to shine in a layout, so I used a pre-diecut 12" x 12" black card stock.  Some areas have the cross pieces cut out with a craft knife, other sections I left them in.  The small squares were each cut down by 1/8" to fill in the spaces.  I love this layout!

Thursday, February 12, 2015

TBT Valentine's Post-It Note holder

This is a mini project I created as gifts for moms in my Mother's of Preschoolers (MOPS) small grop in 2011.  I have a few left that I plan on gifting to my younger son's team of teachers.

Created in 2011
 I started with red card stock trimmed to 3 1/8" x 8 1/2".  It is scored at 3 1/8", 3 1/2", 6 5/8", and 7".   The pink card stock was pressured embossed with Sizzix Heart and Dots embossing folder then inked with red ink to make the hearts pop a bit more.  The square is trimmed to 2 1/2" x 2 1/2'.  A 18" piece of ribbon is adhered to the red card stock, and the pink card stock is adhered over that.  A simple bow closes the little gift.  I made about 15 of these in less than an hour and they were a bit hit!


Thanks for stopping by!  It has been a busy week around the little farm, and I've not had much time to play in my craft cave.  The up coming weekend will be all about High School wrestling, so I don't know that I will have time to play this weekend either.  Good thing I've had a some time in the last few weeks!

Thursday, February 5, 2015

Throw Back Thursday Woven Valentine


Unbelievably, this Valentine was created with scissors, an Xacto blade, and a hole punch!

Created in 2000

The heart outline was cut with a pair of scalloped Fiskar decorative scissors then the holes were hand punched.  The inside of the heart was cut out with an Xacto blade.  The woven red card stock is cut with the same scalloped decorative scissors and then woven with straight cut white card stock, and adhered to the scalloped heart die cut.  The large white heart card base is also hand cut.  I made several of these and kept one for my archive files.  Now we have all kinds of ways to cut and punch paper.   

I hope you have enjoyed this little blast to the past!  It has inspired me to do a little more paper weaving!

Thursday, January 29, 2015

TBT Punches and Stamps

I have always been a Taz fan and it just so happens that my niece celebrated her fourth birthday in Taz style.  I was fun to use my Taz punch and my Taz stamps.

Created in 1999


I used the colors from the invitation and thank you notes and included them in the layout.  The Taz stamps were colored with colored pencils and blended with a Dove Blender pen.  This is a fun memory and a cute layout of my niece who is now 20!

This is one layout that shows how much styles have changed over the years!

Thursday, January 15, 2015

TBT Crossroads Layout


One project every scrapbooker should consider creating for herself (himself too) is an “All About Me” album.  We so often scrap our loved ones, and often do not even end up in the photos.  I hope you make a concentrated effort to be in the photos of an event, I hand the camera to one of the kids so quality sometimes isn’t great!

This layout is done for a 11” x 8 ½” landscape style Pioneer album.  It was a prize at a crop and has a purple cover, which just happens to be my favorite color.  When I started on my All About Me album I tried to locate additional page protectors, but was not able to purchase any more.  So this will be a small album, I have a few more layouts to complete the album.


Crossroads 4/2009


Created in spring of 2009 for a challenge on a private forum, the theme of the layout is Crossroads.  It details the crossroad of being a long-time single woman to marrying my husband at 45.  This was a major, but much welcomed change in my life.  Just 6 months after I completed the layout, our family changed dramatically with the adoption of our two boys.   Our blog, Journey of Joy, chronicles the process and the first months the boys were home. 

The card stock is My Mind’s Eye 29th Street collection.  I layered pre-made flowers and added jeweled centers and leaves.  Along the bottom edge I punched paper with Fiskars edger punch and added a bit of sheer ribbon.  The titles are die cut with Quickutz Ginger font.  Our wedding photo was printed at specialty photo printer that allowed you to add digital frames.  This was before I learned how to do it on my own with PhotoShop Elements.  

Enjoy, and go create something that is ALL ABOUT YOU!

Thursday, January 8, 2015

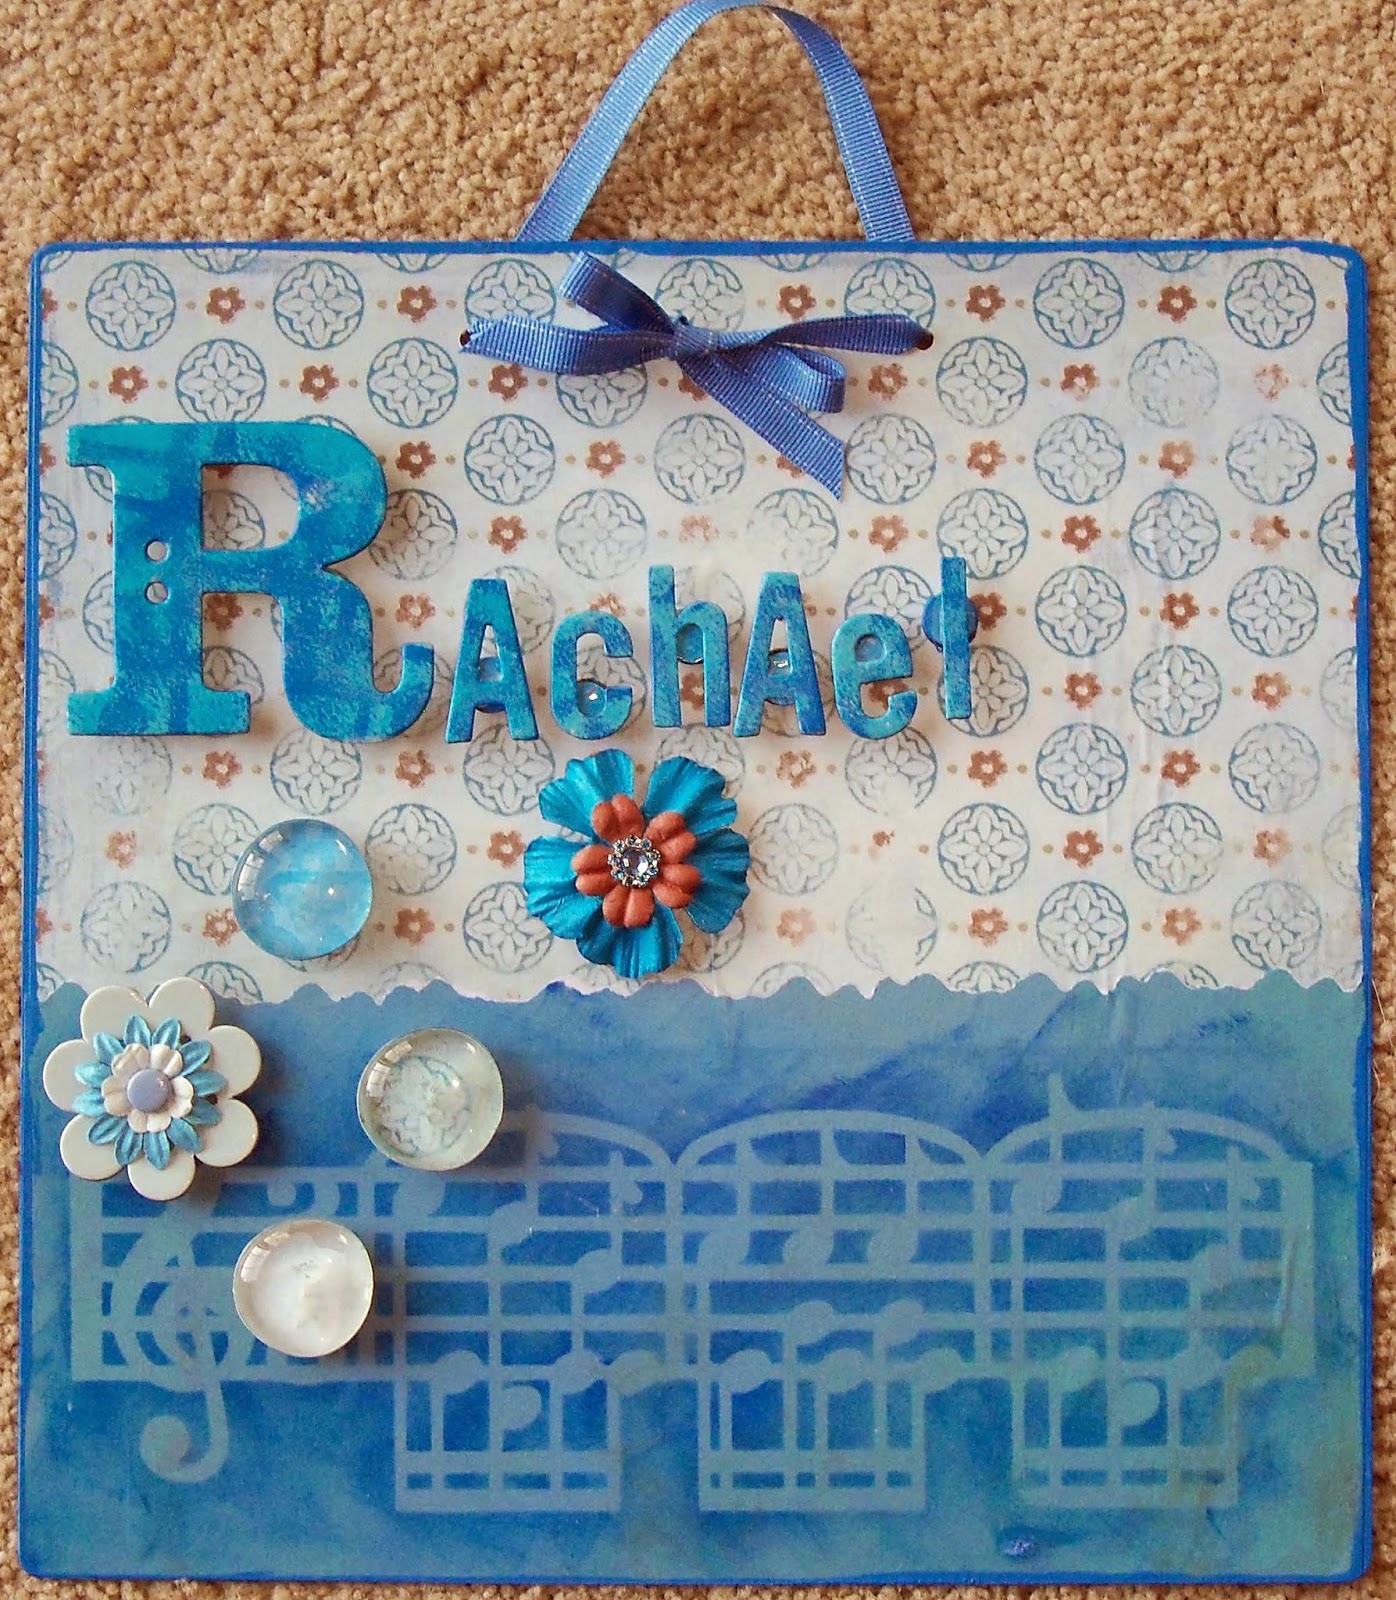
Throw Back Thursday Magnetic Memo Boards


Wow, it is Thursday and not a holiday!  Time for a new Throw Back Thursday post, to review past projects made before I started blogging.  In 2010 I created a few personalized magnetic memo boards for my nieces and sis-in-law.  I made a total of five, but did not photograph the first two before I sent them off.  (Oops!)


For each I started with a 12” x 12” galvanized metal sheet that I rounded the corners and drilled holes in for a more finished look.  Plaid Mod Podge in matte finish layered the decorative papers in place.  A combination of patterned papers, stamping, stencils, decorative scissors, and punches were used to decorate the layers.  


I painted chipboard letters with Making Memories Scrapbook Colors paint.  I still have a large collection of paint colors and it is perfect for painting on paper or chipboard.  Pam and Larissa’s letters were finished with stamped images in StazOn Cotton White.  Rachael’s letters covered in the same paper as the Tim Holtz music staff stencil at the bottom of her board . . . it was the first try with the stencil repurposed to decorate the letters.  Each letter has small ceramic magnets so the name letters can also be used to hold things to the board.  A jewelry grade adhesive, E6000 glue held the magnets in place.  


The flower magnets were assembled and adhered to ceramic magnets.   The glass baubles have decorative paper adhered with Mod Podge to the back-side, then they are attached to ceramic magnets.  Each board is finished with a coordinating ribbon. 

I used this same idea here for Keys to a Good Life MemoBoard.   Thanks for stopping by!  

Thursday, December 18, 2014

TBT, Angel Season Continues!

Front of card

Unfortunately I did not date the back of this card, but I am guessing I created it around 1998 to 2000 or thereabouts.  You may recognize the stamps from a more recent creation, my Elegant Angel Scarf.

I started with blue card stock trimmed to 6" x 12".  The front is randomly stamped with a Denami Designs Angel image and two different Denami flourish images.  I most likely used Encore Ultimate Metallic Purple and Memories Midnight Blue.  The front image is another Denami Designs Angel image stamped and heat embossed in silver.  The blue card was sprayed with glitter spray made by Krylon. The frame and sentiment panel is Denami silver card stock cut with a Fiskars deckle rotary wheel.  This was before many decorative edge scissors were available.  The sentiment stamp is stamped in Memories Midnight Blue.  The card is scored at 5" and 8 1/2" and accordion folded to make a finished card size of 5 1/2" x 6".   The front panel is adhered in the center and slightly over hangs the front fold.  The sentiment panel is hidden while the card is folded.
Card Unfolded

Even today the simplicity and beauty of this card makes me smile! I hope you enjoy this stroll down memory lane!

Thursday, December 11, 2014

TBT Chalk and Stencil Angel

Circa 1997

The season for Angels continues!  This wonderful image is a series of three stencils that are colored with chalks.  She is simple and understated.  The card is finished with decorative corner rounder by McGill and rounded corners on the base card.  I really should get this lovely stencil set out and play with it again!

Thursday, December 4, 2014

Tis the Season for Angels!

Created in 1997
This wonderful image is from Peddler's Pack Stampworks, a store in Beaverton, Oregon.  It is still open, and back in the 90's I would make the occasional trip across PDX metro area to visit this wonderful store.  This beautiful angel is stamped and colored with colored pencils and blended with a  Dove Blender.  She is fussy cut with scissors and an Xacto knife.  A little bit of water is added with a paint brush around the perimeter on the mulberry paper then it is torn leaving little wisps of fibers.   The backing is a metallic wrapping paper cut with a Fiskars rotary wheel!  Enjoy this little blast from the past!  

Thursday, November 27, 2014

TBT Giving Thanks

Created in 2008
Happy Thanksgiving!  I pray that you are celebrating the many things that you and your families have to be thankful for on this day.

I created this pieced die cut during the heyday of my fun with my Klic-n-kut.  I created this die cut in the KNK software and contributed it to a file exchange.  The die cut pieces are layered on the black mat which is welded to the sentiment.  The die cuts were chalked to add a little dimension.  Enjoy!

Thursday, November 20, 2014

TBT Rubber Baby Buggy Bumpers

Created in 1999

This is a fun card I made for my Dad for Father’s Day in 1999.  The images are all from Rubber Baby Buggy Bumpers (try saying that 10 times fast!).  I used to love sitting on the floor in the rubber pit at rubber stamp conventions and discover great images.  My dad happens to be a fisherman; and this spoof on the fish laughing at the hook was just to good to pass up.  Decorative scissors provided interest with the main image and mat over the background stamping.  

Please leave a comment, I love hearing from you!

Thursday, November 13, 2014

Throw Back Thursday Woman’s Best Friend


I spent many years as a single adult, and my scrapbooking shows many aspects of that life style.  My kids were “fur children”, and Emily was my second dog.  She was an Australian Cattle Dog aka red heeler.  She had a grey mask from puppyhood, and was a wonderful companion for 14 years.  When I travelled she would stay with my parents or with a friend who also had fur children. 

Created in 1997
 Paula Best created a line of stamps to use in scrap booking and card making.  I love her whimsical style!  The background paper is self-made using a Rollergraph and direct to paper inking.  The corners are a Fiskar scissor that was popular in the day.  The stamped embellishments and the title block are cut with another Fiskar scissor.  The die cut actually started out saying “Man’s Best Friend”, but a little fussy cutting and inking added the necessary letters.  I especially love the photo my mom took that has Emily looking in the passenger window and her face is in the side-view mirror!  Emily has been gone for 6 years now, but she is not forgotten!

Thursday, November 6, 2014

Throw Back Thursday Angel Pin

Created in 1996

I may have mentioned a time or two that I collect angels . . . this is a heat-laminated pin I crafted in 1996.  I was part of the Portland Singing Christmas Tree Choir for a number of years.  Each year I would make a little gift to share with the ladies in my group.  The stamp is from Peddlers Pack and is part of a sweet Nativity set.  The image was stamped in black ink and completed with colored pencils and glitter in the wings, halo, sash and stars.  Cute is not my typical choice, however this is one "cute" image I enjoy using.  

Thursday, October 30, 2014

Throw Back Thursday Birthday Card

Today we are going all the way back to card I made for my dad's birthday in 1997!  Not one of my earliest creations, but one that shows a few techniques.
 

The lion in the tree and the foliage are both Art Impression stamps.  The ink is most likely Colorbox pigment ink for the foliage and Memories black for the main image.  The lion and the tree trunk were done with colored pencils and a Dove blender.  Wafer thin dies were not on the market yet, but Fiskars scissors in all styles were popular.  I used a Mulberry paper to layer behind the stamped image.  My maiden name was Lyon, so the best way to create a personalized card for my dad, is to use a lion stamp for Mr. Lyon.  

Thanks for stopping by!  As usual I love to here a comment or two!

Thursday, October 23, 2014

TBT Wildflowers Layout


The photos that compose this layout were all shot around a campground near Timberline Lodge on Mount Hood here in Oregon.  I was taking a three-day ski instructor seminar and was camping as close to the ski area as possible.  After a morning of skiing I would walk the campground to limber my muscles and stretch.  While on my meanderings I came upon a number of wonderful wild flowers in the campground.  I was fortunate to find a Trillium, one of Oregon’s endangered species of flowers.  Also preserved is one of the butterflies that hatched while we were skiing.  There is something magical about skiing down a glacier with butterflies!  This one was captured on the grill of my car, so no butterflies were intentionally harmed.

Created in 1997

 I used a Deju Views alphabet template for the letter shapes and a Magic Matter to create the perfect mats for each letter.  The paper is from a Provo Craft Slab.

Thanks for stopping by!  Leave a comment, they make me smile!

Wednesday, October 15, 2014

TBT Family Day


Yesterday is the day that we as a family celebrate FAMILY DAY.  Our sons were adopted from Russia on September 25, 2009, but it took us until October 15, 2009 to finally be reunited as a family.  This photo was taken a few days later when both sets of Grandparents could be together with us as we began the great journey together.

I had collected a few Adoption related scrapbooking items during our long process of 18 months to bring our boys home.  This paper was one of those supplies, with the title already printed on the paper.  I only had two sheets, and thus need to use it wisely as I wanted a layout for each boy.  The contrasting background paper is cut from behind the photo mat.  I found matching Black Magic card stock in my stash.  A few border stickers and a time line journaling mat finished the layout.

My how they have grown, changed, and matured since this photo.  I am so proud of the young man my now fifteen year-old son has become.  My little man has grown from being barely at the 3% for height and weight to almost the 50%.  Our daughter is now a freshman in college.  Happy Fifth Anniversary as a Family to my precious family!

For those interested in the full story, please contact me and I will share our adoption journey blog.

Thanks for stopping by and leave a comment or two! 

Thursday, October 9, 2014

TBT Coluzzle and Lace Stickers

Created in 1998

As the title says, I used the Coluzzle to create this collage of Beautiful Begonias.  The photos are from a visit to Butchart Gardens on Vancouver Island in Canada.  There were so many beautiful Begonias they deserved a layout of their own!  Lace stickers were the perfect complement to the flowers and to frame the center photos.  This is one of my favorite layouts from this time period.  What is amazing is to see how much our style changes as the industry has changed.  

Thursday, October 2, 2014

TBT My 15 Seconds of Fame!


We all have a time in our lives when things are not going our way, finances, health, job stuff, relationships . . . whatever God has us dealing with in our journey.  I had suffered a close-head brain injury in late fall of 1994 that lead to a series of these kinds of issues.  I was very fortunate that I had an extremely supportive family and crafting!!!!  During my two plus year recovery I discovered rubber-stamping and quickly became addicted to the joy of playing with ink and paper and such.  Within 3 years my sister got me hooked into scrapbooking the archival way--think Creative Memories.
In the summer and fall of 1997 I was published twice.  (See my crafting resume.)  This scrapbook page documents the joy and fun I had with my card being published in Somerset Studios.  This was truly a bright spot in my life during a time when many other things were very difficult.  I am so thankful that I found my creative side as it continues to serve me well through the years.  

As you can tell I liked Border Buddies and using pens to frame my layouts.  I complemented the layout with a stamping sneeze of stamped rubber stamps.  The title is the sign from First Impressions and the sub-title is Rubber Baby Buggy Bumpers alphabet.  I loved this crazy font and used it frequently, one letter at a time mounted on wooden pegs.  A copy of the card that was sent in for publication also adorns the page.  A few cringe worthy aspects are the deckled scissors used to cut a photo and the shaped corner rounders, but hey that was the style in 1997! 

Crafting of many kinds over the ages has served mankind well.  Art, music, and crafting feeds the soul!  May God bless you in this journey we call life!
   

Thursday, September 25, 2014

TBT Digital Layout mounted to Canvas


Here is a project from the past that has been on display in my parents’ home since 2008.  They celebrated their 50th Wedding Anniversary in 2008, and this was a gift I gave them at their celebration.  I was dabbling in Digital Scrapbooking over at Jessica Sprague.

The layout is similar to one I learned to do in Digi in Deep.  I printed the layout in 12 x 12 format and then mounted it to a 12 x 12 canvas.   The canvas had been prepped with gold paint around the edges. 

Side View
 What I love about this layout is that it shows the endearing love that my Mom and Dad have for each other.  The smaller photo is taken at their wedding; the focal photo was taken on the family trip to Lake Billy Chinook where we spent a week on a houseboat.  Such fond memories for me!