Showing posts with label Unity Stamp Company. Show all posts

Tuesday, January 31, 2023

Just Love You for Retro Rubber Challenge 199

Here we are with our second challenge of 2023 at Retro Rubber.  We are getting close to Valentine's Day so a color challenge working with Valentiney colors is appropriate!

A clean and simple card using cream, pink and silver was my choice for this challenge.


Unity Stamp Company has this really fun set called "Moon Beam and Heart Strings" released in Sept 2015.  I knew it would be perfect for a clean and simple one layer card.  
  • The image is stamped in the center of the card with Delicata Silvery Shimmer and heat embossed with silver embossing powder.  The image is also stamped off the edge of the card to both the right and left to create a string of hearts across the entire card.  The outside images are offset towards the top of the card.
  • The hearts are colored in with Memento Dual Tip Marker in Angel Pink.
  • The middle sentiment is from the Unity Stamp Company set and is stamped in Memento Angel Pink.  The "we" was masked before inking the stamp, as both my husband and I will be signing this card.
  • Technique Tuesday's Say It Happy "Happy Valentine's Day" is stamped int he lower right corner in Delicata Silvery Shimmer and Heat Embossed in Silver embossing powder.  

Clean and simple can be very elegant and effective, as well as quick to put together once the design decisions are made!  Enjoy all the cards made by the design team over at Retro Rubber

CHALLENGE GUIDELINES

  • We require stamps older than one year.  If we feel you are using newer stamps, you may be disqualified from the challenge without notification.
  • New papers/dies are OK – but you must use at least one stamp older than a year and describe the age in your blog post.
  • Please note that all challenges require the use of at least one stamp older than a year.
  • Post your new creation to your blog or online gallery.   Use keyword RRCB198.  No backlinking. 
  • Link back to the blog using the Linky Tools by the due date. 
  • Enter as many times as you like. 
  • Feel free to combine our challenge with a maximum of 10 challenges.  Entries linked to more than 10 challenges will be disqualified without notification.
  • If your project is posted on a private group site such as Split Coast Stampers or a photo sharing site not all DT members may be able to comment.   Thank you for understanding.
  • Turn off Word Verification.  We love to comment but word verification can make that difficult.

Thanks for stopping by, and as always comments are appreciated!

Tuesday, August 30, 2022

Tag, you're it! from Retro Rubber

 The challenge at Retro Rubber for the next two weeks is to use a tag on your project.  This leaves a great deal of wiggle room!   Please check out the Design Team's interpretations of this challenge.


  I have a 4" x6" box of miscellaneous tags that were the inspiration of my card.  To fit the longer tag I decided on a slimline card size of 3 1/2 x 8 1/2".  

  •  I choose a stamp from Unity Stamp Company's . . . birthday jubilee set from July of 2013.  It is stamped in Memento Peanut Brittle.  All of the tags are also inked with Peanut Brittle.
  • To add a little interest to the next tag I used the Paper Studio Stars embossing folder, then directly inked the raised stars with Peanut Brittle.
  • The last tag has Burlap Ribbon adhered, a bit of ephemera found in the latest cleanup of my craft desk.  Fits perfectly!
  • I pulled out AC Twine in dark brown, then Darice in neutral and tied bows on each tag.
  • All the layers are adhered together and I have an easy peasy quick masculine birthday card ready to go!
Thanks for stopping by, I hope your summer is going well!  Please do enter you project in the gallery over at Retro Rubber Blog Challenge!  


Friday, May 27, 2022

Use Creative Medium Background for a Stunning card

Use Creative Medium Background for a Stunning Card


I am always searching for new ways to use supplies and tools.  Creative Medium comes in many colors, but the Iridescent Green creates stunning results on black paper.  The use of an Embossing Folder helps the layers of the iridescent effect really shine.  A few layered stamped images and I have a beautiful sympathy card to send to a dear friend.  
 

Skill: Beginner


Time: 1 hour plus dry time


Directions:


Step 1:


Cover a section of black paper (with or without texture) with a thin layer of Creative Medium in Iridescent Green.  I used Imagine's Squeegee to spread the layer across the paper.  The rubber edge was very helpful to get a thin even layer.  Set aside to dry, possibly overnight.  After it is dry it will still have a slightly rubbery texture.


Step 2:


Trim a section of the paper to 4" x 5 1/4" and pressure emboss with Sizzix Tropical Paisley Embossing Folder.  You can really see the detail in this photo.


Step 3:


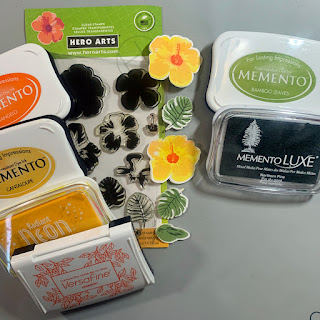
Layer stamp the Hero Arts Hibiscus and leaves images.  Start with the lightest ink first.  For the Hibiscus--Radiant Neon Electric Yellow, Memento Cantaloupe, Memento Tangelo, and Versa Fine Habanero.  The leaves are stamped in Memento Bamboo Leaves and Northern Pine.  The images are die cut twice more from white and layered under matching die cuts with OnPoint glue.


Step 4:


The sentiment from Unity Stamp Company is stamped in Versa Fine Habanero then heat embossed with Iridescent Embossing powder.  (Not shown) The image is die cut with Lawn Cuts Everyday Sentiments die.  One end is trimmed off square.  The banner is inked with an ink dauber and Radiant Neon Electric Yellow.  The edges are inked with Memento Cantaloupe. 


Step 5:


Ink the edges of a 4 1/4" x 5 1/2" card with Radiant Neon Electric Yellow ink with an ink dauber.


Step 6:


The layers are adhered together with Tear It! Tape.  It adheres well with the textured layers of the card.  The two Hibiscus flower are lifted a bit with dimensional foam adhesive.


Imagine

  • Creative Medium Iridescent Green
  • Imagine Squeegee
  • Radiant Neon Electric Yellow
  • Memento--Cantaloupe, Tangelo, Bamboo Leaves, Northern Pines
  • Versa Fine Habenero
  • Tear It! Tape
  • Ink Dauber

Other

  • Black and white cardstock
  • Sizzix Tropical Paisley Embossing Folder
  • Stamp Platform
  • Heat Embossing Gun
  • Hero Arts Hibiscus C1868
  • Unity Stamp Company "beautiful life, blessed memories"
  • Lawn Cuts Die Everyday Sentiments
  • Dimensional Foam Adhesive

Tuesday, April 26, 2022

Tic Tac Toe Mother's Day Card

We have a new challenge at Retro Rubber for the next two weeks. It is always fun to see how each project turns out with the Tic Tac Toe board.

I've been playing around with layering stamps and this set is from Altenew Build a Flower Snapdragon released in 2019.  I sat for an afternoon and choose several different color combos once I had my stamps positioned on a stamp platform.  There are two different Snapdragon stems in the set that could be inked up at the same time.  For the Tic Tac Toe I choose the horizontal line: flowers, dry embossing, bling (as a spray). 


  • All stems, leaves, and buds are stamped in Memento Pear Tart and Bamboo Leaves.
  • The Orange Snapdragon is Memento Cantaloupe, Tangelo, and Morocco.
  • The Pink Snapdragon is Memento Angel Pink, Versa Color Orchid, and Versa Color Peony.
  • The Purple Snapdragon is Versa Color Misty Mauve, Heliotrope, and Grape.
  • The A-7 card base (5" x 6 1/2 ") is spritzed with Fireworks! Bamboo Leaves, as well as a section of cardstock used to create the sentiment banner.  
  • White cardstock trimmed to 4" x 5 1/2" is spritzed with Sheer Shimmer Spray in Sparkle and then pressure embossed with Cuttlebug's Basket Weave embossing folder.  After is it dry Memento Bamboo Leaves ink is applied directly to the raised portions of the cardstock.
  • The sentiment banner is die cut with Lawn Cuts Everyday Sentiment Banners and then stamped with Unity Stamp Company's . . . . mama's and grandma's Happy Mother's Day sentiment in Memento Bamboo Leaves.  The edges are inked in the same.
  • the layers are adhered together to finish the card.

It has a real shimmery look in real life, that is difficult to capture in even well light photos.  It was fun to play around with the Snapdragons, even though the placement of the layering stamps were a bit fussy.

Please do join us at Retro Rubber!  We would love to see your projects in our Gallery!

  CHALLENGE GUIDELINES

  • We require stamps older than one year.  If we feel you are using newer stamps, you may be disqualified from the challenge without notification.
  • New papers/dies are OK – but you must use at least one stamp older than a year and describe the age in your blog post.
  • Please note that all challenges require the use of at least one stamp older than a year.
  • Post your new creation to your blog or online gallery.   Use keyword RRCB181.  No backlinking. 
  • Link back to the blog using the Linky Tools by the due date. 
  • Enter as many times as you like. 
  • Feel free to combine our challenge with a maximum of 10 challenges.  Entries linked to more than 10 challenges will be disqualified without notification.
  • If your project is posted on a private group site such as Split Coast Stampers or a photo sharing site not all DT members may be able to comment.   Thank you for understanding.
  • Turn off Word Verification.  We love to comment but word verification can make that difficult.

Thanks for stopping by, and remember your comments are always appreciated!