Showing posts with label Interactive paper art. Show all posts

Tuesday, March 1, 2022

Tic Tac Toe for Retro Rubber

 Tic Tac Toe challenges are always fun as we see so many different variations in the submissions.  I went with the bottom row of birthday, confetti, and twine and made a shaker card.  Come join us at Retro Rubber Challenge Blog.

The base of the card is from the Sizzix Impresslits Happy Birthday set.


  • The card front is trimmed to 4" x 5.25" and centered in the embossing folder that includes the happy birthday center die.
  • The middle of the circle is die cut with the matching die in the set.
  • The raised dots are gently inked with Versa Color Baby Blue.
  • The overlay is die cut with the embossing folder die and then both matching circles in the die set then inked in VersaColor Baby Blue.
  • Two sets of balloons were die cut, three were used as embellishments.  The balloons were inked directly with VersaColor in Baby Blue or Red Magic, then heat embossed with iridescent embossing powder.  I held the balloons with a binder clip and tied a small circle in the twine before placing it on the balloon to add the strings.  Actually to get twine at the correct scale I used crafting thread and teased apart a length so each string was two fibers.
  • The sentiment is from My Favorite Things Birthday Greeting set from January 2017.  It is stamped on white cardstock in VersaColor Magic Red and heat embossed in iridescent embossing powder.  Once cool the fish tail was die cut with Lawn Fawn Sentiment banners on one end and trimmed on the other.  The entire banner was then inked in VersaColor Baby Blue.
  • To create the shaker portion I first marked small pencil lines around the outside edge of the sentiment circle.  Two layers of thin line foam adhesive were added to the card base outside the pencil lines.  The pencil lines were erased.
  • The outside edge of the card base was inked in VersaColor Baby Blue and two layers of foam adhesive were added just inside the inked area.
  • The clear acetate window was trimmed and added to the back of the card front.
  • Confetti sequins were added to the inner circle.  
  • The card front was then adhered to the card base with the already placed foam adhesive.
  • The Happy Birthday overlay was glued into place with small dots of On Point Glue.
  • A piece of foam adhesive was added to all three balloons, then using the binder clip to hold the balloons I tied a small knot to place behind the sentiment banner.
  • The sentiment banner is adhered with dimension foam adhesive, making sure to hold the balloon strings in place.
Thanks so much for checking in with me here, and please do go check out all the beautiful cards the Design Team has made over at Retro Rubber Challenge Blog.

CHALLENGE GUIDELINES

  • We require stamps older than one year.  If we feel you are using newer stamps, you may be disqualified from the challenge without notification.
  • New papers/dies are OK – but you must use at least one stamp older than a year and describe the age in your blog post.
  • Please note that all challenges require the use of at least one stamp older than a year.
  • Post your new creation to your blog or online gallery.   Use keyword RRCB177.  No backlinking. 
  • Link back to the blog using the Linky Tools by the due date. 
  • Enter as many times as you like. 
  • Feel free to combine our challenge with a maximum of 10 challenges.  Entries linked to more than 10 challenges will be disqualified without notification.
  • If your project is posted on a private group site such as Split Coast Stampers or a photo sharing site not all DT members may be able to comment.   Thank you for understanding.
  • Turn off Word Verification.  We love to comment but word verification can make that difficult.

Saturday, May 8, 2021

Mother's Day Gate fold card

I recently took a class through Heartfelt Creations using their new Gateway Dies.  The paper collection from Heartfelt Creations is from 2016, Berry Blossoms.  The finished card was very pleasing!  I hope you enjoy my version of this card!

 
Along with the Berry Blossoms stamp and Die and the Floral Basic Shaping mold I made some quick flowers to decorate the front of the card.  They are stamped in Memento Angel Pink and sponged in Lilac Posies.  The sentiment is also Heartfelt Creations and is stamped in Brilliance Pearlescent Orchid.     The center of the flowers are decorated with Nuvo Crystal Drops in Dandelion Yellow and Suze Weinburg's Mini Mosaics in Cracked Corn.  The front is decorated with the Scalloped Flourish Gateway Die and Elegant Swirl Die.


The interior also used the Elegant Swirl Gateway Die and Scalloped Flourish Gateway Die.  The sentiments are from Unity Stamp Company's . . . . Mama's & Grandma's.  All are stamped in Memento Northern Pine.

The card kit was put together before the online class, but I didn't really have time to complete all the details, so I went back and finally finished the card this week!  

Thanks so much for stopping by, as always I enjoy your comments.  FYI, if you receive emails from my blog that "widget" is being phased out.  I've not figured out how to send out emails once this service stops.  


Tuesday, February 2, 2021

For My Love Valentine for Retro Rubber

Hello!  It is Valentine's season and our challenge over at Retro Rubber Blog Challenge can be either for a Valentine, or other special card as the Design Team will demonstrates on the blog.  Do go check out their wonderful cards for our theme:


I wanted to create a special Valentine for my husband and using this color scheme makes for a very masculine look.

I just purchased this great die from Sizzix designed by Tim Holtz and thought it was perfect for a shaker card.

  • I used the Sizzix Thinlits 66416 to die cut the heart with the heartbeat squiggle from 4" x 5 1/2" grey cardstock from Recollections.  
  • The front was then pressure embossed with Sizzix 3-D Confetti Hearts embossing folder.
  • The squiggle didn't fare so well after being embossed so I die cut another and fussy cut tabs so it could be adhered to the back of the card front.
  • A section of acetate was trimmed to fit the heart opening and Darice Adhesive foam strips were used to create the window around the heart.  More foam adhesive was put around the outside edges of the card front.
  • An A-2 card base was inked with Versa Fine Crimson Red before the card front was adhered.  A small amount of heart confetti (manufacturer unknown--too old!) in the spot where the window will be in the card.  It is much easier to center the card front on the card base using this method.
  • The sentiment is by Technique Tuesday, a set from 2008 "All you need is Love".  It is stamped in Versa Fine Crimson then die cut with Lawn Cuts Everyday Sentiments Banners.  The custom length is done be placing the die cut piece back in the die to get the diagonal ends just where I wanted them.

Wait, there's more!  Here is the inside of the card!  I also loved the additional squiggle die cuts and had to use them on the inside.

 
  • The heart and love squiggles are die cut from the same grey cardstock and adhered with very small dots of Zig blue at the tips of the lines.
  • The inside sentiment is from the same Technique Tuesday set and is stamped in Vera Find Crimson Red.
  • The final touch is a small cupid sequin, again it is so old I have no idea who made the sequins, but they sure come in handy around Valentine's Day! 
Do come join the fun for our challenge at Retro Rubber!   We have a few simple rules:  1) Use a stamp that is at least one year old or older in your project.  2)  Tell us how old your stamp is  3)  You may enter up to ten challenges including ours 4)  You may enter our challenge up to three times.  Thanks so much for stopping by and do have some fun with this challenge!


Tuesday, April 7, 2020

Easter version of Be Squared!

We have a fun challenge over at Retro Rubber for the next two weeks.  Do go check out all the options the Design Team created! 


We have a few simple rules: 1)  Use at least one stamp older than a year  2) Tell us how old the stamp is  3) Enter up to ten challenges including ours.  That is it, so come and play along!


This is the front of the card, which was designed to be clean and simple.

  • Sizzix Card, Square Flip-It #2 was used to die cut Lawn Fawn Watercolor Shooting Star cardstock.  
  • The smaller square die cut is from Elizabeth Craft Design's Stitched Squares.  
  • Unity Stamp Company Everything Easter from 2/2015 was used to stamp both the front and inside sentiments in Memento Tangelo.   
  • Memento Tangelo was rubbed on the inside of Cuttlebug Gingham embossing folder before the cardstock was pressure embossed.  
This is how the card appears with the Flip-It opened.


Although there is not much room for a written hand written message this is a quick and simple card to create.

Thanks so much for stopping by and I do hope you will play along with us over at Retro Rubber for our Be Squared Challenge!  

Thursday, February 13, 2020

For My Sweetheart

As a card maker, every once and awhile I like to make a very special card for my husband.  This card did take some time to plan and create, but the results are really fun!


The front of the card is just a hint of the inside!
  • Dark red cardstock is the base of the card, topped with Me and My Big Ideas patterned paper from 2011.  The base is 4 1/4" x 5 1/2" (or 11" before the fold).
  • Karen Burniston's Twisted Panel Pop-up dies are used to die cut light grey cardstock, dark red cardstock, and black cardstock for the front.
  • Memento Tuxedo Black ink is used through the card for the stamping.  
  • Joy Clair's Hello Sentiments (2017) stamped the "For My" and Studio G's Sweetheart (2006) completes the front sentiment.
  • Red twine decorates the tops of the sentiment's before the entire card front is adhered together.


As you can see the majority of the labor of love was in the interior of the card!  To die cut and assemble the card, please follow Karen Burniston's excellent video HERE!
  • Red, black, grey, pink and green cardstock are used to die cut all the pieces. The center panel with the mechanism is die cut from the same Me and My Big Ideas patterned paper used on the front of the card. 
  • The top panel use's Hero Arts CL498 Celebrate Everyday from 2015.  Using a stamp positioner I stamped each word of the sentiment one at a time, although it is one long sentiment, "Happy Valentine's Day".  
  • "Be Mine" is another 2008 Studio G.  They just happen to be the perfect size!
  • Lawn Fawn's 2014 Hedgehugs was perfect for the two center panels of the card.  The images are stamped and die cut from kraft cardstock and colored with Prisma pencils.  
  • Hero Arts 2013 CL582 XOXO hugs & kisses is stamped on the far right panel.  
  • A combination of Technique Tuesday's So Grateful from 2014 "Love You" and Scrapbook.com's 2019 XOXO "forever & ever" finish the final bottom panel. 
I hope you find this card to be an inspiration of ways to combine stamps, die cuts, and different company's products to create one really fun and fantastic card!  Thanks for stopping by and Happy Valentine's Day!

I am delighted to enter the following challenges:
Aud Sentiments #244 Valentine/Love Sentiment 

Wednesday, October 23, 2019

Las Vegas Sights!

My husband and I recently traveled to Las Vegas for my Kodiak High School All Class Reunion.  We are not gamblers or drinkers, but we did enjoy seeing the sights and eating great food!  One of our stops was to a BRICK AND MORTAR local scrapbook store, ScrapbooksRUs.  I was able to find great papers to scrapbook our trip.  They are all custom papers by Scrapbook Customs that ScrapbooksRUs carries in the store.  The owner knew immediately we were from out of town and greeted us by saying "Where are you visiting from?".  The give away?  My spouse was with me as we came in the store.  Thank you dear husband for going to the scrapbook store with me!


I had too many photos to fit on a double page layout, but not enough to create another page or two.  So lift up the flap and see six more photos!


There were lots of colors in the Vegas Sights print, so I choose from those to complement the photos.  The Vegas Sights is two sided, and the B side is featured as the strips along the A side.  The yellow cardstock behind the Las Vegas Strip die cut is fussy cut to trim it down (literally) in size.

Thanks so much for stopping by and taking a look!  Have a wonderful day!

Monday, December 24, 2018

Christmas Greetings for Quick Quotes

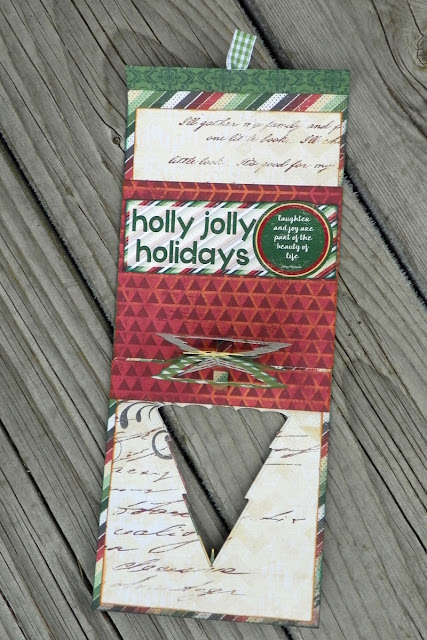
Merry Christmas Eve to one and all!  Neva here to share some Christmas cheer and a few cards I enjoyed creating to give to family and friends for this holiday season.  All of the cards feature Holly Jolly Holiday collection.  My first card is an interactive pop-up card inspired by one of my favorite Three Dimensional artists, Karen Burniston.


I used several different papers to create my version of the card.  Karen has a great how-to video that will help assemble the card.  I used just the die set that creates the pop-up tree, and trimmed the accent papers with my trimmer.  All the dark papers are inked with Evergreen Powder Puff Chalking Ink and the light papers with Kokomo Powder Puff Chalking Ink.  The key dimensions are as follows:


  • The base of the card uses 103 trimmed to 4 1/4 x 11".  It is scored at 4 3/4", 9 3/4", and 10 1/2". 
  • The front panel is 100 trimmed to 4" x 4 1/2".  (I had originally chosen a different paper, but didn't like the lack of contrast, so revised my decision.) 
  • The inside top and bottoms panels are 104 trimmed to 4" x 4" and 1 3/4" x 4".
  • The pop-up mechanism panel is originally 4 1/4" x 4 1/2", with the bottom 3/4" trimmed and re-assembled with the removable tape to create the center fold.

All of the tree parts were die cut from various papers in the collection.
  • The frames are one side of 105, and the center floating trees are the reverse side.
  • The slotted center tree is 103.
  • The decorations are die cut from 102.
  • The tree topping star is die cut from 100.
For accents I used the following:
  • A saying from Holly Jolly Holidays 600 Quotes and Phrases is trimmed to the inside frame to fit into the card.
  • A small piece of green gingham ribbon serves the small tab to open the top opening card.
  • I do suggest the magnets linked under Karen's video as the ones I found locally did not hold the card together through the paper layers.
 I made a few more cards using Holly Jolly Holiday 500 and 600 Quotes and Phrases along with the scraps and bits left on my craft table from my Christmas related layouts featured earlier in the month.  All of the cards can be created from the Club Q Altered Kit with a few additions from your stash.


  • I had many strips of paper in widths between 3/8" and 1/2".  I laid the strips diagonally across the card base. and trimmed the excess from around the edges.  
  • The entire card front is inked in Evergreen Powder Puff Chalking Ink.
  • A saying from 600 is matted with 103 and layered over the top.

  •  A greeting from 500 is trimmed and inked.
  • Small strips of 100 are placed behind the saying.
  • The panel is matted with 104.
  • Brads are placed in each of the four corners to anchor the card together before adhering to a card base.

  • A greeting from 500 is trimmed and inked.  
  • It is matted with 104.
  • Strips left-over from the "Lefse" layout is placed behind the saying and adhered to the card base.
  • A small raffia bow is adhered to the top.  

  • I really liked the rustic look of this saying so a small jute bow and jute cord decorate the front of the greeting from 500.
  • Burlap ribbon is placed behind the greeting.
  • The panel is backed with 101 and adhered to a card base.  

  • The Noel greeting is trimmed and inked.
  • A small angel is die cut from vellum and cream card stock and adhered to the front of the card.
  • The panel is backed with 101 and adhered to the card base.
  • Small gems from the December Club Q kit are adhered randomly to the card front.
Quick Quotes Products
December Club Q Altered Kit
OR
Holly Jolly Holiday Paper Pack 
Holly Jolly Holiday 500 12" x 12" Quotes and Phrases
Holly Jolly Holiday 600 Quotes and Phrases
Powder Puff Chalking Ink in Kokomo and Evergreen

Other Products
Christmas Trees Pop Stand by Karen Burniston in cahoots with Riley and Company
Jute cord by Darice
Burlap Ribbon from my stash
Angel die by Quickutz
Vellum
Cream Cardstock
Raffia from my stash

My cards are in the mail to bring holiday cheer to my loved ones.  If you are sending greeting late (yes some of us do that!) or if you are planning ahead for the holiday season of 2019 I hope you are inspired to make a few quick cards!  

Wednesday, November 21, 2018

Happy Thanksgiving card for Quick Quotes

Hello friends of Quick Quotes, Neva here to share a three-dimensional Thanksgiving card.  I used the lovely Autumn Brilliance collection to create this festive fall card.


This card folds flat for mailing, and stands up and holds it shape by clever tabs and slits in the design of the card.


  • I started with Autumn Brilliance 102 and 105 for the base sections of the card.  Using a template I traced and cut out the sections.  
  • The sections are inked in Powder Puff Chalking Ink in Milk Chocolate.  (Which, by the way, will hide the small imperfections of hand cutting a card panel, yeah!)
  • Autumn Brilliance 100 is used to create the front panels on each section of the card.  I used parts of the design that would highlight the leaves and show the fun zig zag pattern.
  • The edges are inked in Powder Puff Chalking Ink in Kokomo.
  • Using a stamp positioner, the sentiments are stamped on the sections before assembly.  This allowed me to stamp multiple layers of ink to create nice dark impressions without smudging.


  • Three sets of the leaves are die cut from 100 and 102.
  • Using ink daubers each type of leaf was inked in a variety of Powder Puff Chalking Ink Colors.  I used Barn Board, Desert Sun, Banana Bliss, Biscotti, Rusty Nail, Milk Chocolate, and Kokomo to create fall colored foliage. 
  • The card is assembled using strong adhesive and glue dots to hold the leaves in place.  The leaves will stand out a bit from the card when it is in the displayed "bendi" position.  
This card was so much fun to assemble from the wonderful Autumn Brilliance collection.  I think it is a fabulous autumn card to celebrate Thanksgiving!

Quick Quotes Products
Autumn Brilliance Paper Pack 100, 102, 105 
Powder Puff Chalking Ink--Milk Chocolate, KokomoBarn Board, Desert Sun, Banana Bliss, Biscotti, Rusty Nail.

Other Products
Bendi Card Template by Hot Off the Press
. . . today, I am thankful by Unity Stamp Company
Four Seasons die by Spellbinders

Thanks so much for stopping by and do enjoy your time with family and friends during this Thanksgiving holiday!  ~Neva

Saturday, December 9, 2017

Snowy Mittens!

The challenge this month at Imagine was "Let it Snow!"  Here is my take:


Delicata is the perfect ink to create a Let It Snow Flip card, or in my case Warm & Cozy Wishes while surrounded by snowflakes! In order to make this card, you will need the Sizzix Framelits Flip Its 660022 or one similar to it from Sizzix. There are several video tutorials on how to use this die and once you have a handle on how to construct the card then the rest is easy!

The mittens and cuffs are stamped and heat embossed with clear embossing powder and die cut, then placed over the stamped mitten image. The snowflake background is created by stamping with Delicata White Shimmer and heat embossing with clear embossing powder. Delicata Sapphire Blue is applied over the entire area with an Ink Blusher then the ink is buffed off the images with a paper towel.

The background behind the mittens and the small snowflake die cuts are simply stamped in Delicata, the shimmer of the ink does the rest! Ink blusher applies ink around the edges of the card in Delicata Silvery Shimmer, and behind the circle in Delicata Sapphire Blue.

By using just three Delicata inks, a bright and beautiful coordinated flip card is fun to create. I hope your holidays are warm and cozy!

Imagine

Other
The Stamps of Life—Mittens2stamp and die set, Patterns4mittens
Sizzix—Framelits FlipIts 660022

Monday, February 13, 2017

Seascape water colored with Fireworks!

Imagine now has Fireworks in 2 once bottles!  Hurray!  There is also an agitator in the bottle that makes it so easy to mix the shimmer back into the solution.  The Imagine blog is featuring several projects today that include this wonderful seascape that I water colored with Fireworks.  Go check all the amazing project out over at Imagine!


Last summer I purchased a set of dies I just HAD to have, without really knowing when I would use them in the future.  Every crafter has those shopping moments!  When the Fireworks challenge was announced, I had the perfect way to showcase both the dies and the wonderful color palette of the Fireworks sprays with this under the sea diorama.  Fireworks can be used as water colors with water color paper and a little water spray.  It was so much fun to create a multilayered scene with just die cuts, Fireworks, and a Pico Embellisher.  The Fireworks adds just the right amount of shimmer to make the fantasy come alive!

Imagine

Other
Water Color paper
Water Spray bottle
Elizabeth Craft Designs—Shells Small, Shells Large, Turtle, Seaweed, Stitched Rectangles

Monday, September 19, 2016

Mini Book Fun for Imagine


I was very excited when I heard our theme at Imagine for the month of September was to highlight books because I am a mini-book fanatic!  I have truly enjoyed creating small books over the last 20 years.  So I set out to craft a cute little book from fun foam, chipboard and cardstock that has a ribbon binding.  To make the book more portable, I made an elastic closure to hold it together.  It is easy to decorate the fun foam with StazOn ink, and the elastic closure uses some Fabrico makers to add color inside the ridges. 

A few details:


Skill Level:  Intermediate
Time:  2 hours plus dry time


Step 1
Trim tan fun foam to 5” x 7”.  (This size was chosen as I hoped to add some texture with an embossing folder, but didn’t like the lack of results so that ended up on the inside.)  The fun foam is stamped with a variety of marbling stamps using StazOn in Saddle Brown, Timber Brown, and Cactus Green.


Step 2
The create a color coordinated elastic closure, a 12” piece of soft ¼” elastic is inked with StazOn in Saddle Brown and colored with Fabrico markers in Chocolate and Pea Pod.  The colors are muted with a spritzing of Ink Potion No. 9.  It was a little lighter than I liked, so another layer of StazOn ink in Timber Brown was added.  The elastic is set aside to dry. 


Step 3
The stack of pages, called a signature of the book, is 5 sheets of cream cardstock trimmed to 4 ¾” x 6 ½”.  Each sheet is scored down the middle and creased.  The signature is lined up and the inside set is marked with a pencil at the center and 1 3/8” away from center. The holes are punched with a paper piercer, or you can use a heavy duty thumb tack.  The same marks and punch holes are made in the fun foam cover.  The signature and cover are slightly different sizes so it is more simple to use a centering ruler for this measuring task.   


Step 4
A 15” length of 1/8” ribbon is threaded through the signature and cover using a tapestry needle.  Starting from the outside, the ribbon is threaded through the center hole in the cover and signature.  You will have to line up the needle with holes in the signature before pulling it all the way through.  A length of ribbon, or tail, is left on the outside. 


Step 5
From the inside the ribbon is threaded through an outside edge hole of both layers.  Next the ribbon is threaded from one outside hole to the other outside hole back to the inside of the book.  From the inside the ribbon is threaded back through the center hole.  Take care to not pierce the ribbon and only go through the hole.


Step 6
The ribbon tails should be on either side of the center ribbon.  You may gently adjust the length of the tails at this point.  Tie the tails around the center ribbon and make a bow.


Step 7
Round the signature in a stack with a heavy duty corner rounder like Zutter.  Rounding the corners after binding allows them to line up more neatly.  Trim two pieces of chipboard to 3 ¼” x 4 ¾” and round outside corners.  Line up the chipboard between the cover and the signature. 


Step 8
Mark holes for elastic 1” from the top and bottom edges of the cover and ¾” from the outside edge.  Punch holes through both the chipboard and foam cover.


Step 9
Add a quick dry adhesive designed for paper to the chipboard cover and adhere to the foam cover.  Place wax paper between chipboard and the signature in case a bit of adhesive leaks out from around the edges.  Repeat for the front of the mini book.  Place under a stack of books and let dry.  Mine took about an hour.


Step 10
Thread elastic through the holes in the back cover.  Leave the elastic slack enough to go around the front cover.  Pin the elastic together and then stitch at the mid-point to secure.  This is flatter than knotting the elastic. Trim the excess elastic.  Add adhesive to the chipboard and adhere to the last page of the signature so the elastic is hidden.  Adhere the front page of the signature to the front chipboard cover.  Add the wax paper to protect the rest of the signature as before and dry under a stack of books. 

This little book is the perfect size to hold wallet size photos, meandering thoughts and notes, or sketches. 

Supplies

Imagine
·      StazOn-- Timber Brown, Saddle Brown, Cactus Green
·      Fabrico Markers—Chocolate, Pea Pod
·      Ink Potion No. 9

Other:
·      Fun foam--tan
·      Chipboard
·      Cardstock—Cream
·      1/8” ribbon
·      ¼” elastic
·      Quick dry paper adhesive—Scotch works well
·      Yvonne Albrition Designs—Marble tile stamps
·      Acrylic blocks
·      Score board
·      Centering ruler
·      Paper piercer and mat
·      Tapestry needle, needle and thread
·      Heavy duty corner rounder
·      Heavy duty hole punch
·      Wax paper

Wednesday, May 11, 2016

Transparent Element = Shaker Card


 Come join our challenge at Ruby’s Rainbow Challenges and create a card or project that incorporates a transparent element.  It was my turn to select the challenge theme and am delighted with the wonderful interpretations the Design Team created, do stop by and check them out!


A shaker card is one way to incorporate a transparent element into the design of a card.  I have these wonderful circular Shake It Pouches made by Impression Obsession that was perfect for this challenge.  We have a dear friend who just received her MBA, so it was time to craft a Gradation Celebration card.  In my search for confetti, I found that it is not readily available, so large glitter was the perfect solution and the starting point for the color theme of the card.

1.     I determined that I wanted the area for the shaker element to be 4” x 4” and worked from that dimension to create the step card.  Turquoise card stock is trimmed to 7” x 10.5”.  At 1 ½” from each edge the card stock is cut from 1 ¼” to 6 ½”.  The base is scored at 1 ¼”, 2 ½” and 6” along the sides, and at 5 ¼” in the center section.  The card is folded into the step card base.
2.     Trim pink card stock to 1 ¼” x 3 ¾” and 1” x 6 ¾”, pressure emboss with Cuttlebug James’ set circle pattern, and sand to bring out texture.
3.     Die cut Spellbinders Lacey Circle with the Standard Circle centered in the middle. 
4.     Stamp Hero Arts Congrats Stamp and Cut sentiments around the edge of the Lacey Circle.  The polymer stamps are easy to position and curve to shape with the use of an acrylic block.  Versa Color in Turquoise is a perfect match for the card stock.  Sand edges of the Lacey Circle. 
5.     Die cut Quickutz diploma and graduation cap from Kraft, black and purple card stock.  Die Cut Spellibinders Phrases One Congratulations from purple card stock. 
6.     Place confetti stars, hearts, and Rainbow large glitter in Shake It pouch and adhere.  To card front.  Adhere remaining elements, with the lacey circle concleating the edges of the Shake It pouch.  Dot the “i” with Memento Dual Marker in Grape Jelly, this is easier than trying to get the itty bitty tittle (yes it is a real word, I googled it!) to adhere to the pressure embossed card stock. 

Supplies:  Imagine Crafts-Versa Color Turquoise and Memento Dual Marker Grape Jelly, Spellbinders-Lacy Circle, Standard Circle Small, Phrase Set One, Quickutz-Graduation Cap, diploma, Hero Arts Congrats Stamp & Cut, Cuttlebug-James’ set Circle Pattern, turquoise, pink, purple, black, and Kraft card stock.

Please do come and play along with Ruby's Rainbow Challenges and share your project that includes a transparent element!

I would like to enter the following challenges: