Showing posts with label layout. Show all posts

Thursday, June 23, 2022

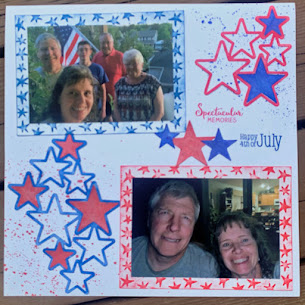
Fourth of July Layout Made Easy with Memento inks and Fireworks!

Today I will share how easy it is to create a very cohesive layout using just two ink colors and the matching Fireworks! colors for an amazing Fourth of July scrapbook layout.  With just white cardstock, an embossing folder, a large die cut, and stamps this layout is perfect for Independence Day.

Skill:  Beginner

Time:  2 hours

 Directions:

Step 1:


Trim white cardstock to 1" on each edge larger than the photos.  Pressure emboss with Star Blanket.  Ink raised portion of embossed areas and edges with Memento Danube Blue or Lady Bug.  For my layout I trimmed two sections 5" x 7", three sections 4" x 5", and one section by 4" x 4" to back my phtotos.

Step 2:


Die cut two sets from Spellbinders Cascading Stars die and remove the stars.  Trim one outline die cut into a section of five stars, with the other being four stars.  Use Jumbo Dauber to tap Memento Danube Blue over one die cut and the smaller portion of the trimmed die cut.  Tapping the ink onto the paper keeps from damaging the die cut, which can occur if a rubbing motion is used.  The larger portion of the trimmed die cut is inked in Memento Lady Bug.  Continue to add ink until it is the desired hue. 

Step 3:


The splatter method is used with Fireworks! to add some interest to the white background.  Shake the bottle to distribute glimmer and then remove spritzer nozzle and gently tap the top to splatter ink from the outside of the spray tube.  Continue to tap until the desired amount of ink is on the paper.  I choose sections where the die cuts would be eventually placed.  I alternated the color choices from the die cut color.  This is the lower right corner of the right page.  

Step 4:


The left side of the layout shown completed with splattered Fireworks! in Memento Lady Bug and Danube Blue.

Step 5:


Determine placement placement of elements to add stamped sentiments.  Place on layout and remove other elements.  Use a stamp platform to stamp sentiments in proper position.

Step 6:

On the right page the stamped elements are determined, then half are removed before stamping to allow for clean stamping of correct colors.  The remaining elements are added and stamped.  It was easier to stamp all the images Memento Lady Bug at one time, then follow with images in Memento Danube Blue.

Step 7:


Spritz Fireworks! into a plastic tray or surface.  Place die cut stars from step 2 face down on the Fireworks! ink to add color.  Use tweezers to move around in the ink and add more ink to tray as needed.  About a third of the stars were inked with Fireworks! in Lady Bug the remaining in Fireworks! Danube Blue.

Step 8:


Determine correct placement of Fireworks! stars in the die cut.  I rotated the star until it fit properly into the die cut area.  Not all the stars are identical, so taking the time to find the right one was worth the effort for a seamless look.   

Step 9:

Adhere elements to layout.  Tear It! tape was used to adhere the photos to the textured mats.  The die cuts are adhered with On Point! glue.  The small dots around the star frames keep the layout clean and smudge free.  


Art Supplies

Imagine:

Memento--Lady Bug and Danube Blue

Fireworks!--Lady Bug and Danube Blue

Jumbo Dauber

Tear It! Tape

On Point Glue

Other:

White Cardstock

Cuttlebug Star Blanket embossing folder

Spellbinders Cascading Stars

Technique Tuesday Spectacular Memories

Hero Arts CL493 Holiday Sentiments

Tweezers

Die Cut machine

Stamp Platform

Wednesday, June 12, 2019

PADA Award Winner

Today I am sharing a layout about a stand-out event in my husband's career.  He is an aerospace engineer, and this is one of the first major awards that recognizes his excellence in the field of aviation design and engineering.  He is a long time EAA (Experimental Aviation Association) member and this award is from a subsidiary, the Personal Aviation Design Academy (PADA).


Echo Park's Jack and Jill collection was perfect for this layout.  I love the aviation themed parts of this collection.  I created this layout primarily from scraps left over from previous layouts.

  • A 2" strip of the B side of Travel pattern and 1 1/2" strip of the B side of Plaid pattern span both pages.  
  • I used a single 12" sticker from the Element stickers sheet to create the pop of red across the layout.  With creative placement of elements and a snip of the scissors it goes the distance.  I even had a small section left to add at the bottom of the layout for balance.
  • A journal card with the same print as the Planes pattern incorporated the diagrams of various aircraft in two places. 
  • A 6" x 6" square of the Planes pattern spans the bottom of the layout.   This paper is a favorite and I wanted more of it to show through. 
  • A small squares and rectangles of the B side of Cars pattern creates a visual triangle.
  • A few more elements from the Element Sticker sheet highlight the Dad and Son photo and balance on the opposite side with the compass.
  • The alpha stickers from the set are used for the title and sub-title.
  • Tangerine Quickutz is used to die cut the year for the title and add a bit more red for visual interest.
I really like how this layout came together and preserves an amazing memory for my husband.   Thanks for stopping by and visit again soon!

Friday, June 7, 2019

Hello!

I recently played along with a challenge that required using scraps from the layout I had just completed.  This is the companion to the Cousins layout posted yesterday.  It also occurred  the next day in our return trip from Wisconsin.


I used the Fancy Pants Design collection My Family and featured the cut apart cards as journaling elements and embellishments.  I also used the backside of the previous layout as the cardstock base, so the blue-grey still matches perfectly!

  • 1/8" strips are trimmed to frame the layout.  
  • The striped strip is trimmed to 3/4" and then punched with Fiskars scallop punch taking care to line up the holes and scallops. 
  • The focal photo is matted with patterned paper trimmed to 4 1/2" x 6". 
  • The title is Echo Park's Hello sentiment die punched twice to provide a bit of depth.  
  • The layout is adhered together with the paper mitered at the corners to create a clean lines.   
  • The journaling is completed with a Zig Writer in Steel Grey.
Thanks for checking in here at Finding Snippets of Time to Craft.  Recently it really has felt like I've only had snippets to sit in my newly re-organized craft room.  Do leave a comment, I appreciate knowing that this may have inspired you to do some of your own crafting.


Thursday, June 6, 2019

Cousins

I have a few layouts I have completed recently, and now finally have time to blog and share with you.  This layout features photos from the summer of 2010.  Interestingly enough the paper collection is also from 2010, My Family by Fancy Pants Design!


Since I created two of these double page layouts, I used my paper carefully!
  • The background is Coredinations Distress Collection in the perfect blue-grey color.
  • Patterned papers are trimmed to 3/4", 1 1/4", and 2 1/2" by 12". 
  • The focal photo is matted with 5" x 7" patterned paper.  
  • Various embellishments are trimmed from the card part of the collection.
  • One side is of the one of the patterns is graph paper, perfect for the journal block and the title!
  • All of the edges are distressed with the Edge Distressor tool by Heidi Swapp.  Believe me I had a lot of paper crumbs all over my desk!
  • The title is Quickutz's Diesel font.  
  • The journaling is completed with a Zig Writer in Steel Grey.
Thanks for stopping by, your comments are always appreciated!  Come by again tomorrow to see a "companion" page of sorts that uses the same collection.

Thursday, September 20, 2018

Quick Quotes Mini album from Club Q kits

Hello Quick Quote friends!  Neva here to share a mini album created from September's Club Q kits.  I used all the parts of the Ultimate Combo Club Q to fashion the twelve pages of this 6" x 6" album.  Recently I scrapped a few photos from this event, my parent's Sixtieth Anniversary Celebration.  My mother's wish for the weekend was to take many family photos and individual photos that showed each family member's personality.  With a little perseverance we granted her wish . . . the first round of photos were not of good quality as settings on her camera had been adjusted from auto to manual.  But we believe round two of photos turned out even better!


Three sheets from the page kits were used to create the pages, one sheet of Main Street 101 and two sheets of Main Street 102.  The remaining sheets from the page kits and Altered kit were used to mat the photos.  Accents from Main Street 103 were cut from the scraps from the Altered Frame kit.  Design Team members were sent Main Street Quotes and Phrases 600 which is used throughout the album including the opening title.


To guide you through the process I used to plan and create this mini album I will share a few insider tips.
  • I start with a paper planning grid to determine the sequence and placement of photos.  You will notice I added an extra page as I had most of the planning done and wanted to change the order of the photos.
  • Photos are printed in three sizes:  4" x 6" and trimmed down to varying sizes, 3" x 4", and 2" x 3".
  • Each of the three sheets are trimmed to four 6" x 6" base pages, for a total of twelve.
  • Each 6"x 6" page is laid next to it's companion and the photo mats and embellishments are selected.  
  • I made an effort to vary the embellishments from the two page kits, the Chipboard Die Cuts, and the Quotes and Phrases, throughout the album.  The similarity between the two page kits made this easy, but added a nice variety to each layout.
  • Some companion page backgrounds match, others are complementary.  Complementary layouts feature the background on one side and photo mats on the opposite that match.
  • All the elements for each page set are put in envelopes to finalize the design, as a few embellishments were moved around in the mini album before final assembly.  
  • The journaling strips were created in a Word document and printed in brown then are inked in Mocha Mama Powder Puff Chalking Ink.  Not all are included for publication to protect privacy.
  • Ribbons were tied into bows and added to the pages that needed that last little embellishment. 

Front Cover:
  • Photo is trimmed to 3 1/4" x 5", and backed with 102 white dots that is 1/4" larger all around for a frame of 3 3/4" x 5 1/2".  All of the larger photos have this mat sizing.
  • The mat is inked with Powder Puff Chalking Ink in Bermuda.
  • The 101 grunge side page is inked in Powder Puff Chalking Ink Mocha Mama as is the "Bless this family" sentiment.  What a great sentiment from the Main Street Quotes and Pharses 600! 
  • The photo and sentiment are adhered at slight angles to allow both to fit the page with a bit of overlap.
Pages 2 and 3
  • These pages feature my parents and my siblings and uses teal 101 for the left and grunge quarter 102 for the right.  The mats are the 102 for the left and 101 for the right to tie the pages together.
  • The accents are used directly from the page kit, along with a bow made from the ribbon from the Small Altered kit.

  • A hidden a flap lifts to reveal a fun photo and story.  We had a great time recreating a photo that we gave my parents in 1981 when frizzy perms were a thing for men.  My niece crouched behind my brother so her curly hair would give him the illusion of his hair back then.  We obviously could not keep a straight face!
  • Barn Board Powder Puff Chalking Ink is used to ink the elements of these pages.
  • With care, one ink color can be used on one side of the page and a different color on the opposite side.

 Pages 4 and 5
  • Both sides use dotted 102 for the page and 102 teal side for the mats.
  • The accents are used directly from a page kit, as is the gingham bow.
  • The large circle is trimmed asymmetrically to add interest and tie the two pages together.  I also like to think of the symbolism of our wedding rings!
  • Bermuda Powder Puff Chalking Ink is used to ink the elements of these pages.

Pages 6 and 7
  • This layout shares a bit of my parent's personality!  It features 102 quarter grunge side.  
  • The smaller photos are 2" x 3" and the mats are 2 3/8" x 3 3/8".  
  • The smaller mats are more proportional to the smaller photos by framing the photo with 3/16" on each edge.   
  • The red mats are trimmed from the scraps of the Altered Frame kit as Main Street 103 is featured as an accent in September's Club Q.   The teal mats are 101.
  • Mocha Mama Powder Puff Chalking Ink is used to ink the elements of these pages.

Pages 8 and 9
  • There are some really great sentiments in the Main Street Chipboard die cuts that are perfect for layouts about families.  This one is fantastic to represent the younger generation of our family!
  • Both Mocha Mama and Bermuda Powder Puff Chalking Ink are used to ink the elements.
  • Pages are 102 dotted and 101 grunge for the mats.  

Pages 10 and 11
  • My family is featured in these pages, so the journal strips are included.  
  • The background is 102 grunge quarter and the mats are 101 teal.
  • Mocha Mama Powder Puff Chalking Ink is used to ink the elements.

Pages 12 and 13
  • Personality photos for my family on 102 dotted pages. 
  • The frames area 101 grunge and a scrap of 103 red for the large photo.
  • The banners are trimmed from Main Street Quotes and Phrases and have holes pierced through the corners.
  • Twine is threaded through the banners before the are adhered.  
  • Both Mocha Mama and Bermuda Powder Puff Chalking Ink are used to ink the elements.


Pages 14 and 15
  • These pages feature my brother's family.  
  • Opposing backgrounds and mats are used in this layout.  The quarter grunge of 102 and the teal side of 101. 
  •  Mocha Mama Powder Puff Chalking Ink is used to ink the elements.
  •  I really like how the patterns of the papers show up in the Chipboard Die Cuts!  All three embellishments have the dotted side of 102.

Pages 16 and 17
  • More photos of my brother's family.  
  • Grunge 101 is used for the background.  The mats are a mix of 102 quarter grunge and 103 red.
  • I almost forgot to use the great little chipboard banners from the page kits, they finally show up here!  They are inked in Bermuda Powder Puff Chalking Ink.
  • Black and red twine are threaded through the buttons before they are adhered.  I enjoy adding these little touches to bump up the effect of buttons!
  • The mats and Chipboard Die Cut are inked in Mocha Mama Powder Puff Chalking Ink,

Pages 18 and 19
  • These pages feature my sister's family.
  • These pages are complementary with 101 teal and 102 quarter grunge.

  • Another hidden flap hides the photo of my sister's family and their plus one, my niece's (now) fiance.  :)
  • Chipboard Die Cuts are the embellishments.
  •  Bermuda Powder Puff Chalking Ink is used to ink the elements.

Pages 20 and 21
  • More photos of my sister's family.
  • True story about the sentiments selected.  My niece moved to a remote town in Alaska with a population of less than 1,500 people to take her first teaching job . . . and she met her now fiance!  The school district is pleased as they will have a music teacher who stays longer than a year.
  • The pages are dotted 102, with mats of teal 101 and red 103.
  • Both Mocha Mama and Bermuda Powder Puff Chalking Ink are used to ink the elements. 

Pages 22 and 23
  • We have a tradition of taking group photos of birth order.  We did it at my Grandparent's 50th Anniversary 30 years ago, and it was fun to take these in August!
  • Quarter grunge 102 and teal 101 are the background, with complementary mats.
  • I used up the last few bits of the pages kits for embellishments, love it when you get to the end of a project and have very little left! 
  • Another great sentiment from Main Street 600 Quotes and Phrases.  
  • Mocha Mama Powder Puff Chalking Ink is used to ink the elements.

Back Cover
  • Grunge 101 with the title from a page kit.
  • Mocha Mama Powder Puff Chalking Ink is used to ink the elements.
Final assembly
  • I used a Bind-It All tool to punch the holes and bind the mini album together.  A similar tool can be used to bind the album.
  • Alternately, the holes can be punch through each page and binder rings can be used to finish the album.
  •  Because the pages are smaller and are not placed in page protectors, I choose to adhere the Chipboard Die Cuts with additional glue dots to insure they would stay put!
Making mini albums is a passion of mine, and I am thankful that the elements of the Ultimate Club Q Kit worked so well together to create a cohesive but fun mini album.  Thinking outside the of the kit can be really fun and a satisfying crafting experience.


Here is my version of the Large Altered Kit, I always really enjoy making a Quick Quote Canvas!  They always turn out so beautifully!  I used a different Main Street Chipboard Die Cut, and punched holes to insert the brads.  Shhhhh, this will be a gift for my parents!

Quick Quotes Products
Club Q Ultimate Combo Kit
Main Street Quotes and Phrases 600--coming soon
Powder Puff Chalking Ink in Mocha Mama, Bermuda, Barn Board

Other Products
Twine from my stash
Bind-it-All tool and wire by Zutter
Spice and Ocean by Zig Writer
Bakers twine from my stash


Thanks for stopping by today!  Neva

Tuesday, May 8, 2018

Mother's Day featuring Whistlin' Dixie by Quick Quotes


Hello, Neva here to share a layout showcasing a favorite photo from a few years ago. The colors of the photo lead me to use a selection of Whistlin' Dixie papers from the great paper collection by Quick Quotes.


The background of 103 has an elegant vintage feel so I decided to incorporate embellishments to reflect the look.
o   A large die cut from 106 provides an area for the title and journaling.
o   The edges are inked with Powder Puff Chalking in Kokomo.
o   Lace is added to one side of the die cut.
o   The title is die cut from coordinating red cardstock. 
o   The journaling is added after the layout is adhered together.
o   The photo is matted with the reverse side of 106 also edged in Kokomo.


I selected two sayings from 500 and die cut the circle and rounded the corners of the rectangle.  Both of these are adhered by thin foam adhesive to add a bit of dimension.  


The finishing touches are small bows and adhesive pearl embellishments added to complete a visual interest triangle.

The coordinating papers of a collection make it easy to put together a cohesive layout in a short time period.  This single page layout took about 30 minutes but is very elegant due to the wonderful background.

Quick Quotes

Other

Grand Labels Four by Spellbinders

Classic Circles Large by Spellbinders

Corner Rounder

Brown/Cream Lace Scrap Pack by The Paper Studio

Adhesive Faux Pearls by Recollections

Ribbon by Offray

Thanks for stopping by and I hope this layout has inspired you to consider how Quick Quotes patterns easily create quick and stunning layouts for your scrapbooks!

Neva

Thursday, March 29, 2018

14th Birthday Layout


Yes, another birthday for my son . . . I’m a bit behind and am currently on a birthday scrapbooking roll!  This layout is inspired by the sketch over at Scrap the Boys.  It has been fun to see his growth over the years, and these photos show a true 14 year-old!


Cosmo Cricket’s Halfway Café Flagstaff is a great base for this layout.  I trimmed the tag from behind the star to incorporate the b-side of the paper.  The star and bottom section are Core-dinations Kraft Core cardstock.  The sanding brings out the Kraft nicely don’t you agree?  The bottom strip is pressure embossed with Darice Assorted Stars embossing folder that is 12” x 2 ¼”.  The tag hole cover is die cut from the Kraft side scrap and a Quickutz die.  The stars are red cardstock die cut with Spellbinders stars which is a staple for scrapbooking for boys!  Searching through my stash I found Idea-ology’s Grunge Board Harlequin Digits and Punctuation, just perfect!  To cover the gray grunge board I experimented a bit to get the color just right . . . .  Versa Magic Cloud White, Wheat, and Sahara Sand created the color match.  Memnto Luxe in Rhubarb Stalk and Northern Pine are used to edge a few elements as well.  The bit of thread is We R Memory Keepers Sew Easy from the red collection.  The tiny folder tab is Quickutz and Zig pen in red.  Raffia from my stash adds the circle element of the sketch, and wahoo another layout finished!

I would like to enter the following Challenge:

Thursday, February 8, 2018

Love Challenge for Quick Quotes


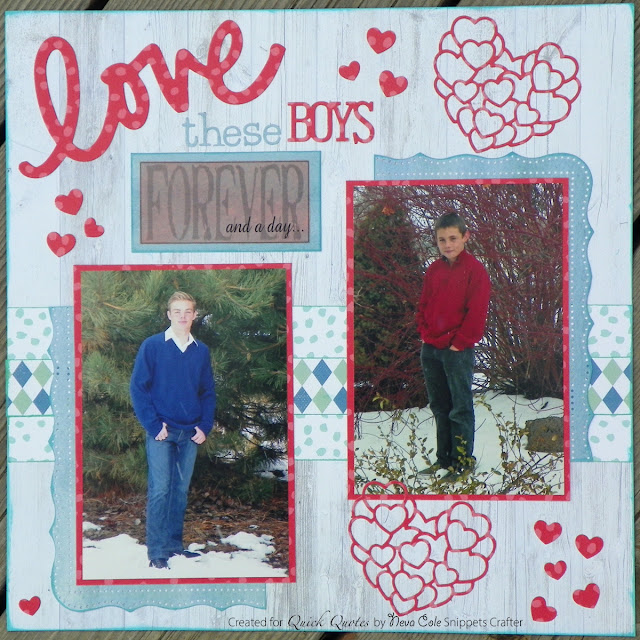
Quick Quotes has a very seasonal challenge for you, the theme is Love, perfect for February!  Neva, here to share my take on the challenge.  I had some fantastic photos from last year’s Christmas photo shot that I wanted to scrap, my two boys.  The lighting was perfect, we had a little snow on the ground, and for a change the boys were cooperative!   


I love the B side of many of the papers Quick Quotes manufactures, and Spring Showers is no exception.  I started with Spring Showers 102, as the white-washed wood background was a perfect base for the photos.  To add a splash of color I used Spring Showers 104 to create mats and die cut the accents.  The B side of Spring Showers 100 is a calm blue and is used to create shaped mats for the photos with a border and corner punch set.  The final accent is Spring Showers 103, using both sides to create a patterned strip across the page. 


A few details from the layout, first here is the behind the scenes look at my matted photos.  Because I like to use many layers of paper on my layouts my albums tend to get really heavy.  To avoid extra weight, I trim away parts behind the photos that don’t show, and as a bonus I have pretty paper to create die cuts, companion pages, journal cards, or greeting cards at a later date.


Forever and a day, K75 vellum strip provided part of the title.  I carefully trimmed the section and inked the back with Tropical Punch before backing it with a trimmed section of Spring Showers 100.


A close up the background strip and the shaped mat for the photos shows how Burmuda and Key Largo PowderPuff Chalking inks adds just a little bit of extra dimension to the layout.


The pattern in Spring Showers 104 is so subtle in the heart die cut.  I also edged the entire page in Burmuda. 

I am very pleased with the final look of the layout.  The photos are highlighted with just the right combination of colors from the Spring Showers collection.

Quick Quotes Products
Spring Showers (Coming Soon)
PowderPuff Chalking Inks:  Bermuda, Key Largo, and Tropical Punch

Other Products

Heart die from Impression Obsession DIL056-J

Love die from Momenta

Boys Rule die from Echo Park

CK Typist font from Quickutz

Cherish corner and border punch from Martha Stewart

Thank for stopping by the blog today, it is a joy to share with you a page about loving my boys!  

Neva


Wednesday, May 31, 2017

Guest Detective for CSI: Color, Stories, Inspiration Case #231


The Imagine Artists in Residence have joined forces with CSI: Color, Stories, Inspiration to create a few inspired layouts. 

I went back in time and found some photos of my son in one of his favorite costumes from the Halloween season.  In all honesty these costumes were worn many times after the holiday for many great play times.  These photos are from school on Halloween, the day when all the little girls were princesses and the super heroes were saving them during recess . . . that will be the other side for this layout when I have the time!  

 
I choose to work the the following prompts in the Evidence:  Stripes, bow, and stars.  Captain America is a big one for stars!  I started by punching the Royal Blue cardstock with EK Success border punch before adhering it to the Primary Red cardstock.  The red is die cut with Spellbinder's Cascading Stars, and several sizes of Standard Circles Large and Small to create embellishments.  The Royal Blue cardstock is also die cut into a circle to complete the Captain's shield.  Momenta's Cut & Emboss Stars is used to embellish the center of the shield with Canson Silver paper.  Another layer of silver paper is used in the shield.  The star embellishment is layered stars along with the craft thread tied in a bow. 

The star background strips are made with Buttery Yellow cardstock pressure embossed with Darice's 12" x 2" Assorted Stars embossing folder.  The surface is then inked with Memento Danube Blue.  Turquoise is embossed with The Paper Studio's Small Stars embossing folder, the surface is inked with Memento Lady Bug. 

Since I didn't have any striped paper on hand that was coordinated with the color scheme I decided to stamp my own.  Memento Danube Blue and Lady Bug along with Versa Magic Sea Breeze are stamped on the buttery yellow cardstock with stamps from the TPC Studio Dots & Stripes set.  

The Testimony was quick and easy!  The title is stamped in Memento Lady Bug on the Turquoise cardstock with Scrappy Cat's Playful Serie.  The Buttery Yellow cardstock is cut into strips and journaling is done in Memento Dual Tip Marker in Danube Blue.  The journaling is written with exclamations and with inspired words of Super, Awesome, and Wow. 

Do stop by CSI: Color, Stories, Inspiration and check out the layouts with a Super Hero theme.  Today is Superman's birthday after all!

Imagine:
Memento and Memento Dual Tip Markers--Danube Blue and Lady Bug
Versa Magic Sea Breeze

Other:
Spellbinders--Standard Circles Large & Small, Cascading Stars
Momenta--Cut & Emboss Stars
TPC Studio Dots & Stripes
EK Success--Star border punch
Scrappy Cat--Playful Serie alpha stamp set
The Paper Studio--Small Stars embossing folder
Darice--Assorted Stars embossing folder 12" x 2"
Craft Thread--Royal Blue
Cardstock assorted--Buttery Yellow, Primary Red, Turquoise, Royal Blue

Monday, February 20, 2017

Family Love in Pink

The color challenge for the month of February at Imagine was to use Rose Pink, this is my interpretation of the challenge.  Check out the tutorial over on the Imagine Blog today!


One snowy afternoon in December we had an amazing family photo shoot, the lighting was perfect with just a hint of snow flashing through our photos.  (A little patience and lots of shots with a tripod and delay shutter can get yield a Christmas card worthy image.)  I was really pleased with this photo and wanted to highlight it for our color challenge this month at Imagine.  Changing the image to black and white really makes the light pink accent color pop. The subtle color of Creative Medium in Iridescent Pink behind the photo helps tie the layout together as well as creating a shimmery color for black die cuts.  A little texture complemented the design by pressure embossing and staining a strip of Vertigo. Memento Angel Pink glossy die cut accents add the finishing details.

This project is now proudly hanging in my home for all to enjoy!  

Imagine

Other
Black and white Cardstock
Sizzix Hearts and Dots A2 Embossing Folder
Teresa Collins Happy Stencil
Dream Weaver Embossing Paste Spreader
Spellbinders Labels Twenty-Five
Technique Tuesday Home Is Stamp Set
Lifestyle Crafts Heart Dies
Momenta Love Die
Taylored Expressions Gratitude Die
Becky Higgins Rolling Date Stamp
Heat Gun
Die cut machine

Wednesday, May 6, 2015

Best Friend


In among the outdoor chores of the weekend I did manage to get one layout done on iNSD!   I am also working on a couple of other projects, which will be posted in the near future.  With the nice weather and immediacy of needing to get the irrigation up and running to water the fields so the steer will have something to eat in a few weeks required my attention on Saturday.  So glad that the pump and irrigation folks are working overtime this time of year!  Plus the poults (young turkeys), chicks, ducklings needed to be moved to the outdoor chicken pen . . . yes, just snippets of time to get some crafting in this weekend.  Fast forward another few days and still working on irrigation issues, working a sub job, and working on stuff for the business.  Finally have time to write a blog post! 

Found this nice little sketch (which I tweaked to use for two photos) from Stick It Down.


These photos are taken just two days after my son came home from Russia, and depicts the close bond he had already developed with our two German Shepherds.  (Gotta love his hair cut, short all over with bangs in front, very popular in Russia at the time even with the adults!)  


I used papers and scraps from the Die Cuts With a View Pet Stack.  The bones and hearts die cut is by KI Memories.  It is the reverse side with a bit of creative sniping to shape the die cut to following the diagonal shape in the sketch.  The front side is a brown (see this post and layout), and the reverse is white.  To help it match the color scheme of the papers I inked it up with a bit of Colorbox Dune.  
Spellbinders Lacey Circles die cut the scalloped circle.  From the Queen and Company Dog themed Chip board a set I have had for years and qualifies as NBUS (never before used schtuff) I found my title, Best Friend plus the cute heart.  A bit of Ranger Sunset Orange on the heart and Pantone Tria (alcohol inks available before Ranger's) in Teal (320Ti) were used to color the chipboard.  The paw print die cuts are from my stash.  

The journaling stripes are white card stock that has been inked with Colorbox Dune and the edges are inked with Colorbox Terra Cotta.  The journaling is done in Zig Ocean.  I think it all matches and ties the layout together!  The vellum quote is from Flair Designs and fits the theme of layout very well.

Glad I got at least one layout done on iNSD!  

This layout is entered in the following challenges:

The Paper Girls Challenge  #79 Cute Critters

Challenge Winner at:
Bimini Moose Scrapbook Challenges Pet Pages