Tuesday, December 3, 2019

Retro Rubber think Red, White, and Green for Christmas

For our last challenge of the year at Retro Rubber we have the seasonal color theme!  Everyone can use a few handmade Christmas cards, so come join the fun and make a few to enter our challenge.  Our rules are simple 1)  Use a stamp that is at least one year or older and indicate the age of the stamp in your challenge entry 2)  Enter up to ten challenges including ours.


I will admit I did a couple of variations on the theme, and finally decided on this design.


I am a huge angel fan, so many of my Christmas cards feature angels.  It is always fun to use the same stamps or dies and create new versions of a card.
  • Cheery Lynn Designs Lacey Angel is die cut from red cardstock.  I knew I wanted to create a layered card so the angel is adhered to white cardstock and then fussy cut to create a solid white background around the lacey die.  
  • Spellbinders Opulent Ovals is used to die cut the oval layer which is inked with Brilliance Pearlescent Ivy.  
  • The sentiment by Annette Watkins from about 1997 is stamped in Brilliance Pearlescent Ivy on vellum.   The vellum is run through a 2.5 Xyron Sticker Maker first then it is then die cut with Spellbinders Resplendent Rectangles.    
  • Sizzix Snow Flower embossing folder is used to emboss vellum for the background.   
  • The layers are carefully adhered to together, the green oval was adhered to the vellum first with dimensional foam adhesive.  The adhesive was applied behind the oval on the embossed vellum layer and adhered to the A2 card base.  The sentiment vellum sticker is adhered to the oval.  The angel is adhered with dimensional foam adhesive to the vellum embossed layer.
Thanks so much for supporting our Retro Rubber Challenge blog over the years, we are now over 5 years old and still going strong.  Join the fun over at Retro Rubber with your own Christmas card or red, white and green project!

Monday, December 2, 2019

December Stick It Down Double Page

Here we are with the last sketch of the year for Stick It Down.  A great one for all those Christmas photos you undoubtedly have!


Here is my version of the sketch, which I recreated for four double page spreads.  I was able to use a two sheets of Kraft cardstock and three sheets of patterned paper for all four layouts!  I am really pleased with the embellishments I stamped to match.


Tuesday, November 19, 2019

Masculine Birthday Card with a fun twist for Retro Rubber

We will have a birthday boy in our house today and I used this Tic Tac Toe board  from our Retro Rubber Challenge as inspiration to create a card for the occasion.


I choose the vertical column of "mode of transport/die cut/masculine" and had some fun!


My son is a plane aficionado and I have several to choose from to create his card.
  • The background uses Memento Sky Blue and Danube Blue inks.  Two stencil edges, Deja View C-Thru Ruler, and Fairytale Creations #3001 Chalk Talk help define the cloud edges.  I used an ink blusher to apply the inks.   
  • Using scraps I die cut the plane with Carta Bella Vintage Airplane die set.  A standard whole punch with trimmed to create a helmet, well because the plane is flying and needed a pilot!  Both the helmet and the prop are colored with Galaxy Marker in Mercury Silver.  These really do work well on dark colored cardstock.
  • The sentiment is from the Technique Tuesday's Chickadees 2.0 set from 2017 and is stamped in Memento Danube Blue.  The paper strip is hand trimmed into a banner.  a small section of silver twine is used to connect the airplane to the banner.
  • At this point I still had space on the card and decided to add a bit more.  Technique Tuesday's Say It Hugs from 2013 is used to create the sentiment stamped in Memento Danube Blue directly on the background and die cut the "Hugs".
  • Everything is adhered to an A7 size card base.  
Enjoy all the cards created by the design team over at Retro Rubber.  Please join us and play along with the Tic Tac Toe Board.  We have a few simple rules 1)  Use at leasst one stamp that is older than a year and tell us how old the stamp is in your post 2) Enter up to ten challenges, including ours!  Hope to see you in our gallery soon.  

Tuesday, November 5, 2019

Thinking of You for Retro Rubber Anything Goes

At Retro Rubber we always enjoy seeing all the wonderful creations for Anything Goes, so now is the time to show us your best using a stamp that is at least one year or older!


I had a need to make a sympathy card this winter.  Butterflies symbolize hope and joy during hard times, so I looked up on the trusty interwebs to see what butterflies might be around with snow on the ground.  I found a few and based my color scheme on the Monarch butterfly.


I am a butterfly aficionado, and do have a few stamps and dies to choose from!
  • The butterfly image is Layering Butterflies and Cutting Dies from Hot Off the Press 2017.  It is stamped in Versafine Habenaro, Vintage Sepia, Delicata Dark Brown Shimmer, and Brilliance Coffee Bean.  
  • The embossed background is Snow Flurries by Darice pressure embossed on white cardstock.
  • I used the die to create a mask and placed it on the background then stamped the antennae in Delicata Dark Brown Shimmer.
  • The butterfly is shaped and adhered to the card front with glue dots under the body and dimensional foam adhesive under the wings.
  • The edges of the card base are inked in Vintage Sepia before the card front is adhered.
  • The sentiment is die cut from white cardstock using the Sentiments Four set by Spellbinders.  Then it is inked with Versafine Habenaro.  I used a liquid glue to adhere it to the front of the card.
Thanks so much for stopping by!  Please do come and play along with us and create your own Anything Goes project, we would love to see it over at Retro Rubber Challenge Blog!  Please remember to use a stamp older than a year and tell us how long it has been around.  We also ask that you enter only up to ten challenges including ours.  Have a wonderful day!

Monday, November 4, 2019

November Stick It Down Double Page Sketch

Normally I like to use the sketch within the season, but I just happened to have the exact number of photos already printed for this layout that fit this month's Stick It Down sketch perfectly!  So a summer themed boy layout it is!


My photos aren't the exact size, and I moved them around just a bit, but I do love the gears as embellishments!


I had purchased specific patterned paper to complete this layout and the sketch was helpful in stretching the paper over two duplicate layouts, one for each boy's album.
  • Two sheets of American Crafts Bicycles were trimmed in the direction that matched the layout.
  • Core'dinations Light Aqua Plaid was trimmed for the layouts.
  • Craft Smart Embossed Cardstock was a perfect color match and one sheet was trimmed for the layouts.    
  • Using Sizzix Tim Holtz Alterations Gadget Gears and Spellbinders Donna Salazar Sprightly Sprckets I die cut a variety of gears for embellishements.  I used the Craft Smart Embossed Cardstock, a sheet of coordinating light aqua cardstock from my stash, and DCWV Metallic Silver cardstock to create the gears.  
  • Since the background was white I used the light aqua cardstock from my stash and stamped Recollections Grunge Alphabet with Memento Luxe Teal Zeal to create the title.  My Brother Scan N Cut made quick work of electronically die cutting the letters.  
  • I added the journaling underneath the title, as there was a fun story to go with these photos.  The man who was the biggest "master mechanic" did so just for fun, Dad got in on the action a little too, but Kurt just enjoyed teaching a 10-year-old how to fix a flat!
This layout was a bit time consuming to complete, but once done I am really pleased with the results.  Do give this sketch a try, or one of the other sketches over at Stick It Down.  Thanks for stopping by Snippets of Time to Craft!  

Friday, October 25, 2019

Fremont Street Experience

When in Las Vegas, taking in the craziness that is Fremont Street Experience is part of the fun.  I had read about Fremont Street Experience and wanted to see the lighted dome . . . little did I know this was not the only aspect of Fremont Street that people went to see!  I was advised by a local to wear shoes . . . as it is usually crowded and dirty, and to be prepared to see all kinds of characters!


We went right as the light shows started, but it was not as crowded or crazy.  We got the tame version, which was fine by me and my husband.  We saw many other street performers, a few that were not suitable for my scrapbook pages.  Notice the blue circles on the street, those are scheduled assigned spots where the performers can stand.

I used purple cardstock as a base to match the purple in the printed Old Antique Words by Scrapbook Customs for ScrapbooksRUs.  Two different colors of grey cardstock are used to complement the colors.  I trimmed 1 1/4" strips and die cut the edges with Spellbinders Classic Bracket.  Not much of the strip shows from behind the photos on the right side, but I wanted more of the printed paper to show.  Sizzix Thinlits by Jen Long Just a Note font is used to die cut both titles.

With so many photos I decided to keep the embellishments to a minimum.  I am pleased with the outcome of the layout.

Thanks so much for stopping by and sharing your thoughts here at Snippets of Time to Craft!  Have a blessed day!

Thursday, October 24, 2019

Around Las Vegas

Two more pages, not actually companion pages, but they will reside side by side in the album.  If we had more time we would have hiked in Red Rock Canyon, but as it was we just drove by, so two scenic shots.  There will be another layout about the craziness that is Fremont Street, but our photos at the iconic Las Vegas landmark were perfect for the next layout.


The background papers are Old Antique by Scrapbook Customs for ScrapbooksRUs.  By the way if you have not had the opportunity to shop at Scrapbook Customs I would highly recommend their products.  I have a stash of custom papers that I will use for scrapbooking my kids high school graduations.  They also have many awesome custom sport papers.  You will notice the the color of the title influences the overall color of the paper.  Both sides have the photos double matted.  Red Rock has a journal block, and the mats on the Fremont St. trimmed a bit larger to include room for journaling at the bottom.  

Thanks for stopping by and checking in with Snippets of Time to Craft!  As always your comments are appreciated!

Wednesday, October 23, 2019

Las Vegas Sights!

My husband and I recently traveled to Las Vegas for my Kodiak High School All Class Reunion.  We are not gamblers or drinkers, but we did enjoy seeing the sights and eating great food!  One of our stops was to a BRICK AND MORTAR local scrapbook store, ScrapbooksRUs.  I was able to find great papers to scrapbook our trip.  They are all custom papers by Scrapbook Customs that ScrapbooksRUs carries in the store.  The owner knew immediately we were from out of town and greeted us by saying "Where are you visiting from?".  The give away?  My spouse was with me as we came in the store.  Thank you dear husband for going to the scrapbook store with me!


I had too many photos to fit on a double page layout, but not enough to create another page or two.  So lift up the flap and see six more photos!


There were lots of colors in the Vegas Sights print, so I choose from those to complement the photos.  The Vegas Sights is two sided, and the B side is featured as the strips along the A side.  The yellow cardstock behind the Las Vegas Strip die cut is fussy cut to trim it down (literally) in size.

Thanks so much for stopping by and taking a look!  Have a wonderful day!

Tuesday, October 22, 2019

Retro Rubber Sketchy time!

You are going to love all the versions that the Design Team has created for the sketch over at Retro Rubber!  I know that my card came together really quickly once I decided the theme.  Do come and play along with our challenge and remember we have two simple rules.  1)  Please use a stamp that is older than a year and indicate the age of the stamp 2)  Enter up to ten challenges including ours.


As I thought through my initial concept I zeroed in on a pine cone die and embossing folder I had in my stash.  Fortunately one of my earliest purchases was a pine bough from American Art Stamps back in May of 1997.  It is fun to use it again in a mixed texture project.


  • I stamped the pine boughs in Versa Color Tea Leaves on cream cardstock and fussy cut the images.  (My Scan N Cut is buried by plants right now . . . we are painting the interior of our home and all the house plants ended up on my desk in the craft room!)
  • Brown cardstock is die cut with Elizabeth Craft Designs Stitched Circles and Spellbinders Standard Circles Small is die cut from cream cardstock. 
  • Happy accident!  The brown cardstock that I used to die cut the circle was from my scrap bag and was the perfect size for the front of an A-2 card.  I just happened to die cut the circle from about the center without thinking and I could still use the rest of the piece for the front of the card!  This cardstock was pressure embossed with Elizabeth Craft Designs Pine Cone embossing folder, then the surface is lightly sanded to bring out the embossing.
  • The pine cones are die cut from red-brown cardstock and rolled into shape.  
  • The remainder of the red-brown cardstock is trimmed to make the banner shape behind the circles.  
  • With all the texture in the background I decided it was best to use a die cut sentiment, so a Stamps of Life Die set, Framelites Drop-Ins 660143 had the right size of Happy Birthday.  With a little creative trimming I had a great little sentiment.  
  • All the layered are adhered together a a bit of twine is tied in a bow at the top of the pine boughs.
I think that this fall themed birthday card is perfect for a man in my life, as my husband's birthday is right around the corner!  Thanks for stopping by, it is a pleasure to read your comments!  

Tuesday, October 15, 2019

Back to School 8th Grade

Another year for Back to School for my youngest.  His last as a middle schooler.  I managed to get photos with his brother and with us, his parents.  A big plus was the photo of him at the back of the bus with his friends.


I started with a sketch challenge over at 2peasrefugees and choose complementary colors to my son's shirt and My Minds Eye Academy collection.
  • I am surprised that I have used so much yellow cardstock in my recent scrapbooking and this layout really called for yellow to match the big yellow school bus!
  • A large circle is cut from Darice Dark Blue Plaid and backed with a dark blue cardstock from my stash.  I have found the best tool for large circles in my Creative Memories XXXXX.
  • A stripe of Bus paper and red School Phrases paper go across the bottom of both sides of the layout.   
  • Each of the photos are backed with blue cardstock.  
  • I stamped the embellishment images from The Paper Company Studio with StazOn Black Tuxedo and water colored each with Memento inks in Rhubarb Stack, Paris Dusk, Dandelion, London Fog, and Peanut Brittle.  I colored a little of each from the Memento Dual Tip Pen on my craft mat and added a spritz of Ink Potion #9.  All the images are die cut with my Brother Scan N Cut.  YEAH, no more fussy cutting!
  • I purchased two files from the Silhouette online store to create the title and subtitle.  The yellow is trimmed from behind the circle mats, and the shadow red is from my stash.  
Thanks so much for visiting my blog, your comments are appreciated! 

Monday, October 14, 2019

Bicycles

One of my favorite paper companies right now is Echo Park.  They have such delightful collections, and they can be mixed with other collections easily like I have in this layout.


I primarily used That's My Boy by Lori Whitlock for Echo Park and added in another sheet from Jack and Jill, also by Lori Whitlock for Echo Park. 
  • I wanted to use the journal card with a bicycle, so I incorporated the matching pattern from the collection on the right side.
  • Photos are backed with one paper that is represented by a vertical strip on the opposing page. My Boy and You Rock are used both A and B sides.  
  • The Jack and Jill Bicycles was perfect for this layout and I had one sheet.  I made duplicate layouts for both boys so it was stretched between 4 pages. 
  • I didn't want the bicycle sticker to float, so it is grounded by the small section of Boy Stripes.
  • That's My Boy Element Stickers and Alpha Stickers are used to finish the embellishments, title and subtitle.   
Another fun memory scrapbooked and in the album!  Thanks for stopping by Snippet of Time the Craft, and as always your comments are appreciate!

Sunday, October 13, 2019

Back to School 2010

Although we are in October, in a way it's still back to school time!  This layout is from 2010, when my older son dropped off his supplies for fifth grade.  He was in a blended fourth/fifth grade and had the same teacher for both years. It made for an easier transition into US schools.


I used bits and pieces I had left over from previous layouts from Appleton collection by Scenic Route.  I also play along with a sketch challenge over at 2peasrefugees, a just for fun forum about scrapbooking.
  • The background paper is White Lined Paper (yes, really that is the name!) also by Scenic Route.  
  • I wanted to bring out the primary colors in the paper so I used Memento Dandelion ink to color the Technique Tuesday Tile Fundamental Superstars.
  • Appleton Chipboard embellishments are added.
  • The circles are die cut with Spellbinders Circles Small.
  • A bit of the background paper was trimmed underneath the elements and used as journal strips.  The journaling is done in Zig Writer Blue Jay.
  • The title is from the Scan N Cut library, and was perfect to finish off this fun layout from a few years back!
As always know that I appreciate your visit to my blog, please leave a comment if you are so inclined!  

Saturday, October 12, 2019

Styling

It is not often that I am able to used purple on a boys layout, but withe the purple drapes the boys wore during their professional haircuts was a perfect opportunity to use a favorite collection by Basic Grey from 2008, Euphoria. 


Euphoria was a collection I like so much I bought EVERYTHING!  Many elements show up on this page. 
  • Spellbinders Labels Four Grand is used to die cut bracket shapes used in the background.
  • Several papers from the collection are used in this layout: Elation, Frenzy, Trance, and Delirium.  This layout was completed in duplicate, so I was careful with the use of my papers.
  • Sticker letters, Chip Stickers, and Buttons from the collection are used to complete the layout embellishments.
  • I can never leave button holes empty, so white craft thread is used to tie up the buttons.
  • All the edges are inked in Versa Magic Eggplant.  It helps to delineate and add depth to the page.  
  • Journaling is completed in Zig Writer Orchid.  
Thanks for checking out this fun layout that documents one of the few times my boys had professional haircuts.  Have a wonderful weekend!

Friday, October 11, 2019

Aviation Museum

The first summer our boys were home from Russia we took a road trip to Oshkosh, Wisconsin for the annual EAA Airventure convention.  We've been many times since, but this layout hold particular joy as my young son was so enthralled with all the interactive exhibits related to aircraft and piloting.  You can just see his amazement in the photos.  


The bright orange in his shirt was great to match the All About a Boy collection by Lori Whitlock for Echo Park
  • Matching Blue cardstock is used for the base layer.
  • Super hero is trimmed to 9 1/2" x 12", split to 5" on the left and 7" on the right.  The corners are rounded.   
  • Games is trimmed to 7" x 7" on the left, and 5" x 7" on the right.  
  • Curious is trimmed to 1 1/2" x 7"on the left and 1 1/2" x 5" on the right and layered below Games.  
  • Various embellishments are selected from the collection Sticker Elements, Alpha Stickers, and Chipboard Accents and added to complete the layout.  
  • Journaling on the journal card is completed in Zig Writer Blue.  
Sometimes using one collection really simplifies putting together a great layout, and Echo Park collections are great for this purpose.  Both A and B sides are all coordinated and the patterns repeat in the embellishments. 

Thanks so much for stopping by and know that your comments are appreciated!

Thursday, October 10, 2019

Lava Cast Forest

Now that life is not so busy (well not really) I do have time to share a few layouts that I've worked on over the summer!

This layout was photo heavy so I kept the paper selections and embellishments simple to highlight the fun photos of the kids in the lava tubes.
  • The base is Kraft card stock with sections of ancient Provo Craft Paper Slab patterned papers layered along the edges. 
  • Bazzill Bacis Just the Edge Cardstock Strips are layered over the top.
  • Several sentiments from the Jillibean Soup by Hampton Art's set Enjoy are stamped in VersaFine Vintage Sepia.  Enjoy is die cut with the matching die, and the remainder I cut into embellishment strips.   The edges are inked with Vintage Sepia.  Echo Park Jungle Safari Enamel Drops are added to the ends of the embellishments. 
  • The journaling fills the two empty spots and is done in Zig Writer Chocolate.
  • The title is die cut from matching green and cream cardstock with Quick Kutz Frankie Classic. 
Thanks so much for stopping by!  I hope you enjoy this memory from almost 9 years ago.  It holds a special place in my heart as my dear friend has graduated to heaven, and I am thankful that I can document this time that she spent with our family. 

Tuesday, October 8, 2019

Monochromatic Birthday for Retro Rubber

I really enjoy seeing the projects that are created from the Tic Tac Toe challenges at Retro Rubber.  Our Design Team and entries are always so creative!  Check out this month's Tic Tac Toe:


I choose the bottom row: Die cut or punch, monochrome, and birthday.  We have a few fall birthday's so this was perfect to make another fall themed birthday card.


  • I inked up Darice's Birthday Collage embossing folder with Kaleidacolor Cappuccino Delight and pressure embossed white cardstock.  The white embossing turned out to detract from the other design elements so I inked it with Memento Tangelo to keep the card more monochromatic.  
  • Happy Balloons Stamp and Die Set by Concord & 9th is a great set to use for many occasions.  It was released in September 2017.
  • The large balloon is stamped in Kaleidacolor Cappuccino Delight and die cut with the matching die.  
  • The balloon frame, banners, and string are all die cut from white cardstock.
  • The get perfect placement on the sentiments, I placed the die cut banners back into the cardstock and secured them from the back with painters tape.  Using a stamp positioner I stamped the sentiments in the darkest shade from Kaleidacolor Cappuccino Delight.  The banners have pre-embossed fold lines that make it easy to create the folded dimension.
  • The balloon layers are secured together with Zig Glue and a bit of coordinating baker's twine is tied in a bow around the base of the balloon.  
  • The layers of the card are adhered together and the balloon is mounted with dimensional foam adhesive.  
Thanks for stopping by and please check out the rest of Retro Rubber's Design Team creations.  We have a few simple rules to play along with our challenge:  1)  Use at least one stamp that is older than a year  2) Play along with our challenge and only nine others.

Have a wonderful fall!

Monday, October 7, 2019

Carving Pumpkins for Stick It Down

Stick It Down has a really fun sketch for the double page layout this month!  (We also have sketches for the single page as well as a card so check it out!)

It has a decidedly fall theme that can be switched out for your favorite season or theme.  I had some photos from last fall to scrap, so I went with the pumpkins and Halloween theme.


Searching through my stash I found a great collection by Imaginisce, Hallowhimsy Collection that was perfect for putting together this layout.
  • The background is part of the collection with the subtle spider webs.
  • Both sides of several sheets are used to create the coordinating tags to match the tag from my stash.  A 1/2" circle punch and the Cropidile is used to create the reinforcement holes.    The edges are inked with Delicata Black Shimmer to add definition.  
  • My new Brother Scan N Cut came in handy with all the pre-loaded Halloween images.  I used all of them in smaller sizes to create the die cuts. 
  • For the title I down loaded Silhouette's "Carving Pumpkins" file.  To help is stand out a bit more I outlined it in Black Zig writer.   
  • To add the border I used Paper Studio Pumpkins washi tape.  
  • The dotted tag needed a little sprucing up so I added Happy Halloween washi tape on a diagonal.  
I had a lot of fun creating this layout with the sketch this month.  It is a great way to incorporate several themed papers together, or to use up scraps from a collection.  Thanks so much for stopping by and come play along with us at Stick It Down this month!

Tuesday, September 24, 2019

Retro Rubber Anything Goes and Happy Halloween!

We have everyone's favorite challenge for the next two weeks at Retro Rubber . . . anything goes!


Since it is close to Halloween, I decided to go with that theme for this fun card!


I have some really fun Heidi Grace Designs Stamps from about ten years ago, with two different sized spiders.  They actually had 8 legs which is the correct number of spiders . . . as a Biology teacher I keep track of such things!
  • To create the spider web I mixed Creative Medium by Tsukineko together with Brilliance Graphite Black inker and used The Crafters Workshop Spiderweb stencil on white cardstock.  
  • White cardstock is die cut with Spellbinders Labels 2.  The sentiment and little spider are stamped in Versa Fine Crimson Red and heat embossed with with clear embossing powder.  Want to Scrap Nestabilitities has several embellishments that match the shapes of Spellbinders dies, and I happened to have black bling for Labels 2.
  • The larger spider is also stamped in Versa Fine Crimson Red and heat embossed with clear embossing powder.  The eyes on both of the spiders are colored in with Memento Dual Tip marker in Cantaloupe.  The spider is fussy cut and adhered to the center of the spider web.
  • The background is inked with a Sponge Dauber and Versa Fine Crimson Red.  
I think this is a really fun card that will be great to send out Halloween greetings!  Do check out the rest of the Design Teams projects over at Retro Rubber and give the Anything Goes theme a try!  Our rules are simple, 1) Use at least one stamp that is over a year old and 2) Enter up to ten challenges including ours!

Thanks for stopping by!

Tuesday, September 10, 2019

Fall Colors for Retro Rubber

The nights are a little cooler, the days are shorter, and a few of our trees are changing to their fall colors, so it must be time to create a card with a fall color theme!  Join us at Retro Rubber for a little fall fun!  Remember our very simple rules 1)  Use at least one stamp that is one year or older and tell us how long it has been around and 2)  Enter up to ten challenges including ours! 


I acquired a Ginkgo embossing folder last fall and really wanted to use it for this card . . . I also have a stamp from about 1998 or 1999 from Stamp Out Art that I bought at a stamp convention in Portland.  Time to use them both together!  I have a small fascination with Ginkgo trees.  There were several on my college campus and my botany professor taught us that they are living fossils, the only species left in their Division.  They also have male trees and female trees, not both genders on one tree.  Your little botany lesson for the day!


I also played along with the card sketch from Stick It Down.  I am on their design team for double page layouts, which is the post below that went live on September 9th.

  • I had a scrap of paper that was spritzed with several Fireworks! colors that I used for the background strip.  Fireworks! in Lady Bug, Tangelo, Dandelion, and Rich Cocoa give it a shimmery multi-hued look.  
  • Elizabeth Craft Designs Ginkgo embossing folder is used to pressure emboss, then Versa Fine in Vintage Sepia is rubbed over the surface to bring out the embossing.  
  • Three Ginkgo leaves are stamped on another section of the scrap with Vintage Sepia, then fussy cut.
  • The happy Birthday sentiment is from Ms. Sparkle & Co from March of 2017.  Sometimes you can find great stamps from the bargain bin at Joanns!  It is stamped in Vintage Sepia. 
  • The sentiment is die cut with my Brother Scan N Cut.  My new machine is used in almost every project now, so I think it was a good investment!
  • A bit of mesh from my stash is layered under the Ginkgo embossed strip and also held down with dimensional foam adhesive that anchors the sentiment and leaves to the card.  
Thanks for stopping by, and do join the fun at Retro Rubber for the next two weeks with your fall color inspired projects!
(I did mention I have a thing for Ginkgo trees!)


Monday, September 9, 2019

Stand Up Paddleboarding for Stick It Down

The summer just sped by and here we are starting fall!  I wanted to celebrate summer a little longer so my September layout for Stick It Down features photos from our camping trip at Dillon Reservoir in Colorado.


Dillon Reservoir is the highest in the US at 9017 feet, hence part of the title.  It has several campgrounds, but may be better known for Summit County  and home to several ski resorts.  This layout is to celebrate the new sport I took up this year, and paddling on Dillon was one of the highlights of the summer.  

  
  • I wanted to keep the focus on the photos so I keep the design true to the sketch but clean and simple.
  • FYI, all the photos except the one of me were taken through my dry bag!  
  • The background is a blue cardstock from a Michaels blue combo pack.  Perfect color to match the color the sky!
  • I went shopping around on Etsy for SVG cut files to match the scenery.  The mountains are from thesvgearth Mountain SVG Bundle.  The Trees are from MandarinSVG Forest SVG, and the SUP are from SmilingWild SUP silhouette SVG.
  • Each file is cut on my Brother Scan N Cut after being sized to fit the layout.  Each color of cardstock is from my stash.
  • The Mountains and Trees are shaded with Square Pastels.
  • The papers are all Provo Craft from their ancient stabs bought at Michaels more than 15 years ago, except the evergreen trees.  It was in my stash and has no label. 
  • I got out my trusty Quickutz from the tall but slender Abigail font for the main title.  The dates are a mix of Olivia and Stiletto (for the slash and dash).  
  • Since I had so much to say I really wanted to type my journaling . . . MSW didn't do the trick so a quick tutorial on Youtube and PSE came in really handy!
Do check out the rest of  the Stick it Down Double Page Layouts and the fun sketches for single page and cards too!

Thanks for stopping by and enjoy the fall!

Tuesday, August 27, 2019

Congratulations Mr. & Mrs. for Retro Rubber

We recently were honored to go to a family destination wedding to Catalina Island.  What a wonderful place to enjoy family, the sights, and a very memorable wedding!  This sketch for Retro Rubber came in really handy to put together a quick but elegant card.


I went for clean and simple and incorporated the elements of the sketch


  • I have a collection of papers that are very retro, easily more than 15 years old that were purchased a Costco.  The card base is 5" x 6 1/2" and each of the layers are 1/2" smaller in dismension.
  • The sentiments are from Feb 2017 Cardmaking and Papercraft, Sincere Sentiments by SC Design.  This set has been a mainstay for elegant cards.
  • The sentiments are stamped in Delicata Silvery Shimmer then embossed with Creations Unlimited Embossing Powder in 24K Sterling.  The embossing powder is silver with gold glitter which is not only really sparkly but also pulls together the gold and silver accents in the layers.
  • The champagne glasses are a die cut from Elizabeth Craft Designs Wedding Charms 1188.  The charm loop was trimmed away and the glasses are heat embossed with matching ink and embossing powder.
  • The layers are adhered together to finish the card.
Please do join along with us at Retro Rubber.  We would love to see your creations using this great sketch.  We have two simple rules 1) Use at least one stamp older than a year and tell us how long you have had it in your stach 2) Enter up to ten (10) challenges including ours.

Thanks for stopping by today!  Have a wonderful crafty day!

Tuesday, August 13, 2019

Anything Goes for Retro Rubber

Always a favorite challenge at Retro Rubber is Anything Goes!  We have a few simple rules: 1) Use at least one stamp older than a year 2) enter up to ten challenges including Retro Rubber. 


A few months (well more than a year ago now!) I made several cards using Technique Tuesday's Wild Rose from 2016.  Two others have been featured here on the blog and now the last of the set.  I used the same stamp set for the purpose of showing one stamp used in three different ways.  The first can be found here and the second here


For this card I used a water color technique and stamping the same image as the background layers.
  • Two sections of water color paper are die cut with Elizabeth Craft Designs Stitched Rectangles.  
  • The smaller section is stamped using a stamp positioner with the Wild Rose image using Memento Morocco ink pad and Dual Tip marker for the flower section.  It is spritzed with water to allow the ink to migrate on the paper.
  • The leaves are stamped using the same method and Memento Pistachio.
  • The panel is dried with a head gun then over stamped to create a crisp image over the top.
  • The next layer is stamped with just the flower portion and spritzed to allow the ink to migrate.
  • The Kraft cardstock base is stamped with just the leave portion of the image.
  • The sentiment (from the same set) is stamped in Memento Morocco.
  • The layers are adhered together with dimensional foam adhesive.  
Altogether this is a quick card to put together and is a lot of fun to create.  Please do share your own Anything Goes creation with us at Retro Rubber!  Thanks so much for stopping by! 

Monday, August 5, 2019

5th Birthday for Stick It Down Double Page Reveal

This is a great sketch that can be easily manipulated to add a few more photos.  Head on over the Stick It Down and check out the rest of the Design Team's layouts! SID also has single page and card sketches to play along with every month.


I had more photos than what the sketch called for, so I sized them down and put together the layout.


  • I choose Echo Park Paper Company's Happy Birthday Boy Collection to highlight all the bright colors in my photos.
  • Both sides of Age is Just a number is trimmed for the numbers and orange sections.
  • Birthday Hats is also used along with the Element Stickers.
  • I found some aqua colored cardstock in my stash that was a perfect match to the color scheme to use as the background for the layout.
  • The "5th" is a very old sticker font by Pebbles.
  • I had a rather long story to tell so the journaling is done on the computer.
Thanks for stopping by and do enter in and join the fun at Stick It Down!

Tuesday, July 30, 2019

Retro Rubber Tic Tac Toe creates a Thank You Card

I think Tic Tac Toe challenges are so much fun over at Retro Rubber because of the huge variety of projects that can fit the theme!  Do check out the Design Team's cards, they are amazing!


I used the diagonal that includes enamel dots/gems, texture, and heat embossing. 


Sometimes when I am at a loss for inspiration I look through my stash of test projects to help me kick start my mojo.  This is just one of those times!
  • The background is white cardstock that is spritzed with Fireworks! in Rhubarb Stalk.  It was in the stash, so it was already dry.
  • It is pressure embossed with Tide by Lifestyle Crafts.
  • The surface is sanded to take off most of the Fireworks! spray.  In a few place you can tell the spray soaked all the way through the paper.
  • The sentiment is by Taylored Expressions from their In and Out Thanks collection released in October 2014.  It is stamped in Memento Luxe Rhubarb Stalk and heat embossed with iridescent clear embossing powder.  I used my Scan N Cut to die cut around the outside.
  • The background is mounted to a card base, the sentiment is mounted with dimensional foam adhesive, and the accent gems are added at the ends of the swirls in the pattern.
This card was very quick to put together once I had the initial concept.  I am very pleased with the final outcome!  Do come play along with us at Retro Rubber!  We have a few simple rules 1) use at least one stamp that is at least a year old 2) Enter up to ten challenges including ours.  Thanks for stopping by!

Tuesday, July 16, 2019

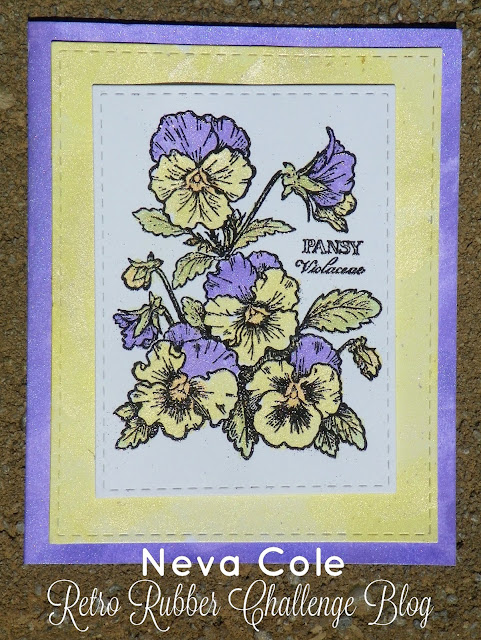
Color Me! Pansies for Retro Rubber

We have a wonderful summer time color challenge for the next two weeks at Retro Rubber.  Use Purple, yellow and green on your card.  What a fun color combination.  We have a few simple rules:  1)  Use at least one stamp that is more than a year old and in need of inky love 2) Enter no more than 10 challenges including ours. 

 
The inspirational photo guided me to the exact image I wanted to use for this challenge.   It is one in my collection that has remained on it's wood block for sentimental reasons.  The Pansy image from PSX 1993. 
  • The image is stamped in Memento Luxe Tuxedo Black and heat embossed in Black Detail Embossing Powder.
  • I tapped a bit of Imagine's Fireworks! on my craft mat and water colored the image.  There is a very pretty shimmer to the images.  I used Dandelion, Tangelo, Grape Jelly, New Sprout, and Bamboo Leaves.
  • The left over was used to color the edges of the mat and the base of the card.  
  • The image and the base layer are both die cut with Stitched Rectangles by Elizabeth Craft Design.  
Easy peasy!  Pansies are a favorite flower of mine because they are a happy flower that will reseed in my Central Oregon Flower beds.  Thanks so much for stopping by and to come join the challenge at Retro Rubber!

Monday, July 8, 2019

Double Page for Stick It Down, Soccer Season in one Layout!

I just loved how quick and easy this layout went together with this fun sketch from Stick It Down!


I am working through some events from a few years back and wanted to get all of one Parks and Rec Soccer Season in one layout.  Many soccer photos are best as landscape, so using three photos that are 3 1/2" x 2" took the place of each portrait photo.


  • I stayed fairly true to the sketch, using 3 3/4" circles around the perimeter.  I used Autumn Leaves (blue check with soccer balls and sayings) and two Stamping Station papers, Soccer Typewriter and Soccer Sayings.  
  • The ball soccer balls are ancient Queen & Co Felt Fusion.  
  • The top border is a ribbon from Bobbin Ribbon. 
  • I have a new toy!  A Brother Scan N Cut SDX 225, which I used to die cut the title.  with a little experimentation I used painters tape to keep the letter spacing and applied liquid glue to the letters to adhere them to the layout.  
  • With so much going on already on the layout, I choose smaller embellishments form a Stick-a-bilities set for Soccer.  The colors were perfect!
Always glad to have another layout completed and memory preserved . . . even it if is from a few years back! Have fun with this sketch and come play along with us at Stick It Down!

Monday, July 1, 2019

Christmas in July Retro Rubber teaming up with Double Trouble

Happy July! Here at Retro Rubber, we are starting off this month with a bang (because it’s July, after all)! We are starting our challenge a day early so that we can team with the Double Trouble Challenge!
 
 
Our theme is Christmas in July so all you have to do for our challenge is to make a Christmas card using at least one stamp older than a year.
 
Here’s the cool part: by teaming with Double Trouble you get to play along with their challenge as well! All you need to do is follow their requirements which are super easy and fun!
  • Thing 1 – Double Trouble: Make a square card, scrapbook page, gift box or use squares on your project.
  • Thing 2 – Double Dare: Use a rubber or acrylic stamp older than one year. (Sweet – that’s us!)
  • Thing 3 – Twisted Sister: If you create a beach scene with Santa you can earn an extra chance to be in Double Trouble’s random draw.
Be sure to visit their website – Double Trouble Challenge – to get all the details for their challenge to make sure that you are following their requirements as well!  So here we go! Double the fun! Double the Trouble!
 
 
For my Christmas in July card I went with silver, white and a bit of pastel.  I am not a big Santa fan, so didn't have anything to play along with Thing 3.  
 
  • I started by stamping the Angel by DeNami Designs from 1998.  She is one of my origanal Angel stamps.  The image in stamped in Delicata Silvery Shimmer on white cardstock and heat embossed with Stampendous Sterling Silver Embossing Powder.
  • The image is colored with Decorating Chalks and gently blended to give just a hint of color.
  • The sentiment is another really old stamp, one from 1992 by Annette Watkins.  It is also stamped in Delicata Silvery Shimmer on white cardstock and heat embossed with Stampendous Sterling Silver Embossing Powder.
  • Both sections are edged in Delicata Black Shimmer to help them pop off the background.
  • I have a fun new toy . . . the Brother Scan N Cut SDX 225, the background is one of the designs that comes loaded on the machine.  I sized it to 5.25" x 5.25" to fit the front of my square card base and die cut Canson Silver Cardstock.  
  • The 5.5" x 5.5"  card base is also edged in Delicata Black Shimmer,
  • After I adhered the die cut I added the Angel image and the sentiment with dimensional foam tape.  
 I am very pleased with this quick and simple card, and may make a few more for the Christmas Season!  Please do come play along with us at Retro Rubber Blog Challenge and Double Trouble.  Thanks for stopping by! 

Tuesday, June 18, 2019

Birthday Greetings for Anything Goes at Retro Rubber Challenge

Everyone's favorite challenge, Anything Goes!  Come join the fun at Retro Rubber and enter your project for the challenge.  Remember to use at least one stamp that is older than a year and share how long it has been around.  We also ask that you only enter up to ten challenges including ours.


I used a few inky techniques to create the monochromatic birthday card.


  • For the background I inked white cardstock directly with Memento Lulu Lavender then pressure embossed it with Darice's Damask embossing folder.  The raised portions were then inked with Memento Sweet Plum.  I used painter's tape to mask the center portion and inked the outside edges with Memento Grape Jelly.
  • I trimmed strips of cardstock (inked with Lulu Lavender) and then pressure embossed with Cuttlebug's James Embossing Folder set Stripes.  The raised portions were inked with Memento Luxe Grape Jelly  (pigment vs dye of the regular Memento ink) and heat embossed with clear embossing powder.  Ribbons are typically shiny so I wanted to have that effect for this card.
  • Altenew's Bells and Bows is color layered stamped on white cardstock with Memento Lulu Lavender, Sweet Plum, and Elderberry.  To get the shiny effect the entire bow is inked with VersaMark and heat embossed with clear embossing powder.
  • I die cut Spellbinder's Opulent Ovals from white cardstock and then inked the center section with Memento Lulu Lavender.  The sentiment by Taylor's Expressions: In and Out Birthday is stamped in Memento Luxe Grape Jelly and heat embossed with clear embossing powder.  The edges are inked with Memento Luxe Grape Jelly.  
  • The layers are adhered together with the bow and greeting raised with dimensional foam adhesive.  
I hope you enjoyed the monochromatic card!  Create your own Anything Goes project and join us at Retro Rubber!

Sunday, June 16, 2019

Congrats Bridal Shower Card

It is a busy month for our family this year.  Besides Father's Day and three June birthdays we also have a wedding and a college graduation.  This is the card I made for my niece's bridal shower.  She is a music teacher, so I incorporated that a little bit into the design. 


With a few embossing folders and dies this card came together very quickly using the Mojo Monday sketch from Poetic Artistry.
  • The card base is 5" x 6 1/2".
  • A section of Bazzill Bling in purple is pressure embossed with Sizzix 3-D Confetti Hearts.
  • Silver glitter paper is pressure embossed with Spellbinder Music.
  • Another section of Bazzill Bling is die cut with Elizabeth Craft Design Stitched Circles.
  • Heartfelt Creations Timeless Amour hearts die cuts two hearts to top the circle.
  • Ribbon from my stash is tied into a double bow before being adhered to the front of the card to finish the sketch.
I was inspired by the following challenges:


Until next time . . . thanks for stopping by!