Showing posts with label Taylored Expressions. Show all posts

Tuesday, January 17, 2023

A Winter themed Birthday Card

We are back for another year of playing with our Retro Stamps over at Retro Rubber Challenge Blog.   Do come and check out the fun cards the design team created for this theme. 


I have a nephew with a January birthday, so this was a perfect opportunity to make a masculine card with a stamp set intended for Christmas by Taylored Expressions named Simply Stamped Pine Cones released in October 2015.

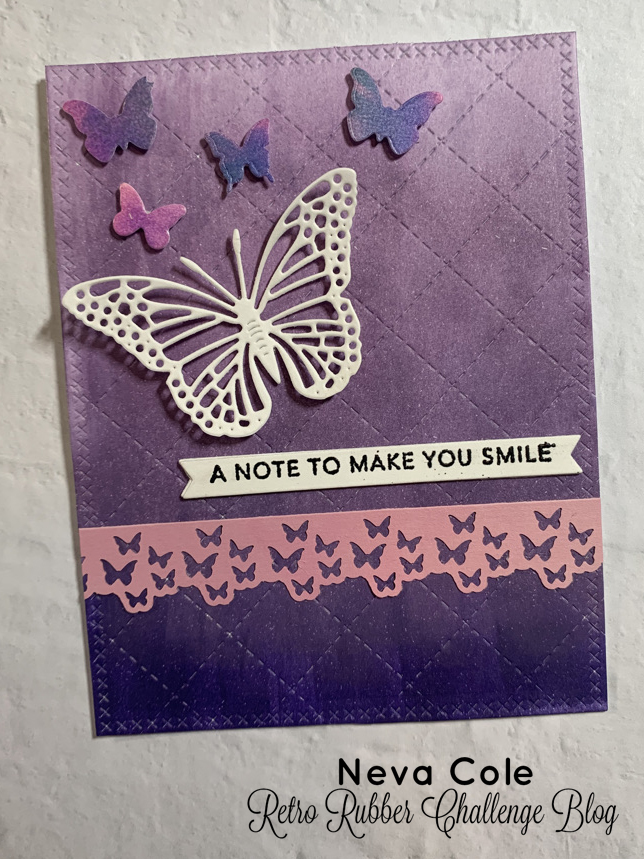
  • The front of an A-2 card is pressured embossed with Darice's Snowflake Background embossing folder to add a bit of texture and interest to the base card.
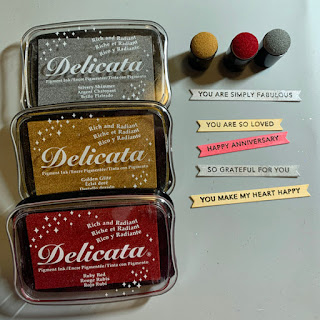
  • The pine cones are a three layer stamp set with matching dies.  I stamped them in Versa Magic Wheat, Sahara Sand, and Jumbo Java. 
  • Lawn Fawn Large Cross Stitch die is used to create a card front.  Versa Magic in Sahara Sand is used to color the background, and Versa Magic is used to inked the edges.
  • The bough is stamped in Versa Magic Jumbo Java, and the pine needles are Stamped in Tea Leaves.
  • The sentiment is Taylored Expressions as well, their original Simple Strips released in April 2019.   It is stamped in VersaFine Nocturne and heat bossed with clear embossing powder.  A matching die cuts the entire set out at one time.  It is lightly sponged with Versa Magic in Wheat.
  • The layers are adhered together using dimensional foam tape behind the card front and the center pine cone.  The sentiment is adhered directly to the card front panel.

This card was fun to put together once my creative mojo started flowing.  I hope you find your time to create a winter themed card and share with us over at Retro Rubber Challenge Blog.

CHALLENGE GUIDELINES

  • We require stamps older than one year.  If we feel you are using newer stamps, you may be disqualified from the challenge without notification.
  • New papers/dies are OK – but you must use at least one stamp older than a year and describe the age in your blog post.
  • Please note that all challenges require the use of at least one stamp older than a year.
  • Post your new creation to your blog or online gallery.   Use keyword RRCB197.  No backlinking. 
  • Link back to the blog using the Linky Tools by the due date. 
  • Enter as many times as you like. 
  • Feel free to combine our challenge with a maximum of 10 challenges.  Entries linked to more than 10 challenges will be disqualified without notification.
  • If your project is posted on a private group site such as Split Coast Stampers or a photo sharing site not all DT members may be able to comment.   Thank you for understanding.
  • Turn off Word Verification.  We love to comment but word verification can make that difficult.

Thanks so much for stopping by!  Have a wonderful 2023!


Tuesday, November 22, 2022

Tic Tac Toe Challenge for Retro Rubber

It has definitely moved from fall to winter in my part of the country in a hurry!   One day is was fall (Oct. 31st) and the very next day we had snow on the ground heralding in the winter!  But I put my fall thinking cap on to play with this fun Tic Tac Toe Challenge from Retro Rubber. 


I choose the top line to make a CAS card in about 15 minutes!

  • To start I die cut the Taylored Expressions Flourishing Frame Cutting plate from tangerine cardstock.  I believe it was a freebie from 2021 Black Friday's sale!
  • I used the center block from the die cut and adhered it with temporary adhesive.  Using an ink blusher I inked the edges in memento Luxe Morocco.  I tried to make it darker at the edges blending to a lighter color toward the center.
  • The die cut is adhered with a new to me adhesive, Sticky Specks that I purchased at the Hillsboro, OR CKC.  It was super sticky, and helps keep all the little leaves in place.
  • The sentiment is from Recollections Many Thanks, 2019.  It is stamped in Memento Luxe and heat Embossed in clear embossing powder to make it pop on the white background.  By stamping it slightly off center it left room for the final embellishment.
  • A scrap of dotted yellow ribbon is tied in a bow and adhered with a glue dot.
 Easy peasy; Orange, die cut, and ribbon!  Please do join us at Retro Rubber, but first go check out the lovely makes of the design team!

CHALLENGE GUIDELINES
  • We require stamps older than one year.  If we feel you are using newer stamps, you may be disqualified from the challenge without notification.
  • New papers/dies are OK – but you must use at least one stamp older than a year and describe the age in your blog post.
  • Please note that all challenges require the use of at least one stamp older than a year.
  • Post your new creation to your blog or online gallery.   Use keyword RRCB195.  No backlinking. 
  • Link back to the blog using the Linky Tools by the due date. 
  • Enter as many times as you like. 
  • Feel free to combine our challenge with a maximum of 10 challenges.  Entries linked to more than 10 challenges will be disqualified without notification.
  • If your project is posted on a private group site such as Split Coast Stampers or a photo sharing site not all DT members may be able to comment.   Thank you for understanding.
  • Turn off Word Verification.  We love to comment but word verification can make that difficult.

Tuesday, November 8, 2022

Ombre Just a Note to Make you Smile

 For the next two weeks the challenge at Retro Rubber Challenge Blog is to use the Ombre effect.  Blend inks, find an ombre patterned paper, have some fun!  Check out how the Design Team interpreted this challenge!  As you can see by the graphic, you may go in any color direction you wish!

 I went with one of my favorite colors, purples to create my card.  I actually used snippets left over from other projects to pull this card together once I had the background completed.


  • Using a Imagine Ink Blusher I added color to one edge of white cardstock (4 1/4" x 5 1/2") and dragged the color into the rest of the card.  The first ink I used was Versa Fine Clair Fantasia.  
  • To lighten up the ombre effect I switched to Memento Luxe Sweet Plum to finish the background.  A little Ink Potion #9 helped blend the colors.
  • The add interest the card front panel was die cut with the Concord & 9th Quilted Card front die and the Lawn Fawn Stitched Rectangle Stackables.  
  • Taylored Expressions Background (Original) Simple Strips Sentiment was stamped in Versa Fine Clair Nocturne and heat embossed with clear embossing powder, then die cut with the matching die.  The first set of Simple Strips was released in April of 2019.  It is mounted on two more die cuts to add a bit of dimension.
  • One of the snippets from my stash with a pink strip that had been border punched with the Tonic Butterfly border punch.  It glued to the card front and trimmed at the edges.  
  • A butterfly is cut from white cardstock using Cheery Lynn Design Exotic Butterfly, and adhered with a rolled up glue dot under just the body of the butterfly.
  • Impression Obession Butterflies die is used to cut another scrap that had very similar colors to the purple and are adhered with 1/8" dimensional foam adhesive.  These also happened to be in my snippets stash.

Please do come play along with our challenge at  Retro Rubber Challenge Blog.  We would love to see your projects!

CHALLENGE GUIDELINES

  • We require stamps older than one year.  If we feel you are using newer stamps, you may be disqualified from the challenge without notification.
  • New papers/dies are OK – but you must use at least one stamp older than a year and describe the age in your blog post.
  • Please note that all challenges require the use of at least one stamp older than a year.
  • Post your new creation to your blog or online gallery.   Use keyword RRCB194.  No backlinking. 
  • Link back to the blog using the Linky Tools by the due date. 
  • Enter as many times as you like. 
  • Feel free to combine our challenge with a maximum of 10 challenges.  Entries linked to more than 10 challenges will be disqualified without notification.
  • If your project is posted on a private group site such as Split Coast Stampers or a photo sharing site not all DT members may be able to comment.   Thank you for understanding.
  • Turn off Word Verification.  We love to comment but word verification can make that difficult.

Thanks for stopping by, your comments are always appreciated!

Friday, March 18, 2022

Pastel Easter Card Made Easy with Kaleidacolor


See how to use the Kaleidacolor ink pad to create a pastel Easter Card with subtle style that can be completed in a short amount of time.  Layering with contrasting cardstock and texture added with embossing folders gives this card great dimension. 

Skill:  Beginner

Time: 30 minutes

Directions:

 
Step 1

Trim white cardstock to 8.5" x 5.5" to make card base.  Fold in half and use a rubber brayer to ink the front of the card with Kaleidacolor in Baby Powder.  Move the brayer to fully cover the card and re-ink brayer as needed to create a well inked surface.  Pay attention to direction of ink pad and brayer to avoid mixing the ink colors beyond the ombre look.

Step 2

Trace the outside of a cross die on craft cardstock to create a matching layering piece.  Fussy cut the layer three time or use a electronic die cut machine to cut three layers.  Glue the layers together with OnPoint Glue.  Using a wet glue allows a little time to wiggle the layers into perfect position. 


 Step 3

Place die on white cardstock and die cut and pressure emboss with rubber mat.  Use a make-up sponge rolled to pick up ink in the same ombre of the Kaleidacolor ink pad and ink through the die onto the raised embossed areas.  Die cut two more layers and glue the colored die cut to the top of the first two white layers.  


Step 4

Ink the raised portion of the embossing folder with Kaleidacolor Baby Powder in the same color direction as the card base.  Pressure emboss a 3.75" x 5" section of white cardstock.  The ink will transfer to the indentations of the design.


 Step 5

Trim a section of Kraft cardstock to 4" x 5.25".  Layer the assembled parts of the card without adhering them together to determine the placement of the sentiment.  I choose the appropriate size circle die to die cut the corner of the pressure embossed white cardstock.


Step 6

Using the next size smaller circle die and pressure embossed white cardstock to determine placement of the smaller circle die on the Kraft cardstock and die cut. 


Step 7

Determine placement of sentiment and remove the layers.


Step 8

Stamp the sentiment in Delicata Sapphire Blue.

Step 9

Adhere the layers of the card together.  The Kraft cardstock layer is adhered with dimensional foam adhesive.  All the other layers used Tear It! Tape for best adhesion.

Art Supplies

Imagine

  • Kaleidacolor--Baby Powder
  • Delicata Sapphire Blue
  • OnPoint Glue
  • Tear It! Tape

Other

  • Brayer
  • Spellbinders Crosses Two, Standard Circles Large and Small
  • Darice Crosses Embossing Folder
  • Scan n Cut
  • Taylored Expressions Inside Scoop Easter Blessings
  • Dimensional Foam Adhesive
  • Make-up sponge

Thursday, January 27, 2022

New Techniques to add Texture for a Handsome Anniversary Card


Today’s tutorial will demonstrate how to create multi layers of texture for a dramatic Anniversary Card.  StazOn, Delicata, and Mboss will add amazing levels of metallic shimmer.

Skill:  Advanced

Time:  60 minutes

Directions:


Step 1


Trim white piece of sturdy cardstock to 4 1/8” x 5 3/8”.  I used the backing of a paper pack, that had one shiny white side.  First, I pressure embossed with Sizzix 3-D Textured Impressions Doodle Triangles.  A makeup sponge was used to spread StazOn Metallic inks from re-inkers in Platinum, Silver and Gold randomly around the surface of the card front.  StazOn dries on the sponge and makes it a one-time use tool. StazOn Jet Black ink is gently tapped over the raised portions of the card panel.  Set aside to dry or heat with a heat gun.


Step 2


Using a stamp from my stash (manufacturer unknown) small hearts were stamped randomly in VersaMark ink and heat embossed in Mboss in Valentine.


Step 3


Memento Luxe in Tuxedo Black is used to stamp Taylored Expressions Simple Strips Background sentiments followed by heat embossing with black embossing powder.  The matching die is used to die cut the entire set and five sentiments are selected for the front of the card.

Step 4


Each sentiment strip is inked with Delicata in Silvery Shimmer, Golden Glitz or Ruby Red with an ink dauber.  Since the sentiment is embossed, the ink will not change the color.


Step 5


The sentiment strips are backed with white cardstock with the matching backer die.  The edges are inked with Memento Tuxedo Black and an ink blusher to add definition.


Step 6


A Scribble Heart die by Impression Obsession is die cut from white cardstock.  The die is then inked with Versa Mark ink and heat embossed with Mboss in Valentine.


Step 7


A white card base is trimmed to 5 ½” x 8 ½”.  The edges are inked with Memento Tuxedo Black and an ink blusher.


Step 8


The card base is adhered to textured front with TearIt! Tape.  The Heart is adhered with OnPoint Glue.  The sentiment strips are adhered with dimension foam tape.  A striking masculine anniversary card goal achieved!


Art Supplies


Imagine

·      StazOn Re-inkers—Platinum, Silver, Gold

·      StazOn Jet Black ink pad

·      VersaMark ink pad

·      Mboss—Valentine

·      Memento Luxe—Tuxedo Black

·      Embossing Powder--Black

·      Delicata—Silvery Shimmer, Golden Glitz, Ruby Red

·      Memento Tuxedo Black

·      Ink Blusher

·      Ink Dauber

·      Tear It! Tape

·      OnPoint Glue


Other

·      Sizzix 3-D Textured Impressions Doodle Triangles

·      Make up sponge

·      Background heart stamp (manufacturer unknown)

·      Taylored Expressions Simple Strips Background Sentiments, Die, and Backer Die

·      Impression Obsession Scribble Heart die

·      Dimensional foam adhesive

·      Black and White cardstock