Showing posts with label Fibers. Show all posts

Tuesday, August 26, 2025

Books books books! at Retro Rubber

If you are a bibliophile this challenge is for you brought to you by Retro Rubber!  I will admit my stash was a bit scant when it came to images for this challenge.  I did go looking for ideas and came across some lovely images . . . but the spirit of this challenge is to use what you have!  So I resisted the urge to find a retro image elsewhere at went with one I already owned.


I will admit my stash was a bit scant when it came to images for this challenge.  I did go looking for ideas and came across some lovely images . . . but the spirit of this challenge is to use what you have!  So I resisted the urge to find a retro image elsewhere and went with one I already owned from TPC Studio released in 2010.  It was a part of a Back to School Set.  It is an image I have used on scrapbook layouts for back to school.


  •  The background is from a Judi-kins Stamp mounted on wood that has a copy right of 2000 printed on it.  An Excerpt of a story from the Book of Kells is the name of the stamp.  It is stamped in Versa Mark on Kraft cardstock.   My Favorite Things Wonky Stitched Rectangles is used to die cut the image.
  • The Books image is stamped in Versa Magic Jumbo Java and colored with Derwent Watercolor pencils.  The panel is cut with a smaller die from the MFT Wonky Stitched Rectangles.  (As a side note I just found out the MFT has closed!  I will miss this fun company!)  
  • The thank you sentiment is a Studio G image from 2009 stamped in Versa Magic Jumbo Java.  
  • Fiber is tie around the front panel and then adhered with dimensional foam adhesive.  The entire panel is then adhered to the card base.   

We have  ton of fun over at Retro Rubber and would like to see how you play with this theme!   We do have a few guidelines:

  • We require stamps older than one year.  If we feel you are using newer stamps, you may be disqualified from the challenge without notification.
  • New papers/dies are OK – but you must use at least one stamp older than a year and describe the age in your blog post.
  • Please note that all challenges require the use of at least one stamp older than a year.
  • Post your new creation to your blog or online gallery.   Use keyword RRCB259.  No backlinking. 
  • Link back to the blog using the Linky Tools by the due date. 
  • Enter as many times as you like. 
  • Feel free to combine our challenge with a maximum of 5 challenges.  Entries linked to more than 5 challenges will be disqualified without notification.
  • If your project is posted on a private group site such as Split Coast Stampers or a photo sharing site not all DT members may be able to comment.   Thank you for understanding.
  • Turn off Word Verification.  We love to comment but word verification can make that difficult.


Tuesday, April 22, 2025

Challenge time with a Tic Tac Toe

Another two week challenge at Retro Rubber Challenge Blog.  This particular board was my choice, so super fun to play along!


The decision to use as much of the challenge of possible was easy!  I missed stitching and Sequins/gems as the card seemed complete at this point.


  •  The background is pearlized vellum pressure embossed with Darice Basket Weave embossing folder.
  • The stamp is Pink Fresh Painted Peony from March 2021.  It was stamped in Delicata Silver and heat embossed with clear embossing powder.  This was one of the first stamp sets I owned that stencils were available to color the image.  Memento ink in Angel Pink, Rose Bud, Lilac Posies, Dandelion, Cantaloupe, Morocco, New Sprout, and Cottage Ivy.   The set also had a dies to match the stamps.  Very fun!
  • The Sentiment is Altenew Elegant Saying released in 2023 stamped in Delicata Silver and heat embossed to match the stamped focal image.
  • The front of the card was pierced on each edge of the vellum that was mounted to the card base.  The twine from my stash was threaded through and tied in a bow.  

 Your turn!  Play along with us at Retro Rubber and create your own card!   

CHALLENGE GUIDELINES

  • We require stamps older than one year.  If we feel you are using newer stamps, you may be disqualified from the challenge without notification.
  • New papers/dies are OK – but you must use at least one stamp older than a year and describe the age in your blog post.
  • Please note that all challenges require the use of at least one stamp older than a year.
  • Post your new creation to your blog or online gallery.   Use keyword RRCB253.  No backlinking. 
  • Link back to the blog using the Linky Tools by the due date. 
  • Enter as many times as you like. 
  • Feel free to combine our challenge with a maximum of 5 challenges.  Entries linked to more than 5 challenges will be disqualified without notification.
  • If your project is posted on a private group site such as Split Coast Stampers or a photo sharing site not all DT members may be able to comment.   Thank you for understanding.
  • Turn off Word Verification.  We love to comment but word verification can make that difficult.

Thanks for stopping by!  Come again soon. 

Tuesday, October 8, 2024

Birthday wish for a Halloween Witch

 Sometimes you just have to embrace the day you are born, as my sister-in-law does with her October 31st birthday.  It great that I can create a handmade card just for her that celebrates her birthday in witchy style.  The next two weeks at Retro Rubber Challenge Blog we have a fun tic tac toe to play with.

I choose the diecut, ribbon or twine, patterned paper horizontal row.  I started with the patterned paper that already had a lovely oval die cut in the middle!

  • The "witch foot" is stamped in Memento Luxe Black Tuxedo and Heat embossed with black embossing powder.  It is the Hero Arts Stamp and Cut released in 2016.   It is then die cut.
  • Nuvo Crystal Drops in Bright Gold is put on the buckle and a small black pearl is placed in the center.
  • The paper is DCWV Dots, the twine is American Crafts.
  • The card is assembled to determine the sentiments placement.  The orange cardstock is from my stash.  The top sentiment is from the Witch Foot stamp set, the Birthday is from Technique Tuesday.  Both are stamped in Memento Luxe Black Tuxedo and Heat embossed with black embossing powder.

Please do join along and make your own project to use the tic tac toe!

CHALLENGE GUIDELINES

  • We require stamps older than one year.  If we feel you are using newer stamps, you may be disqualified from the challenge without notification.
  • New papers/dies are OK – but you must use at least one stamp older than a year and describe the age in your blog post.
  • Please note that all challenges require the use of at least one stamp older than a year.
  • Post your new creation to your blog or online gallery.   Use keyword RRCB239.  No backlinking. 
  • Link back to the blog using the Linky Tools by the due date. 
  • Enter as many times as you like. 
  • Feel free to combine our challenge with a maximum of 10 challenges.  Entries linked to more than 10 challenges will be disqualified without notification.
  • If your project is posted on a private group site such as Split Coast Stampers or a photo sharing site not all DT members may be able to comment.   Thank you for understanding.
  • Turn off Word Verification.  We love to comment but word verification can make that difficult.

Thursday, December 15, 2022

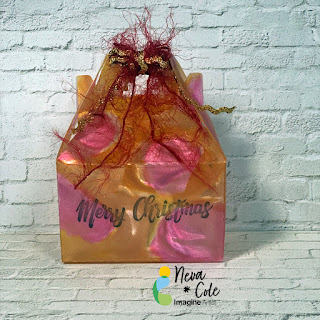
Vertigo Christmas Gift Box with StazOn Inks


Vertigo is a beautiful translucent material to use in creating projects, in today's tutorial there will be tips and hints to make your project shine!  The perfect ink for this box is StazOn,  and is the only ink that will dry on Vertigo and other plastics. 

 Skill:  Intermediate

Time:  1 hours

Step1:

 
Vertigo can be cut with scissors OR with a simple die.  Complex dies do not work well with most plastics, vertigo included.  This particular box needed 8.5" by 5" section of Vertigo, 12" x 12" sheets can be purchased directly from Imagine Crafts website.  Recycled packaging may be substituted for Vertigo, however the results will not have the stunning effect the the patterns that Vertigo provides.   The Pebbles pattern of Vertigo was used for my box.

Step 2:


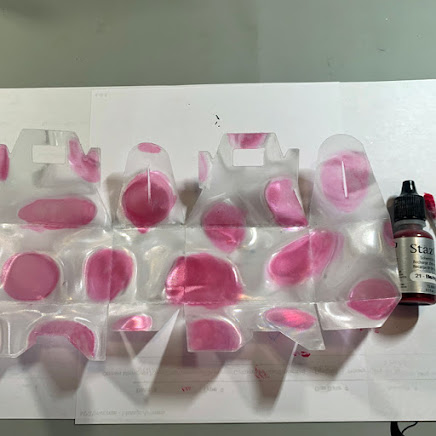
Place a few drops ink from StazOn Blazing Red inker on a plastic surface to use as a palette.  On the INSIDE  of the box use a cotton swab to color each of the pebbles from the center out.  A little goes a long way with the translucent colors. 

Step 3:

 
Metallic StazOn ink is slightly less translucent than the other colors.  To capture more shimmer apply a drop or two of StazOn Metallic Gold on the INSIDE of the box and move the ink with a cotton swab to color around the pebbles.

Step 4:

 
Continue to add StazOn Metallic Gold ink to cover the remaining areas of the inside of the box.  Set aside to dry, as the Metallic ink is a bit thicker and takes a longer to dry. 
 
Step 5:

The sentiment is stamped on the OUTSIDE of the box, keeping the interior of the box ink from lifting and to have the correct orientation.  Merry Christmas is stamped in StazOn Jet Black. 

Step 6:


Tear It! tape is perfect to hold the bottom of this gift box together.  Assemble box and determine the best placement for the Tear It! tape.  Unfold box and add Tear It! tape, my project called for five sections to hold the box in shape.

Remove Tear It! tape liner and assemble gift box.  Decorate with matching ribbon and fibers to close the top and keep your gift secure.

Art Supplies

Imagine:

Vertigo--Pebbles 12" x 12" sheet

StazOn Inkers--Blazing Red and Metallic Gold
 
StazOn Jet Black
 
Tear It! tape
 
Other:

Bakery Gift box die--Lifestyle Crafts

Cotton Swabs 

Sentiment--Christmas Blessings Taylored Expressions

Misc:  Gold Ric Rac and red fibers

Tuesday, August 30, 2022

Tag, you're it! from Retro Rubber

 The challenge at Retro Rubber for the next two weeks is to use a tag on your project.  This leaves a great deal of wiggle room!   Please check out the Design Team's interpretations of this challenge.


  I have a 4" x6" box of miscellaneous tags that were the inspiration of my card.  To fit the longer tag I decided on a slimline card size of 3 1/2 x 8 1/2".  

  •  I choose a stamp from Unity Stamp Company's . . . birthday jubilee set from July of 2013.  It is stamped in Memento Peanut Brittle.  All of the tags are also inked with Peanut Brittle.
  • To add a little interest to the next tag I used the Paper Studio Stars embossing folder, then directly inked the raised stars with Peanut Brittle.
  • The last tag has Burlap Ribbon adhered, a bit of ephemera found in the latest cleanup of my craft desk.  Fits perfectly!
  • I pulled out AC Twine in dark brown, then Darice in neutral and tied bows on each tag.
  • All the layers are adhered together and I have an easy peasy quick masculine birthday card ready to go!
Thanks for stopping by, I hope your summer is going well!  Please do enter you project in the gallery over at Retro Rubber Blog Challenge!  


Tuesday, May 24, 2022

A quick Birthday Card for Anything Goes at Retro Rubber

Time for another Anything Goes! Challenge at Retro Rubber, always a fan favorite.  I decided to make a quick card, not necessary clean, but simple!

My son recently had a birthday, and this challenge was perfect to make a quick card to help him celebrate!  Actually the only stamps used on this card are Stampabilities Vintage Type 96 pc from 2019, as they were the perfect size to fit the balloons which are very retro!

  • The birthday background is created with white cardstock that is pressure embossed with Darice's Birthday Collage embossing folder.
  • A brayer is inked up with ink from the Kaleidacolor Blue Breeze pad and then inked over the raised areas of the card background.  Using a brayer helps avoid getting ink in the "valley" parts of the background.
  • The balloons are die cut from white cardstock using Quickutz balloon dies from about 2000!  I kept the white highlight piece and placed it back in the balloon later on.
  • The numbers are stamped in Memento Luxe Wedding White and heat embossed with white embossing powder.  I selected a color from the hues on the Kaleidacolor Blue Breeze and used an ink dauber to ink up the balloons to match the background.
  • The card base inked with an ink dauber from the same hues of the card background from the Kaleidacolor Blue Breeze iink pad.
  • The balloons are assembled with foam adhesive on the back to hold the white sections in place.  Before removing the adhesive to place the balloons on the card, craft thread is tied to the balloons for strings.  The tails of the strings are adhered to the back of the card background.
  • The card background is adhered to the card base.  

The is a super quick card to put together, and still was fun to coordinate all the blues using one ink pad!

 CHALLENGE GUIDELINES

  • We require stamps older than one year.  If we feel you are using newer stamps, you may be disqualified from the challenge without notification.
  • New papers/dies are OK – but you must use at least one stamp older than a year and describe the age in your blog post.
  • Please note that all challenges require the use of at least one stamp older than a year.
  • Post your new creation to your blog or online gallery.   Use keyword RRCB183.  No backlinking. 
  • Link back to the blog using the Linky Tools by the due date. 
  • Enter as many times as you like. 
  • Feel free to combine our challenge with a maximum of 10 challenges.  Entries linked to more than 10 challenges will be disqualified without notification.
  • If your project is posted on a private group site such as Split Coast Stampers or a photo sharing site not all DT members may be able to comment.   Thank you for understanding.
  • Turn off Word Verification.  We love to comment but word verification can make that difficult.

 Thanks so much for stopping by, remember your comments are always appreciated!


Tuesday, March 1, 2022

Tic Tac Toe for Retro Rubber

 Tic Tac Toe challenges are always fun as we see so many different variations in the submissions.  I went with the bottom row of birthday, confetti, and twine and made a shaker card.  Come join us at Retro Rubber Challenge Blog.

The base of the card is from the Sizzix Impresslits Happy Birthday set.


  • The card front is trimmed to 4" x 5.25" and centered in the embossing folder that includes the happy birthday center die.
  • The middle of the circle is die cut with the matching die in the set.
  • The raised dots are gently inked with Versa Color Baby Blue.
  • The overlay is die cut with the embossing folder die and then both matching circles in the die set then inked in VersaColor Baby Blue.
  • Two sets of balloons were die cut, three were used as embellishments.  The balloons were inked directly with VersaColor in Baby Blue or Red Magic, then heat embossed with iridescent embossing powder.  I held the balloons with a binder clip and tied a small circle in the twine before placing it on the balloon to add the strings.  Actually to get twine at the correct scale I used crafting thread and teased apart a length so each string was two fibers.
  • The sentiment is from My Favorite Things Birthday Greeting set from January 2017.  It is stamped on white cardstock in VersaColor Magic Red and heat embossed in iridescent embossing powder.  Once cool the fish tail was die cut with Lawn Fawn Sentiment banners on one end and trimmed on the other.  The entire banner was then inked in VersaColor Baby Blue.
  • To create the shaker portion I first marked small pencil lines around the outside edge of the sentiment circle.  Two layers of thin line foam adhesive were added to the card base outside the pencil lines.  The pencil lines were erased.
  • The outside edge of the card base was inked in VersaColor Baby Blue and two layers of foam adhesive were added just inside the inked area.
  • The clear acetate window was trimmed and added to the back of the card front.
  • Confetti sequins were added to the inner circle.  
  • The card front was then adhered to the card base with the already placed foam adhesive.
  • The Happy Birthday overlay was glued into place with small dots of On Point Glue.
  • A piece of foam adhesive was added to all three balloons, then using the binder clip to hold the balloons I tied a small knot to place behind the sentiment banner.
  • The sentiment banner is adhered with dimension foam adhesive, making sure to hold the balloon strings in place.
Thanks so much for checking in with me here, and please do go check out all the beautiful cards the Design Team has made over at Retro Rubber Challenge Blog.

CHALLENGE GUIDELINES

  • We require stamps older than one year.  If we feel you are using newer stamps, you may be disqualified from the challenge without notification.
  • New papers/dies are OK – but you must use at least one stamp older than a year and describe the age in your blog post.
  • Please note that all challenges require the use of at least one stamp older than a year.
  • Post your new creation to your blog or online gallery.   Use keyword RRCB177.  No backlinking. 
  • Link back to the blog using the Linky Tools by the due date. 
  • Enter as many times as you like. 
  • Feel free to combine our challenge with a maximum of 10 challenges.  Entries linked to more than 10 challenges will be disqualified without notification.
  • If your project is posted on a private group site such as Split Coast Stampers or a photo sharing site not all DT members may be able to comment.   Thank you for understanding.
  • Turn off Word Verification.  We love to comment but word verification can make that difficult.

Friday, September 10, 2021

Fall leaves Thanks for Imagine


In today's card making tutorial I will show you how to create fall themed Thanks card using three different inks from Imagine.  The autumn colors are vibrant and blend well with kraft card stock and burlap ribbon.  I hope this card inspires you to think of all things pumpkin spice and apple cider as we head into fall!

Skill:  Intermediate

Time:  1.5  hours 

Directions:


Step 1

Spritz white cardstock with Fireworks! Lady Bug, Tangelo, and Dandelion.  I like to start with the darkest color first working to the lighter color to fill in the last areas of white.  Set aside to dry. 


Step 2

Use Memento Peanut Brittle and Ricch Cocoa to ink white cardstock.  I used the ink pad directly on the cardstock as I wanted a splotchy look.


Step 3

Die cut the Fireworks! colored cardstock with Skeleton Leaves dies.  Cut an outline to back the skeleton leaves either by hand or with an electronic die cutting machine.  Adhere the layers together with On Point Glue.  Small dots in the thicker areas of the leaves works best.


Step 4

Die cut one “Thanks” sentiment from the Fireworks! colored cardstock and three from white cardstock.  Layer together with On Point Glue to create a dimensional sentiment.  To avoid glue from leaking out from between the layers use small dots of glue on the outside edges.


Step 5

Use a soft rubber brayer to ink cardstock trimmed to 4.74” x 5.75”.  Kaleidacolor in Autumn Leaves was used with the green portion in the middle and the light orange on either end of the cardstock.  Flip the cardstock to achieve this look.


Step 6

Pressure emboss the cardstock with Basket Weave embossing folder.  Use a sanding block to remove color and allow the embossed design to pop.


Step 7

Adhere background to A7 kraft card base with Tear It! Tape.  Adhere burlap ribbon with Tear It! Tape, it is translucent enough that it does not show through the burlap, and will hold the card together.  Adhere Thanks sentiment with On Point Glue.  Adhere the leaves with Tear It! Tape.


Art Supplies


Imagine


·      Fireworks!—Lady Bug, Tangelo, Dandelion

·      Memento—Peanut Brittle, Rich Cocoa

·      Kaleidacolor—Autumn Leaves

·      On Point Glue

·      Tear It! tape


Other

·      Sizzix Thinlets Skeleton Leaves

·      Spellbinders Phrase Set One

·      Darice Basket Weave embossing folder A7 size

·      Recollections A7 card Base

·      Burlap Ribbon

·      Sanding Block

·      Dimensional Foam Adhesive

·      Brother Scan-N-Cut


Thanks for stopping by!

Tuesday, December 1, 2020

Christmas Theme for Retro Rubber

For our last Retro Rubber challenge of the year is a Christmas theme board.  We have a couple of simple rules 1) Use at least one stamp that is at least one year old 2) Tell us how long you have the stamp 3) Enter no more than ten challenges including ours 4) Enter our challenge up to three times.  Have some fun and join us at Retro Rubber. 

I decided to dig through my really old Christmas themed papers.  The old ones from Paper Pizzaz that came in 8 1/2" x 11" tear out books, from about 1996 or so.  The prints are smaller and coordinate well together.


  • The sentiment manufacturer is unknown, but written on the back is 1998 and a price of $4.75.  My guess is Sonshine stamps?  It is stamped in Memento Cottage Ivy, then trimmed and edged in the same ink.
  • Patterned paper is trimmed to fit the front of the 5" x 6 1/2" card front and edged in Cottage Ivy as well.
  • Sizzix Winter leaves is used to die cut three layers of red, green, and brown cardstock to assemble the greens.  
  • Stars are die cut from patterned paper, then backed with three layers of white cardstock to create "chipboard" stars.  
  • Snowflakes are die cut from Elizabeth Craft Designs Entwined Circle, and Spellbinders Four Seasons. 
  •  The add to the country feel theme, a strip of burlap ribbon is added and the embellishments are adhered with glue dots.  

Another Christmas card ready to send greetings is finished!  Please come join the fun of our last challenge of the year over at Retro Rubber!

Tuesday, November 17, 2020

Happy Birthday for Retro Rubber

Here we are soon to wrap up 2020!  Over at Retro Rubber we are celebrating birthdays with our challenge.  So for the next two weeks come and play along!  Our rules are simple 1) Use a stamp that is at least a year old that needs inky love 2) tell us about the age of said stamp 3) Enter up to ten challenges including ours 4)  You may enter our challenge up to three times.


Since snow is falling,  in all honesty it's mixed with rain, I thought a winter birthday card would be in order.  Plus I have a niece who is big into the outdoor sports including snowboarding so I thought a snowflake themed card would be fun and feminine.


  • A quick search in my vellum stash I found the perfect light blue vellum.  It is pressure embossed with Darice Snowflake background.
  • Tried and true Spellbinders Create a Flake One and Three provided the die cuts.  They are also pressure embossed and then inked through the die with Versa Color Mountain Lake to high light the snowflake shape.
  • Taylored expressions In & Out Birthday from Sept 2014 provides the sentiment.  It is stamped in Versa Color Mountain Lake.  The corners are rounded with the WeR Memory Keepers corner punch.  I like this punch because you can choose three different curves for the corners.  The panel is edged in Versa Color Mountain Lake.
  • I adhered the snowflakes and sentiment with dimensional adhesive THEN wrapped the American Crafts color hemp around the snowflakes.  It seemed a little easier than trying to glue down the hemp cord!
  • All the layers are adhered to the front of a standard A2 card.

Thanks so much for stopping by!  Please do come by Retro Rubber and play along with us!  We love seeing you in our gallery!


Tuesday, October 6, 2020

Tic Tac Toe for Retro Rubber Sympathy card

 Time for a new challenge over at Retro Rubber Challenge Blog, a fun Tic Tac Toe inspiration board.   There a a few simple rules 1) Use at least one stamp that is more than a year old 2) Tell us how long you've had it or when it was manufactured 3) Enter up to ten challenges, including ours.  

I decided to use the middle horizontal row to make a clean and simple sympathy card.  As the card would be masculine I went with twine instead of ribbon, thinking that it's super similar and a tad more masculine.


This is an A2 sized card 4 1/4 x 5 1/2 base.

  • Sizzix skeleton leaves are die cut from green cardstock.
  • Twine is tied around the stem of the leaves.
  • The 4" x 5 1/4" edges of the card front are inked with Memento Luxe Northern Pine.  
  • The sentiment from Sincere Senitments 2/2007 is stamped in Memento Luxe Northern Pine.  This set has been used many times and was acquired when I had a subscription to Cardmaking & Papercraft.  It is designed by Simonne Clay. 
  • The die cut is adhered with Zig Two Way Glue.
  • The card front is adhered to the base.

I made several of this design, as I had family members on my husband's side pass away recently.  (Not COVID related)  My uncle who was not expected to survive his bout with shingles that caused encephalitis is making his recovery.  We are very thankful for his recovery, and keep praying for his family.  (So I still have a few in my stash if needed in the future.)

Thanks so much for stopping by and please do join our challenge over at Retro Rubber.  

Tuesday, May 5, 2020

Spring Flowers for Retro Rubber Challenge Blog

A new challenge over at Retro Rubber Challenge Blog, perfect for May as things are starting to bloom!


I decided to go with clean and simple for my flower based card.  The bonus of my technique is that I got two stampings from the same coloring job, so both of my Mother's Day cards are done!


  • Penny Black Lilacs from 2018 image was colored directly on the stamp.
  • Memento Dual Markers were used in the following colors:  Summer Sky, Bahama Blue, Danube Blue, Pear Tart, Bamboo Leaves, and Cottage Ivy.
  • The image was lightly misted with Ink Potion #9 and then stamped.
  • The second stamping was slightly lighter, but still stunning! 
  • The sentiment is from Hero Arts CL498 from 2015.  It is stamped in Memento Danube Blue.
  • The card base is ink with an Ink Dauber in Memento Danube Blue.
  • A bit of pom pom fiber is attached to the card front before adhering it to the card base.  
I hope you are staying safe and healthy during this time and have some spare time to craft.  Please do come and play with us at  Retro Rubber Challenge Blog.  We have very simple rules 1) Use a stamp that is at least a year old and tell us how long it's been in your stash 2) Enter up to ten challenges including ours. 

Tuesday, February 25, 2020

New Baby card for Retro Rubber Anything Goes

Woops, I am a little late with this post as real life got in the way!  So this go around at Retro Rubber the challenge is everyone's favorite.  Anything Goes!  Remember we have a few simple rules 1)  Use at least one stamp that is more than a year old  2)  Let us know how long it has been around with a date (approximate works too) 3)  Enter up to ten challenges including Retro Rubber.


Some dear friends of our just had a baby girl!  She joins her two big brothers.  The parents waited until her birth to find out her gender, so it is such an awesome time for all of them.  Her biggest brother who is all of 4 1/2 said "It's going to be a girl, I can feel it in my bones!"  Such an old soul little boy!


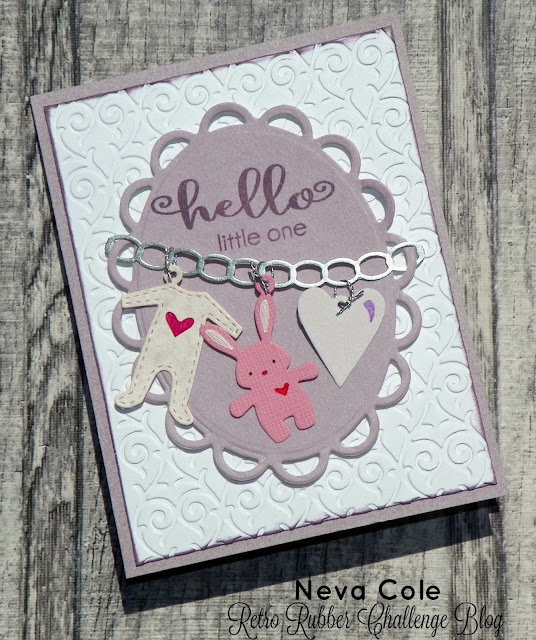
Since I had some really cute baby charm dies, I decided to go that route and include a stamped sentiment.  All of the cardstock is from my stash, some are just little scraps.
  • The rabbit and onesie are from Elizabeth Craft Designs Baby Charms.  There are stencil spots on the dies to easily color in the hearts and other details with pens.  I used Zig Writers in Pure Pink, Pure Red, and black.  A white Gelly Roll pen colored the interior of the rabbit's ears.
  • The heart is from another Elizabeth Craft Designs set, Hanging Charm Pull TabZig Writer in  Hyacinth is used to color the highlight.
  • Elizabeth Craft Designs Chains 1 is die cut from metallic silver cardstock.  The charms are attached with silver craft thread.  It is softer and easier to mail than jump rings!
  • Spellbinders Lacey Ovals is die cut and the placement of the chain allowed me to determine the spot for the sentiment.
  • The sentiment is from Technique Tuesday Chickadess 2.0 and is stamped in Versa Magic Eggplant.  
  • White cardstock is pressure embossed with  Elizabeth Craft Designs Hearts Entwined and the edges are inked with Versa Magic Eggplant.
  • The card is adhered together with the lacey oval adhered with thin foam adhesive. 
Thanks so much for stopping by and we hope to see you in our gallery at Retro Rubber for Challenge #129 Anything Goes!

Tuesday, January 14, 2020

Winter Birthday card for Retro Rubber

Time to get back into the swing of things over at Retro Rubber Challenge blog.  Our first challenge of 2020 is "it's Cold Outside!"  In our part of the world we are in the mid 30's during the day and freezing temps over night. 


I have a family member who has a January birthday so it was perfect to create a winter themed birthday card for him.


It is hard to tell in the photo, but the trees do have a bit of shimmer to mimic a light frost of snow.
  • A very old stamp in my collection, a tree by Ann-Ticipations from 1996 is the featured image.  It is stamped in Delicata Dark Brown Shimmer which also edges the image.
  • The trees are outlined with Zig's Wink of Stella, which is very subtle.
  • The sentiment is from Hero Art's "It's your day" from 2013.  It is stamped in Delicata Dark Brown Shimmer.  The ends are trimmed with Fiskars Art Deco Corner Edger to create a unique banner look.  The edges are inked Delicata Dark Brown Shimmer.
  • Judikens Extra Fine Grove Corrugated Sheet is wrapped with Darice Natural Hemp cord and tied in a knot.  
  • All the layers are adhered to a A-6 size card base.
Thanks so much for stopping by!  Please do visit the rest of the Retro Rubber Design Team's blogs and leave them a little love!  Enter the Retro Rubber challenge with your own Winter Themed project and remember our simple rules:  1) Use at least one stamp that is more than a year old and needs a bit of inky time 2) State how old your image is 3) Enter only up to 10 challenges including ours.

Tuesday, October 22, 2019

Retro Rubber Sketchy time!

You are going to love all the versions that the Design Team has created for the sketch over at Retro Rubber!  I know that my card came together really quickly once I decided the theme.  Do come and play along with our challenge and remember we have two simple rules.  1)  Please use a stamp that is older than a year and indicate the age of the stamp 2)  Enter up to ten challenges including ours.


As I thought through my initial concept I zeroed in on a pine cone die and embossing folder I had in my stash.  Fortunately one of my earliest purchases was a pine bough from American Art Stamps back in May of 1997.  It is fun to use it again in a mixed texture project.


  • I stamped the pine boughs in Versa Color Tea Leaves on cream cardstock and fussy cut the images.  (My Scan N Cut is buried by plants right now . . . we are painting the interior of our home and all the house plants ended up on my desk in the craft room!)
  • Brown cardstock is die cut with Elizabeth Craft Designs Stitched Circles and Spellbinders Standard Circles Small is die cut from cream cardstock. 
  • Happy accident!  The brown cardstock that I used to die cut the circle was from my scrap bag and was the perfect size for the front of an A-2 card.  I just happened to die cut the circle from about the center without thinking and I could still use the rest of the piece for the front of the card!  This cardstock was pressure embossed with Elizabeth Craft Designs Pine Cone embossing folder, then the surface is lightly sanded to bring out the embossing.
  • The pine cones are die cut from red-brown cardstock and rolled into shape.  
  • The remainder of the red-brown cardstock is trimmed to make the banner shape behind the circles.  
  • With all the texture in the background I decided it was best to use a die cut sentiment, so a Stamps of Life Die set, Framelites Drop-Ins 660143 had the right size of Happy Birthday.  With a little creative trimming I had a great little sentiment.  
  • All the layered are adhered together a a bit of twine is tied in a bow at the top of the pine boughs.
I think that this fall themed birthday card is perfect for a man in my life, as my husband's birthday is right around the corner!  Thanks for stopping by, it is a pleasure to read your comments!  

Saturday, October 12, 2019

Styling

It is not often that I am able to used purple on a boys layout, but withe the purple drapes the boys wore during their professional haircuts was a perfect opportunity to use a favorite collection by Basic Grey from 2008, Euphoria. 


Euphoria was a collection I like so much I bought EVERYTHING!  Many elements show up on this page. 
  • Spellbinders Labels Four Grand is used to die cut bracket shapes used in the background.
  • Several papers from the collection are used in this layout: Elation, Frenzy, Trance, and Delirium.  This layout was completed in duplicate, so I was careful with the use of my papers.
  • Sticker letters, Chip Stickers, and Buttons from the collection are used to complete the layout embellishments.
  • I can never leave button holes empty, so white craft thread is used to tie up the buttons.
  • All the edges are inked in Versa Magic Eggplant.  It helps to delineate and add depth to the page.  
  • Journaling is completed in Zig Writer Orchid.  
Thanks for checking out this fun layout that documents one of the few times my boys had professional haircuts.  Have a wonderful weekend!