Showing posts with label Chalking. Show all posts

Tuesday, January 14, 2025

Winter Fun for Retro Rubber Challenge Blog #246

 Welcome back to Retro Rubber Challenge Blog as we start 2025 with a seasonally appropriate challenge.

 Where I now live in North Central Minnesota it actually looks something like this outside today!  High was a lovely 4F on this bright and sunny morning.  We recently received 6 inches of new snow, some is still in the trees.  A perfect excuse to stay inside and do a little crafting?

For my card I decided to use a whimsical winter stamp set by Hunky Dory Crafts in the UK called Winter Warmers and release in 2017 as  gift with Creative Stamping. 


  • The penguin's sweater was stamped in Memento Tuxedo Black and masked, with the penguin stamped over the mask.  The presents and sentiment are aslo stamped in Memento black.
  • All the images are colored with crafters chalk, I wanted a softer look.  
  • All the images were fussy cut. 
  • Ancient paper from my stash was used to create the card base.  Paper Pizaz Snowflakes from 1997 and Darcies Country Folk Plaid from 1999.  The deckle edge was trimmed using my Creative Memories trimmer.  The layers were adhered together.
  • The images are mounted with various thicknesses of foam adhesive.
  • The star and sentiment was begging for a little bling, so I used Stickles in Diamond to make a little sparkly shine.  Actually it is best to add this at the very last so the entire card can be set aside to dry.  

In a way a fairly simple card to send to a special little human that is having a birthday soon!

Please do join us at Retro Rubber Challenge Blog and create your own winter project!

CHALLENGE GUIDELINES

  • We require stamps older than one year.  If we feel you are using newer stamps, you may be disqualified from the challenge without notification.
  • New papers/dies are OK – but you must use at least one stamp older than a year and describe the age in your blog post.
  • Please note that all challenges require the use of at least one stamp older than a year.
  • Post your new creation to your blog or online gallery.   Use keyword RRCB246.  No backlinking. 
  • Link back to the blog using the Linky Tools by the due date. 
  • Enter as many times as you like. 
  • Feel free to combine our challenge with a maximum of 10 challenges.  Entries linked to more than 10 challenges will be disqualified without notification.
  • If your project is posted on a private group site such as Split Coast Stampers or a photo sharing site not all DT members may be able to comment.   Thank you for understanding.
  • Turn off Word Verification.  We love to comment but word verification can make that difficult.


Monday, July 1, 2019

Christmas in July Retro Rubber teaming up with Double Trouble

Happy July! Here at Retro Rubber, we are starting off this month with a bang (because it’s July, after all)! We are starting our challenge a day early so that we can team with the Double Trouble Challenge!
 
 
Our theme is Christmas in July so all you have to do for our challenge is to make a Christmas card using at least one stamp older than a year.
 
Here’s the cool part: by teaming with Double Trouble you get to play along with their challenge as well! All you need to do is follow their requirements which are super easy and fun!
  • Thing 1 – Double Trouble: Make a square card, scrapbook page, gift box or use squares on your project.
  • Thing 2 – Double Dare: Use a rubber or acrylic stamp older than one year. (Sweet – that’s us!)
  • Thing 3 – Twisted Sister: If you create a beach scene with Santa you can earn an extra chance to be in Double Trouble’s random draw.
Be sure to visit their website – Double Trouble Challenge – to get all the details for their challenge to make sure that you are following their requirements as well!  So here we go! Double the fun! Double the Trouble!
 
 
For my Christmas in July card I went with silver, white and a bit of pastel.  I am not a big Santa fan, so didn't have anything to play along with Thing 3.  
 
  • I started by stamping the Angel by DeNami Designs from 1998.  She is one of my origanal Angel stamps.  The image in stamped in Delicata Silvery Shimmer on white cardstock and heat embossed with Stampendous Sterling Silver Embossing Powder.
  • The image is colored with Decorating Chalks and gently blended to give just a hint of color.
  • The sentiment is another really old stamp, one from 1992 by Annette Watkins.  It is also stamped in Delicata Silvery Shimmer on white cardstock and heat embossed with Stampendous Sterling Silver Embossing Powder.
  • Both sections are edged in Delicata Black Shimmer to help them pop off the background.
  • I have a fun new toy . . . the Brother Scan N Cut SDX 225, the background is one of the designs that comes loaded on the machine.  I sized it to 5.25" x 5.25" to fit the front of my square card base and die cut Canson Silver Cardstock.  
  • The 5.5" x 5.5"  card base is also edged in Delicata Black Shimmer,
  • After I adhered the die cut I added the Angel image and the sentiment with dimensional foam tape.  
 I am very pleased with this quick and simple card, and may make a few more for the Christmas Season!  Please do come play along with us at Retro Rubber Blog Challenge and Double Trouble.  Thanks for stopping by! 

Tuesday, April 25, 2017

Fun with Buttons!


Wow, it is time for a new challenge at Retro Rubber Blog Challenge, and this time around it is to use buttons on your project.  Do check out the Design Team’s wonderful creations.


I first looked through my button collection and was not inspired by what I had on hand . . . so while I was at Joann’s I checked out their novelty buttons.  Once I saw these cute outdoor themed buttons by Favorite Findings I had the perfect retro stamp in mind to create a fun scene!


First I stamped and masked the tree images from Creations Unlimited from about 1999.  I inked the trees with Memento Pistachio and then added some lowlights on the stamps in Olive Grove before stamping. The stamp of my beloved Mount Hood is most likely from Stamp Cabana and purchased in the early 2000’s at the Portland Stamp Convention.  It is stamped in Tuxedo Black over the masked trees.  The images are lightly chalked with EK Success craft chalks to finish the scene.  To create the look of the snowfields on the mountain I used Imagines’ irRESISTible Pico Embellisher in Wedding Dress.  It added just the right amount of shine to look like snow!  The frame is Kraft cardstock pressure embossed with Theresa Collins woodgrain embossing folder then is inked with Memento Rich Cocoa and Potter’s Clay.  The cute buttons had the hasps removed before they were adhered to the scene.  

Come join the fun at Retro Rubber and create your own project with buttons!  Remember to use at least one stamp that is more than a year old!  Thanks for stopping by!

Tuesday, March 28, 2017

Enjoy the Journey Retro Rubber Challenge


Hello everyone, it is time for another challenge at Retro Rubber Challenge Blog, and this time it is an easy peasy sketch.  Please check out all the fun takes on this sketch by the Design Team


I’ve had this cool Sizzix Compass Blueprint stamp and die set since April of 2015.  I finally sat down and created a card with this set.  Yeah me!  There are five layers to stamp to use all the dies to add dimension.  So each layer is stamped in Memento Tuxedo Blank on cream cardstock and then colored with Square Pastel Chalks by Koss, a very quick way to color and shade.  The layers are die cut and the compass portion was fussy cut.  The label sentiment is stamped in Memento Pistachio and Nautical Blue and the edges are colored with the chalks.   The bottom layer is adhered directly to the card base and the next layers are adhered with thin dimensional foam adhesive. 

Come join the fun at Retro Rubber Challenge Blog and enter your own card based on the sketch.

I would like to enter the following challenges:


Tuesday, November 8, 2016

Be Thankful and a color challenge


I must say that the year is zipping by and it is already almost Thanksgiving!  This is the inspiration for our challenge at Retro Rubber for the next two weeks.  Be thankful! And use the photo for your color inspiration.


I recently purchased a fun die from Cottage Cutz that is the Cornecopia.  That was the start for my card, but then came the Retro Rubber inspiration to use a really old Fiskars burlap roller from about 1998, plus Unity Stamp Company’s  . . . today I am Thankful set from October 2014.


Step One:
Ink burlap roller stamp with Kaleidacolor Autumn Leaves and roll over white card stock.  Trim to A7 size and round corners.

Step Two:
Ink Unity Stamp Company’s  . . . today I am Thankful sentiment in Memento Luxe Peanut Brittle, stamp on white cardstock, and heat emboss with clear embossing powder.  Die cut with Spellbinders Labels Eleven and ink edges with an Ink Blusher and Memento Luxe Peanut Brittle.

Step Three:
Die cut white cardstock with Cornucopia from Cottage Cutz.  Identify each tiny piece and shade to Pastels chalk.  This was the quickest and easiest way to color and shade the tiny pieces. 

Step Four:
Assemble the card by adhering burlap stamped background to A7 size Kraft card base.  Adhere the Cornucopia pieces together with repositionable Xyron adhesive.  I ended up moving them around before I was totally satisfied!  Apply permanent adhesive to the completed composition and adhere to the card from.  Adhere sentiment with dimensional foam adhesive. 

Please do join us in this challenge and share your creation with us at Retro Rubber Blog Challenge.  
Remember to use at least one stamp that is more than a year old and share how long you have had it and to enter 10 or fewer challenges.

Monday, June 13, 2016

Celebrating Flag Day

Today is the birthday of the Stars and Stripes, and this card is featured on the Imagine Crafts blog.  Tomorrow the American flag is honored with a day of its own on June 14th.  This day is also known as Armed Forces day.  The American flag represents the life of an individual who has served in the military.   There is a certain reverence­­ for the flag and for all that it symbolizes for our country.  I am honored to share a card that features the red, white, and blue of the United States flag.


A tutorial for this chalk and All Purpose Ink card can be found on the Imagine Crafts blog.  Links to all of the resources can be found there as well.  Be proud of our American flag and all that it represents!

Tuesday, June 16, 2015

Birthday Wishes Card


It has been a busy card-making month!  Graduations, weddings, anniversaries, Father’s Day and family birthdays have all been topics for the month of June.  Today I am sharing a card I made for my fabulous sister.


I started with the sketch over at Sketch Saturday and played with a few other challenges to keep my crafting mojo going strong. 

All of the papers and card stock came from a layout scrap kit that I kept together from this layout, Fashion Statement or Yes I had to scrap this!  I stamped the Hero Arts sentiment from the “It’s Your Day” set onto the yellow card stock with Tsukineko Memento Luxe Sweet Plum and heat embossing it with clear embossing powder.  To get an idea of placement I lightly traced the exterior of the die onto the card stock.   Spellbinders Labels 9 and Want 2 Scrap Nestabling worked perfectly for the stacked sentiment on magenta card stock.  Spellbinders Nested Pennants die cut the two layers of pennants from patterned paper and magenta card stock.

The next layer is the yellow card stock pressure embossed with Darice’s Large Petal Background.  After sanding the card stock I chalked the different embossed flowers and swirls with EK Success Craft Chalk.  I really like this effect as it is not something I have tried before.  To not over power the overall design elements I decided to use the netting as the sketch element.  The card is backed with purple card stock.  The finishing touch is a stacked set of Prima flowers along with a bling center.  The card base is white card stock.

I would like to enter this card in the following challenges:
Make It Monday Embossing I used both heat and dry
Creative Artist Challenge Bingo row (Bling, Embossing, Free Space, Chalk, Purple)  To be honest this was my inspiration for using the chalk on the pressure embossing.

Tuesday, June 9, 2015

Retro Rubber Blog Challenge #16 Tie It on Birthday Card


We have another fun challenge over at Retro Rubber for the next two weeks.  Tie It On with twine or ribbon.  Please remember to use your Retro Rubber that is more than a year old, and tell us how it came to join your collection and when if you can remember!


My Dad is turning 89 this year!  So I created a masculine seascape birthday card to celebrate the occasion. 


 The stamp images are all from Art Impressions, purchased sometime in the early 2000’s.  If you like the images they are still available!  The forefront images are stamped first in Tsukineko Memento Tuxedo Black on cream card stock and then masked.  Create a mask by stamping the image on a post-it note.   Fussy cut the image just inside the most exterior line.  This prevents a blank shadow where the images met while stamping.  The background is stamped over the top of the masks.  The images are colored with Decorator Chalks; a quick and easy way to color and add shading.


The frame is made by pressure embossing craft card stock with Craftwell Teresa Collins Woodgrain Cottage and inked with Tsukineko StazOn Saddle Brown.  The largest size of Coluzzle was used to cut the inner portion of the frame with the exterior edge as the guide to cut the outside edge.   The corners of the card were rounded with the old Creative Memories corner rounded.  The frame was adhered into place over the images on the card stock.   

Sizzlets Tag, Oval was used to die cut the back from the wood grain card stock and the front from cream card stock.  Boxer Scrapbooking sentiment is stamped in Tsukineko Memento Tuxedo Black.  The tag had one hole so a second tag was die cut and placed over to punch the second hole.  Darice Hemp cord #20 is looped through the holes and the tag is adhered with dimensional foam adhesive the background.  The tag is adhered in place on the card for the finishing touch.

Come on over to Retro Rubber Challenge Blog and join in the fun with ribbon or twine and a retro stamp!

I would like to enter this card in the following challenges:

Tuesday, May 26, 2015

Vintage Lace for Retro Rubber Blog Challenge 15

For the next two weeks the theme at Retro Rubber Blog Challenge is to create a vintage feel card and/or incorporate lace.  There are many ways to interpret this challenge and I choose the Retro Rubber stamp version myself!


 I have had this lacey frame image set for a very long time, probably since the late 1990's to early 2000's, and I am not sure if I have ever used it!  I purchased it unmounted at a rubber stamp convention and unfortunately do not recall the manufacturer.  The stitched frame is by Great Impressions purchased around 1997.  The baby toys are Peddler's Pack, a local Oregon stamp manufacturer, and some images are still available even though I purchased them in 1997 to make baby shower invites for my niece!  The sentiment barely qualifies as Retro, but it is Technique Tuesday's Happy set.


All the images are stamped in Tsukeniko Memento Tuxedo black.  The stitched frame is stamped first, far enough from the edge of the card to accommodate the lace frame images.  The lace edge and corner was stamped with Tsukineko StazOn Jet Black on clear acrylic sheets using the stamp positioner.  Careful stamping and masking created the lace frame.  Then the baby toys were stamped into their positions.  After I was satisfied with the design of the card I folded and trimmed it to size.


The background is colored with EK Success craft chalks which allowed for easy shading especially with the lace frame.  The toys were colored with Chameleon pens:  YL3 Summer Sun, OR4 Seville Orange, RD4 Crimson Red, BL3 Sky Blue, PK3 Bubblegum, BR2 Hot Cocoa, YG3 Spring Meadow.  To add the finishing touches the booties have added flocking around the cuffs from a Recollections set of flocking, and several toys and the hearts have glossy accents added with Ranger Inkssentials.

The die cut background for "happy" is cut from white velvet paper and chalked the match the color of the frame.  The inner "happy" is die cut and chalked in yellow.  The "new baby" is stamped in Tsukineko Memento Luxe Pear Tart and heat embossed with clear embossing powder.

Come join the fun at Retro Rubber Blog Challenge and show us what you can create using vintage lace!  The rules are simple:  follow the current theme AND use your retro rubber (more than a year old).

I would like to enter this card in the following challenges:


Sunday, May 24, 2015

Masculine Best Wishes Birthday Card


It was time to make a masculine birthday card and my new collection Everyday Heroes from Heartfelt Creations came in handy.  Actually I was itching to get it inky and cut up, so this card was fun to make.


I started by masking the HC My Anchor stamp so only the sailboat would stamp.  It was stamped with Tsukineko Tuxedo Black on cream card stock.  The anchor was also inked up separately and then die cut with HC Everyday Heroes die set anchor.  Then the images were colored with EK Success Craft Chalks.    The sentiment from Everyday Heroes set was inked with Tsukineko Tuxedo Black on cream card stock and then die cut with the banner.

It was easy to select a paper from the Everyday Heroes paper collection that had three different designs on one sheet.  Perfect for card making!  The image and layers were die cut with Cut Mat Create Die Set 1A and 1B.  Using the remaining dies from Everyday Heroes the accent papers were die cut.   I will admit to asking my husband to tie a bowlen knot with the hemp cord on the anchor die cut.  It should look realistic! 

After adhering the bottom two layers to the card base (8” x 6” folded) half of the iron works die cut was adhered.  The next two layers are adhered with thin dimensional foam adhesive.  The buckle and banner die cuts were assembled and adhered with thicker dimensional foam adhesive.  The anchor is adhered and the hemp cord is glued into place with Art Glitter Adhesive dries clear glue. 

This was a really fun and simple card to create and is a perfect masculine birthday greeting!

I would like to enter this card in the following challenges:


  Creative Knockouts #90 Sentimentally Yours
      

Thursday, March 12, 2015

Best Buddies Layout


My most frequent format for scrapbook layouts is a double page layout with multiple photos.  So a single page layout is not the norm, but was definitely fun!  I decided to play along with Stuck on U Sketches and completed this sketch.


 I used the large DCWV Pet Stack for all of the patterned cardstock in this layout.  About a year ago I found a package of KI Memories bones 12” x 12” die cut overlays that is layered over the base cardstock.  The circle is cut with Cutter Bee Curvy Cutter, I love that I can cut a 12” diameter circle, but this one is 10” cut from DCWV blue card stock.   A few other scraps from the Pet stack add the additional layers.  

 
 The title is Thickers Black Tie Velvet stickers colored with Craft Chalks.  The “forever” sentiment is from Technique Tuesday “Words We love” set stamped in Tsukineko Memento Luxe Rick Cocoa on coordinating brown card stock.  

  
I discovered I actually had three photos that I wanted to include and a bit of journaling so I decided to add a Foto Flap by Outdoors and More.  I will cut a slit in the page protector to allow the interactive flap to move. 

The final touches are a few paw die cuts and bone paper clips from my stash.  The layout is a little busier than my usual style but I do like how it turned out! 

Wednesday, February 25, 2015

Seashore Thinking of You Guest Designer at Crafting By Designs


I am very excited to once again be a Guest Designer for Crafting by Designs today.  I selected the theme of "Thinking of You" a month ago with the intent to make a card for my friend, but instead it is a "Thinking of You" card for her adult son.  This the third of five cards created for my dear friend's family who passed away on Feb 16th.  It has been excellent therapy for me to release some of my grief by crafting and blogging about her home going to Jesus.  It is my prayer to live my life as well as she did!


I am not sure what company made the seashore image, perhaps Stamp Cabana?  It is stamped in Tsukineko Tuxedo Black and colored with craft chalks.  This is a quick and easy way to create a blended multi-colored scene.  The inner frame is golden yellow card stock die cut with Spellbinders Scalloped Petite Ovals Small.  The top layer of royal blue card stock is die cut with Spellbinders Petite Ovals Small then pressure embossed with Darice Plaid embossing folder.  The top layer is adhered with dimensional foam adhesive.

The Unity sentiment is stamped in StazOn Tuxedo Black on re-purposed packaging.  The image is fussy cut and mounted to the top layer with a glue dot under the cork.  I think it looks remarkably like a glass bottle found on the seashore although maybe not as scratched up!

Please come on by Crafting by Designs and enter your own "Thinking of You" card!

The color inspiration for this card is the challenge and photograph at Chocolate Baroque.  Thank you!  It is entered into their challenge.

Monday, February 23, 2015

Butterfly Sympathy Card


 I have returned from an amazing Celebration of Life service for my very dear friend.  I was one of eight asked to speak about a specific topic of her life.  What an honor and blessing.  Memorial services truly are a time to celebrate a life well lived.  I will miss her friendship but know this was not a goodbye . . . but I will see you soon in the glory of God's presence in heaven.
I created this card for her beloved mother, whom I have known for almost as long.  This is the second of five sympathy cards I made for her family.

 
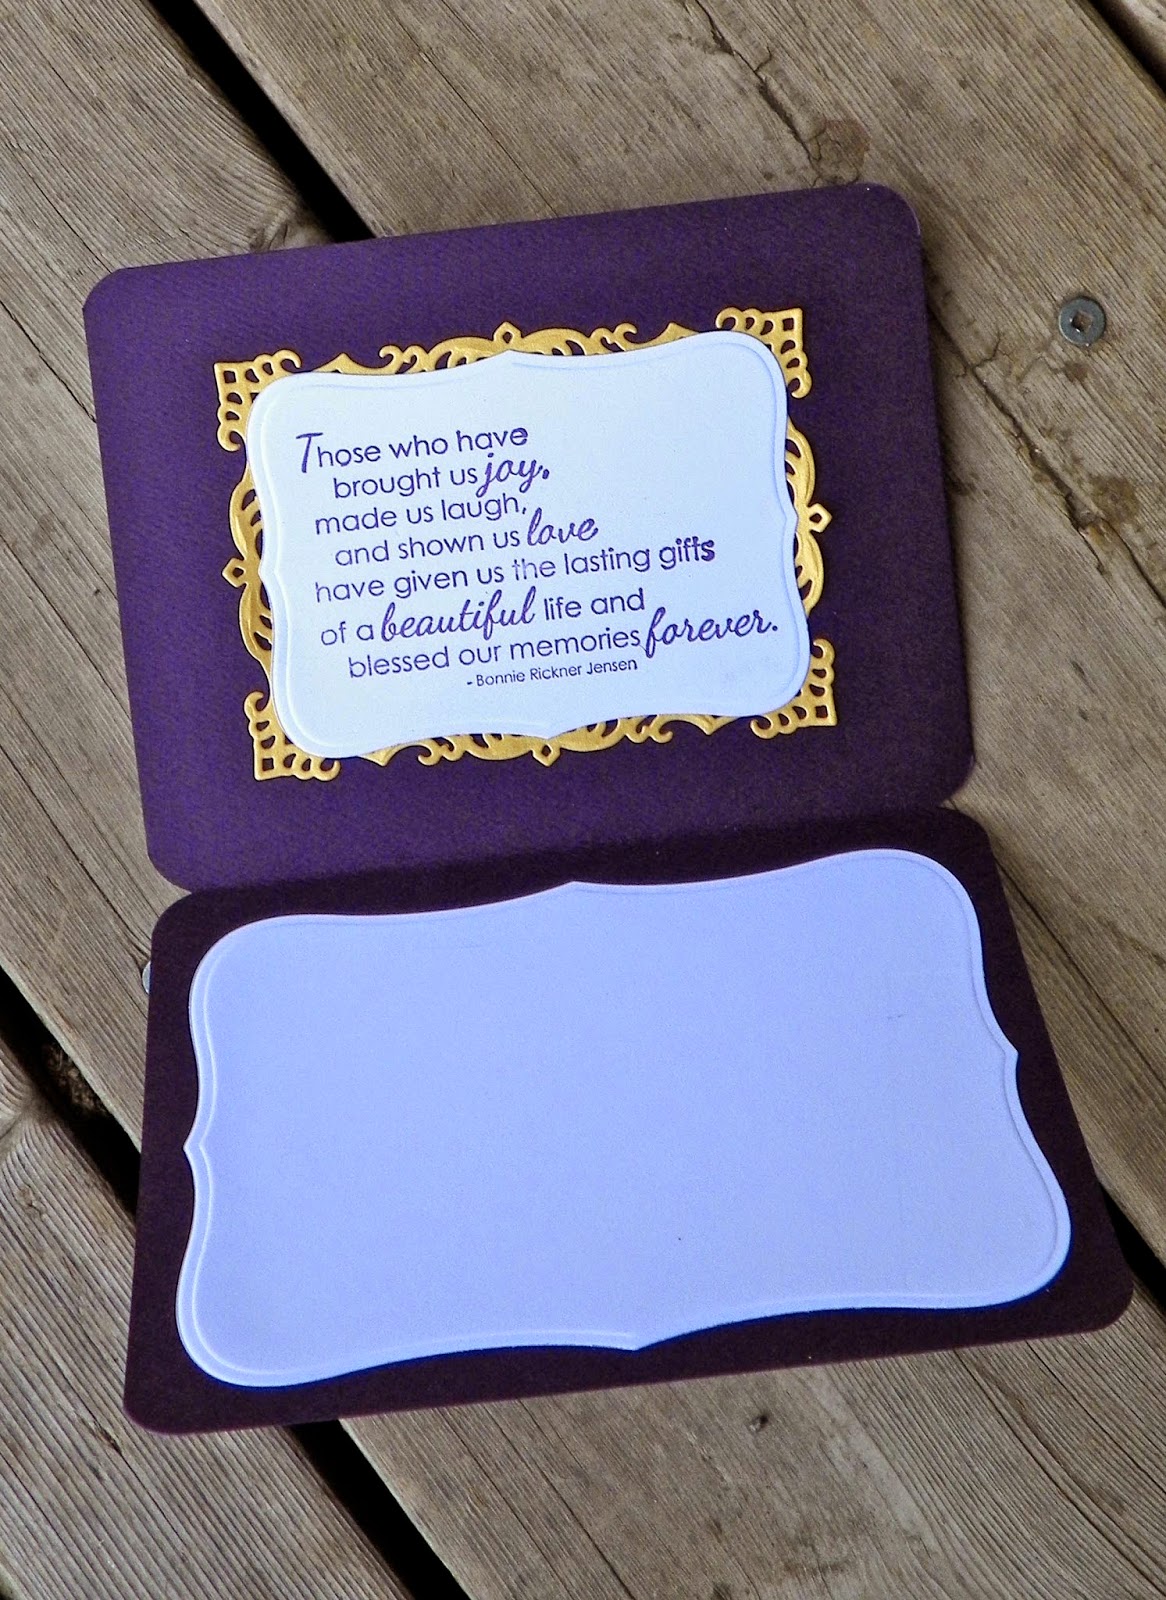
I started with my version of Blackberry Bliss card stock trimmed to A 2 size, 6 1/4" x 9" folded in half.  Spellbinders Labels Eight and Decorative Labels Eight were die cut from white card stock and Raspberry Ripple make up the lower layers.  The top layer is stamped on Wisteria Wonder in Tsukineko Brillance Gold with an image from Unity Stamps' Beautiful Life, Blessed Memories set.  It is heat embossed with Stampendous Sahara Pearls embossing powder.  I purposely shopped for sympathy images over the last few months as I knew my friend's time was short.  The layers are adhered with dimensional foam adhesive.
The butterfly is a die cut by Cheery Lynn Designs, Exotic Butterfly Small #2 die cut in white card stock and colored with craft chalks.  It is backed with Small Angel wings by Cheery Lynn Designs in gold card stock.  The die cut was pressure embossed so it would merge nicely with the upper layer. The card is finished with a few DCWV pearls and a triple looped bow tied on my Bows-It-All 2.  I am very pleased with the front of the finished card.

Inside of the card
Since the card stock was so dark I decided to decorate the inside of the card, using the same Spellbinders dies and white and gold card stock.  The inside image is stamped in Tsukineko Versa Magic and is another sentiment from the Unity Stamps' Beautiful Life, Blessed Memories set.
This card was inspired by and entered in the following challenges.

Sunday, February 8, 2015

Anything But a Card Friendship ATC Booklet


This month the challenge over at Anything But a Card is to create a project that celebrates Friendship.  There are so many sayings that give us an understanding of friendship . . . and I have several that are stamps in my collection!  Artist Trading Cards are one way to make new friends and share art at the same time.  I have a collection that dates back to 2006 from the now defunct Memory Makers forum.  I have remained friends with many of my ATC trading friends through new forums and now in blogland too.  Another reason to dabble in ATC creation is the small "canvas" size that allows experimentation with a number of fun techniques.  I am glad that you have stopped by to see the full version of my ATC Friend booklet.


Front Cover, ATC 1

I knew that I wanted to make a collection of ATCs for this project.  So I decided to make a booklet along the lines of the tutorial over at Splitcoast Stampers.  I choose to make my booklet from 8” x 12” card stock and fold at 3”, 6”, and 9” on the long direction and 4” on the short direction.  The card stock was stamped with a Fiskars’s roller stamp and Tsukineko Kaleidacolor Berry Blaze.  After training the folds the edges were inked in corresponding colors.  The front cover edge was slit and ribbon was adhered inside, the back cover has an open edge and the corresponding back ribbon was adhered inside.  Each page was adhered together to form the booklet.


While I design my ATC I kept the rule of threes in mind.  The ATC needs three things:  a background, a focal image (in this case the friendship sayings), and an embellishment.

ATC 1 (front cover)

I wanted to play a little with my Superior Palette Stamp & Stick Gluepad that I’ve owned for awhile.  I stamped glossy card stock with a star image from Technique Tuesday Twinkle Twinkle set and “friend” sentiment from Stampendous Happy Messages.  After the images are heated I gently brushed Jacquard Products Pearl Ex Flamingo Pink across the image with a paint brush and buffed.  Using a soft foam roller (normally used for small household paint jobs) I added Tsukineko Kaleidacolor Denim ink over the top of the image then inked the edges with the darkest blue.  My Moments Paper Roses were the final touch to embellish the ATC.

ATC 2 and ATC #

ATC 2

This saying I found on the Internet and printed it on white card stock.  Using the same soft foam roller I inked the ATC with Tsukinkeo Kaliedacolor Berry Blaze over the sentiment and inked the edges with the darker purple.  The Inkadinkado image is stamped in Berry Blaze just below the sentiment.  The finishing touch is a bit of bakers twine tied in a small multi-loop bow.

A few process photos

ATC 3

I stamped the sentiment from Hampton Art on white card stock.  I used several pastel pink and purple chalks from Decorating Chalks with a stencil from Recollections I recently received as a prize from winning a challenge.  A few buttons from my stash and white craft thread finish the ATC.

ATC 4 and ATC 5


ATC 4

This is actually the first ATC I created and I did a bit of experimenting with the Superior Palette Stamp & Stick Gluepad and different media.  I tried foiling with no success, glitter (too chunky), and finally the dry Pearl Ex.  The images are stamped and heat embossed on black glossy card stock before brushing Duo Red-Blue and Flamingo Pink Pearl Ex over the images.  There really is a nice iridescence to the Pearl Ex that does not show in the photographs.  The frame is by Sweet Impression (in my stash forever!) and the sentiment is by Creative Cousins.   I added a heart shaped paper clip to the ATC.   ATC can be created either portrait or landscape style as shown with this image.

ATC 5

This was another experimentation ATC.  I finally went with using the Tim Holtz Mini Mask Compass to create the background image FIRST on white card stock, then printing the saying over the top.  This saying I found on the Internet as well.  The Jacquard Products Pearl Ex is mixed 4 parts to 1 part of powdered Gum Arabic.  I have used this process a few times and created my own well plate from an old candy box.  I add just enough water to make the well moist enough to use the Pearl Ex as a paint.  The water evaporates and the remaining pigment and gum Arabic are good to go for the next round.  After printing the sentiment over the image, I added the small watch by Recollections with a small black brad.   The edges are inked with Tsukineko Memento Tuxedo Black.  

ATC 6 and ATC 7


ATC 6

The image by Hero Arts was inked with Tsukineko Memento Luxe Tuxedo Black and heat embossed with clear embossing powder on white glossy card stock.  The leaves were colored in with Chameleon YG3 Spring Meadow.  The image was masked with a fussy cut post-it mask and then the edges were inked with a Tim Holtz handle and Adirondack alcohol inks in Purple Twilight and Wild Plum.  I added a flower brad over the top of the stamped flower with a Liquid Pearls Lavender Lace center and a little dragonfly brad to finish the ATC.

ATC 7

I used another saying from the Internet and then inked the white card stock with Tsukinkeo Kaliedacolor Denim and the soft foam roller.   The star image by Personal Stamp Exchange is inked in Tsukinkeo Encore Silver and stamped around the sentiment.  The brad was inked with Tsukinkeo  StazOn Azure to match the ATC, and the edges of the angel were inked to help her stand out from the background.  Mrs Grossman’s Vellum Vines Silver & Rose finish the ATC as a frame around the edges. 

To say I used just a few supplies would be an understatement . . . !

Almost everything used in creating this project.
  
Whew!  Thanks for stopping by and checking out my Friendship project, and as always, please join our challenge at Anything But a Card!  As a final note I wanted to show you just a portion of the experimental failures for this project . . . just so you know that playing with our inks, paper, and media is a process and is meant to be fun!

The not ready for prime time ATC versions!


I would like to enter my ATC Friend Booklet in the following challenges:
We Do Doobado #3 Hearts and Flowers-Flowers on the cover and ATC 6, hearts in ATC 2, ATC 3, and ATC 4
dragonfly and ATC 7 Angel
Simply Create Too #78 Use Hearts--hearts in ATC 2, ATC 3, and ATC 4
QRK Stampede Challenge #125 Anything But a Card


Thursday, December 11, 2014

TBT Chalk and Stencil Angel

Circa 1997

The season for Angels continues!  This wonderful image is a series of three stencils that are colored with chalks.  She is simple and understated.  The card is finished with decorative corner rounder by McGill and rounded corners on the base card.  I really should get this lovely stencil set out and play with it again!

Thursday, November 27, 2014

TBT Giving Thanks

Created in 2008
Happy Thanksgiving!  I pray that you are celebrating the many things that you and your families have to be thankful for on this day.

I created this pieced die cut during the heyday of my fun with my Klic-n-kut.  I created this die cut in the KNK software and contributed it to a file exchange.  The die cut pieces are layered on the black mat which is welded to the sentiment.  The die cuts were chalked to add a little dimension.  Enjoy!