Showing posts with label ATC. Show all posts

Monday, December 7, 2015

December Birthday ATC


Hello faithful blog followers!  It seems that I had my wonderful announcement just before Thanksgiving then fell off the face of blogland!  Not to worry, just living the holiday life with my family and substituting a few days the following week.  We had a wonderful Thanksgiving that included butchering and plucking our own homegrown turkey.  It was super yummy!  On Black Friday we supported the local economy by going shopping and found some incredible deals.  We have also attended 2 all day wrestling tournaments with our boys.  Add in a day trip to Portland for a Singing Christmas Tree performance, and that made for a very busy few days.  I am thankful for the down time to craft again this weekend after a busy, busy, busy 10 days or so!  Today I am sharing the last of the series of Birthday ATCs that will go postal to it’s recipient.  I enjoy using pieces of past projects that reside in a scrap bin on my craft table and this is no exception.


1.     Glossy white card stock is inked with Kaleidacolor in Berry Blaze using a brayer and Ink Potion No. 9.  The desired section trimmed to 2.5” x 3.5” the standard ATC size.
2.     Another section is die cut with Spellbinders Labels Eight.
3.     Spritz matte white card stock with Fireworks in Lilac Posies, Lulu Lavender, Summer Sky.  Set aside to dry.  Stamp Inkadinkado Just Saying sentiment in Versa Magic Eggplant and heat emboss with clear embossing powder.  Die cut Spellbinders Decorative Labels Eight.
4.     Die cut 4 small snowflakes from vellum with Spellbinders Create A Flake One and Three.  The center of the largest is the 5th snowflake.
5.     Adhere small labels together and mount to the ATC with dimensional foam adhesive.  Adhere 3 snowflakes directly to the ATC using wet adhesive.  Adhere the remaining 2 with dimensional foam adhesive.

Imagine Crafts by Tsukineko Supplies
·      Kaleidacolor Berry Blaze
·      Ink Potion No. 9
·      Versa Magic Eggplant
·      Fireworks Lilac Posies, Lulu Lavender, Summer Sky
·      Craft Mat

Other supplies
·      Inkadinkado Just Saying stamp set
·      Spellbinders Labels Eight, Decorative Labels Eight, Create A Flake One and Three
·      Miscellaneous:  Glossy white card stock, matte white card stock, vellum, hard rubber brayer,  die cut machine, dry adhesive, wet adhesive, dimensional foam adhesive.  

I am pleased to enter the following challenges:

Saturday, October 10, 2015

Fall Birthday ATC


It is fun creating Artist Trading Cards for a Birthday Swap, and this one was no exception!  Part of the fun is finding bits and pieces from other projects or practice projects that just flow together.


The base is another section of Kraft card stock pressure embossed with Teresa Collin’s Woodgrain Cottage and inked with Tsukineko StazOn Saddle Brown.  The practice project was created with Provo Craft Slab patterned paper die cut Heartfelt Creations Decorative Blossom Corner. 

The flower is created with Spellbinder Rose Creations that is stamped with Heartfelt Creations Botanical Floral Precut set with Tsukineko Versa Magic Shara Sand.  The petals are colored with Chameleon’s OR4 Seville Orange and then sprayed with Tsukineko Spritz in Gold.  The “leaves” are Heartfelt Creations Christmas Poinsettia and Sun Kissed Fleur die.  The leaves are stamped in Versa Magic Sage; heat embossed with clear embossing powder and colored with Chameleon OL3 Olive Green.  The flower is held together with a green glitter brad from my stash.

To finish the ATC I used green card stock die cut with Spellbinder’s Labels Eight.  The Happy Birthday sentiment is by Imaginisce from the Snag ‘em Stamps All Kinds of Happy Collection.  It is stamped in Tsukineko StazOn Saddle Brown. 

I would like to enter this ATC in the following challenges:

Thursday, September 17, 2015

Escher Birthday ATC


It is time to share another Artist Trading Card for a birthday swap.  The recipient happens to be male, so a masculine version was in order.  I have known him as a ATC trader since the Making Memories Forum days!  I have several ATCs from him and wanted to make something fun and special. 

I have been playing around with the Ombre effect and this started as one of the experiments.  The card size version didn’t meet my satisfaction, but when it cut down to 2 ½” x 3 ½” it is perfect!  

Front

The background is Faber Castell Gelato in Boysenberry on Strathmore Bristol 300 series.  I love this stuff for water intensive techniques!  After it dried I stamped the Stamp Out Cute Escher Birds to Fish image in a variety of inks.  Colorbox Oyster White was the base blended with Dragonfly black and Sepia Black.  The image was heat embossed with clear embossing powder.  The background is black card stock embossed with Sizzix Dot Matrix.

Back
The small tag die cut is by Quickutz and is stamped with Tsukineko Memento Tuxedo Black.  It is attached to the ATC with a bit of baker’s twine and a glue dot.  The fly charm is attached with glue dots as well. 

The following challenges provided inspiration:


Sunday, September 13, 2015

Butterfly Birthday ATC


I will admit that the last few weeks have been filled with many things other than crafting.  My creative mojo was on vacation, and other priorities were higher up the list.  I have recently lost almost 30 pounds, which is a great deal of hard work in self discipline, meal planning, and daily exercise.  Along with that comes the cleaning out of my closet and the shopping for a fun wardrobe that fits the new me!  Now that school has started, school shopping is done, the boys’ rooms are de-cluttered, and the playroom given a thorough cleaning out I feel like I have a little time to play in my craft room.   (We won’t talk about the fact the craft room could use a little cleaning itself!)

This afternoon I sat down to create a Birthday ATC that is a little over due.  I like to use the snips and scraps from projects that were either experiments or didn’t make it for a card or scrapbook page.  This ATC used three leftover bits in its creation.    

I love how the bright sunshine brings out the shimmer!
 
The base Kraft card stock is embossed with Craftwell Teresa Collin’s Woodgrain Cottage and inked with Tsukineko Saddle Brown.  It is from the Advent Calendar I made last November!  The background is from the ABAC Celebration project in July and uses Imagine Crafts Fireworks in Dandelion, Tangelo, and Lady Bug.  More than a year ago I played around with Cheery Lynn’s Exotic Butterflies Small #2 and Angel Wings.  I think the Angel Wings is highlighted with Rexell Derwent Watercolor pencils with a bit of Liquid Pearls in Buttercup.  The new addition to pull the whole project together was the branch is Quickutz Wildflower with a bit of creative trimming.  The sentiment is from Inkadinkado Just Saying.  It is stamped in Tsukineko Saddle Brown.  

Just for fun, the reverse side.
  
The layers are adhered together; the branch is adhered with Zig Two Way Glue, which is perfect for small pieces.  After shaping the butterfly it is adhered with dimensional foam adhesive and glue dots. 

Proud to say that this ATC was a winner of this challenge:


The following challenges provided some inspiration to get me going today! 
Pile It On #86 Birthday


Sunday, July 12, 2015

Birthday ATC for ABAC Anything Goes Challege


For this month’s challenge Anything Goes at Anything But a Card I am sharing an Artist Trading Card I created as part of a birthday swap.  I enjoy being part of a variety of forums that discuss paper crafting.  One such forum is Rubberstampchat, there are a few folks from Making Memories forum days, plus a bunch of fun new stamping friends.  I joined the birthday ATC swap as a way to share my art and learn new techniques at the same time.  Swaps are great fun!


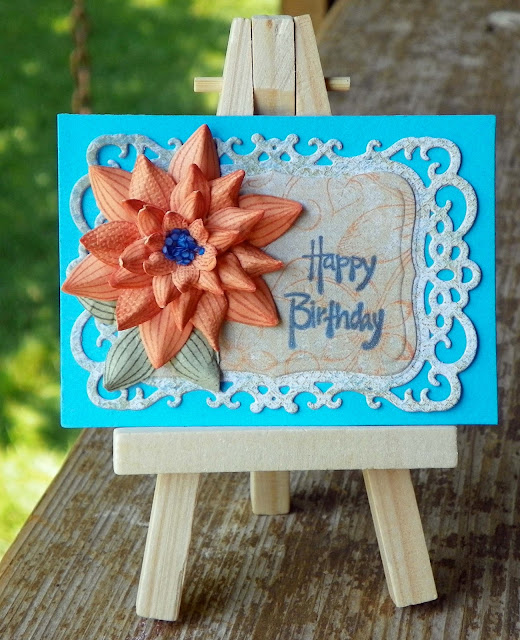
Many of my ATC’s start with remnants of previous projects that have graced my craft table; and this one uses a left-over flower from this project created as an entry for the Design Team at Heartfelt Creations.  I enjoy creating handmade flowers with their dies and stamps.  The flower uses Sun Kissed Fleur die and Striped Precut sets on orange card stock.  The center is Suze Winberg’s Mini Mosaics in Blue Ice, which I have owned for about 15 years; it is fun to use great items from my stash to complete a new project!  The leaves are stamped on green card stock.


Heartfelt Creations Sun Kissed Fluer papers were die cut with Spellbinders Labels Eight and Decorative Labels Eight to back the flower.  Studio G’s Happy Birthday is stamped in Tsukineko Encore Ultimate metallic Blue and heat embossed with clear embossing powder.  The finished card is mounted to a blue card stock ATC (2 ½” x 3 ½”).


Thanks for stopping by and please do enter the Anything Goes challenge at Anything But a Card!   

Friday, June 5, 2015

June Birthday ATC


It is time for the June version of my ATC (Artist Trading Card) Birthday swap.  When I need to jump-start my creativity I look at the leftovers sitting on my table. I was inspired by the punches from the Tonic Butterfly border punch to make a butterfly ATC.  They were from the card that is in the post from Thursday!


The background is Stamp Out Cute stamp that I have owned since the mid 90’s, purchased unmounted at the Portland Stamp Convention.  It is stamped in Tsukinkeo Versa Mark and embossed with clear embossing powder on Bristol 100 pound paper.  Using a heavier card stock is my preference when working with techniques that involve water.  I colored swatches of the stamped area with Faber Casteel Gelatos in Cotton Candy, Lime, and Guava then spritzed it with water.   I moved the color around with a paper towel and removed the excess from the embossed areas. 

The tiny butterfly confetti is contained in an envelope made from up-cycled plastic bag packaging die cut with Sizzix Card & Envelope Mini Elegant die.  The edges were sealed with Designer Dries Clear Adhesive.  I found that using a cotton swab I was able to apply a very thin layer that dried more quickly, but still it took overnight!  After the butterfly confetti was sealed into the mini envelope, Vellum Glue Dots adhesive was used to adhere the envelope to the ATC.  The final touch is the “Happy Birthday” sentiment by Studio G stamped in Tsukineko StazOn Azure.

I would like to enter this ATC in the following challenges:

Sunday, March 29, 2015

Five Mini Flowers for Anything But a Card Fifth Sunday Challenge


We have another Fifth Sunday challenge going on over at Anything But a Card.  That means you can create anything (but a card of course!) that includes five!  You can also create 5 some things!  My contribution is an Artist Trading Card that features five miniature felt-flowers for a birthday ATC swap.


I started with Impression Obsession’s Spiral Flowers and die cut white wool felt.  This can be found on a bolt in the fabric section of your local craft store.  After die cutting and carefully removing the excess with tweezers I sprayed the flowers with a variety of mists.  Tsukineko’s Fireworks Tangelo and Dandelion, and Tattered Angels Glimmer Mist in Sun Sisters (plus a little Tangelo on one), Rum Punch, and Marmalade gave me a splendid color array to build my little garden.  I set these aside to dry.  One thing to remember when using glimmer sprays is with white felt the color will become very intense.  Low temperature hot glue seemed to be the best choice to hold the little flowers together.  They should also survive the mailing process quite nicely! 

The greenery in the background is by Technique Tuesday from the “In Bloom” mini collection.  It is stamped in Tsukineko Versa Magic Key Lime and Memento Luxe Pear Tart.  The butterflies (from the same collection) are stamped in Tsukineko Versa Magic Aloe Vera.  The “Happy Birthday” sentiment is from Boxer Scrapbooking (now defunct) and is stamped in Tsukineko Versa Magic Mango.

After I assembled the ATC, I realized the stems and leaves really needed to be felt as well . . . so a search through my die stash revealed Heartfelt Creations Decorative Chateau Gate and Cut Mat Create 1B sets both had small greenery sprigs with stems and leaves.  These were spritzed with Tsukineko Fireworks Pear Tart.  These were attached with Art Glitter Adhesive.  The felt leaves and stems set of the beautiful little flowers nicely! 

Go have some crafting fun this week and play along with our Fifth Sunday challenge at Anything But a Card!

Sunday, March 15, 2015

March Birthday Artist Trading Card


I am part of a Birthday ATC swap on a forum, RubberStampChat.  Each month we send an Artist Trading Card to the members of the swap with birthdays in that month.  What fun!


This month I had some fun with the Superior Palette Stamp & Stick Glue Pad.  I stamped the background with a Stamp Out Cute image on light pink card stock, and then added Martha Stewart Peridot glitter.   The glitter is heat set with an embossing heat gun.  The glitter is a little more green in real life!

A few Prima flowers and a little bling for the center create a pretty embellishment.  The tag is Sizzlets Tag Set, Small that is stamped with Colorbox Cat Eye Charcoal using the Imaginesce All Kinds of Happy Collection on light green card stock.  A pink eyelet and a few coordinating fibers finish the ATC.  

This project is entered into the following challenges:

Sunday, February 8, 2015

Anything But a Card Friendship ATC Booklet


This month the challenge over at Anything But a Card is to create a project that celebrates Friendship.  There are so many sayings that give us an understanding of friendship . . . and I have several that are stamps in my collection!  Artist Trading Cards are one way to make new friends and share art at the same time.  I have a collection that dates back to 2006 from the now defunct Memory Makers forum.  I have remained friends with many of my ATC trading friends through new forums and now in blogland too.  Another reason to dabble in ATC creation is the small "canvas" size that allows experimentation with a number of fun techniques.  I am glad that you have stopped by to see the full version of my ATC Friend booklet.


Front Cover, ATC 1

I knew that I wanted to make a collection of ATCs for this project.  So I decided to make a booklet along the lines of the tutorial over at Splitcoast Stampers.  I choose to make my booklet from 8” x 12” card stock and fold at 3”, 6”, and 9” on the long direction and 4” on the short direction.  The card stock was stamped with a Fiskars’s roller stamp and Tsukineko Kaleidacolor Berry Blaze.  After training the folds the edges were inked in corresponding colors.  The front cover edge was slit and ribbon was adhered inside, the back cover has an open edge and the corresponding back ribbon was adhered inside.  Each page was adhered together to form the booklet.


While I design my ATC I kept the rule of threes in mind.  The ATC needs three things:  a background, a focal image (in this case the friendship sayings), and an embellishment.

ATC 1 (front cover)

I wanted to play a little with my Superior Palette Stamp & Stick Gluepad that I’ve owned for awhile.  I stamped glossy card stock with a star image from Technique Tuesday Twinkle Twinkle set and “friend” sentiment from Stampendous Happy Messages.  After the images are heated I gently brushed Jacquard Products Pearl Ex Flamingo Pink across the image with a paint brush and buffed.  Using a soft foam roller (normally used for small household paint jobs) I added Tsukineko Kaleidacolor Denim ink over the top of the image then inked the edges with the darkest blue.  My Moments Paper Roses were the final touch to embellish the ATC.

ATC 2 and ATC #

ATC 2

This saying I found on the Internet and printed it on white card stock.  Using the same soft foam roller I inked the ATC with Tsukinkeo Kaliedacolor Berry Blaze over the sentiment and inked the edges with the darker purple.  The Inkadinkado image is stamped in Berry Blaze just below the sentiment.  The finishing touch is a bit of bakers twine tied in a small multi-loop bow.

A few process photos

ATC 3

I stamped the sentiment from Hampton Art on white card stock.  I used several pastel pink and purple chalks from Decorating Chalks with a stencil from Recollections I recently received as a prize from winning a challenge.  A few buttons from my stash and white craft thread finish the ATC.

ATC 4 and ATC 5


ATC 4

This is actually the first ATC I created and I did a bit of experimenting with the Superior Palette Stamp & Stick Gluepad and different media.  I tried foiling with no success, glitter (too chunky), and finally the dry Pearl Ex.  The images are stamped and heat embossed on black glossy card stock before brushing Duo Red-Blue and Flamingo Pink Pearl Ex over the images.  There really is a nice iridescence to the Pearl Ex that does not show in the photographs.  The frame is by Sweet Impression (in my stash forever!) and the sentiment is by Creative Cousins.   I added a heart shaped paper clip to the ATC.   ATC can be created either portrait or landscape style as shown with this image.

ATC 5

This was another experimentation ATC.  I finally went with using the Tim Holtz Mini Mask Compass to create the background image FIRST on white card stock, then printing the saying over the top.  This saying I found on the Internet as well.  The Jacquard Products Pearl Ex is mixed 4 parts to 1 part of powdered Gum Arabic.  I have used this process a few times and created my own well plate from an old candy box.  I add just enough water to make the well moist enough to use the Pearl Ex as a paint.  The water evaporates and the remaining pigment and gum Arabic are good to go for the next round.  After printing the sentiment over the image, I added the small watch by Recollections with a small black brad.   The edges are inked with Tsukineko Memento Tuxedo Black.  

ATC 6 and ATC 7


ATC 6

The image by Hero Arts was inked with Tsukineko Memento Luxe Tuxedo Black and heat embossed with clear embossing powder on white glossy card stock.  The leaves were colored in with Chameleon YG3 Spring Meadow.  The image was masked with a fussy cut post-it mask and then the edges were inked with a Tim Holtz handle and Adirondack alcohol inks in Purple Twilight and Wild Plum.  I added a flower brad over the top of the stamped flower with a Liquid Pearls Lavender Lace center and a little dragonfly brad to finish the ATC.

ATC 7

I used another saying from the Internet and then inked the white card stock with Tsukinkeo Kaliedacolor Denim and the soft foam roller.   The star image by Personal Stamp Exchange is inked in Tsukinkeo Encore Silver and stamped around the sentiment.  The brad was inked with Tsukinkeo  StazOn Azure to match the ATC, and the edges of the angel were inked to help her stand out from the background.  Mrs Grossman’s Vellum Vines Silver & Rose finish the ATC as a frame around the edges. 

To say I used just a few supplies would be an understatement . . . !

Almost everything used in creating this project.
  
Whew!  Thanks for stopping by and checking out my Friendship project, and as always, please join our challenge at Anything But a Card!  As a final note I wanted to show you just a portion of the experimental failures for this project . . . just so you know that playing with our inks, paper, and media is a process and is meant to be fun!

The not ready for prime time ATC versions!


I would like to enter my ATC Friend Booklet in the following challenges:
We Do Doobado #3 Hearts and Flowers-Flowers on the cover and ATC 6, hearts in ATC 2, ATC 3, and ATC 4
dragonfly and ATC 7 Angel
Simply Create Too #78 Use Hearts--hearts in ATC 2, ATC 3, and ATC 4
QRK Stampede Challenge #125 Anything But a Card


Tuesday, November 4, 2014

Retro Rubber Challenge Blog Challenge Number One!

Our first challenge at Retro Rubber Challenge Blog is Drum Roll Please!


The rules are simple, your stamp must be one year or older.  You may create what ever you like with your stamped image.  Come and join in on the fun and show us what was your first love stamp image.

I purchased my first art stamp at Holiday Bazaar in 1983.  I also purchased heat embossing powder that had instructions to use an iron on low setting to melt the powder.  Most likely I used a dye-based ink, as pigment inks were not yet on the market.  It does not surprise me that my first art stamp is an image of angel; I have collected them for 30+ years!  The image is the perfect size for an Artist Trading Card aka ATC, which is a 2.5 x 3.4” format card used for trading with other artists.  I have a collection of ATC from conventions and forum ATC trades.  It is a really fun way to share a small sample of your art with each other.  
Angel ATC 2.5" x 3.5"
Supplies:  Tsukineko: Encore Purple and Blue, Memento Tuxedo Black, Shimmer Spray Silver, Versa Magic:  Pixie Dust, Thatched Straw, Sea Breeze, Spring Pansy; sponge dauber, Fantastix.  Hero Arts: Angel image circa 1983; Spellbinders: Label Four; Recollections: Pearl stickers.  Misc: Spellbinders Grand Calibur machine, plates, and embossing pad, scissors, tweezers. White card stock, removable tape, adhesive, dimensional foam dots.

1.     Trim two pieces of white card stock to  2 1/2" x 3 1/2",  and one piece of white card stock to 3 3/4" x 4 3/4".
2.     Score larger piece along the shorter edge at 1/2", 5/8",  3 1/8", and 3 1/4".  Score shorter edge at 1/2", 5/8", 4 1/8", and 4 1/4".  Valley fold along all score lines to train folds.
3.     Secure Spellbinders Label Four with removable tape and die cut center of frame.  Pressure emboss; leave die in place and spritz with Tsukineko Silver Shimmer Spray.  Set aside to dry.
 
4.     Stamp Hero Arts Angel image in Tsukineko Memento  Tuxedo Black in the center of the ATC sized card stock.
5.     Use Sponge Daubers to swirl Encore Purple and Blue around the  image.
6.     Use Fantastix and Versa Magic inks to color image.
7.     Trim corners of frame and remove inside section of each corner as shown.
8.     Adhere one edge of ATC to get proper placement of both sections.  Apply dimensional foam dots to corners of the ATC as shown.  Adhere remaining edges folding the card stock to make a dimensional frame.  Use second ATC sized card stock to back the frame.
9.     Adhere Recollections Pearl embellishments.
10.     Sign and date the die cut section of the frame and adhere to the back of the ATC.
I hope you enjoyed seeing my first stamp image and what I was inspired to create with it to share with you.  Please do come and play along and join the fun of using our Retro Rubber!