Thursday, June 22, 2017

Happy Graduation (better late than never!)


Hello Retro Rubber fans . . . my post is very late, my apologies.  The last week had been filled with visits to the ER with two different family members, one was followed by emergency surgery and a hospital stay.  So my blogging ground to a halt, but now I’ve a few minutes to share my card with you for the latest Retro Rubber Blog Challenge from the following sketch.


I had a number of Graduation cards to make so the sketch came in handy to create this quick and simple version.


The Technique Tuesday Grad stamp from 2015 is stamped in Delicata Black Shimmer and heat embossed with Iridescent Embossing Powder.  Kaleidacolor Blue Breeze is added with a rubber brayer to make the image stand out.  The image is mounted on black cardstock and iridescent ribbon is added along the bottom edge.  The sentiment from the same set is stamped in Delicata Silvery Shimmer and heat embossed with Silver Surf Embossing Powder.  The black cardstock is mounted to an A2 card base and was ready to be sent to the lucky graduate!

Thanks for stopping by and there is still time to play with the challenge through June 30th at Retro Rubber Blog Challenge.  Just remember to use a stamp that is at least a year old and tell us how long it has been around, and to enter no more than 10 total challenges!

Friday, June 16, 2017

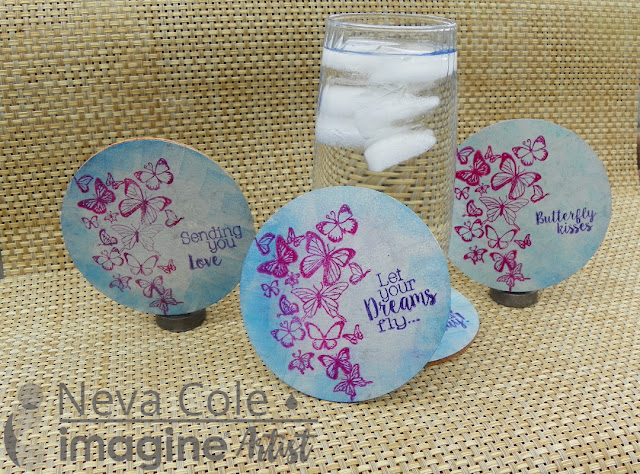
Butterfly Coasters


I am always up for a challenge that does not involve cardstock, the challenge of the month for Imagine.  This is my take on the challenge.  These coasters have been in my stash for a while and with this challenge it was the time to make something cool with them!  My Mom loves butterflies, and this will be a perfect gift for her to take along on their motorhome trips as they are light-weight and will store easily.  The actual crafting time is relatively short, but the dry time between each layer is about 30 minutes, so plan accordingly—it will give you time to work on other projects!

Level: Intermediate
Time:  30 minutes + several hours of dry time between coats.

Step 1
Apply StazOn Opaque Cotton White ink directly to metal and dab with an Ink blusher to cover the surface.  Set aside to dry thoroughly.

Step 2:
Use an ink blusher to gently dab StazOn Azure around outside edges of each coaster.  Set aside to dry. 
 
Step 3:
Use a foam brush to seal layers with GlazOn matte.  Place GlazOn in a small disposable container and paint on coasters.  Do not add directly to coaster as it will lift the ink from the surface.

 
Step 4:
Trace a coaster on a scrap piece of paper for the stamp positioner.  Practice location of stamp and adjust if necessary.   Stamp images in StazOn Blazing Red Joy Clair’s Butterfly Kisses is used for these coasters.  Stamp sentiments in StazOn Blazing Royal Purple.  Let dry thoroughly before sealing with 2 additional coats of GlazOn Matte, allowing for complete drying between coats.

Step 5:

Adhere metal coaster to cork coaster with E6000 glue.  Set aside to dry.  Get set to enjoy personalized coasters!

Imagine:

Other:
Recollections Metal and cork coasters
Joy Clair Butterfly Kisses stamp set
Foam Brush
E6000 glue

Thursday, June 15, 2017

Vintage Planes for Father's Day


Time to make another Father’s Day card as we celebrate on Sunday! I was inspired by the Off the Edge challenge and pulled out my Carta Bella Adventure is Out There stamp set and the matching Vintage Airplane Stencil.  With a little Memento Luxe Rich Cocoa on both the image and through the stencil I created a cohesive look. What is fun about a stencil is I could make the planes go the opposite direction from the stamped image.  In all honesty, I stenciled the images and then decided to redo the process so I could leave room for the sentiment.  The sentiment is an old Studio G set and is stamped in Memento Luxe Nautical Blue.  The airplane image is heat embossed with clear embossing powder and die cut with the matching die.  After mounting the plane image on the blue cardstock I added the dotted ribbon to ground the plane.  Before adhering the front panels to the card base I sponged Memento Luxe in Nautical Blue and Rich Cocoa around the edges to contrast the card front. 

I would like to enter the following challenges:
Quirky Crafts Challenges  Things with wings
The Male Room #62 Off the Edge Enter on 6/20!
Crafting by Design Things with wings
City Crafter #366 Frame It!
Tuesday Throwdown #347 For the Men
Always Fun Challenges #10 For the Male or Dad
Cards in Envy You’re the Man

Wednesday, June 14, 2017

Tangerine Daisy Aster Birthday Card

Tangerine in the color of the month over at Imagine.  Today this card with hand-made flowers is featured.


There are so many wonderful tangerine colored flowers, the daisy asters being one example. I wanted the flowers to look as realistic as possible and included lots of layers to pop off the card front.

I started by die cutting multiple layers to create very realistic flowers with a bit of shaping.  I selected a matching stamp set from Heartfelt Creations to decorate the card layers to fashion a cohesive look with the coordinating dies. And just like a good crafter would, I finished by adding Gold Sheer Shimmer Spritz to the front panel along with the Tangerine All-Purpose Ink with the same Gold Shimmer to create a very striking look!  I am really glad the photo shows the wonderful shimmer!

Imagine:

Other:
Heartfelt Creations—Delicate Asters stamp and die set, Bold Delicate Asters stamp set, Inspire Me sentiment
White cardstock
Corner rounder

Tuesday, June 13, 2017

Joining the Stick It Down Double Page Design Team

If you know my style of scrapbooking, you know that I tend towards double page layouts that tell a story or share an event.  I am delighted to be included in the Stick It Down Double Page Design Team.  Look for our sketches at the beginning of the month and DT reveals on the first Monday of the month. 

I am looking forward to sharing more of my scrapbooking with you in the next few months!  Stay tuned!

Monday, June 12, 2017

Starrry Father's Day Card


I am in the time crunch to create a few more Father’s Day cards.  I also have a ton of birthdays plus graduations to think about this time of year.  This card concept came to mind when I created this layout as a GDT for Colors, Stories, Inspiration blog.  I originally die cut this set of light blue stars and changed my mind . . . figuring I could use it later!  Interior stars from the red die cut fit perfectly and I decided to die cut a few of a patterned paper found while cleaning up my craft table.  Not enough energy to go figure out the manufacturer right now, cold induced fog is limiting my mojo!  Next up was Say it Happy from Technique Tuesday.  This die and stamp set is perfect when needing almost any holiday sentiment.   The Father’s Day is stamped in VersaFine Cimrson Red and is a awesome match to the red I do think!

Here are the challenges I would like to join, thanks so much for stopping by!

Allsorts Challenge #419 Use at least two dies
Crafty Catz #374 AG with twists of dies
QKR Stampede #247 For the guys
Craft Rocket Challenges #8 For the Men/Boys
Cardz 4 Guys #171 Something Blue for Father’s Day

Wednesday, June 7, 2017

Father's Day Card featuring Kaleidacolor

This gorgeous wolf is featured at Imagine today along with another Tangerine inspired animal card.  Check it out!


Summer time brings a few holidays to celebrate, Father’s Day starts off the fun!  I am so pleased with how this card came together with the lovely colors of the Kaleidacolor Cappuccino Delight ink pad.  The focal image is stamped on glossy cardstock in StazOn Timber Brown and die cut with the matching die.  Using a Fantastix color from the Kaleidacolor pad is picked up and added to the image starting with the lightest colors first.  To lighten and move the ink around a bit of Ink Potion No. 9 is sprayed on the craft mat and picked up with the Fantastix.  The background is brayered on glossy cardstock and stamped in colors from the Cappuccino Delight palette.  The wolves in the background are stamped in StazOn Jet black.

My dad is sure to enjoy this nature inspired Father's Day card.  He has spent a great deal of time in the outdoors enjoying the wilds of Alaska.


Imagine:

Other:
Local King Rubber Stamps—Wolves and matching die
TPC Studio—Dots and Strips (Hill line)
Glossy cardstock
Kraft card base


Tuesday, June 6, 2017

Anything Goes at Retro Rubber


Retro Rubber’s challenge for the next two week is ANYTHING GOES!  This is always a popular challenge and we usually get some fantastic projects.  Please check out the fun projects the Design Team has created. 


We had a big birthday in our home this last week, my son turned 18!  Wahoo!  This card was inspired by the sketch over at Paper Craft Crew Challenges.  


My son likes the color blue, so I found ribbon in my stash in several colors of blue and used that as the starting point for color selection.  I wanted to feature eighteen on his card so I went with some really old Idea-ology grunge board—harlequin digits & punctuation.  The grunge board readily absorbs ink, I used Memento Luxe Nautical Blue.  DCWV cardstock in two coordinating colors are added to the mix.  One is pressure embossed and sanded with Cuttlebug’s Happy Birthday embossing folder.  The other is stamped with Taylored Expression In & Out Birthday from 9/2014.  The sentiment is fussy cut before it is adhered to the card with dimensional foam adhesive. 

Please come play along with our Retro Rubber challenge and share your ANYTHING GOES project with us!  Remember to use a stamp at least 1 year old, after all we are the Retro Rubber Blog Challenge, and let us know how long it’s been around.  We also ask that you enter only 9 other challenges besides ours.

I would like to enter this card in the following challenges:

Sunday, June 4, 2017

Class of 2017


Wow, it is that time of year, Graduation!  We have several friends with High School graduates this year, so it is time to make a few graduation cards.  I started with the scraps I had on my craft table that will be featured tomorrow in another card, so the color scheme will be familiar!  I really like the sketch from Freshly Made Sketches and had to give it a go.  One of my newest embossing folders, Congrats Collage by Darice came out to play.  I really like the texture an embossing folder and a little sanding creates.  Technique Tuesday’s Cap & Gown seal was stamped in Memento Luxe Teal Zeal and die cut with a Spellbinders Standard Circle die.  The Spellbinder’s Classic Scalloped Circles Large provided the half circle in the sketch.  Fiskars Monumental Moments and a very old Hero Arts alphabet, Serendipity adds the sentiment above the line.  A bit of iridescent white ribbon finishes off the card. 

Stay tuned for a few more graduation cards, a fun way to spend some time in my craft cave.
   
I am delighted to play along with the following sketches.