Showing posts with label ribbon. Show all posts

Tuesday, February 11, 2025

Sketchy Time at Retro Rubber

 We have a great sketch, perfect for Valentine's Day if you still need to make a card for someone!  Check out the great makes of the Design Team at Retro Rubber Challenge Blog.  

So my take followed the sketch for the most part with a few additions.


 I knew I had some lovely deep red suede paper that is easily 25 years old.  In that folder I found the border that must have been left over from an old project.  I had a perfect use for it!

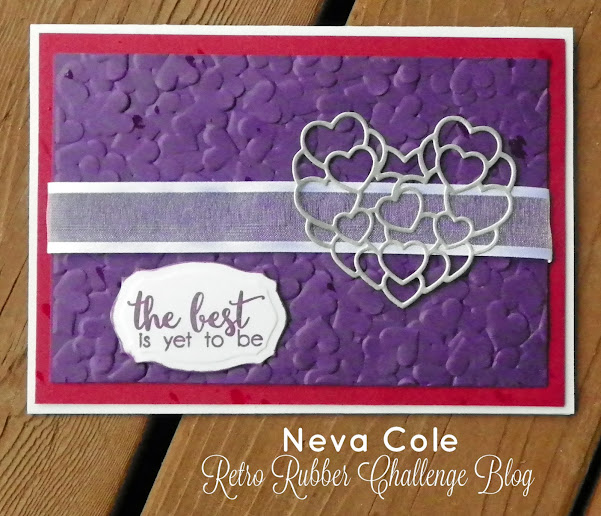
  • The hearts are ancient Quickutz dies cut from cream cardstock and the above mentioned red suede paper.  
  • Scrapbooks.com had a great layering tag die that I use ALL the time.  After die cutting black cardstock, it is run through and pressure embossed with Sizzix Scattered Hearts embossing folder.  
  • The scrap bin of patterned papers yielded the perfect strip paper for the design.
  • Lawn Fawn die cut banners is stamped with a Technique Tuesday Love is all you need stamp set from 2008.  Memento Luxe Rhubarb Stalk ink is used to stamp the image and it is heat embossed with clear embossing powder.  
  • The layers are adhered together and a small tied bow is the finishing touch.

Thank you so much for stopping by and I hope that you enjoy playing along with this sketch at Retro Rubber Challenge Blog.   

CHALLENGE GUIDELINES

  • We require stamps older than one year.  If we feel you are using newer stamps, you may be disqualified from the challenge without notification.
  • New papers/dies are OK – but you must use at least one stamp older than a year and describe the age in your blog post.
  • Please note that all challenges require the use of at least one stamp older than a year.
  • Post your new creation to your blog or online gallery.   Use keyword RRCB248.  No backlinking. 
  • Link back to the blog using the Linky Tools by the due date. 
  • Enter as many times as you like. 
  • Feel free to combine our challenge with a maximum of 5 challenges.  Entries linked to more than 5 challenges will be disqualified without notification.
  • If your project is posted on a private group site such as Split Coast Stampers or a photo sharing site not all DT members may be able to comment.   Thank you for understanding.
  • Turn off Word Verification.  We love to comment but word verification can make that difficult.


Tuesday, December 3, 2024

Retro Rubber Challenge 245 to finish 2024

 Here we are at the end of another challenge blogging year at Retro Rubber!  Our last challenge is a creative Tic Tac Toe, that can be used in many ways.

 This is very conducive to create a lovely Christmas card.  Some of the greenery is the same as the last challenge, but used in a very different way!  Here in Northern Minnesota  porch pots are very popular.  As of last week they all became frozen so the greens will stay all winter.  My card is a representation of a porch pots and looks similar to the one sitting on my porch!

Heartfelt Creations last day was November 30, 2024.  I've been a Platinum Member since 2013, and purchased products regularly.  This is the Winter Wreath Accents and Die from 2021.  (Yes, featured in the last challenge too!)  I choose the Ribbon or Twine/Greens/Dies or Punches diagonal to create my card.

  • The greens from HC Winter Wreath Accents are stamped in Memento Northern Pine and Cottage Ivy on various colors of green card stock.  Memento Bamboo Leaves is blended onto the images as well.  All are die cut with matching die.
  • Sizzix Small Tattered Florals die was used to create the brown branch fro cardstock.
  • Sizzix Garden Greens dies are used for addition sprigs in the arrangement.  One set is blended with Memento Cottage Ivy.  
  • The pot is a punch I've own for easily 20 years!  Green shimmer paper was punched for the pot and the edges lightly inked with Memento Coffee ink.
  • The oval is die cut from the center of Kraft cardstock with the Simon Says Stamp Stitched Ovals.
  • The background paper is by Hot of the Press.
  • The layers are adhered together and the "porch pot" greens are assembled and adhered with various thickness of regular and foam adhesive.
  • The sentiment from Lawn Fawn's Winter Wavy Sayings  (2019) is stamped in Memento Northern Pine on green card stock and die cut with the matching die. 
  • The final touches includes Christmas Red Stickles for red berries and a bow tied from shiny red ribbon.  

I hope that you enjoy playing along with us a Retro Rubber and enter your own Tic Tac Toe project!  


Tuesday, April 23, 2024

Tic Tac Toe! Friendship card

Spring is inching happily towards us!  At Retro Rubber Challenge Blog we have a fun Tic Tac Toe and it happens to be my contributed challenge.  Often I have a hard time with Tic Tac Toe challenges, as I overthink the process.  But once I got going on this one I was able to check all the squares off, and complete a black out, well I guess that's a bingo term!

 
This is the challenge image to create your card or project. 
 
 
My card was created using the following:
  •  The die cut is Stitched Ovals from Elizabeth Craft Designs.  It is die cut from white cardstock and stamped with Hero Arts 2009 Friends are Flowers in Memento Luxe Pear Tart and heat embossed with clear embossing powder.  Fireworks! Bamboo leaves is gently tapped over the image to add some depth and painted into the leaves. Small die cuts from Sizzix Tim Hotlz Tattered Flowers are die cut from scraps of cardstock to put over the stamped flower.
  • The pink shimmer card stock is first die cut with the Stitched Ovals from Elizabeth Craft Designs then pressure embossed with Darice Petal Background embossing folder.  With a white core paper, the flowers are distressed with a sanding block as well as the edges.  K & Company adhesive gems are added to a few of the flower's centers.
  • The card base has Fireworks! Bamboo leaves gently tapped around the edges to pair with the focal image.
  • The layers are adhered together to the card base, taking care the the oval is placed the same direction as it was die cut.  Even with symmetrical dies they are not perfect!
  • Sheer purple ribbon is tied into a small bow and adhered to the card.

How fun is that?  Sometimes a Tic Tac Toe board can inspire the next little detail on your card!

 CHALLENGE GUIDELINES

  • We require stamps older than one year.  If we feel you are using newer stamps, you may be disqualified from the challenge without notification.
  • New papers/dies are OK – but you must use at least one stamp older than a year and describe the age in your blog post.
  • Please note that all challenges require the use of at least one stamp older than a year.
  • Post your new creation to your blog or online gallery.   Use keyword RRCB229.  No backlinking. 
  • Link back to the blog using the Linky Tools by the due date. 
  • Enter as many times as you like. 
  • Feel free to combine our challenge with a maximum of 10 challenges.  Entries linked to more than 10 challenges will be disqualified without notification.
  • If your project is posted on a private group site such as Split Coast Stampers or a photo sharing site not all DT members may be able to comment.   Thank you for understanding.
  • Turn off Word Verification.  We love to comment but word verification can make that difficult.

Do come and play along with us at Retro Rubber Challenge Blog. We would love to see what you create!

Tuesday, March 12, 2024

Spring is on the Way!

Our theme for the next two weeks at Retro Rubber Challenge Blog is Spring is on the Way!Early blooming flowers are a sign that spring is right around the corner.  The sunny faces of Daffodils smiling will brighten anyone's day!  I created two of these cards, one for each of the Mothers in our family.


The stamp/die/mold Spring Daffodil set from Heartfelt Creations was released in 3/2021.  These flowers do take a bit of time create, but the end product is so worth the effort!  Heartfelt Creations has been a leader in exquisite flowers for over two decades.  Sadly the creator and owner is retiring.  If there is a flower you really love, now is the time to see if they are still available.  (I'm not in any way affiliated with HC, but have loved their products for many years!)

There are videos available on YouTube (Heartfelt Creations Spring Daffodil) to help you make these flowers, so I am going to list the supplies I used rather than describe the creation.  There is an accordion fold between the front die cut and card base, with the fence die cut mounted in the middle.  This allows the dimension of the flowers to shine.

Supplies:

  • Heartfelt Creations Spring Daffodil stamps, dies, shaping mold
  • HC Fragrant Hyacinth Stamp and die for the leaves
  • HC Spring Garden Paper collection (on card front base and tag)
  • HC Deluxe flower shaping kit
  • HC golf tool
  • HC Pastel Pollen Stamens
  • HC Teardrop Lattice Gateway die
  • HC Lattice Flourish Gateway die
  • HC Thank you sentiment stamps 9/2018
  • Memento Luxe' Dandelion
  • Memento Cantaloupe, Cottage Ivy, Pear Tart, Bamboo Leaves
  • Versa Magic Pumpkin Spice
  • Hot glue gun
  • Craft wire
  • Floral green tape
  • Paper Studio Tag Punch
  • Creative Memories Corner punch, Trimmer
  • Ofray Ribbon
  • Green, Purple, and white cardstock

Enjoy creating for Spring or in my case preparing ahead for Mother's Day!

CHALLENGE GUIDELINES

  • We require stamps older than one year.  If we feel you are using newer stamps, you may be disqualified from the challenge without notification.
  • New papers/dies are OK – but you must use at least one stamp older than a year and describe the age in your blog post.
  • Please note that all challenges require the use of at least one stamp older than a year.
  • Post your new creation to your blog or online gallery.   Use keyword RRCB226.  No backlinking. 
  • Link back to the blog using the Linky Tools by the due date. 
  • Enter as many times as you like. 
  • Feel free to combine our challenge with a maximum of 10 challenges.  Entries linked to more than 10 challenges will be disqualified without notification.
  • If your project is posted on a private group site such as Split Coast Stampers or a photo sharing site not all DT members may be able to comment.   Thank you for understanding.
  • Turn off Word Verification.  We love to comment but word verification can make that difficult.

Thursday, December 15, 2022

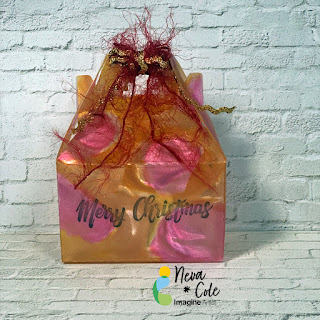
Vertigo Christmas Gift Box with StazOn Inks


Vertigo is a beautiful translucent material to use in creating projects, in today's tutorial there will be tips and hints to make your project shine!  The perfect ink for this box is StazOn,  and is the only ink that will dry on Vertigo and other plastics. 

 Skill:  Intermediate

Time:  1 hours

Step1:

 
Vertigo can be cut with scissors OR with a simple die.  Complex dies do not work well with most plastics, vertigo included.  This particular box needed 8.5" by 5" section of Vertigo, 12" x 12" sheets can be purchased directly from Imagine Crafts website.  Recycled packaging may be substituted for Vertigo, however the results will not have the stunning effect the the patterns that Vertigo provides.   The Pebbles pattern of Vertigo was used for my box.

Step 2:


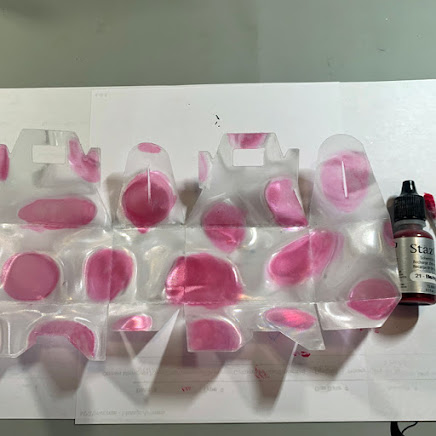
Place a few drops ink from StazOn Blazing Red inker on a plastic surface to use as a palette.  On the INSIDE  of the box use a cotton swab to color each of the pebbles from the center out.  A little goes a long way with the translucent colors. 

Step 3:

 
Metallic StazOn ink is slightly less translucent than the other colors.  To capture more shimmer apply a drop or two of StazOn Metallic Gold on the INSIDE of the box and move the ink with a cotton swab to color around the pebbles.

Step 4:

 
Continue to add StazOn Metallic Gold ink to cover the remaining areas of the inside of the box.  Set aside to dry, as the Metallic ink is a bit thicker and takes a longer to dry. 
 
Step 5:

The sentiment is stamped on the OUTSIDE of the box, keeping the interior of the box ink from lifting and to have the correct orientation.  Merry Christmas is stamped in StazOn Jet Black. 

Step 6:


Tear It! tape is perfect to hold the bottom of this gift box together.  Assemble box and determine the best placement for the Tear It! tape.  Unfold box and add Tear It! tape, my project called for five sections to hold the box in shape.

Remove Tear It! tape liner and assemble gift box.  Decorate with matching ribbon and fibers to close the top and keep your gift secure.

Art Supplies

Imagine:

Vertigo--Pebbles 12" x 12" sheet

StazOn Inkers--Blazing Red and Metallic Gold
 
StazOn Jet Black
 
Tear It! tape
 
Other:

Bakery Gift box die--Lifestyle Crafts

Cotton Swabs 

Sentiment--Christmas Blessings Taylored Expressions

Misc:  Gold Ric Rac and red fibers

Tuesday, November 22, 2022

Tic Tac Toe Challenge for Retro Rubber

It has definitely moved from fall to winter in my part of the country in a hurry!   One day is was fall (Oct. 31st) and the very next day we had snow on the ground heralding in the winter!  But I put my fall thinking cap on to play with this fun Tic Tac Toe Challenge from Retro Rubber. 


I choose the top line to make a CAS card in about 15 minutes!

  • To start I die cut the Taylored Expressions Flourishing Frame Cutting plate from tangerine cardstock.  I believe it was a freebie from 2021 Black Friday's sale!
  • I used the center block from the die cut and adhered it with temporary adhesive.  Using an ink blusher I inked the edges in memento Luxe Morocco.  I tried to make it darker at the edges blending to a lighter color toward the center.
  • The die cut is adhered with a new to me adhesive, Sticky Specks that I purchased at the Hillsboro, OR CKC.  It was super sticky, and helps keep all the little leaves in place.
  • The sentiment is from Recollections Many Thanks, 2019.  It is stamped in Memento Luxe and heat Embossed in clear embossing powder to make it pop on the white background.  By stamping it slightly off center it left room for the final embellishment.
  • A scrap of dotted yellow ribbon is tied in a bow and adhered with a glue dot.
 Easy peasy; Orange, die cut, and ribbon!  Please do join us at Retro Rubber, but first go check out the lovely makes of the design team!

CHALLENGE GUIDELINES
  • We require stamps older than one year.  If we feel you are using newer stamps, you may be disqualified from the challenge without notification.
  • New papers/dies are OK – but you must use at least one stamp older than a year and describe the age in your blog post.
  • Please note that all challenges require the use of at least one stamp older than a year.
  • Post your new creation to your blog or online gallery.   Use keyword RRCB195.  No backlinking. 
  • Link back to the blog using the Linky Tools by the due date. 
  • Enter as many times as you like. 
  • Feel free to combine our challenge with a maximum of 10 challenges.  Entries linked to more than 10 challenges will be disqualified without notification.
  • If your project is posted on a private group site such as Split Coast Stampers or a photo sharing site not all DT members may be able to comment.   Thank you for understanding.
  • Turn off Word Verification.  We love to comment but word verification can make that difficult.

Tuesday, August 2, 2022

Elegant but CAS Sympathy Card for Retro Rubber Anything Goes

It is the season of life where I need to make sympathy cards.  For friends who have a parent pass, or even siblings of friends.  Anything Goes at Retro Rubber is a good challenge for this type of card.

This clean and simple card uses ink, an embossing folder, a stamp, and ribbon and takes about 10 minutes to complete!

  • Ink is directly applied to the embossing folder with a brayer on the high points.  White cardstock is placed and attention is paid to not allowing it to move before it is pressure embossed.  Brilliance Pearlescent Poppy was my ink of choice for this card.  Once embossed the ink appears in the valleys of the impression.  The card front is trimmed to 4" x 5.25" and then inked in Brilliance Pearlescent Poppy.
  • The sentiment is from Unity Stamp Company's ". . . beautiful life, blessed memories" set released in January 2015.  
  • A matching ribbon is tied in a bow and adhered with a glue dot.
  • The card front is adhered to a A2 card base 4.25" x 5.5".

I hope you will join us at Retro Rubber for our Anything Goes challenge.  Thanks for stopping by!

 CHALLENGE GUIDELINES

  • We require stamps older than one year.  If we feel you are using newer stamps, you may be disqualified from the challenge without notification.
  • New papers/dies are OK – but you must use at least one stamp older than a year and describe the age in your blog post.
  • Please note that all challenges require the use of at least one stamp older than a year.
  • Post your new creation to your blog or online gallery.   Use keyword RRCB186.  No backlinking. 
  • Link back to the blog using the Linky Tools by the due date. 
  • Enter as many times as you like. 
  • Feel free to combine our challenge with a maximum of 10 challenges.  Entries linked to more than 10 challenges will be disqualified without notification.
  • If your project is posted on a private group site such as Split Coast Stampers or a photo sharing site not all DT members may be able to comment.   Thank you for understanding.
  • Turn off Word Verification.  We love to comment but word verification can make that difficult.

Tuesday, October 12, 2021

Anything Goes for Retro Rubber

 It's time for a new challenge at Retro Rubber and it is one of everyone's favorites!  Anything goes!


Today I have a CAS sympathy card that you can have in the mail in no time!  I use one of my favorite techniques with embossing folders, and then added a ribbon touch.


  • To achieve the inlaid embossed look I inked up the raised portion of Sizzix Embossing Folder Moroccan with Brilliance Pearlescent Poppy.  Then pressure embossed and trimmed the card front down the the inked edges.
  • The sentiment is from Unity Stamp Co. . . . beautiful life, blessed memories set.  It is stamped in Pearlescent Poppy.
  • A simple bow is tied and mounted with a glue dot below the sentiment.
  • The card front is adhered to a matching A2 card base.  

 CHALLENGE GUIDELINES

  • We require stamps older than one year.  If we feel you are using newer stamps, you may be disqualified from the challenge without notification.
  • New papers/dies are OK – but you must use at least one stamp older than a year and describe the age in your blog post.
  • Please note that all challenges require the use of at least one stamp older than a year.
  • Post your new creation to your blog or online gallery.   Use keyword RRCB169.  No backlinking. 
  • Link back to the blog using the Linky Tools by the due date. 
  • You may enter no more than 5 times. 
  • Feel free to combine our challenge with a maximum of 10 challenges.  Entries linked to more than 10 challenges will be disqualified without notification.
  • If your project is posted on a private group site such as Split Coast Stampers or a photo sharing site not all DT members may be able to comment.   Thank you for understanding.
  • Turn off Word Verification.  We love to comment but word verification can make that difficult.

Thanks so much for stopping by, and do come and play with us at Retro Rubber!

Tuesday, May 11, 2021

Retro Rubber Tic Tac Toe Just Saying Thank You Card

Retro Rubber has a new Tic Tac Toe to play along with for the next two weeks!  Do check out what amazing things the Design Team created!


I always need a few Thank You cards in my stash, and this challenge was perfect to use some of my really pretty spring paper scraps from a Basic Grey collection Mint Julep released in 2012.  So very retro paper too!  I went with the Patterned Paper, Heat Embossing, and Ribbon column.


  • The stamp is Happy Day by Studio G from 2011 when they were still made of rubber!  It is stamped in Encore Teal and heat embossed with Iridescent embossing powder.  The collection is two sided so the coordinating papers are all from the Min Julep collection.  
  • The sentiment is die cut with TT Die Banners.
  • The square and rectangles are both sets from Elizabeth Craft Designs Stitched Squares and Stitched Rectangles.
  • The bow is made from layered sheer yellow and lopped edged pink ribbon.  
  • The final touches are the Butterflies!  First the paper is inked with Versa Mark Dazzle and then heat embossed with Iridescent embossing powder.  Then die cut with Cuttle bug Springtime Confetti.  They are the perfect size to coordinate with the small print flowers.  

Please do join along with our challenge at Retro Rubber.   We have a few simple rules:  1) Use a stamp at least one year old  2) Tell us how old the stamp is  3) Enter up to ten challenges including ours.  Thanks for stopping by!

I would like to enter into the following challenge as I based my card off their simple but great sketch!


Fab Friday 213


Wednesday, March 24, 2021

See how to Make a Stamp Multi-Colored for Imagine

See How to Make a Stamp Multi-Colored

By Neva Cole

In today's crafting tutorial, I will show you how to use a single stamp image and stamp each line in a different color ink.  I will also share how to blend VersaMagic inks for a background and take it up a notch by dry embossing.  

Skill:  Intermediate

Time: 1 hour

Directions:

Step 1

Place image on stamp positioner and use a post-it to cover the bottom three lines of the image.  I used a sentiment stamp from Unity Stamp Co. titled "Everything Easter" with four lines of text.  Use a paper piercer to tuck the post-it securely in place. Ink the top line with VersaMark in Aloe Vera.   Remove post-it and stamp image on cardstock. Clean ink off of the post-it so you can use it for subsequent steps.  Clean image after stamping and moving to Step 2.  Repeat this after each step through step 4.

Step 2

Use two post-its to cover lines 1,3 and 4 and ink image with VersaMark in Spring Pansy. 

Step 3

Use two post-its to cover lines 1,2, and 4 and ink image in VersaMark Sea Breeze. 


Step 4

Use a post-it to cover lines 1,2, and 3 and ink image in VersaMark in Spring Pansy.


 Step 5

Clean entire image and ink in VersaMark and stamp image over the colored lines.  Heat emboss with Iridescent Embossing Powder.


Step 6

Using ink blushers ink a section of 4" x 5.25" cardstock in VersaMagic Aloe Vera, Spring Pansy, and Sea Breeze and blend into each color.  Use an ink blusher to ink over the heat embossed sentiment image with VersaMagic Pixie Dust.

Step 7

Pressure emboss 4" x 5.25" blended color cardstock with Lifestyle Crafts Tide embossing folder.


Step 8

Use a sanding block or sand paper to gently remove the color from the raised areas of the embossed cardstock.  The white color of the cardstock will show through.


Step 9

Die cut sentiment image and use and ink blusher to in the edges in VersaMagic Spring Pansy.


Step 10 

Ink the edges of an A-2 (4.25" x 5.5") card base in Versa Magic Spring Pansy.


Step 11

Adhere layers together with foam adhesive.  Adhere pearl embellishments in curly- ques of the embossed background.  Adhere pearl embellishments to the center of small flower sequins and adhere with On Point Glue.  Tie a triple looped bow from sheer ribbon and adhere with On Point Glue.

Art Supplies

Imagine

  • VersaMagic-Pixie Dust, Spring Pansy, Aloe Vera, Sea Breeze 
  • VersaMark
  • Embossing Powder-Iridescent
  • Ink blushers
  • On Point Glue

Other

  • Unity Stamp Co.  Everything Easter
  • Post-it notes
  • Paper piercer
  • Lifestyle Crafts Tide embossing folder
  • Sanding block
  • SpiegelmomScraps 50's Sock Hop sequins
  • Foam adhesive


Tuesday, March 16, 2021

Anything Goes for Retro Rubber

 Always a fan favorite is an "Anything Goes" challenge.  Come play along and enter your project at Retro Rubber.  


A few quick reminders:  1)  you must use at least one stamp that is older than a year AND let us know how long you have had it.  2)  You may enter up to ten challenges including ours.  3)  Please limit your entries to our challenge to three projects.  

If there is one kind of card that is more difficult to make it is a Sympathy Card, especially for family and close friends.  Often they are a card that you need at a time when your crafting mojo may not be working because of the circumstances.  With that said I do encourage you to have a sympathy card or two on hand so they are ready to send as needed.  Recently I needed three to send to a friend and her daughters following the passing of their dad and grandpa.  I am really glad I had cards in my stash ready to go!


This card is simple, elegant, and a quick make:

  • Trim white cardstock to 4.75 " x 6.25" and pressure emboss with Darice Corner Scroll embossing folder.  Edge the card front with Delicate Silver Shimmer.
  • Stamp sentiment in Delicata Silver Shimmer.  It is from the Sincere Sentiments set released in 2017 by SCDesigns.
  • Heat emboss with Imagine Sparkle Embossing powder.
  • Secure sheer ribbon around card front then using a second piece of ribbon, tie a knot around the first ribbon.  It is much easier to get the correct placement of the knot using this method.
  • Adhere card front to A-7 card base.

Please come join our Anything Goes challenge and see what you come up with to delight the design team.  Thanks so much for stopping by!


Tuesday, November 3, 2020

Anything Goes for Retro Rubber Anniversary Card

 We have the ever popular Anything Goes for our challenge for the next two weeks over at Retro Rubber Challenge Blog.

We have very simple rules:  1) Use a stamp older than a year, give it some inky love!  2)  Tell us how old the stamp is or give us your best guess  3)  Enter up to ten challenges including ours.


Today I am featuring a card I made for my husband for our 15th Anniversary.  I used the colors from our wedding and the paper selection is what I used when I scrapped our wedding.


  • The sentiment is from Technique Tuesday Inspired Dragonfly released in 2016 and Unity Stamp Company's . . . no remedy for love released in 2015.  It is stamped on Coordinations Light Icy Indigo in Versa Color Grape.  Spellbinders Labels 25 is used to die cut the sentiment and the edges are inked in Versa Color Grape.
  • Canson Silver paper is die cut with Impression Obession DIE 056-I.  
  • Coordinations Groovy Grape is pressure embossed with Sizzix Textured Impressions Confetti Hearts.  
  • Silver sheer edged ribbon is adhered around the embossed layer and adhered to Coordinations Deep Racy Raspberry.  The additions embellishments are adhered to the layers.
  • The base card is Coordinations Light Icy Indigo.

Thanks so much for stopping by and do come play along with us at Retro Rubber Challenge Blog.

Tuesday, September 22, 2020

Retro Rubber Anything Goes!

 A challenge that everyone can enjoy, Anything Goes at Retro Rubber Challenge Blog!  We have a few simple rules:  1) Use a stamp at least a year or older 2) tell us how old the stamp is 3) enter up to ten challenges only including ours.  Thanks!


I made a few thank you cards for my birthday, and decided to share them with you!

I started with Concord & 9ths' Many Thanks Stamps and Dies from 2017.

  • Since I needed a stack to send out I stamped four sets of the background Thanks.  I used Versa Color Paprika and Brown, Versa Fine Vintage Sepia, and Delicata Dark Brok Shimmer.  Using my stamp positioner I stamped four in succession and cut each 6" x 6" into 3" x 6".
  • The background is inked in Paprika and then mounted to dark craft colored cardstock which is also inked.
  • Brown ribbon from my stash is wrapped around the top for balance and a knotted section is adhered with a glue dot.
  • A die cut of the quote bubble is adhered around the thanks.
  • "so much" is stamped in Paprika on dark craft cardstock.
  • A die cut heart from the set is inked with Paprika as well.
  • The final embellishment is the butterfly from Recollections.
  • Light brown craft cardstock is the card base. 


Here is the finished stack, I ran out of brown ribbon so I repeated the process in another color scheme to make a few more thank you cards.

Come join us at Retro Rubber Challenge Blog for Anything Goes!

Tuesday, April 21, 2020

Retro Rubber Anything Goes Butterfly Kisses

Hello all!  Either you have more time to craft than you've ever had before, OR you are even more busy because not only are you working from home, schooling your children, AND taking twice the amount of time to do grocery shopping.  I would fall in the later category.

At any rate, our challenge for the next two weeks over at Retro Rubber is Anything Goes!


This morning was the first time I've had time to sit down at my craft table and create something, and I am very pleased with the results.  I was inspired by the challenge listed below.


  • This wonderful bit of ribbon was in my scrap ribbon stash and was the starting point for the card.  
  • The native butterflies are just starting to hatch in our area (my GSD loves to chase them and their shadows), plus butterflies are a favorite of mine anyway.  This set is by Joy Clair Butterfly Kisses from 4/2017.
  • The background is Kaleidacolor Berry Blaze that is brayered onto Bristol cardstock with a soft rubber brayer.  
  • The background butterflies are stamped in Memento Luxe Tuxedo Black.
  • I ended up doing a second go at the background, and then decided the focal butterfly could be stamped on the scrap in Memento Luxe Tuxedo Black.  (The first stamping of the background butterflies do not go as planned!)  The focal butterfly is fussy cut.
  • Bristol cardstock is die cut with Spellbinders Mystical Embrace die and then inked with an Ink Dauber in Memento Luxe Tuxedo Black.
  • The edges of the card base are also inked with Memento Luxe Tuxedo Black.
  • The ribbon is adhered to the background, then to the base with foam adhesive.  The sentiment panel is adhered with foam adhesive as well.  The focal butterfly is shaped a bit and adhered with a bit of foam adhesive and glue dots.  
 I was inspired by TGIF Challenges Sketch for my card!

Thanks so much for stopping by and please to come by and join our Anything Goes Challenge at Retro Rubber!

Thursday, February 27, 2020

Kindermusik

It is super fun to scrap photos that are now (yikes) ten years old.  They are good memories that help when parenting a teen gets tough!

 The left side is inspired by the sketch challenge over at Scrap Your Stash.  The sketch is altered for 4 photos on the right side.
.

  • I started with light blue cardstock as a base and added a colorful music patterned paper I have in my stash for who knows how long?  There was no identifying printing on the paper to even know who made it, but it was perfect for this layout!
  • I has some great scraps from Bo Bunny Toy Box, Circles (which I think count as polka dots) and Cheerful.  The small 4 represents how old my son was in the photos, and is from the B side.
  • The yellow strips is also a B side pattern as is the two color small strips.  I think they all coordinate together well.
  • To add both washi tape an follow the idea of the sketch I added lime green washi by Paper Studio.  It did take a few minutes to miter the corners.  
  • The tag was cut with Paper Studio's Tag punch.  A small remnant of ribbon from my stash tops the tag.
  • The Musical die cuts are from the Silhouette store.
  • David Walker Creative Imaginations letter stickers create the two titles. 
  • Journaling was completed with a Zig Writer in Splash.  
 Thanks so much for stopping by!  It is therapeutic to share my crafting with the blogsphere!   
 

Wednesday, January 29, 2020

Blankies Layout

Hello all, I am finally having some time to do some scrap layouts.  Not usually a single page gal, I choose a single page sketch for these precious photos of my boys almost 10 years ago!


I am like many scrapbookers, and have a huge stash of patterned papers.  I found a few that are almost vintage to create this layout.
  • My Mind's Eye Lime Swirl from 2006, and Magnolia from 2008, and Art Imaginations Blue Scroll from 2005 all coordinated together.  
  • Wanting to go a bit mixed media I splattered some Fireworks! in Bahama Blue and Summer Sky on white cardstock.  After it was dry, it was die cut with Spellbinders Cascading Stars.  One of the things I like about this die is you can use all the parts!
  • The title is die cut from a light blue cardstock using an installed font on my Brother Scan N Cut DX.  
  • A few bits of ribbon from my stash are tied into bows.
  • Everything is mounted on Core'dinations Distress Collection Blue cardstock.
  • The final embellishments are Spiegelmom Scraps Southern Blue Bells sequins.  
I was inspired by Sketches in Thyme:


I would also like to submit to the following challenges: