Tuesday, May 29, 2018

Thanks a Latte for Quick Quotes

Welcome to the end of the month here at Quick Quotes.  You may have noticed all the fun coffee themed projects and I am here to share a sweet shaker card with you. 


Thanks A Latte was created from a few papers from the Anchors Away collection. The inside of the shaker card has mini coffee cups which I think are so cute!


o   Anchors Aweigh 101 is trimmed to 4 ¼” x 5 ½”.
o   The paper is pressure embossed with a folder that also die cuts the coffeed cup at the same time.  How cool is that?
o   To bring out the embossed areas, a sanding block is used to sand away the color from the paper.


o   Anchors Aweigh 104 is trimmed to 4 ½” x 5 ¾”.
o   Anchors Aweigh 109 is trimmed to 4 ¾” x 6”.
o   Embellishments are die cut from the scraps of the coffee cup.
o   The die cuts are initially inked with Powder Puff Chalking Ink Island Orange. 
o   Later (not shown) I inked the sentiment with Kokomo because I decided it need more contrast.
o   All the rectangle sections are inked with Island Orange.


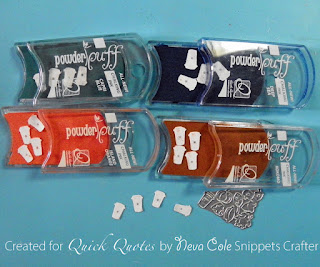
o   Twenty-four mini coffee cups are die cut.  (The die includes other fall themed mini shapes, but I just wanted the coffee cups)
o   Four ink colors, Island Orange, Kokomo, Deep Sea, and Capri Blue were used to ink the mini die cuts. 
o   Four mini die cuts were left white.


o   A section of re-purposed packaging is trimmed to 4 1/8” x 5 3/8”.
o   The card front is adhered to the clear re-purposed packaging.
o   Foam tape is adhered around the perimeter of the card front and around the outside edge of the coffee cup.
o   The mini coffee cups are placed in the shaker area and the card layers are adhered together.
o   Vellum is die cut to add as a lid for the cup, with the slim die cut cup details adhered to the vellum. 
o   The sentiment die cut is adhered directly to the re-purposed packaging. 
o   All the card front layers are adhered to a 5” x 6 ¼” card base.  I have card bases that are a standard 6-Bar (5” x 6 ½”) that I trimmed down to fit the card front. 


Thanks so much for stopping by today, I hope you have enjoyed this short tutorial on making a quick shaker card.  Quick Quotes papers makes it easy to coordinate a wonderfully layered card.

Quick Quotes Products
Anchors Aweigh 101, 104, 109 (sadly no longer available.)
Powder Puff Chalking Ink:   Island Orange, Kokomo, Deep Sea, Capri Blue

Other Products

Thanks a Latte by Lindsey Serata Sizzix Impresslits

Foam Tape by 3M

Friday, May 25, 2018

Coffee Lovers Blog Hop with Quick Quotes


Welcome to the Coffee Lover blog hop collaboration with Quick Quotes.  Please check out the entire list over at Quick Quotes.  There are some really fun cards!


 I am a coffee lover and enjoy a great cup of coffee almost every morning, my red Kurig was a birthday gift from my mother a few years back.  Since I am the only coffee drinker in my home, having a fresh little Kurig pod has really improved the flavor of my daily treat.  On to my contribution for the blog hop, a card that incorporates several papers from the Whistlin’ Dixie line.

o   I die cut the mug, background for coffee, and the accent stripes from 103. 
o   The base card and front panel are die cut from 107. 
o   The coffee sentiment, backing for the mug, and accent stripes are die cut from 106. 
o   The Coffee sentiment did not stand out enough against the striped background so I outlined it with a Zig writer in the color . . . wait for it, coffee! 
o   The mug is also outlined to add cohesiveness to the front of the card. 
o   After deciding placement for the mug and coffee sentiment I stamped the sentiments in Powder Puff Chalking Ink in Purple Rain. 

Quick Quotes Products
Whistlin’ Dixie 103, 106, 107

Other Products
Die Coffee statement, Die Hot Cocoa, Hot Chocolate2stamp by The Stamps of Life
Coffee Zig Writer

Tuesday, May 22, 2018

Getting Sketchy Thank You Card for Retro Rubber


Retro Rubber has a cool sketch to play along with for Challenge 87.  Check out all the fun interpretations of the sketch done by the Design Team. 


For my version, I wanted to play with a color layering set by Hero Arts, the Color Layering Hibiscus from 2016.  The set has matching dies, so once I got the color scheme down this was fun card to put together.  I stamped in Memento Dandelion, Cantaloupe, Tangelo and Morocco for the flowers starting with the lightest color first.  New Sprout and Bamboo Leaves create the leaves.  As I crafted the flowers I thought about a very old collection by Basic Grey called Lucky, a favorite of mine back in the day.  I had a few scraps that were a perfect match!  I die cut the oval from Elizabeth Craft Designs Stitched Ovals.  I would have made the strip across the center wider, but went with what was in the scrap folder!  The sentiment is by Technique Tuesday from the Echinacea set issued in 2017.  The stamp was out on my table as it was up for consideration for this project.  The little bottle cap sticker just happens to be by Basic Grey as well.  It was so cool that is was the ideal embellishment to complete the sketch.  After inking the edge of the back rectangle, the card was adhered together.  The flower die cuts are mounted with varying thicknesses of foam adhesive.  

Please come and play along, we would love to see what you will do with this sketch.  Remember to use at least one stamp that is more than one year old, tell us how long it has been in your stash, and to enter only up to 10 challenges.  Thanks so much! 

Thursday, May 17, 2018

Let's Swim featuring Quick Quotes


Quick Quotes aficionados, summer is coming!  Neva here to share a layout using Spring Showers.  Originally, I planned to use 103 for both the dots and argyle pattern, but the stripes of 101 really popped against the brick red coloring of the pool deck in the photos. 


o   Both Spring Showers 101 and 103 are trimmed to 10 ½” squares, and 2” are trimmed from each.
o   The saying on the left is trimmed from the 12” x 12” Far and Away Quotes & Phrases.
o   A color stripe on the right is trimmed from Navigator 105, it just happens to be very close in color.  It's great when collections can be mixed and matched!
o   The journaling strips are cut from Spring Showers 102.
o   All sections are inked with Powder Puff Chalking Ink in Capri Blue.
o   The sections are adhered together on matching cardstock.
o   The decorative loops are die cut from Spring Showers 104.  (A little secret here, I accidentally die cut the loops while working on another layout and saved it, happily discovering it was great for this layout!)
o   The title is die cut from Spring Showers 104.


Earth Wind Fire Chipboard Die Cuts are a great match not only in color but also complement the fun theme of the layout. The close-up also shows the Far and Away Quotes & Phrases.


A close-up that shows the matching stripe from Navigator 105 and another Chipboard Die Cut.


The white wash of Spring Showers 102 is great for journaling.  


The pop of color from Spring Showers 104 is perfect for the title of this layout.  It also adds a visual interest of triangle of color between the two sides of the double page layout.

I enjoy how the elements of several collections can work together for a great layout.  Thanks so much for joining us today here at Quick Quotes.  

~ Neva

Quick Quotes products


Other Products

Aqua Cardstork by DCWV

Loops & Rick Rack by Sizzix

Moxie Classic by Quickutz

Ocean Zig Writer


Tuesday, May 8, 2018

Mother's Day featuring Whistlin' Dixie by Quick Quotes


Hello, Neva here to share a layout showcasing a favorite photo from a few years ago. The colors of the photo lead me to use a selection of Whistlin' Dixie papers from the great paper collection by Quick Quotes.


The background of 103 has an elegant vintage feel so I decided to incorporate embellishments to reflect the look.
o   A large die cut from 106 provides an area for the title and journaling.
o   The edges are inked with Powder Puff Chalking in Kokomo.
o   Lace is added to one side of the die cut.
o   The title is die cut from coordinating red cardstock. 
o   The journaling is added after the layout is adhered together.
o   The photo is matted with the reverse side of 106 also edged in Kokomo.


I selected two sayings from 500 and die cut the circle and rounded the corners of the rectangle.  Both of these are adhered by thin foam adhesive to add a bit of dimension.  


The finishing touches are small bows and adhesive pearl embellishments added to complete a visual interest triangle.

The coordinating papers of a collection make it easy to put together a cohesive layout in a short time period.  This single page layout took about 30 minutes but is very elegant due to the wonderful background.

Quick Quotes

Other

Grand Labels Four by Spellbinders

Classic Circles Large by Spellbinders

Corner Rounder

Brown/Cream Lace Scrap Pack by The Paper Studio

Adhesive Faux Pearls by Recollections

Ribbon by Offray

Thanks for stopping by and I hope this layout has inspired you to consider how Quick Quotes patterns easily create quick and stunning layouts for your scrapbooks!

Neva

May Flowers for Retro Rubber


May Flowers is the new challenge over at Retro Rubber.  In my humble opinion it is perfect for Mother's Day!
 
For this fabulous challenge, I decided to use one of the first sets I purchased that had stamps and coordinating dies, Vintage Floret by Heartfelt Creations released in 2012.  To complement the flowers, I used Classic Leaf stamp and die sets from Heartfelt Creations released in 2015.  The pretty die adorning the top of the card is by Heartfelt Creations from about 2012 as well, called Raindrops on Roses. The sentiment is from the Unity Stamp Company's Mamas & Grandmas set from 2015. 


I started with three sheets of patterned cardstock from Heartfelt Creations Delicate Aster collection. Two backing layers are trimmed and the edges are distressed with my Heidi Swapp Edge Distresser that has been hiding in my tool tote.  Made quick work of the edges! 
To create the flowers, I first die cut the flower layers. Then the images are stamped in StazOn Royal Purple using this method I highlight in this post.  It goes much faster for me to do multiples with the die cut then stamp method.  Since I created two of these cards there were 20 individual layers.  Next I used my 3D Rose Shaping Mold to shape all of the layers in TWO passes. After placing the flowers in the mold a small spritz of water helps the shaping process, hence the reason I used StazOn ink to avoid smearing.  After I run the mold through my Cuttlebug I set them aside to dry.
The leaves are die cut and stamped in Memento Olive Green.   They are shaped using Heartfelt Creations flower shaping kit.  I stamped the sentiment in StazOn Royal Purple on a strip with distressed edges. To assemble the bottom layer is attached directly to a 5" x 6 ½" card base, the next layer is adhered with dimensional foam adhesive.  The die cut, sentiment strip, flowers and leaves are attached to the layer with On Point Glue and glue dots.  The flower centers are finished Queen & Co pearls.
Please do come play with us at Retro Rubber and enter your own May Flowers project.  Remember to use at least one stamp older than one year and to enter only 10 or fewer challenges.  Thanks for stopping by!

Monday, May 7, 2018

Level 4 Swim for Stick It Down


We have a great two-page sketch that can be used many ways for our challenge at Stick It Down this month.  Check out what the other Double Page DTers have created with this multi-purpose sketch!


I choose to scrap some photos of my son from a few years back.  I wanted swim theme die cuts, but didn’t find any in my stash, or really for purchase . . . so I made them!  After googling a few images of swim fins and kick boards I copied them to a word document and sized them for the page.  I printed two copies and then went to work with cardstock, scissors, and ink.  I think they turned out nicely!  I used Versa Magic ink in Mango, Eggplant, Midnight Black, and Cloud White to create depth and dimension.  I selected royal blue cardstock and a light blue patterned paper from a really old stack of Provo Craft papers for the background.  I was looking to match some Mrs. Grossman’s Design Lines I had in my stash.  I am having a blast using up old stuff and creating pages.  Once I had the photos in place I realized there wasn’t quite enough to make the layout shine.  I flicked Fireworks! Spray in Bahama Blue on the lighter colored paper, and in Cottage Ivy on the royal blue.  Just a tiny bit of shimmer.  With a few journal strips and a title die cut with my new Sizzix Just a Note Alphabet I thought I was done. 

True story here, a few weeks ago I tried my hand at making home-made enamel dots from Pony beads.  I put them out on the second-story deck to cool.  Came back 10 minutes later and they had been blown all over the deck and through the slates.  I picked most of them up, and my dear son found a bunch in the grass under the deck.  When I had the layout still on my desk I found another one outside and was inspired to add a few to the layout.  Yes, now it is done!


Another side-note.  I like to photograph my layouts outside . . . here is a photo of one page taking flying lessons!  See the shadow?  I caught the photo while the page was mid-air.

Thanks for stopping by, and do try your hand at the great sketch.  You will have fun!