Showing posts with label Club Q. Show all posts

Monday, December 24, 2018

Christmas Greetings for Quick Quotes

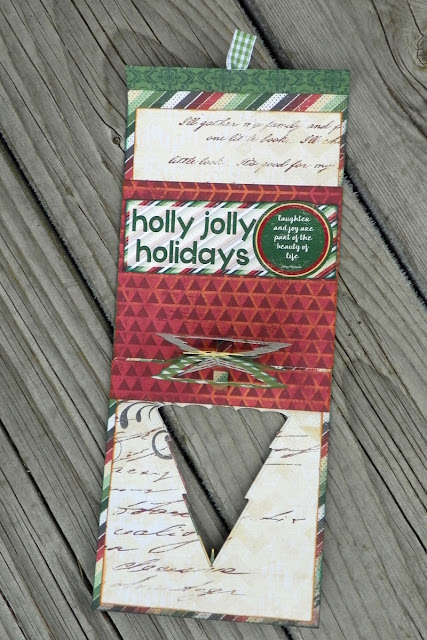
Merry Christmas Eve to one and all!  Neva here to share some Christmas cheer and a few cards I enjoyed creating to give to family and friends for this holiday season.  All of the cards feature Holly Jolly Holiday collection.  My first card is an interactive pop-up card inspired by one of my favorite Three Dimensional artists, Karen Burniston.


I used several different papers to create my version of the card.  Karen has a great how-to video that will help assemble the card.  I used just the die set that creates the pop-up tree, and trimmed the accent papers with my trimmer.  All the dark papers are inked with Evergreen Powder Puff Chalking Ink and the light papers with Kokomo Powder Puff Chalking Ink.  The key dimensions are as follows:


  • The base of the card uses 103 trimmed to 4 1/4 x 11".  It is scored at 4 3/4", 9 3/4", and 10 1/2". 
  • The front panel is 100 trimmed to 4" x 4 1/2".  (I had originally chosen a different paper, but didn't like the lack of contrast, so revised my decision.) 
  • The inside top and bottoms panels are 104 trimmed to 4" x 4" and 1 3/4" x 4".
  • The pop-up mechanism panel is originally 4 1/4" x 4 1/2", with the bottom 3/4" trimmed and re-assembled with the removable tape to create the center fold.

All of the tree parts were die cut from various papers in the collection.
  • The frames are one side of 105, and the center floating trees are the reverse side.
  • The slotted center tree is 103.
  • The decorations are die cut from 102.
  • The tree topping star is die cut from 100.
For accents I used the following:
  • A saying from Holly Jolly Holidays 600 Quotes and Phrases is trimmed to the inside frame to fit into the card.
  • A small piece of green gingham ribbon serves the small tab to open the top opening card.
  • I do suggest the magnets linked under Karen's video as the ones I found locally did not hold the card together through the paper layers.
 I made a few more cards using Holly Jolly Holiday 500 and 600 Quotes and Phrases along with the scraps and bits left on my craft table from my Christmas related layouts featured earlier in the month.  All of the cards can be created from the Club Q Altered Kit with a few additions from your stash.


  • I had many strips of paper in widths between 3/8" and 1/2".  I laid the strips diagonally across the card base. and trimmed the excess from around the edges.  
  • The entire card front is inked in Evergreen Powder Puff Chalking Ink.
  • A saying from 600 is matted with 103 and layered over the top.

  •  A greeting from 500 is trimmed and inked.
  • Small strips of 100 are placed behind the saying.
  • The panel is matted with 104.
  • Brads are placed in each of the four corners to anchor the card together before adhering to a card base.

  • A greeting from 500 is trimmed and inked.  
  • It is matted with 104.
  • Strips left-over from the "Lefse" layout is placed behind the saying and adhered to the card base.
  • A small raffia bow is adhered to the top.  

  • I really liked the rustic look of this saying so a small jute bow and jute cord decorate the front of the greeting from 500.
  • Burlap ribbon is placed behind the greeting.
  • The panel is backed with 101 and adhered to a card base.  

  • The Noel greeting is trimmed and inked.
  • A small angel is die cut from vellum and cream card stock and adhered to the front of the card.
  • The panel is backed with 101 and adhered to the card base.
  • Small gems from the December Club Q kit are adhered randomly to the card front.
Quick Quotes Products
December Club Q Altered Kit
OR
Holly Jolly Holiday Paper Pack 
Holly Jolly Holiday 500 12" x 12" Quotes and Phrases
Holly Jolly Holiday 600 Quotes and Phrases
Powder Puff Chalking Ink in Kokomo and Evergreen

Other Products
Christmas Trees Pop Stand by Karen Burniston in cahoots with Riley and Company
Jute cord by Darice
Burlap Ribbon from my stash
Angel die by Quickutz
Vellum
Cream Cardstock
Raffia from my stash

My cards are in the mail to bring holiday cheer to my loved ones.  If you are sending greeting late (yes some of us do that!) or if you are planning ahead for the holiday season of 2019 I hope you are inspired to make a few quick cards!  

Thursday, December 13, 2018

Quick Quotes Club Q Christmas Version

Happy Holidays friends of Quick Quotes from Neva!  Have you seen the beautiful Club Q layouts this month?  I enjoyed using both kits to create layouts to commemorate last year's Christmas memories.  My first layout used one kit as designed with a few tweaks.


The design of the background paper is hard to cover up because it is so pretty!  I had very few photos of Christmas Eve and Christmas Day for 2017 so this layout was perfect.  My photos were landscape rather than portrait orientation thus a few changes were made to accommodate the direction of my photos.


  • The left side uses the laser cut mat from the design for the right side trimmed to 4 1/2" x 6 1/2".  My photo was on the darkish side so the B-side white background created a more balanced color scheme.  The edges are inked in Kokomo Powder Puff Chalking Ink.
  • The green mat is from the original right side as well and is trimmed to 4 3/4" x 6 3/4".
  • All the green mats are inked in Evergreen Powder Puff Chalking Ink for the entire layout.
  • The frames, pennant, and red mats are inked in Kokomo Powder Puff Chalking Ink.
  • The journaling is done Holly Jolly Holidays 100 before being mounted behind the frame and matted with the coordinating laser cut. 

  • The larger mats for the two landscape photos are trimmed from the papers in the small altered kit.
  • The red mat is 6 1/2" x 8 1/4.  The green mat is 6 3/4" x 8 1/2".   
  • The sentiment is trimmed from Holly Jolly Holidays 600 Phrases and Sayings then inked in Evergreen Powder Puff Chalking Ink.  
  • I borrowed the tree from the small altered kit as well, as it balanced the embellishments on the ride side of the photo mat.
Next up is another layout that documents my love of decorating for the Christmas holidays.  I have a few Nativities to display as well as several Christmas Trees from large to small!  I hope you enjoy the small tour through my Christmas Decor!


This layout is significantly different from the design, however the background paper is a great foundation for both layouts.  The papers supplied in the kit were easily altered to fit the design for my layout.  

  • All of the dark red mats and accents came from the sheet of laser cut shapes and are inked in Kokomo Powder Puff Chalking Ink.
  • The borders on the looped accents are also from this sheet trimmed to 3/8" x 11 3/8".  
  • Shhhh, a little secret here, the red mat is actually two of the punched mats butted up together to create on mat behind the Nativities.  You can't even tell can you?
  • To go behind the red mat, Holly Jolly Holidays 103 is trimmed to 5" x 12" for the left side.
  • The focal photo is framed with both sides of 101 trimmed to 4 1/2" x 6 1/2", and 4 3/4" x 6 3/4".
  • All green accents are inked in Evergreen Powder Puff Chalking Ink.
  • All the other accents are inked in Kokomo Powder Puff Chalking Ink. 
  • On my second try I die cut the title from 101.  My first choice didn't show up as well as this version!
  • I wanted a few more snowflakes to add as embellishments, so I die cut them from the scraps from the laser cut snowflakes and border edges. 
  •  
  •  The mats for the photos of my collections are trimmed from 101 and 5 3/4" x 8 and 6 1/4" x 8 1/2".
  • The red mat is the laser cut mat.
  • To go behind the red mat, Holly Jolly Holidays 103 is trimmed to 4" x 12" for the right side
  • The journaling is printed on Holly Jolly Holidays 100 and is inked in Kokomo Powder Puff Chalking Ink.
  • The numbers are punched from 1Holly Jolly Holidays 100 as well. 

Quick Quotes Products
Ultimate Combo Club Q Kit 
Powder Puff Chalking Ink-- Kokomo and Evergreen

Other Products
Sonja and Olivia fonts by Quickutz
Create A Flake One and Create A Flake Three by Spellbinders.

The lovely colors of the Holly Jolly Holiday papers matched my Christmas photos so well.  Christmas is my favorite time of the year and documenting our memories brings me joy!  Thanks for the opportunity to share this joy!  ~Neva

Thursday, September 20, 2018

Quick Quotes Mini album from Club Q kits

Hello Quick Quote friends!  Neva here to share a mini album created from September's Club Q kits.  I used all the parts of the Ultimate Combo Club Q to fashion the twelve pages of this 6" x 6" album.  Recently I scrapped a few photos from this event, my parent's Sixtieth Anniversary Celebration.  My mother's wish for the weekend was to take many family photos and individual photos that showed each family member's personality.  With a little perseverance we granted her wish . . . the first round of photos were not of good quality as settings on her camera had been adjusted from auto to manual.  But we believe round two of photos turned out even better!


Three sheets from the page kits were used to create the pages, one sheet of Main Street 101 and two sheets of Main Street 102.  The remaining sheets from the page kits and Altered kit were used to mat the photos.  Accents from Main Street 103 were cut from the scraps from the Altered Frame kit.  Design Team members were sent Main Street Quotes and Phrases 600 which is used throughout the album including the opening title.


To guide you through the process I used to plan and create this mini album I will share a few insider tips.
  • I start with a paper planning grid to determine the sequence and placement of photos.  You will notice I added an extra page as I had most of the planning done and wanted to change the order of the photos.
  • Photos are printed in three sizes:  4" x 6" and trimmed down to varying sizes, 3" x 4", and 2" x 3".
  • Each of the three sheets are trimmed to four 6" x 6" base pages, for a total of twelve.
  • Each 6"x 6" page is laid next to it's companion and the photo mats and embellishments are selected.  
  • I made an effort to vary the embellishments from the two page kits, the Chipboard Die Cuts, and the Quotes and Phrases, throughout the album.  The similarity between the two page kits made this easy, but added a nice variety to each layout.
  • Some companion page backgrounds match, others are complementary.  Complementary layouts feature the background on one side and photo mats on the opposite that match.
  • All the elements for each page set are put in envelopes to finalize the design, as a few embellishments were moved around in the mini album before final assembly.  
  • The journaling strips were created in a Word document and printed in brown then are inked in Mocha Mama Powder Puff Chalking Ink.  Not all are included for publication to protect privacy.
  • Ribbons were tied into bows and added to the pages that needed that last little embellishment. 

Front Cover:
  • Photo is trimmed to 3 1/4" x 5", and backed with 102 white dots that is 1/4" larger all around for a frame of 3 3/4" x 5 1/2".  All of the larger photos have this mat sizing.
  • The mat is inked with Powder Puff Chalking Ink in Bermuda.
  • The 101 grunge side page is inked in Powder Puff Chalking Ink Mocha Mama as is the "Bless this family" sentiment.  What a great sentiment from the Main Street Quotes and Pharses 600! 
  • The photo and sentiment are adhered at slight angles to allow both to fit the page with a bit of overlap.
Pages 2 and 3
  • These pages feature my parents and my siblings and uses teal 101 for the left and grunge quarter 102 for the right.  The mats are the 102 for the left and 101 for the right to tie the pages together.
  • The accents are used directly from the page kit, along with a bow made from the ribbon from the Small Altered kit.

  • A hidden a flap lifts to reveal a fun photo and story.  We had a great time recreating a photo that we gave my parents in 1981 when frizzy perms were a thing for men.  My niece crouched behind my brother so her curly hair would give him the illusion of his hair back then.  We obviously could not keep a straight face!
  • Barn Board Powder Puff Chalking Ink is used to ink the elements of these pages.
  • With care, one ink color can be used on one side of the page and a different color on the opposite side.

 Pages 4 and 5
  • Both sides use dotted 102 for the page and 102 teal side for the mats.
  • The accents are used directly from a page kit, as is the gingham bow.
  • The large circle is trimmed asymmetrically to add interest and tie the two pages together.  I also like to think of the symbolism of our wedding rings!
  • Bermuda Powder Puff Chalking Ink is used to ink the elements of these pages.

Pages 6 and 7
  • This layout shares a bit of my parent's personality!  It features 102 quarter grunge side.  
  • The smaller photos are 2" x 3" and the mats are 2 3/8" x 3 3/8".  
  • The smaller mats are more proportional to the smaller photos by framing the photo with 3/16" on each edge.   
  • The red mats are trimmed from the scraps of the Altered Frame kit as Main Street 103 is featured as an accent in September's Club Q.   The teal mats are 101.
  • Mocha Mama Powder Puff Chalking Ink is used to ink the elements of these pages.

Pages 8 and 9
  • There are some really great sentiments in the Main Street Chipboard die cuts that are perfect for layouts about families.  This one is fantastic to represent the younger generation of our family!
  • Both Mocha Mama and Bermuda Powder Puff Chalking Ink are used to ink the elements.
  • Pages are 102 dotted and 101 grunge for the mats.  

Pages 10 and 11
  • My family is featured in these pages, so the journal strips are included.  
  • The background is 102 grunge quarter and the mats are 101 teal.
  • Mocha Mama Powder Puff Chalking Ink is used to ink the elements.

Pages 12 and 13
  • Personality photos for my family on 102 dotted pages. 
  • The frames area 101 grunge and a scrap of 103 red for the large photo.
  • The banners are trimmed from Main Street Quotes and Phrases and have holes pierced through the corners.
  • Twine is threaded through the banners before the are adhered.  
  • Both Mocha Mama and Bermuda Powder Puff Chalking Ink are used to ink the elements.


Pages 14 and 15
  • These pages feature my brother's family.  
  • Opposing backgrounds and mats are used in this layout.  The quarter grunge of 102 and the teal side of 101. 
  •  Mocha Mama Powder Puff Chalking Ink is used to ink the elements.
  •  I really like how the patterns of the papers show up in the Chipboard Die Cuts!  All three embellishments have the dotted side of 102.

Pages 16 and 17
  • More photos of my brother's family.  
  • Grunge 101 is used for the background.  The mats are a mix of 102 quarter grunge and 103 red.
  • I almost forgot to use the great little chipboard banners from the page kits, they finally show up here!  They are inked in Bermuda Powder Puff Chalking Ink.
  • Black and red twine are threaded through the buttons before they are adhered.  I enjoy adding these little touches to bump up the effect of buttons!
  • The mats and Chipboard Die Cut are inked in Mocha Mama Powder Puff Chalking Ink,

Pages 18 and 19
  • These pages feature my sister's family.
  • These pages are complementary with 101 teal and 102 quarter grunge.

  • Another hidden flap hides the photo of my sister's family and their plus one, my niece's (now) fiance.  :)
  • Chipboard Die Cuts are the embellishments.
  •  Bermuda Powder Puff Chalking Ink is used to ink the elements.

Pages 20 and 21
  • More photos of my sister's family.
  • True story about the sentiments selected.  My niece moved to a remote town in Alaska with a population of less than 1,500 people to take her first teaching job . . . and she met her now fiance!  The school district is pleased as they will have a music teacher who stays longer than a year.
  • The pages are dotted 102, with mats of teal 101 and red 103.
  • Both Mocha Mama and Bermuda Powder Puff Chalking Ink are used to ink the elements. 

Pages 22 and 23
  • We have a tradition of taking group photos of birth order.  We did it at my Grandparent's 50th Anniversary 30 years ago, and it was fun to take these in August!
  • Quarter grunge 102 and teal 101 are the background, with complementary mats.
  • I used up the last few bits of the pages kits for embellishments, love it when you get to the end of a project and have very little left! 
  • Another great sentiment from Main Street 600 Quotes and Phrases.  
  • Mocha Mama Powder Puff Chalking Ink is used to ink the elements.

Back Cover
  • Grunge 101 with the title from a page kit.
  • Mocha Mama Powder Puff Chalking Ink is used to ink the elements.
Final assembly
  • I used a Bind-It All tool to punch the holes and bind the mini album together.  A similar tool can be used to bind the album.
  • Alternately, the holes can be punch through each page and binder rings can be used to finish the album.
  •  Because the pages are smaller and are not placed in page protectors, I choose to adhere the Chipboard Die Cuts with additional glue dots to insure they would stay put!
Making mini albums is a passion of mine, and I am thankful that the elements of the Ultimate Club Q Kit worked so well together to create a cohesive but fun mini album.  Thinking outside the of the kit can be really fun and a satisfying crafting experience.


Here is my version of the Large Altered Kit, I always really enjoy making a Quick Quote Canvas!  They always turn out so beautifully!  I used a different Main Street Chipboard Die Cut, and punched holes to insert the brads.  Shhhhh, this will be a gift for my parents!

Quick Quotes Products
Club Q Ultimate Combo Kit
Main Street Quotes and Phrases 600--coming soon
Powder Puff Chalking Ink in Mocha Mama, Bermuda, Barn Board

Other Products
Twine from my stash
Bind-it-All tool and wire by Zutter
Spice and Ocean by Zig Writer
Bakers twine from my stash


Thanks for stopping by today!  Neva

Thursday, July 26, 2018

Happy Birthday layout created from Altered Kit Club Q

Neva here today to share a layout created from the June's Club Q Altered Kit.  I really liked the combinations of papers in this kit and thought it was perfect for the photos of my son's birthday.  The greens from the Secret Garden sheet matched the wrapping paper in the photos.  The reverse side of the Secret Garden sheet with it's multi-colored jellybeans was a great compliment to the brightly hued photos. 


 Often many parts of the Club Q kits are pre-cut, other papers come as whole sheets.  In this case I used the Altered Kit from June as is with one sheet addition.  The section of Sonata 103 wasn't as large as I liked it for the layout so I used another sheet from my stash.  All the other pieces are used in dimensions included in the kit. 
  • Sonata 103 is trimmed to 6" x 12", and the right side section is trimmed to 6" x 7".  
  • All the edges of the papers are inked with Powder Puff Chalking Ink in Capri Blue.
  • The layout is adhered together with each of the inked edges on all of the pieces showing.  
  • The enamel dots are added in a triangle to balance the design.
  • The remaining section of Sonata 103 and the piece from the kit are used to create the stamped embellishments.
  • The Happy Birthday sentiment is die cut from Spring Showers 104 left over from another layout.  

If you have every wondered how to stamp a layered stamp that has a matching die cut, here is the method I have found to get it right the first time!

  • Die cut the image from cardstock first, then place the whole section into a stamp positioner.  
  • You may use re-postionable painter's tape on the reverse to hold the die cut in place, (not shown).
  • Stamp the outline first, I used Capri Blue for the cake.  Look from directly above the image down through the acrylic stamp to line it up with the die cut.
  • Allow the stamp positioner to pick up the stamp then stamp the image.
  • Repeat for each of the layers.  The frosting on the cake is stamped in Key Largo.  I stamped different sections and was able to complete the cake in three phases.

This is the finished version complete with proper number of candles.  Also shown are the enamel dots and one of the stamped sentiments.
  • The candles are stamped with the method above and then the flame is colored with Island Orange and a Fantastix brush tip.  
  • The sentiments are stamped in Capri Blue and the edges are inked with the same color. 


  • Each of the stamped sentiments have a small piece of twine from the kit tied around one end.
  • A smaller tag is hand cut from Sonata 103 to match the shape of the tag from the kit.  
  • Two pieces of twine decorate the top of the tag.
Quick Quotes Products
June Big Altered Club Q Kit
Sonata 103
Powder Puff Chalking Ink Capri Blue, Key Largo, Island Orange

Other Products
Cake2stamp and die, patterns4cake by The Stamps of Life
Happy Birthday Framelits Drop-Ins 661830
Brush Tip Fantastix by Imagine Crafts
Teal Zig Marker

It was so fun to use the Altered Kit for a layout that was perfect for my son's birthday.   Thanks for joining us at Quick Quotes today!

Neva


Friday, June 22, 2018

Quick Quotes Blessed Beyond Measure

Our task for Quick Quotes for the end of June is to use a previous month's Club Q offering.  Neva here to share a layout from events of this spring.  I decided that the Blessed Beyond Measure would be perfect for photos of my son serving as acolyte at our church.  This page kit is from November Club Q and the subtle colors and title worked so well with the theme of this layout.


As the photos I had were taken over three Sundays and had a bit of a sequence in the service it was important to move the sketch around to fit the flow of the photos.
  • The large photos are 5" x 7", so the mats were trimmed down by 1/2" on each dimension.  
  • The blue banner and a few of the scraps from the blue paper are trimmed to give the illusion of a continuous banner across the two pages.
  • The blue is edged with Powder Puff Chalking Ink in Deep Sea.
  • The papers are edged with Powder Puff Chalking Ink in Kokomo.
  • The chipboard pieces are edged with Powder Puff Chalking Ink in Mocha Mama.  
  • The smaller title is  also stamped in Powder Puff Chalking Ink in Mocha Mama.


The key to framing a circular photo is to print the photo slightly larger than the diameter of the frame
  • The large circle photo was printed as a 5" x 7" and trimmed down to fit the frame.
  • The smaller photos are 3 1/4" square and 2 3/4" square 


  • The title provided in the page kit is simply edged in Powder Puff Chalking Ink in Mocha Mama and backed with the provided black patterned paper.  Makes for a quick and stunning title.  
  • To make the ribbon easier to show the top side I tied the knots and then adhered them to the tags rather than threading the ribbon through the provided holes.  Just because the holes are there doesn't mean you must use them!


Quick Quotes Products
November Club Q Blessed Beyond Measure page kit
Powder Puff Chalking Ink in Mocha Mama, Kokomo, Deep Sea

Other Products
Celtic Lower Case Alphabet by Personal Stamp Exchange
Coffee Zig Marker

Thanks so much for stopping by Quick Quotes and do check out the fabulous Club Q kits that are still available as well as the fantastic July Club Q kits.  Although this kit is from the November Club Q selections, thinking outside the box allowed me to use it for a great layout beyond it's intended focus.

~Neva

Wednesday, June 13, 2018

Summer Fun for Quick Quotes Club Q

Hello Quick Quote fans, Neva here to share a layout crafted from the Carefree Summer Fun page kit from the June Club Q. I had a little bit of fun moving the sketch and elements around to fit the photos from our trip last summer to AirVenture.


I wanted to feature photos that gave a flavor of the fun time had as a family, even though it was a bit of a work vacation.  The multicolored background worked well with all of the colors I had in my photos.  I used basically the same photo dimensions from the kit that includes:  three 3 ½” x 3 /2” photos, one 3 ½” x 5 ½” photo, and two 4 ¾” x 6 ¾” photos.  I choose to not use the “Carefree” phrase, but did include the “Summer Fun” sentiment as a title.  The two small 2” x 2” squares worked great as journaling spots for the layout.  


To add depth and contrast I inked the all the pieces with Powder Puff Chalking Ink. 
o   Capri Blue was used on the blue mats. 
o   Desert Sun was used on all the yellow and white pieces including the flourishes and the white cardstock base.
o   All of the orange mats are inked in Barn Board as well as the background patterned paper.   


o   The “Summer” sentiment is inked in both Desert Sun on one edge and Barn Board on the other to help is stand out from the background. 
o   The hole in the “Summer” sentiment is filled with the green brad, and raffia is added to two of the banners to finish the embellishments.  


Quick Quotes Products
Powder Puff Chalking Inks:  Capri Blue, Desert Sun, Barn Board

The elements of the original design are evident in my layouts as the sketch is flipped 90 degrees and flipped to opposite sides, along with a few tweaks to allow the photos to shine.  Thanks so much for joining us at Quick Quotes today, and enjoy your own “Carefree Summer Fun”!

~Neva

Wednesday, March 28, 2018

Drive layout featuring Powder Puff Chalking Inks


Neva here to share a layout that uses part of the March Club Q kit as well as features Powder Puff Chalking inks to create a boy-centric layout.  The base layer, frames, journal tag, button, and banner from the kit worked perfectly!


The strips are from Spring Showers 103, which were left-over from layouts I made earlier this month. 


To make the tire track embellishments:
o   Four 4 ¼” x 5 ½” sections of gray cardstock are trimmed 
o   I gently rubbed Deep Sea across the raised tire track surface of the embossing folder, then pressure embossed each one. 
o   Each set is trimmed with scissors and an Exacto Knife in between the tracks. 
o   After the placement of photos was determined I selectively trimmed the tracks to make a complete pattern across the bottom of the layout.

The left side features two photos that showcase the event and the journaling tag.  A small bit of raffia is threaded through the button before it is adhered to the layout.


The right side features the title stamped in Deep Sea on the banner.  Rather clever of me to come up with a spot-on title with five letters, don’t you think?  Brads from the kit anchor the banner to the layout so it doesn’t seem to float off the page. 
  
My husband really liked the simplicity of this layout as it allowed the photos about the event to really shine.  Watching your children enjoy life is always a pleasure!  Thanks for stopping by, Neva

Quick Quotes Products:
Spring Showers 103 Coming Soon
March Club Q Ultimate Kit
Powder Puff Chalking Inks:  Deep Sea

Other Products:
Tire Track embossing folder by Darice
Farmhouse Capitals Large by Technique Tuesday
White cardstock from my stash
Gray cardstock from my stash
Raffia from my stash