Showing posts with label washi. Show all posts

Tuesday, July 5, 2022

Sketchy Time at Retro Rubber

Sketches are also a quick way to get a start on a card.  This 2 week challenge uses the following sketch from Retro Rubber.   

This sketch inspired me to use a set I've had for awhile.  One of those from Concord and 9th that I just had to have . . . but this is the first time it's actually seen ink!  Sweet Sprinkles was released in 2017.


  • The sprinkles stamp is stamped four times 1.75" x 4.375".  Once each direction in Brilliance Pearlescent Orchid and Brilliance Galaxy Gold.  The edges are inked in Brilliance Pearlescent Orchid.
  • The cupcake top is inked in Brilliance Pearlescent Orchid, then touches of Brilliance Moonlight White was added to the stamp of add a bit of color variation to represent the frosting.  Brilliance Pearlescent Sky Blue Sprinkles are added to the top, and the image is die cut with the matching die.
  • The cupcake paper was stamped in Brilliance Galaxy Gold, I've always liked gold cupcake papers!  One of the reasons I choose this color scheme.  It is die cut with the matching die cut.
  • Two additional layers of each die cut are adhered to the back to create a more dimensional cupcake.
  • The placement of the stamped section, cupcake and choice of two coordinating washi tapes was determined.  The washi tapes are both by Paper Studio.  
  • The sentiment was stamped in Brilliance Pearlescent Orchid before the cupcake was adhered.
  • To finish the inside of the card My Favorite Things Birthday Greetings was stamped in Brilliance Pearlescent Orchid and another bit of washi tape was added.
I am really pleased with the final result, and it was super fun to actually use a stamp in my stash that needed a little inky love!  Please join us at Retro Rubber and play along with this quick and easy sketch!

CHALLENGE GUIDELINEs

  • We require stamps older than one year.  If we feel you are using newer stamps, you may be disqualified from the challenge without notification.
  • New papers/dies are OK – but you must use at least one stamp older than a year and describe the age in your blog post.
  • Please note that all challenges require the use of at least one stamp older than a year.
  • Post your new creation to your blog or online gallery.   Use keyword RRCB186.  No backlinking. 
  • Link back to the blog using the Linky Tools by the due date. 
  • Enter as many times as you like. 
  • Feel free to combine our challenge with a maximum of 10 challenges.  Entries linked to more than 10 challenges will be disqualified without notification.
  • If your project is posted on a private group site such as Split Coast Stampers or a photo sharing site not all DT members may be able to comment.   Thank you for understanding.
  • Turn off Word Verification.  We love to comment but word verification can make that difficult.

Thanks so much for stopping by, your comments are always appreciated!

Monday, March 9, 2020

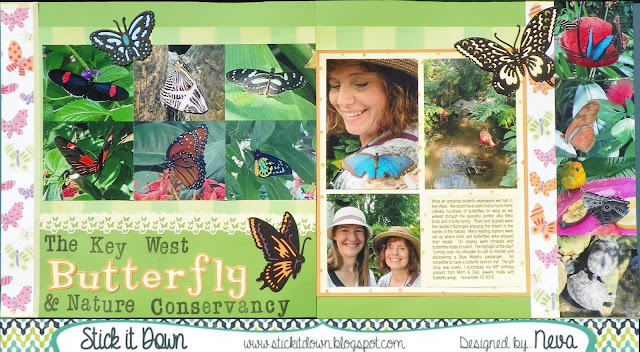
Butterflies for SID March Double Page Reveal

Even though my photos were taken last fall (in Florida) they are perfect for a spring green layout.  We have several fun sketches for you over at Stick It Down.  Not only a double page, but also a single page, and card sketch to play along with for the month.  Check it out!


For my layout I choose to add more photos, by making them smaller.  There are too many wonderful things to share from this experience at The Key West Butterfly and Nature Conservancy.  (At least I had the long title!)


I tried several different colors of background cardstock before I finally decided on the green.  With the bright colors of the butterflies and fun patterned paper I think it holds the layout together.
  • A very old collection by Me & My Big Ideas by Ellen Krans (2006) had all the selections of coordinated paper to make it easy to put together.  
  • Paper Studio light yellow washi adds a dash of pastel to the eges of the butterfly paper.
  • I love butterflies, and sometimes (well often!) will buy a stamp or die just because it is a butterfly.  The Cuttlebug Anna Griffin Butterfly Trio was just such a purchase.  Look how wonderful they are as embellishments for this layout.  If you look closely some of the highlights are colored through the die with Writer Chalk Collection markers.  I also backed each butterfly with a matching die cut by scanning on my Brother Scan N Cut and die cutting coordinating cardstock to put behind the butterflies.
  • Another butterfly tool in my stash is the Tonic Butterfly border punch.  I just had to use it in this layout as an add on embellishment.  The top edge is punched with EK Bubble edge border punch.   
  • The title is a combination of Stampabilities Vintage Type alpha stamped in Tuxedo Black Memento Luxe and Quickutz Tangerine & Shadow.
  • The yellow and orange dot patterned paper is backed with orange cardstock, and the journaling is printed on yellow cardstock that is the exact color of the patterned paper.
Do come and check out the blog and give one of our sketches at Stick It Down a try.  It will be fun!

Thanks for stopping by your comments always make me smile!

Thursday, February 27, 2020

Kindermusik

It is super fun to scrap photos that are now (yikes) ten years old.  They are good memories that help when parenting a teen gets tough!

 The left side is inspired by the sketch challenge over at Scrap Your Stash.  The sketch is altered for 4 photos on the right side.
.

  • I started with light blue cardstock as a base and added a colorful music patterned paper I have in my stash for who knows how long?  There was no identifying printing on the paper to even know who made it, but it was perfect for this layout!
  • I has some great scraps from Bo Bunny Toy Box, Circles (which I think count as polka dots) and Cheerful.  The small 4 represents how old my son was in the photos, and is from the B side.
  • The yellow strips is also a B side pattern as is the two color small strips.  I think they all coordinate together well.
  • To add both washi tape an follow the idea of the sketch I added lime green washi by Paper Studio.  It did take a few minutes to miter the corners.  
  • The tag was cut with Paper Studio's Tag punch.  A small remnant of ribbon from my stash tops the tag.
  • The Musical die cuts are from the Silhouette store.
  • David Walker Creative Imaginations letter stickers create the two titles. 
  • Journaling was completed with a Zig Writer in Splash.  
 Thanks so much for stopping by!  It is therapeutic to share my crafting with the blogsphere!   
 

Monday, October 7, 2019

Carving Pumpkins for Stick It Down

Stick It Down has a really fun sketch for the double page layout this month!  (We also have sketches for the single page as well as a card so check it out!)

It has a decidedly fall theme that can be switched out for your favorite season or theme.  I had some photos from last fall to scrap, so I went with the pumpkins and Halloween theme.


Searching through my stash I found a great collection by Imaginisce, Hallowhimsy Collection that was perfect for putting together this layout.
  • The background is part of the collection with the subtle spider webs.
  • Both sides of several sheets are used to create the coordinating tags to match the tag from my stash.  A 1/2" circle punch and the Cropidile is used to create the reinforcement holes.    The edges are inked with Delicata Black Shimmer to add definition.  
  • My new Brother Scan N Cut came in handy with all the pre-loaded Halloween images.  I used all of them in smaller sizes to create the die cuts. 
  • For the title I down loaded Silhouette's "Carving Pumpkins" file.  To help is stand out a bit more I outlined it in Black Zig writer.   
  • To add the border I used Paper Studio Pumpkins washi tape.  
  • The dotted tag needed a little sprucing up so I added Happy Halloween washi tape on a diagonal.  
I had a lot of fun creating this layout with the sketch this month.  It is a great way to incorporate several themed papers together, or to use up scraps from a collection.  Thanks so much for stopping by and come play along with us at Stick It Down this month!

Friday, March 22, 2019

Butterflies at High Desert Museum

Did you know that March 14th was National Learn About Butterflies Day?  I didn't finish this layout in time to post it on March 14th, but still want to share our fun experience from a few years back.

Since many of the butterflies that photographed well in the exhibit had orange coloration, I choose orange cardstock for the background.

  • The border along the bottom is Spellbinder's Butterfly card front.  The die is designed to be continuous, but great care must be taken to line up the design.  I die cut 3 1/2" x 12" sections from white cardstock to create the border. 
  • Cuttlebug Butterfly dies are used to die cut black cardstock.
  • I found some great butterfly washi tape by Paper Studio at Hobby Lobby to finish the edge of the bottom die cut.  Such pretty butterflies!
  • Fortunately I had taken photos of the identification charts so I was able to accurately label the photos of the butterflies we interacted with in the exhibit.
  • The title is CK Typist by Quickutz.
Even though the layout is simple it did take time to die cut the bottom border and title!  Butterflies are wonderful insects and have special meaning for me.  We don't have many varieties here in Central Oregon, so visiting a butterfly exhibit is a special treat worth remembering.  Thanks for stopping by and taking a look!

Tuesday, February 26, 2019

Retro Rubber teams up with Try Stamping on Tuesday!

We have a new challenge at Retro Rubber, and a doubly fun way to play along this go around!  


We are excited to partner with Try Stamping On Tuesday! We are featuring their sketch as our challenge. As always, you must use at least one stamp older than a year. This is double the fun! You can link up your entry with both challenges. Check them out at Try Stamping On Tuesday!
 My niece will be married soon, and this card is to celebrate the occasion.  Her wedding colors are Navy and Gray, so it is color coordinated just for her!
  •  I really wanted to use Heartfelt Creation's Large Elegant Word Background (~2014) because the image is 1 Corinthians 13 and is perfect for a Wedding Card.  It is large format background stamp and drove the rest of the design decisions for the card.  The image is stamped in VersaFine Majestic Blue.  The edges are inked in Delicata Silvery Shimmer
  • The background card has VersaFine Majestic Blue sponged around the outside edges to match. 
  • The heart is a very old Coluzzle shape and is actually it is the third version that fit the card well!  The image is Hero Arts set Yes Stamp & Cuts from 2014, and is stamped in VersaFine Majestic Blue and heat embossed with clear embossing powder.  The inner heart is then inked with Delicata Silvery Shimmer and heat embossed a second time with clear embossing powder.
  • The background heart is inked with VersaFine Majestic Blue.
  • Two Celebrate sentiments are die cut from Celebration Words Script by Tim Holtz for Sizzix Thinlits.  One is inked in Delicata Silvery Shimmer and the second is inked in VersaFine Majestic Blue.  They are slightly offset to create a shadow effect.  
  • Washi tape by Recollections is mounted on white cardstock and trimmed into the embellishment fishtail pennants to finish the sketch.
  • The card is adhered together with the hearts slightly raised with dimensional foam adhesive or as those in the UK might say "Sticky fixers!"  I've been reading magazines from the UK recently and this term just gives me the giggles! 
Do come and play along with both our challenges!  Retro Rubber asks that you use at least one stamp older than a year, tell us how long you have had the image, and to enter no more than 10 total challenges.  Make sure to link your challenge to Try Stamping on Tuesday as well!

Thursday, October 11, 2018

Carving Pumpkins for Quick Quotes

Hello Quick Quote friends!  Neva here to share a memory from a few years back that features a few Halloween pumpkins!


There are several collections that feature orange, which I thought would be a good backdrop for my layout.
  • Two sheets of Secret Garden 104 with the orange flowered pattern is a great background.
  • Two sheets of Navigator 100 are trimmed to 7 1/2" x 9" and 7 1/2" x 12" and inked with Powder Puff Chalking Ink in Coal Miner.
  • The background is outlined with washi tape.
  • The title is die cut from black cardstock.

The two pumpkin borders are easily created using stamps and ink on Navigator 100.
  • Two sections are trimmed to 9" x 2" and 2" x 12".
  • The pumpkin images are first stamped in Powder Puff Chalking Ink in Coal Miner.
  • A brush tip applicator is used to color the pumpkins with Powder Puff Chalking Ink in Biscotti on the stems and Rusty Nail on the pumpkins.  I like how this particular stamp set let me mix and match.
  • Both sections are backed with Navigator 104 trimmed to 7" x 2 5/8" and 2 5/8" x 12". 
  • All the sections are edged in Powder Puff Chalking Ink in Coal Miner,

This saying from Farmhouse 500 is not only orange, but is also fun to use!
  • The saying is trimmed and inked with Powder Puff Chalking Ink in Coal Miner.
  • Navigator 104 backs the saying.
  • Washi tape ribbons are created by layering washi tape on both sides of white cardstock.  
  • The "ribbons" are trimmed, folded, and adhered to the back of the sentiment. 
Quick Quotes Products
Secret Garden Paper Pack coming soon
Navigator Paper Pack
Farmhouse 500
Powder Puff Chalking Ink in Coal Miner, Biscotti, and Rusty Nail (Both from the Retired Colors Set)

Other Products
Washi tape by Recollections
Black Cardstock by Darice
Trick or Treat by Joy Clair Stamps
Brush Tip Fantastix by Tsukineko
Olivia Upper and Lower Case by Echo Park

It was so much fun to relive these moments from a few years back.  Thanks for joining us here at Quick Quotes!
~Neva

Monday, October 1, 2018

Stick It Down Double Page Halloween Version

We have a fantastic sketch for you this month at Stick It Down.   Check out what the design team did with this fun sketch and notice that we are collaborating with the White with One challenge, which features Grey as the plus one color.


You will notice that I mirrored the sketch and replaced the two smaller photos with one 4" x 6" photo.  This fit the sequence of my photos much better!


As the White + One challenges suggests 70% white, I did choose to use white as my background.  Two different designs of Grey patterned paper, Core'dinations Grey plaid and Darice Grey Small Dot, complete the main elements of the sketch.  The photos are actually trimmed to 3 3/4" x 5 3/4" so that one sheet of Bazzill Ash was used to back the phots.  The scrap of Bazzill Ash is die cut with Quickutz Abigail to create the title.  This font is great when you are short on space but still want to make large title.  The bats are die cut from black cardstock with Echo Park's Going Batty die.  The eyes are colored in with a white Gelly Roll pen.  The spider web washi tape is from Paper Studio and was a killer deal over at Hobby Lobby last month.  (A box with 50 different washi tapes that cover the four seasons of the year on clearance for $7.50!)  To add the last element of the sketch I stamped spider webs in Memento Tuxedo Black.  The stamp comes from a really old Halloween set by Heidi Grace Designs.  A fairly clean and simple design that came together quickly!

Please do stop by and check out the double page, single page, and card sketches for this month over at Stick It Down.  Lots of fun to be had!  Play along with White With One as well.

Thanks for stopping by and taking a peak!


Tuesday, August 14, 2018

Happy Birthday Superstar for Retro Rubber

Wow, I don't know about you, but where I am it has been really hot the last week or two!  Thankful for air conditioning for sure!  So it is nice to stay inside for awhile and enjoy my craft cave.  We have a fantastic tic tac toe board for our challenge these two weeks.  Join the fun!


To be honest, I am just coming off almost a month break from crafting . . . we had our annual trip to EAA AirVenture in Wisconsin with plenty of adventures.  Once home we had tons of other real life stuff to do as well.  So glad a tiny bit of creative mojo showed up to kick start the creation of this card.


I choose the die cut/washi tape/masculine row to put together this super quick birthday card.  I knew I had a "Superstar" sentiment from the Golden Moments set by Maryanne Wise of Autumn Leaves Clear Stamps.  It dates back to 2003.  I also had some cool washi tape from Queen & Co that featured stars so that decided my color choices, now I was off and running.  The sentiment actually says superstar kid, but I masked out the kid for this application.  Hero Arts It's Your Day from 2015 provided the "Happy Birthday" and the inside sentiment shown below.  The images are stamped in Memento Tuxedo Black, and then I choose the correct size of Spellbinders Petite Ovals Small to die cut the sentiment.   The lime green cardstock was die cut with Cascading Stars by Donna Salazar for Spellbinders.  I also die cut a few blue stars to fit into the frame of stars.  The second strip of washi is also by Queen & Co.

 The inside of the card features a few more of the stars and star frames.  What a great way to finish off the card, use what didn't get used on the front!

Come and join us at Retro Rubber and play along with this great tic tac toe board.  Just remember that we ask for at least one stamp that is more than one year old along with it's age and no more that 10 challenges including ours.  Enjoy!

Monday, April 9, 2018

16th Birthday for Stick It Down


I am loving this month’s sketch for Stick it Down!  It was perfect for photos I had of my son’s 16th Birthday


 The photos I had were not that great, and I think that the sketch and elements I selected helped tie the photos together in a cohesive design.

I choose to start with DCWV cardstock in green and blue for the base, and dressed it up with washi tape by Recollections.  I had two rolls that worked together and selected the colors of cardstock based on these choices.  At first I was going to use the patterned washi to outline the triangle shapes, but then decided the photos needed a mat instead.  Took a bit of time to miter each corner, but with wash tape it was easier!  The edges of the triangles still needed a bit of definition so out came the stamps, in this case an old set by TPC Studio, Dots & Stripes.  With polymer stamps it is easy to line up without too much fuss!  Versa Fine Majestic Blue was the best ink choice for the job, and stamped nicely!

To finish off the embellishments of the sketch, I used Quickutz gifts and ribbons.  Each box was pressure embossed with the small Goosebumps embossing plates.  Kind of the first ones out there and designed to be used with the Quickutz handle.  Perfect small sizes!  I used Circles, Swirls, Sparkle, and Stars on the packages, then sanded the surface to bring out the white core of the cardstock and add design texture.  Sizzix Card, Scallop with gifts had a nice sized “Happy Birthday” sentiment that quickly added the title.  A bit of sanding helps it stand out from the layout.  Finally, I added “16” from Quickutz Classic Frankie font with shadow.  A bit of journaling in Navy Zig pen was the final touch. 

Thanks for stopping by and do go check out the rest of the Stick It Down Design Team and enter this month’s sketch challenge.  Double and single page layouts and cards are all listed over at Stick It Down.

I would like to enter this layout in the Paper Girls Masculine Birthday Challenge.  

Wednesday, June 8, 2016

Blazing Poppy Composition Book


For the next fortnight our challenge at Ruby's Rainbow Challenge is Anything But A Card.  I created a new composition book for blog note taking.  As I create projects I write down thoughts so I can remember what products, stamps, dies, and tools were used.  My first one has been in use since October 2014, and it is full so it was time to create a new one.


Heartfelt Creations Blazing Poppy collection was perfect for this ABAC project.  As I frequently carry my comp book with me it couldn't be too lumpy bumpy so the back is more simple than the front.


1.    Select two papers from the collection and trim to 7" x 10".  This will be slightly larger than the covers.  Line the paper up with the binding edge and adhere with Mod Podge.  Place a sheet of freezer paper inside the cover to protect the pages.  (Note: Each side will be done in alternate steps.). Set aside to dry.
2.    On peach cardstock stamp Blazing Poppy stamp in Memento Tuxedo Black.  With a Sponge Dauber add Memento Luxe Morocco to color the center of the flowers.  Die cut the flowers.  Spritz the back of the flowers with water and shape the flowers.  Set aside to dry.
3.    Trim the excess paper from the covers with an Exacto knife and ink edges with Memento Luxe Morocco.  Add a coat of Mod Podge.
4.    Select images from patterned paper collection for the back cover and trim.  Die cut both sizes of Heartfelt Creations Decorative Blossom Corners.  Adhere with a layer of Mod Podge.
5.    Die cut two Heartfelt Creations Eyelet Ovals in coordinating papers.  Adhere with a layers of Mod Podge.
6.    Die cut Spellbinders Foliage from green patterned paper.  Assemble and arrange flowers on front cover and adhere with glue dots and dimensional adhesive to support petal shape.  Add Mod Podge to foliage and adhere to front cover.  Cover with two more layers of Mod Podge allowing dry time between each.
7.    Adhere Sandy Lion Silver washi tape along binding edge to cover paper edge on both back and front covers.  Washi should be 12" long so ends will secure inside the covers.
8.    Place Art Institute Dries Clear Adhesive to centers of flowers and add Suze Weinberg's Diamondz in Onyx.  Allow to dry overnight and shake off excess.

Supplies:
Heartfelt Creations:  Blazing Poppy stamp, die, and paper collection, Decorative Blossom Corner, Eyelet Oval.
Imagine Crafts: Memento Tuxedo Black, Memento Luxe Morocco, Sponge Dauber
Spellbinders Foliage
Sandy Lion Silver Washi Tape
Plaid Mod Podge
Art Institute Dries Clear
Suze Weinberg's Diamondz Onyx
Misc.: peach cardstock, die cut machine, freezer paper

Please stop by Ruby's Rainbow Challenge and see all the wonderful projects done by the Design Team!

I would like the enter the following challenges:

Wednesday, February 17, 2016

Hippo Birdies Humorous Birthday for Ruby's Rainbow Challenges


Ruby’s Rainbow Challenge theme for the next fortnight is “Humorous Birthdays”.  Do stop by the blog and check out all of the fabulous funny cards created by the Design Team.  Then pull out your stamps and create a humorous birthday card yourself!

 
Most of my birthday stamps are the generic birthday fare.   This Avery Elle set, “Hipster-potamus” is an exception.  The images are stamped in Memento Tuxedo Black on white card stock.  With a little quick masking the bird is standing on the hippo’s back and the hippo is standing in the green grass.  I used Chameleon pens in CG8 Cool Gray, PK3 Bubble Gum, NU1 Bisque, and YG3 Spring Meadow.  The image was backed with black card stock.  Strips of pink card stock are covered with Recollections chevron washi tape and large grommet eyelets are attached to each end.  The backing green card stock is pressure embossed with Cuttlebug’s Polka Dots.  The card is assembled on a 6Bar card base.    

Thanks for checking in today!  Enjoy visiting Ruby’s Rainbow Challenges and come create your own humorous birthday card and share it with us!

I would like to enter this card in the following challenges!
Suzy Bee's Bloomin' Challenge #117 AG w/ a twist of sentimental
Dragonfly Journeys #44 Wishy WASHI