Showing posts with label DIY. Show all posts

Thursday, December 15, 2022

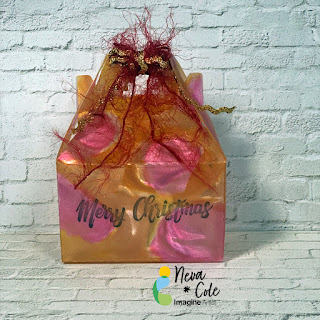
Vertigo Christmas Gift Box with StazOn Inks


Vertigo is a beautiful translucent material to use in creating projects, in today's tutorial there will be tips and hints to make your project shine!  The perfect ink for this box is StazOn,  and is the only ink that will dry on Vertigo and other plastics. 

 Skill:  Intermediate

Time:  1 hours

Step1:

 
Vertigo can be cut with scissors OR with a simple die.  Complex dies do not work well with most plastics, vertigo included.  This particular box needed 8.5" by 5" section of Vertigo, 12" x 12" sheets can be purchased directly from Imagine Crafts website.  Recycled packaging may be substituted for Vertigo, however the results will not have the stunning effect the the patterns that Vertigo provides.   The Pebbles pattern of Vertigo was used for my box.

Step 2:


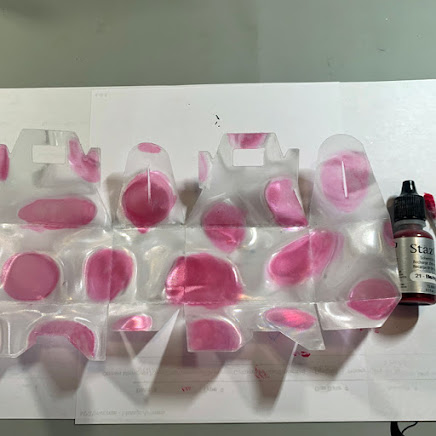
Place a few drops ink from StazOn Blazing Red inker on a plastic surface to use as a palette.  On the INSIDE  of the box use a cotton swab to color each of the pebbles from the center out.  A little goes a long way with the translucent colors. 

Step 3:

 
Metallic StazOn ink is slightly less translucent than the other colors.  To capture more shimmer apply a drop or two of StazOn Metallic Gold on the INSIDE of the box and move the ink with a cotton swab to color around the pebbles.

Step 4:

 
Continue to add StazOn Metallic Gold ink to cover the remaining areas of the inside of the box.  Set aside to dry, as the Metallic ink is a bit thicker and takes a longer to dry. 
 
Step 5:

The sentiment is stamped on the OUTSIDE of the box, keeping the interior of the box ink from lifting and to have the correct orientation.  Merry Christmas is stamped in StazOn Jet Black. 

Step 6:


Tear It! tape is perfect to hold the bottom of this gift box together.  Assemble box and determine the best placement for the Tear It! tape.  Unfold box and add Tear It! tape, my project called for five sections to hold the box in shape.

Remove Tear It! tape liner and assemble gift box.  Decorate with matching ribbon and fibers to close the top and keep your gift secure.

Art Supplies

Imagine:

Vertigo--Pebbles 12" x 12" sheet

StazOn Inkers--Blazing Red and Metallic Gold
 
StazOn Jet Black
 
Tear It! tape
 
Other:

Bakery Gift box die--Lifestyle Crafts

Cotton Swabs 

Sentiment--Christmas Blessings Taylored Expressions

Misc:  Gold Ric Rac and red fibers

Tuesday, April 12, 2022

Sketchy Time at Retro Rubber Easter Card

 It is time for a new challenge over at Retro Rubber Challenge Blog.  This is a beautiful clean and simple sketch that can be adapted in many ways.

Since Easter is coming up I choose a very classic scene for this sketch using Joy Clair's My Redeemer from March 2017.  

  • I do not have a sunburst stencil or die in my stash (gasp!), so I found one as a card design at the Silhouette Design Store and made my own from 60 lb Bristol Board vellum finish.
  • Using my DIY stencil I blended Memento Dandelion, Cantaloupe, and Tangelo to create a background.  
  • The cross is stamped in the center and on another section of cardstock in VersaFine Onyx Black and heat embossed with iridescent embossing powder.  After tapping VersaFine Crimson Red and Vintage Sepia I used a spritz of Ink Potion No. 9 and a fine paint brush to color both crosses.  The second cross is fussy cut with scissors.
  • In my stash of ancient Provo Craft Slabs I found the perfect multi-colored paper to finish the sketch.  A 4" strip was cut and then Lawn Fawn Cuts Stitched Hillside Borders to die cut the two different shades from the paper.  They were purposefully cut a little long so I could overlap the edges in a way that fit the sketch.  After they were adhered I trimmed the excess with scissors.
  • The fussy cut cross was added with dimensional foam adhesive.
  • Taylored Expressions Simple Strips Easter from February 2021 added the sentiment.  It is stamped in VersaFine Onyx Black and heat embossed with iridescent embossing powder.  Memento Cantaloupe is inked over the sentiment that was die cut with the matching die.  A backer die cut was added to finished the sentiment then adhered with dimensional foam adhesive.
A CAS Easter Card, I plan on making a few more as I still have plenty of the multi colored paper to make contrasting hills!  Please do come join us at Retro Rubber Challenge blog and have a little fun creating with the sketch!  

CHALLENGE GUIDELINES

  • We require stamps older than one year.  If we feel you are using newer stamps, you may be disqualified from the challenge without notification.
  • New papers/dies are OK – but you must use at least one stamp older than a year and describe the age in your blog post.
  • Please note that all challenges require the use of at least one stamp older than a year.
  • Post your new creation to your blog or online gallery.   Use keyword RRCB180.  No backlinking. 
  • Link back to the blog using the Linky Tools by the due date. 
  • Enter as many times as you like. 
  • Feel free to combine our challenge with a maximum of 10 challenges.  Entries linked to more than 10 challenges will be disqualified without notification.
  • If your project is posted on a private group site such as Split Coast Stampers or a photo sharing site not all DT members may be able to comment.   Thank you for understanding.
  • Turn off Word Verification.  We love to comment but word verification can make that difficult.

Monday, May 7, 2018

Level 4 Swim for Stick It Down


We have a great two-page sketch that can be used many ways for our challenge at Stick It Down this month.  Check out what the other Double Page DTers have created with this multi-purpose sketch!


I choose to scrap some photos of my son from a few years back.  I wanted swim theme die cuts, but didn’t find any in my stash, or really for purchase . . . so I made them!  After googling a few images of swim fins and kick boards I copied them to a word document and sized them for the page.  I printed two copies and then went to work with cardstock, scissors, and ink.  I think they turned out nicely!  I used Versa Magic ink in Mango, Eggplant, Midnight Black, and Cloud White to create depth and dimension.  I selected royal blue cardstock and a light blue patterned paper from a really old stack of Provo Craft papers for the background.  I was looking to match some Mrs. Grossman’s Design Lines I had in my stash.  I am having a blast using up old stuff and creating pages.  Once I had the photos in place I realized there wasn’t quite enough to make the layout shine.  I flicked Fireworks! Spray in Bahama Blue on the lighter colored paper, and in Cottage Ivy on the royal blue.  Just a tiny bit of shimmer.  With a few journal strips and a title die cut with my new Sizzix Just a Note Alphabet I thought I was done. 

True story here, a few weeks ago I tried my hand at making home-made enamel dots from Pony beads.  I put them out on the second-story deck to cool.  Came back 10 minutes later and they had been blown all over the deck and through the slates.  I picked most of them up, and my dear son found a bunch in the grass under the deck.  When I had the layout still on my desk I found another one outside and was inspired to add a few to the layout.  Yes, now it is done!


Another side-note.  I like to photograph my layouts outside . . . here is a photo of one page taking flying lessons!  See the shadow?  I caught the photo while the page was mid-air.

Thanks for stopping by, and do try your hand at the great sketch.  You will have fun!

Saturday, November 11, 2017

Vertigo Window Clings

Our challenge for November was to create something children would enjoy making at home.  My version is live on the Imagine Blog today.


What a fun challenge this month, a children’s craft project.  Vertigo Leaf Sun Catchers are a fun way to spend some quality time with the child in your life.  Simply place a leaf under a Vertigo Sheet and trace with a complementary color Fabrico pen.  Younger children can make simpler leaf shapes which are easy to cut out with scissors and older children who are more competent with scissors can complete the more complex maple leaf shapes.  After the leaves are cut out, StazOn inks can be added with ink blushers.  I would recommend gloves to keep fingers from becoming too inky!  Additional veins can be traced with Fabrico Pens.  Apply a few glue dots and adhere to your window for eye catching fall décor!

Imagine

Other
Leaf
Scissors
Glue dots


Thursday, July 27, 2017

What can you do with Memento Luxe?


I volunteered to write an article for Imagine about the wonderful ink known as Memento Luxe.  Enjoy!

Memento Luxe is a fabulous pigment ink that comes in 24 colors that coordinate with Memento dye based inks, Memento Dual Tipped Markers, Fireworks! shimmer sprays, irRESISTilbe Texture Sprays, and irRESISTilbe Pico Embellishers.   It is water-based, archival, and acid free so it is great for card making and scrapbooking.  Memento Luxe ink pads are very juicy and can be used on many surfaces both light and dark colored.  


This fun tag uses Memento Luxe Wedding White on black cardstock for a quick but stand-out statement.  If your pad is a bit older, re-inking the pad will give you the best results on dark cardstock. 


Since the Memento Luxe has a longer dry time, amazing ombré effects can be achieved by blending with an Ink Blusher or Sponge Dauber.  More than one color can also be successfully blended to create a beautiful seamless color range.  Here Dandelion is blended into Pear Tart, in turn into Danube Blue on Strathmore Bristol Board.  The sentiment is stamped in Danube Blue ink and is heat embossed with clear embossing powder, which acts as a resist to the coordinating Fireworks! sprays.

As a pigment based ink it is perfect for embossing on paper, chipboard, or wood.  When used on glossy cardstock or vellum it should be embossed because the ink will not dry on slick surfaces. 


Memento Luxe is wonderful for stamping or blending on fabric, wood, canvas, or other porous surfaces.   As it is a pigment based ink it is resistant to fading on all surfaces.  When used on fabric the Memento Luxe is heat-set with an iron at the appropriate fabric setting so it can be laundered and will remain as bright and pigmented as when the ink is first applied.  Heat setting is also recommended for other mixed media surfaces as the ink may smear due to the long dry time.  Butterflies are flying around this time of year and Memento Luxe ink made creating this canvas bag a breeze with a stencil, Ink Daubers, and Jumbo Ink Daubers.  The vines are outlined in Pear Tart and Pistachio, the butterflies are inked in Dandelion, Morocco, and Rhubarb Stalk.  This ink is so easy to use on fabric that both sides of this bag were completed in under an hour!  


A fun and out-of-the-box use for Memento Luxe is to use an inker and mix with Creative Medium.  Place the Creative Medium on a craft mat and squeeze a bit of Memento Luxe ink and mix with a palette knife before applying to a project.  Memento Luxe is richly pigmented and will expand Creative Medium’s color range, with the big plus of matching the other Memento based lines!


This welcome sign uses Lilac Posies mixed with Creative Medium and then applied with a palette knife through a heart stencil.  After the heart dries, the sentiment is stamped in Pear Tart and heat embossed with clear embossing powder on the slick chalk board surface. 

Memento Luxe is one of the most versatile inks in the Imagine line and as illustrated can be used on so many surfaces.  Stock up on all the colors and their inkers and have fun creating!  


Other
Black cardstock
The Stamps of Life--Wish2make stamp set
WR Memory Keepers—white grommet
Fibers--unknown
Strathmore Bristol Board
Unity Stamp Company—Create, Share, etc stamp
Create Out Loud--Canvas Bag
The Crafters Workshop--Flutterby TCW206
Make It Love It Chalkboard Plaque Large Fancy Rectangle
Stencil Girl—Heart Striped Stencil
Technique Tuesday--Farmhouse Capital Letters Large


Wednesday, July 19, 2017

Imagine is hopping along with Stencil Girl


Time for another cross-promotional blog hop, this month it is with Stencil Girl.  There are so many cool designs at Stencil Girl, but as soon as I saw this musical themed stencil, I knew what I wanted to make!   


My oldest niece graduated from college with a degree in Music Education.  She already has a job lined up and is soon going to need to carry a bunch of stuff around.  (Speaking as a teacher myself!)  This personalized cloth bag is functional and washable, and ready to carry around music or lunch as needed!

Level:  Beginner
Time: 30 minutes

After washing the bag, I placed a piece of thick cardboard between the layers to protect the other side of the bag.  The Treble Bass Clef stencil is placed and Memento Luxe in Teal Zeal is inked onto the bag with an ink dauber.  The first image is heat set with an iron before moving to another area of the bag.  Her name is then colored in by using a Fabrico marker #137 Pale Lilac and Ransom Alphabet stencil.  I found it much easier to use a marker over an ink or spray as the color did not smudge as I moved the stencil around to create each letter.  Quick and ready to send to the recipient!  It even doubled as the gift bag for the rest of her graduation gift!

Imagine:

Stencil Girl

 
One lucky winner will receive both a $25 Gift Certificate to StencilGirl Products AND a $25 Gift Certificate to Imagine Crafts!  Visit the fabulous designers from both teams and comment for your
chance to win!  The more blogs you comment on, the more chances you have to WIN!  (One comment per blog please.)  You have until Sunday, July 23rd at 11:59PM Central Time to leave your comments.  Winner will be announced on  StencilGirl's Facebook page and Imagine Crafts’s Facebook page on Monday, July 24th.
  Please make sure you leave us a way to contact you, an email or blog address!  Have fun looking at all the projects!

Here is the list of all the designers that are posting today and the days before, if you visit us and leave us a comment, you will have the opportunity to win this fabulous prize!

JULY 21

JULY 20

JULY 19

Mischelle Smith
Janet Joehlin

Thursday, January 19, 2017

2017 go 'round!


What better way to celebrate new beginning than to have a mini calendar to grace your desk?  I had a blast creating this desk calendar with a bit of old world feel to remind us that we are riding our planet for another go ‘round of the sun! Don’t have mini calendars available?  Print one from the web and cut it down to size!  Delicata in various colors along with Memento covered with VersaMark in Dazzle and embossing powder really make this desk accessory sparkle and shine.

Imagine

Other
Altenew Big World Stamp and Die set
Hero Arts Serendipity Letters & Numbers stamp set
Spellbinders—Grand Labels Eleven, Fancy Tags
Cuttlebug Damask Brocade embossing folder
Cardstock—Kraft, cream, and white
Computer generated mini calendar
Quick dry glue
Dimensional foam adhesive

Sunday, January 8, 2017

A place to put your to do list!


My first project of 2017 for Imagine as an Artist in Residence is live on the Imagine blog today! The New Year reminds us of goals we would like to set for ourselves each year.  One way to reach those goals is to break them done into little chunks, and a “To Do List” is a perfect way to get started.  I often make lists and sometimes they get lost on my counter, so I choose to make a 7” x 9 ½” mini-clipboard to secure my list.  The bright colors inspire me to get the items on the list done!  Stop by the Imagine blog and see how I created this handy clipboard!


Tuesday, July 12, 2016

Butterfly Tote for Imagine Crafts


There are some wonderful Imagine Crafts products that are designed for permanent use on fabric.  I enjoyed personalizing this simple canvas bag with All Purpose Inks and Memento Luxe Inks as a gift for my mom who loves butterflies.  It is simpler than it looks!


This beautiful canvas bag came together is less than an hour.  If I didn't have so many totes already I would make one for myself!  This is a great idea for a bridesmaid gift or a gift for someone special!

Please check out the Imagine Blog for the full tutorial! 

Supplies Used:
Imagine
·      Ink Droppers
·      Memento Luxe

Other
·      Crafters Workshop Flutterby
·      Stampology Autum Leaves Cutesie Alpha
·      White canvas bag (found at Walmart less than $3)
·      Freezer paper
·      White muslin
·      Fusible interfacing
·      Iron
·      Die cut machine with metal shim
·      Cardstock
·      Scissors
·      Hot glue gun and glue

Saturday, December 19, 2015

Three Dimensional Vertigo Ornaments


I am very excited to share my first blog post as an Artist In Residence for Imagine Crafts by Tsukineko.  Please do stop by the Imagine Crafts blog and take a look at the process to create this very easy ornament.  


It is so fun to create a beautiful ornament during the busy Christmas holiday.  I often craft hand-made gifts for friends or co-workers to celebrate the season, as well as new ornaments for our personal Christmas tree.  This Vertigo ornament is also perfect for an ornament exchange and is easy to produce with just a few supplies and tools.


Thanks for stopping by and enjoy your preparations for a Very Merry Christmas!


Sunday, June 14, 2015

Anything But a Card Challenge #48, Out and About


We have a very fun challenge this month at Anything But a Card, Out and About.  I was inspired by the nature right out my front door.  I have a wonderful wild rose bush in my yard that smells lovely in the mornings and evenings.  This time of year I also have a perennial, which I think, is a type of Blue Phlox, but I am not sure.  Every morning the blooms at the ends blossom, and by evening the petals have all fallen off.  If the wind blows they do not last the day!   

Here are a few photos that inspired me to make my project, a flower wreathe.

Blue Phlox
Wild Rose


I started with a Darice twig wreathe with a 6” diameter.  I used the following dies to create the wild rose: Spellbinders Rose Creations and Foliage.  To create the blue phlox I used:  Heartfelt Creations Vintage Floret and Spellbinders Foliage.  The stamens were created from the Sizzix Flower, Gazania.  I carried in samples of the flowers from my yard and matched card stock from my paper stash to the color of the flower.  For the wild rose I inked the center of the flower with Tsukineko Versa Magic Cloud White and heat embossed with white embossing powder.  The edges were inked with Tsukineko Versa Magic Perfect Plumeria.  I snipped between the petals before shaping the flowers around the stamens.  The stamens for both flowers were shaped or rolled and glued before adding Recollections Banana Flocking to the ends.  The blue phlox were inked with Tsukineko Versa Magic Night Sky and a Fantastix bullet tip.  The edges were inked with Tsukineko Versa Magic Purple Hydrangea.

The flowers stems were arranged around the twig wreathe and hot glued into place.  I added Super Moss around the stems.  The flowers were adhered to the stems with hot glue. 

I enjoyed making the nature inspired flower wreathe to remind me of the early summer season around my home.  Come join us over at Anything But a Card and share your creation that is inspired by being Out and About!

I would like to enter this project in the following challenges:
Ladybug Crafts Use your dies
Allsorts Week 315 Flower Power
The Crafter's Cafe Challenge #120 Anything Goes

Selected as a winner at:
As You Like It Challenge Favorite Flower
The wild rose is one of my favorite flowers because of it's beautiful fragrance!