Showing posts with label distressing. Show all posts

Tuesday, May 6, 2025

Sweet Spring Flowers for Retro Rubber

 Are there flowers blooming in your yard?  Not quite yet in mine here in Northern Minnesota--but soon.  I have starts going inside the house and visits to the Amish Greenhouses 45 minutes away are in the plans soon.  Our challenge at Retro Rubber for the next two weeks is to create a card with spring flowers.


I recently sat down and had a play session with a great set from Altenew in 2021, Build-a-flower Bearded Iris.  The lovely Iris comes in many colors and I experimented with several different choices.  Once I had the layering set up on my stamp platform I made eight different flowers in four different colors. 
 

  • The leaves and stems are Memento in Pistachio, Bamboo Leaves, and Olive Grove.
  • The yellow Iris is Memento in Dandelion, Cantaloupe, and Tangelo.
  • The pink Iris is Memento in Angel Pink Lilac Posies, and Rose Bud.   
  • The flowers and leaves are die cut with the matching die.
  • This background is Black-out Distressed Cardstock from Coordinations pressure embossed with Darice Damask embossing floder and then sanded to bring out the distressed green design.
  • The sentiment Happy Birthday is by Scrapbook.com from the set named the same from 2022 and is stamped in Memento Tuxedo Black on the green side of the cardstock used to make the embossed panel.  That way it matches perfectly.  BTW if you are looking for a very versatile Birthday greeting set, the one by Scrapbook.com has about any design you could want!
  • The corners are rounded on an A2 size card, and the layers are adhered together with wet glue and allowed to dry.  

One of the cards was sent to my daughter, the others are in my stash for future use!


CHALLENGE GUIDELINES

  • We require stamps older than one year.  If we feel you are using newer stamps, you may be disqualified from the challenge without notification.
  • New papers/dies are OK – but you must use at least one stamp older than a year and describe the age in your blog post.
  • Please note that all challenges require the use of at least one stamp older than a year.
  • Post your new creation to your blog or online gallery.   Use keyword RRCB254.  No backlinking. 
  • Link back to the blog using the Linky Tools by the due date. 
  • Enter as many times as you like. 
  • Feel free to combine our challenge with a maximum of 5 challenges.  Entries linked to more than 5 challenges will be disqualified without notification.
  • If your project is posted on a private group site such as Split Coast Stampers or a photo sharing site not all DT members may be able to comment.   Thank you for understanding.
  • Turn off Word Verification.  We love to comment but word verification can make that difficult.


Tuesday, March 25, 2025

Everyone's favorite challenge, Anything Goes with Retro Rubber!

 The title says it all, anything goes for a project at Retro Rubber Challenge Blog this fortnight.  


I have a few oversize floral images in my stash and decided to play with one for this challenge.  It is the Altenew Bellowing Peonies from just last year, so barely a year old.  For some reason I really like peony images and this is a perfect example why!


 It is almost a one layer card, and feels very sophisticated to me.

  • The Bellowing Peonies image is stamped in Tuxedo Black Memento ink.  
  • The matching stencils add just the right layering to the image with Memento Angel Pink, Lilac Posies, Dandelion, Cantaloupe, Bamboo Leaves, and Pear Tart.     
  • Some layers are very light handed, then the subsequent layer is more heavy handed to give the subtle colored look.  
  • Altenew Rustic Burlap Press Plate is used to dry emboss texture into the image. 
  • The edges are distressed to give it a hand-made paper feel.  
  • The sentiment is stamped in Memento Lilac Posies and die cut.  The sub-sentiment is stamped in Tuxedo Black and also die cut.  Both are mounted with two additional die cuts glued behind to create more dimension.  

This card has already been mailed to it's recipient.  It was meant to bring some encouragement!

Play along with our Anything Goes, challenge at Retro Rubber--you know you want to! 


 CHALLENGE GUIDELINES

  • We require stamps older than one year.  If we feel you are using newer stamps, you may be disqualified from the challenge without notification.
  • New papers/dies are OK – but you must use at least one stamp older than a year and describe the age in your blog post.
  • Please note that all challenges require the use of at least one stamp older than a year.
  • Post your new creation to your blog or online gallery.   Use keyword RRCB251.  No backlinking. 
  • Link back to the blog using the Linky Tools by the due date. 
  • Enter as many times as you like. 
  • Feel free to combine our challenge with a maximum of 5 challenges.  Entries linked to more than 5 challenges will be disqualified without notification.
  • If your project is posted on a private group site such as Split Coast Stampers or a photo sharing site not all DT members may be able to comment.   Thank you for understanding.
  • Turn off Word Verification.  We love to comment but word verification can make that difficult.

Thanks for stopping by!


Tuesday, September 10, 2024

Fall Color Challenge at Retro Rubber

 For our challenge at Retro Rubber Challenge Blog the colors are slightly non-traditional for fall.  It was really fun to come up with a design that is fallish as Dahlias are still blooming this time of year.


It is so fun to enjoy my Dahlias this time of year.  I once had a neighbor who was a Dahlia aficionado, and grew about 30 kinds of dinner plate Dahlias.   He would share his beautiful blooms.  This card uses Pinkfresh Dahlia Bunch from October 2021.  So Pinkfresh also likes Dahlias in the fall too.  I didn't want to use the entire image on one card so it is carefully trimmed to place on two cards.  Since coloring is so easy with matching stencils I actually made a set of four cards!

First card using the lower part of the image.

Second card using the upper part of the image.

  • The Pinkfresh Dahlia image is stamped in Memento Tuxedo Black.
  • The coordinating stencils are used to add Memento Dandelion Yellow, Cantaloupe, Morocco, Summer Sky, and Teal Zeal.
  • The stamped image is die cut with the matching die, then trimmed into two pieces.  A second die cut is glued to the back to give a bit of dimension.
  • Cuttlebug Basket Weave embossing folder is inked up in Memento Morocco and the background is pressure embossed.  The Basket Weave is highlighted by direct to paper inking in Memento Dandelion Yellow. 
  • The A-2 card base is inked in Memento Teal Zeal to match the leaves.  
  • All the layers are adhered together.  
This is another card that I want to wait until I send it to add the sentiment.  I have two friends battling breast cancer, and I try to send them sweet snail mail about once a month.  I may also use a few as thank you cards.
 
CHALLENGE GUIDELINES
  • We require stamps older than one year.  If we feel you are using newer stamps, you may be disqualified from the challenge without notification.
  • New papers/dies are OK – but you must use at least one stamp older than a year and describe the age in your blog post.
  • Please note that all challenges require the use of at least one stamp older than a year.
  • Post your new creation to your blog or online gallery.   Use keyword RRCB239.  No backlinking. 
  • Link back to the blog using the Linky Tools by the due date. 
  • Enter as many times as you like. 
  • Feel free to combine our challenge with a maximum of 10 challenges.  Entries linked to more than 10 challenges will be disqualified without notification.
  • If your project is posted on a private group site such as Split Coast Stampers or a photo sharing site not all DT members may be able to comment.   Thank you for understanding.
  • Turn off Word Verification.  We love to comment but word verification can make that difficult.
 Thank you for stopping by and do come play with us over a Retro Rubber Challenge Blog!

Tuesday, August 13, 2024

Tic Tac Toe Thank you card for Retro Rubber

 A very fun Tic Tac Toe at Retro Rubber Challenge Blog for the next two weeks.  Honestly, sometimes I struggle with Tic Tac Toe challenges because there are too many choices.  


I purchased an Altenew set "Beautiful Life" from 2021, and had to play with all the elements!  I do like that it has matching Stamps, Die and Stencils, as well as an Embossing Folder.

 The vertical line of stencil, heat/dry emboss, and metallics was the inspiration for this card. 
  • The image is stamped in Memento Tuxedo Black ink.
  • Stencils are used to ink the flower in Memento Dandelion and Cantaloupe, the leaves in Memento Pear Tart and Bamboo Leaves.  
  • The image is die cut.
  • Another Altenew set added the gold leaves.  "Leafy Splendor" from 2024.  The leaves are die cut from gold metallic paper then pressure embossed with the matching embossing folder.  
  • Beautiful Life embossing folder is used to pressure emboss Color Core cardstock.  The surface is sanded to allow the shadow image to pop in orange.
  • The same cardstock is used to create the matching sentiment die cut, using the reverse side.  Altenew Elegant Sayings is stamped in Memento Luxe Tuxedo Black and heat embossed with black detailed embossing powder then die cut.  Additional die cuts adhered to the back create a raised sentiment with a hint of white outline.
  • The card is assembled and an A-2 card base.

 CHALLENGE GUIDELINES

  • We require stamps older than one year.  If we feel you are using newer stamps, you may be disqualified from the challenge without notification.
  • New papers/dies are OK – but you must use at least one stamp older than a year and describe the age in your blog post.
  • Please note that all challenges require the use of at least one stamp older than a year.
  • Post your new creation to your blog or online gallery.   Use keyword RRCB237.  No backlinking. 
  • Link back to the blog using the Linky Tools by the due date. 
  • Enter as many times as you like. 
  • Feel free to combine our challenge with a maximum of 10 challenges.  Entries linked to more than 10 challenges will be disqualified without notification.
  • If your project is posted on a private group site such as Split Coast Stampers or a photo sharing site not all DT members may be able to comment.   Thank you for understanding.
  • Turn off Word Verification.  We love to comment but word verification can make that difficult.

Please do come play along with us at Retro Rubber Challenge Blog!  We love to see your creations. 

Tuesday, April 23, 2024

Tic Tac Toe! Friendship card

Spring is inching happily towards us!  At Retro Rubber Challenge Blog we have a fun Tic Tac Toe and it happens to be my contributed challenge.  Often I have a hard time with Tic Tac Toe challenges, as I overthink the process.  But once I got going on this one I was able to check all the squares off, and complete a black out, well I guess that's a bingo term!

 
This is the challenge image to create your card or project. 
 
 
My card was created using the following:
  •  The die cut is Stitched Ovals from Elizabeth Craft Designs.  It is die cut from white cardstock and stamped with Hero Arts 2009 Friends are Flowers in Memento Luxe Pear Tart and heat embossed with clear embossing powder.  Fireworks! Bamboo leaves is gently tapped over the image to add some depth and painted into the leaves. Small die cuts from Sizzix Tim Hotlz Tattered Flowers are die cut from scraps of cardstock to put over the stamped flower.
  • The pink shimmer card stock is first die cut with the Stitched Ovals from Elizabeth Craft Designs then pressure embossed with Darice Petal Background embossing folder.  With a white core paper, the flowers are distressed with a sanding block as well as the edges.  K & Company adhesive gems are added to a few of the flower's centers.
  • The card base has Fireworks! Bamboo leaves gently tapped around the edges to pair with the focal image.
  • The layers are adhered together to the card base, taking care the the oval is placed the same direction as it was die cut.  Even with symmetrical dies they are not perfect!
  • Sheer purple ribbon is tied into a small bow and adhered to the card.

How fun is that?  Sometimes a Tic Tac Toe board can inspire the next little detail on your card!

 CHALLENGE GUIDELINES

  • We require stamps older than one year.  If we feel you are using newer stamps, you may be disqualified from the challenge without notification.
  • New papers/dies are OK – but you must use at least one stamp older than a year and describe the age in your blog post.
  • Please note that all challenges require the use of at least one stamp older than a year.
  • Post your new creation to your blog or online gallery.   Use keyword RRCB229.  No backlinking. 
  • Link back to the blog using the Linky Tools by the due date. 
  • Enter as many times as you like. 
  • Feel free to combine our challenge with a maximum of 10 challenges.  Entries linked to more than 10 challenges will be disqualified without notification.
  • If your project is posted on a private group site such as Split Coast Stampers or a photo sharing site not all DT members may be able to comment.   Thank you for understanding.
  • Turn off Word Verification.  We love to comment but word verification can make that difficult.

Do come and play along with us at Retro Rubber Challenge Blog. We would love to see what you create!

Thursday, January 27, 2022

New Techniques to add Texture for a Handsome Anniversary Card


Today’s tutorial will demonstrate how to create multi layers of texture for a dramatic Anniversary Card.  StazOn, Delicata, and Mboss will add amazing levels of metallic shimmer.

Skill:  Advanced

Time:  60 minutes

Directions:


Step 1


Trim white piece of sturdy cardstock to 4 1/8” x 5 3/8”.  I used the backing of a paper pack, that had one shiny white side.  First, I pressure embossed with Sizzix 3-D Textured Impressions Doodle Triangles.  A makeup sponge was used to spread StazOn Metallic inks from re-inkers in Platinum, Silver and Gold randomly around the surface of the card front.  StazOn dries on the sponge and makes it a one-time use tool. StazOn Jet Black ink is gently tapped over the raised portions of the card panel.  Set aside to dry or heat with a heat gun.


Step 2


Using a stamp from my stash (manufacturer unknown) small hearts were stamped randomly in VersaMark ink and heat embossed in Mboss in Valentine.


Step 3


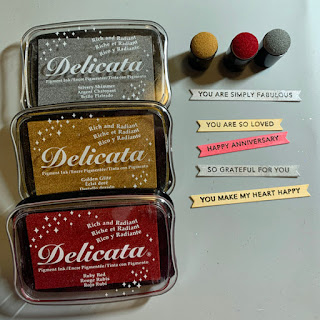
Memento Luxe in Tuxedo Black is used to stamp Taylored Expressions Simple Strips Background sentiments followed by heat embossing with black embossing powder.  The matching die is used to die cut the entire set and five sentiments are selected for the front of the card.

Step 4


Each sentiment strip is inked with Delicata in Silvery Shimmer, Golden Glitz or Ruby Red with an ink dauber.  Since the sentiment is embossed, the ink will not change the color.


Step 5


The sentiment strips are backed with white cardstock with the matching backer die.  The edges are inked with Memento Tuxedo Black and an ink blusher to add definition.


Step 6


A Scribble Heart die by Impression Obsession is die cut from white cardstock.  The die is then inked with Versa Mark ink and heat embossed with Mboss in Valentine.


Step 7


A white card base is trimmed to 5 ½” x 8 ½”.  The edges are inked with Memento Tuxedo Black and an ink blusher.


Step 8


The card base is adhered to textured front with TearIt! Tape.  The Heart is adhered with OnPoint Glue.  The sentiment strips are adhered with dimension foam tape.  A striking masculine anniversary card goal achieved!


Art Supplies


Imagine

·      StazOn Re-inkers—Platinum, Silver, Gold

·      StazOn Jet Black ink pad

·      VersaMark ink pad

·      Mboss—Valentine

·      Memento Luxe—Tuxedo Black

·      Embossing Powder--Black

·      Delicata—Silvery Shimmer, Golden Glitz, Ruby Red

·      Memento Tuxedo Black

·      Ink Blusher

·      Ink Dauber

·      Tear It! Tape

·      OnPoint Glue


Other

·      Sizzix 3-D Textured Impressions Doodle Triangles

·      Make up sponge

·      Background heart stamp (manufacturer unknown)

·      Taylored Expressions Simple Strips Background Sentiments, Die, and Backer Die

·      Impression Obsession Scribble Heart die

·      Dimensional foam adhesive

·      Black and White cardstock

Friday, September 10, 2021

Fall leaves Thanks for Imagine


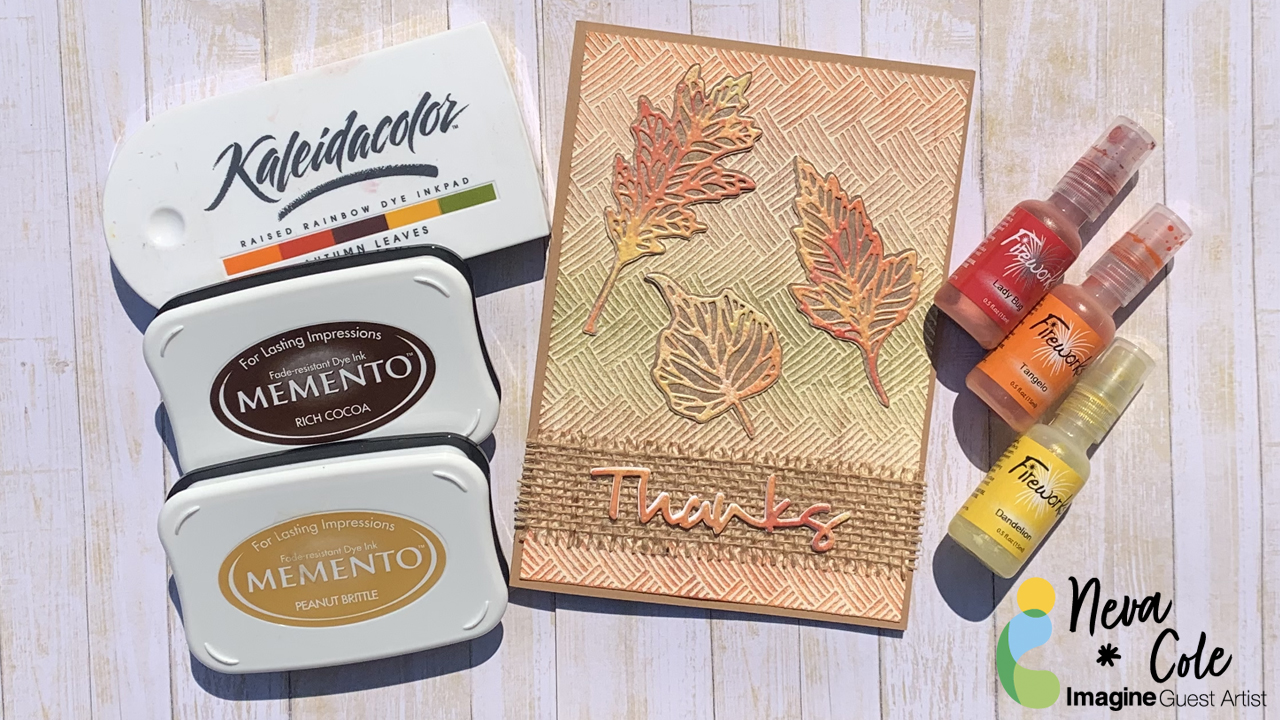
In today's card making tutorial I will show you how to create fall themed Thanks card using three different inks from Imagine.  The autumn colors are vibrant and blend well with kraft card stock and burlap ribbon.  I hope this card inspires you to think of all things pumpkin spice and apple cider as we head into fall!

Skill:  Intermediate

Time:  1.5  hours 

Directions:


Step 1

Spritz white cardstock with Fireworks! Lady Bug, Tangelo, and Dandelion.  I like to start with the darkest color first working to the lighter color to fill in the last areas of white.  Set aside to dry. 


Step 2

Use Memento Peanut Brittle and Ricch Cocoa to ink white cardstock.  I used the ink pad directly on the cardstock as I wanted a splotchy look.


Step 3

Die cut the Fireworks! colored cardstock with Skeleton Leaves dies.  Cut an outline to back the skeleton leaves either by hand or with an electronic die cutting machine.  Adhere the layers together with On Point Glue.  Small dots in the thicker areas of the leaves works best.


Step 4

Die cut one “Thanks” sentiment from the Fireworks! colored cardstock and three from white cardstock.  Layer together with On Point Glue to create a dimensional sentiment.  To avoid glue from leaking out from between the layers use small dots of glue on the outside edges.


Step 5

Use a soft rubber brayer to ink cardstock trimmed to 4.74” x 5.75”.  Kaleidacolor in Autumn Leaves was used with the green portion in the middle and the light orange on either end of the cardstock.  Flip the cardstock to achieve this look.


Step 6

Pressure emboss the cardstock with Basket Weave embossing folder.  Use a sanding block to remove color and allow the embossed design to pop.


Step 7

Adhere background to A7 kraft card base with Tear It! Tape.  Adhere burlap ribbon with Tear It! Tape, it is translucent enough that it does not show through the burlap, and will hold the card together.  Adhere Thanks sentiment with On Point Glue.  Adhere the leaves with Tear It! Tape.


Art Supplies


Imagine


·      Fireworks!—Lady Bug, Tangelo, Dandelion

·      Memento—Peanut Brittle, Rich Cocoa

·      Kaleidacolor—Autumn Leaves

·      On Point Glue

·      Tear It! tape


Other

·      Sizzix Thinlets Skeleton Leaves

·      Spellbinders Phrase Set One

·      Darice Basket Weave embossing folder A7 size

·      Recollections A7 card Base

·      Burlap Ribbon

·      Sanding Block

·      Dimensional Foam Adhesive

·      Brother Scan-N-Cut


Thanks for stopping by!

Thursday, June 6, 2019

Cousins

I have a few layouts I have completed recently, and now finally have time to blog and share with you.  This layout features photos from the summer of 2010.  Interestingly enough the paper collection is also from 2010, My Family by Fancy Pants Design!


Since I created two of these double page layouts, I used my paper carefully!
  • The background is Coredinations Distress Collection in the perfect blue-grey color.
  • Patterned papers are trimmed to 3/4", 1 1/4", and 2 1/2" by 12". 
  • The focal photo is matted with 5" x 7" patterned paper.  
  • Various embellishments are trimmed from the card part of the collection.
  • One side is of the one of the patterns is graph paper, perfect for the journal block and the title!
  • All of the edges are distressed with the Edge Distressor tool by Heidi Swapp.  Believe me I had a lot of paper crumbs all over my desk!
  • The title is Quickutz's Diesel font.  
  • The journaling is completed with a Zig Writer in Steel Grey.
Thanks for stopping by, your comments are always appreciated!  Come by again tomorrow to see a "companion" page of sorts that uses the same collection.