Wednesday, December 30, 2020

Back in the crafting DT saddle again!

 I am happy to announce that I've been invited to be on the guest design team for Imagine.

You will see a project or two a month for the Imagine blog, which I will cross post here as well.  I am looking forward to sharing a pretty sweet Valentine sometime in January so stay tuned!

You can check out the announcement here:  Imagine Blog


Neva Cole

Hello fellow crafters, my name is Neva Cole and I live in the high desert of Central Oregon on a mini-farm with my husband, son, four German Shepherds, and one inside kitty.  A life-long crafter I gravitated towards mostly paper arts, stamping, card making, and scrapbooking about 25 years ago.  My style varies with my mood, sometimes clean and simple then I swing to shabby chic or layered elegance.  I have instructed classes in the paper arts, and come by teaching naturally—I am a retired High School Science teacher.  I look forward to creating with you in the Imagine Community! 

Tuesday, December 1, 2020

Christmas Theme for Retro Rubber

For our last Retro Rubber challenge of the year is a Christmas theme board.  We have a couple of simple rules 1) Use at least one stamp that is at least one year old 2) Tell us how long you have the stamp 3) Enter no more than ten challenges including ours 4) Enter our challenge up to three times.  Have some fun and join us at Retro Rubber. 

I decided to dig through my really old Christmas themed papers.  The old ones from Paper Pizzaz that came in 8 1/2" x 11" tear out books, from about 1996 or so.  The prints are smaller and coordinate well together.


  • The sentiment manufacturer is unknown, but written on the back is 1998 and a price of $4.75.  My guess is Sonshine stamps?  It is stamped in Memento Cottage Ivy, then trimmed and edged in the same ink.
  • Patterned paper is trimmed to fit the front of the 5" x 6 1/2" card front and edged in Cottage Ivy as well.
  • Sizzix Winter leaves is used to die cut three layers of red, green, and brown cardstock to assemble the greens.  
  • Stars are die cut from patterned paper, then backed with three layers of white cardstock to create "chipboard" stars.  
  • Snowflakes are die cut from Elizabeth Craft Designs Entwined Circle, and Spellbinders Four Seasons. 
  •  The add to the country feel theme, a strip of burlap ribbon is added and the embellishments are adhered with glue dots.  

Another Christmas card ready to send greetings is finished!  Please come join the fun of our last challenge of the year over at Retro Rubber!

Tuesday, November 17, 2020

Happy Birthday for Retro Rubber

Here we are soon to wrap up 2020!  Over at Retro Rubber we are celebrating birthdays with our challenge.  So for the next two weeks come and play along!  Our rules are simple 1) Use a stamp that is at least a year old that needs inky love 2) tell us about the age of said stamp 3) Enter up to ten challenges including ours 4)  You may enter our challenge up to three times.


Since snow is falling,  in all honesty it's mixed with rain, I thought a winter birthday card would be in order.  Plus I have a niece who is big into the outdoor sports including snowboarding so I thought a snowflake themed card would be fun and feminine.


  • A quick search in my vellum stash I found the perfect light blue vellum.  It is pressure embossed with Darice Snowflake background.
  • Tried and true Spellbinders Create a Flake One and Three provided the die cuts.  They are also pressure embossed and then inked through the die with Versa Color Mountain Lake to high light the snowflake shape.
  • Taylored expressions In & Out Birthday from Sept 2014 provides the sentiment.  It is stamped in Versa Color Mountain Lake.  The corners are rounded with the WeR Memory Keepers corner punch.  I like this punch because you can choose three different curves for the corners.  The panel is edged in Versa Color Mountain Lake.
  • I adhered the snowflakes and sentiment with dimensional adhesive THEN wrapped the American Crafts color hemp around the snowflakes.  It seemed a little easier than trying to glue down the hemp cord!
  • All the layers are adhered to the front of a standard A2 card.

Thanks so much for stopping by!  Please do come by Retro Rubber and play along with us!  We love seeing you in our gallery!


Tuesday, November 3, 2020

Anything Goes for Retro Rubber Anniversary Card

 We have the ever popular Anything Goes for our challenge for the next two weeks over at Retro Rubber Challenge Blog.

We have very simple rules:  1) Use a stamp older than a year, give it some inky love!  2)  Tell us how old the stamp is or give us your best guess  3)  Enter up to ten challenges including ours.


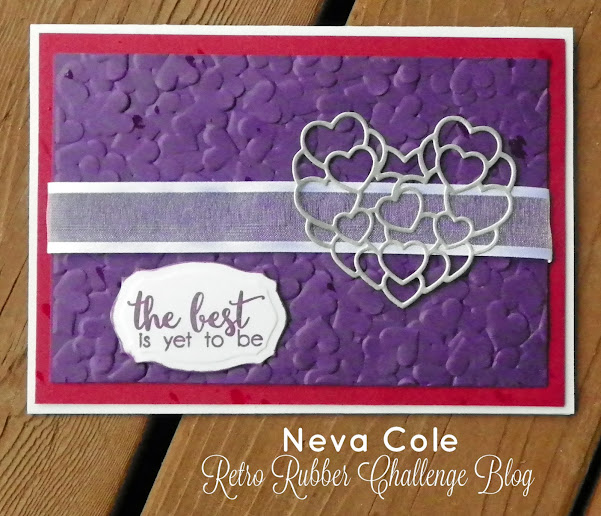
Today I am featuring a card I made for my husband for our 15th Anniversary.  I used the colors from our wedding and the paper selection is what I used when I scrapped our wedding.


  • The sentiment is from Technique Tuesday Inspired Dragonfly released in 2016 and Unity Stamp Company's . . . no remedy for love released in 2015.  It is stamped on Coordinations Light Icy Indigo in Versa Color Grape.  Spellbinders Labels 25 is used to die cut the sentiment and the edges are inked in Versa Color Grape.
  • Canson Silver paper is die cut with Impression Obession DIE 056-I.  
  • Coordinations Groovy Grape is pressure embossed with Sizzix Textured Impressions Confetti Hearts.  
  • Silver sheer edged ribbon is adhered around the embossed layer and adhered to Coordinations Deep Racy Raspberry.  The additions embellishments are adhered to the layers.
  • The base card is Coordinations Light Icy Indigo.

Thanks so much for stopping by and do come play along with us at Retro Rubber Challenge Blog.

Tuesday, October 20, 2020

Seasonal Color Challenge for Retro Rubber

 Ah it's fall (or autumn) here in the Northern Hemisphere.  We've been enjoying a bit of Indian Summer, and had our first  frost of the season 2 nights ago.  My dahlias suffered, but I carried in my hanging baskets.  Actually for Central Oregon this is really late to have our first frost, so the last few weeks I've been enjoying the longevity of my flower garden including roses that had buds!  At any rate we are highlighting the colors of the season at Retro Rubber Blog Challenge for the next two weeks.


For most in the U.S. we celebrate Halloween with black, orange, and white.  It just so happens that my Sister-In-Law was born on Halloween and it is her FAVORITE holiday, and she is our favorite witch.  So I decided to create a birthday card that also celebrates Halloween just for her.


  • A very ancient Rubber Baby Buggy Bumpers stamp of the relief of the moon was stamped in Memento Luxe Dandelion and heat embossed with iridescent embossing powder.  
  • I created a circle mask with a Spellbinder's circle die and sponged ink around the moon image.  I started with Memento Luxe Dandelion, faded to Morocco, and finally Rhubarb Stalk at the bottom of the card.
  • A bit of Memento Luxe Grey Flannel was sponged over the moon and the excess cleaned with a baby wipe from the embossed moon.  The moon was a little too yellow, so a tiny bit of StazOn Orange Zest was sponged over the moon.
  • The tree image is another stamp that been in my inventory forever, Ann-ticipations trees made in 1996.  It's a lovely stamp for fall cards!  It is stamped in Memento Luxe Espresso Truffle and Grey Flannel to add some depth.
  • The sentiments are from Technique Tuesday Say It Happy.  The interior happy is sponged in Memento Luxe Morocco.  The sentiments are stamped in Memento Luxe Wedding White and heat embossing in detail white embossing powder.  The ampersand is from Technique Tuesday's Say It Hugs from 2013. 
  • The witch and hat are Cheery Lynn Designs Witch Hunt from 2015.  They are die cut from black cardstock as is the outline for the Technique Tuesday's Happy die cut.  

I really had fun creating the card, and I am sure my Sister-In-Law will enjoy it!  Play along with our Retro Rubber challenge for the end of October.  We have several simple rules 1) Use one stamp at least a year old 2) Tell us how long you have had the stamp 3) Enter no more than ten challenges including ours.  Simple and fun!  Thanks for stopping by!


Tuesday, October 6, 2020

Tic Tac Toe for Retro Rubber Sympathy card

 Time for a new challenge over at Retro Rubber Challenge Blog, a fun Tic Tac Toe inspiration board.   There a a few simple rules 1) Use at least one stamp that is more than a year old 2) Tell us how long you've had it or when it was manufactured 3) Enter up to ten challenges, including ours.  

I decided to use the middle horizontal row to make a clean and simple sympathy card.  As the card would be masculine I went with twine instead of ribbon, thinking that it's super similar and a tad more masculine.


This is an A2 sized card 4 1/4 x 5 1/2 base.

  • Sizzix skeleton leaves are die cut from green cardstock.
  • Twine is tied around the stem of the leaves.
  • The 4" x 5 1/4" edges of the card front are inked with Memento Luxe Northern Pine.  
  • The sentiment from Sincere Senitments 2/2007 is stamped in Memento Luxe Northern Pine.  This set has been used many times and was acquired when I had a subscription to Cardmaking & Papercraft.  It is designed by Simonne Clay. 
  • The die cut is adhered with Zig Two Way Glue.
  • The card front is adhered to the base.

I made several of this design, as I had family members on my husband's side pass away recently.  (Not COVID related)  My uncle who was not expected to survive his bout with shingles that caused encephalitis is making his recovery.  We are very thankful for his recovery, and keep praying for his family.  (So I still have a few in my stash if needed in the future.)

Thanks so much for stopping by and please do join our challenge over at Retro Rubber.  

Tuesday, September 22, 2020

Retro Rubber Anything Goes!

 A challenge that everyone can enjoy, Anything Goes at Retro Rubber Challenge Blog!  We have a few simple rules:  1) Use a stamp at least a year or older 2) tell us how old the stamp is 3) enter up to ten challenges only including ours.  Thanks!


I made a few thank you cards for my birthday, and decided to share them with you!

I started with Concord & 9ths' Many Thanks Stamps and Dies from 2017.

  • Since I needed a stack to send out I stamped four sets of the background Thanks.  I used Versa Color Paprika and Brown, Versa Fine Vintage Sepia, and Delicata Dark Brok Shimmer.  Using my stamp positioner I stamped four in succession and cut each 6" x 6" into 3" x 6".
  • The background is inked in Paprika and then mounted to dark craft colored cardstock which is also inked.
  • Brown ribbon from my stash is wrapped around the top for balance and a knotted section is adhered with a glue dot.
  • A die cut of the quote bubble is adhered around the thanks.
  • "so much" is stamped in Paprika on dark craft cardstock.
  • A die cut heart from the set is inked with Paprika as well.
  • The final embellishment is the butterfly from Recollections.
  • Light brown craft cardstock is the card base. 


Here is the finished stack, I ran out of brown ribbon so I repeated the process in another color scheme to make a few more thank you cards.

Come join us at Retro Rubber Challenge Blog for Anything Goes!

Tuesday, September 8, 2020

Retro Rubber Color Challenge

 Hello!  I've been missing the time in my craft space, but real life and challenges have prevented the creative mojo from flowing.  I am thankful that my crew over at Retro Rubber has been super understanding!  At any rate I am back, and here is the challenge for the next two weeks.


 Even though I do not have sunflowers growing in my garden I do love seeing the ones around town.  With this challenge I had to find a purchase made at one of the first stamp conventions I attended in Portland, Oregon.  A sunflower image from Auntie Amy that I have had since September of 1996!


  • The sunflower is stamped in StazOn Jet Black and then water colored with a mixture of Fireworks! in Dandelion and Tangelo on the petals, and Cottage Ivy and London Fog for the center.
  • Heartfelt Creations Bold Leaf from 2018 is stamped in Memento Cottage Ivy.
  • Both images were die cut using my Brother ScanNCut.  (Since I made multiples of this card it made easy work of the job!)
  • A scrap of yellow patterned paper laying on my desk was a perfect match, it is backed with a strip of white cardstock inked with Memento Cottage Ivy.  
  • One of the reasons yellow ink is not popular for stamping sentiments is that it is usually difficult to read!  So I die cut Sizzix Thinlits Phrase: Thank you with hearts from 2014.  
  • The layers are adhered together, with the flower popped up just a tad with foam adhesive.  

Thanks for so much for stopping by, it is pleasure when I read your comments.  I know that my blog has been neglected for a few months.  If you wish to read part of the story behind my "hiatus" you can check out our Go Fund Me page regarding my DS14.  

 Please do join us at Retro Rubber Blog Challenge, and remember our very simple rules.  1)  Use and image that is at least a year old 2)  Tell us how long you've had it around 3) Enter up to only ten challenges including ours.  Easy Peasy Lemon Squeezy!  Couldn't resist with the challenge image, :)

Tuesday, August 11, 2020

Anything Goes for Retro Rubber

 Hello everyone, it's been awhile since I've posted on my blog . . . many things have been happening in my immediate family that required my attention.  There wasn't much left to be creative in my craft cave.  It was not COVID illness related, but just didn't have the time or energy to stamp.  Then I needed to create some sympathy cards for family members, and the creative juices thankfully started flowing.  This time around at Retro Rubber we have the ever popular Anything Goes!


I had several different cards to make and this is the one that features a butterfly.
 
 
  • The background features an ancient stamp from Fancy Pants Designs Pollen Dust set stamped in Encore Green.  I believe it was released in 2014.
  • The sentiment is stamped in Encore Pink from Unity Stamp Company's "beautiful life, blessed memories" from 2015.   
  • Circut Cuttlebug's Butterfly trio was used to die cut the butterfly.  The die cut is inked in Encore Blue, Green, and Purple.  I placed the negative from the die cut over the base card to ink in the areas that were die cut open in the butterfly.  
  • Edges are inked in Encore Green and Purple to pull the card together in a jiffy!

Please do come join us over at Retro Rubber Blog Challenge and enter your own Anything Goes project.  We have a few simple rules:  1)  Use a stamp that is at least a year old 2) tell us how long you've had the stamp 3) only enter up to ten challenges including ours.

Thanks for stopping by!  I've missed my creative time and sharing my creations with you!  Blessings during this unique year of 2020.


Tuesday, May 5, 2020

Spring Flowers for Retro Rubber Challenge Blog

A new challenge over at Retro Rubber Challenge Blog, perfect for May as things are starting to bloom!


I decided to go with clean and simple for my flower based card.  The bonus of my technique is that I got two stampings from the same coloring job, so both of my Mother's Day cards are done!


  • Penny Black Lilacs from 2018 image was colored directly on the stamp.
  • Memento Dual Markers were used in the following colors:  Summer Sky, Bahama Blue, Danube Blue, Pear Tart, Bamboo Leaves, and Cottage Ivy.
  • The image was lightly misted with Ink Potion #9 and then stamped.
  • The second stamping was slightly lighter, but still stunning! 
  • The sentiment is from Hero Arts CL498 from 2015.  It is stamped in Memento Danube Blue.
  • The card base is ink with an Ink Dauber in Memento Danube Blue.
  • A bit of pom pom fiber is attached to the card front before adhering it to the card base.  
I hope you are staying safe and healthy during this time and have some spare time to craft.  Please do come and play with us at  Retro Rubber Challenge Blog.  We have very simple rules 1) Use a stamp that is at least a year old and tell us how long it's been in your stash 2) Enter up to ten challenges including ours. 

Monday, May 4, 2020

Stick It Down Double Page Drill Team Reunion

Hello all!  A few months back I attended an All Class Reunion for my High School located in Kodiak, Alaska.  We had four members from our junior year that were all on Drill Team Together.  These photos were perfect for this month's sketch from Stick It Down!


I choose to use school colors of Blue and Gold to scrapbook the page and add embellishments that represented our High School and mascot, the Kodiak Bear!


  • The base cardstock is two toned, so the die cuts and journal strips are the reverse of the base cardstock trimmed from behind the patterned paper.
  • Core'dinations Yellow Small Dots, and Dark Blue large dots, Darice Yellow Stripes and Dark Blue Plaid, along with some ancient Provocraft Slab II Yellow Plaid are used to create the sketch.
  • Blue ribbon from my stash adds the final background section.
  • The Bear is did cut from a file from the Silhouette Store.
  • The KHS emblem is designed from the Varsity font also from the Silhouette Store.
  • The title is die cut with a font on my Scan N Cut.
I am so pleased that I had so many patterns to work with on this sketch, why don't you give it a try and join us at Stick It Down! this month!

Tuesday, April 21, 2020

Retro Rubber Anything Goes Butterfly Kisses

Hello all!  Either you have more time to craft than you've ever had before, OR you are even more busy because not only are you working from home, schooling your children, AND taking twice the amount of time to do grocery shopping.  I would fall in the later category.

At any rate, our challenge for the next two weeks over at Retro Rubber is Anything Goes!


This morning was the first time I've had time to sit down at my craft table and create something, and I am very pleased with the results.  I was inspired by the challenge listed below.


  • This wonderful bit of ribbon was in my scrap ribbon stash and was the starting point for the card.  
  • The native butterflies are just starting to hatch in our area (my GSD loves to chase them and their shadows), plus butterflies are a favorite of mine anyway.  This set is by Joy Clair Butterfly Kisses from 4/2017.
  • The background is Kaleidacolor Berry Blaze that is brayered onto Bristol cardstock with a soft rubber brayer.  
  • The background butterflies are stamped in Memento Luxe Tuxedo Black.
  • I ended up doing a second go at the background, and then decided the focal butterfly could be stamped on the scrap in Memento Luxe Tuxedo Black.  (The first stamping of the background butterflies do not go as planned!)  The focal butterfly is fussy cut.
  • Bristol cardstock is die cut with Spellbinders Mystical Embrace die and then inked with an Ink Dauber in Memento Luxe Tuxedo Black.
  • The edges of the card base are also inked with Memento Luxe Tuxedo Black.
  • The ribbon is adhered to the background, then to the base with foam adhesive.  The sentiment panel is adhered with foam adhesive as well.  The focal butterfly is shaped a bit and adhered with a bit of foam adhesive and glue dots.  
 I was inspired by TGIF Challenges Sketch for my card!

Thanks so much for stopping by and please to come by and join our Anything Goes Challenge at Retro Rubber!

Friday, April 17, 2020

Guest Designer for Single Page at Stick It Down

I am excited to give a single page layout a sketch with our team over at Stick It Down.  I had just two photos printed from an event and decided this would be a great way to showcase them since a long title was perfect for the layout.


My version is from a fall event, and the colors are very vibrant for the season.


  • The Quick Quotes Autumn Brilliance Collection was perfect, I used I used two sides of one paper and one side of two more of the collection.
  • A Plaid ruler for tearing paper made quick work of tearing the edges.
  • During the quarantine I am learning how to use my Brother ScanNCut and Canvas Studio.  It was easy to create my own wavy edged circle frames.
  • The title font is a Silhouette font, ZP Whiplash.  
I hope you enjoy my interpretation of the single page sketch!  So come a play along with us over at Stick It Down!

Tuesday, April 7, 2020

Easter version of Be Squared!

We have a fun challenge over at Retro Rubber for the next two weeks.  Do go check out all the options the Design Team created! 


We have a few simple rules: 1)  Use at least one stamp older than a year  2) Tell us how old the stamp is  3) Enter up to ten challenges including ours.  That is it, so come and play along!


This is the front of the card, which was designed to be clean and simple.

  • Sizzix Card, Square Flip-It #2 was used to die cut Lawn Fawn Watercolor Shooting Star cardstock.  
  • The smaller square die cut is from Elizabeth Craft Design's Stitched Squares.  
  • Unity Stamp Company Everything Easter from 2/2015 was used to stamp both the front and inside sentiments in Memento Tangelo.   
  • Memento Tangelo was rubbed on the inside of Cuttlebug Gingham embossing folder before the cardstock was pressure embossed.  
This is how the card appears with the Flip-It opened.


Although there is not much room for a written hand written message this is a quick and simple card to create.

Thanks so much for stopping by and I do hope you will play along with us over at Retro Rubber for our Be Squared Challenge!  

Monday, April 6, 2020

April SID sketch, State Wrestling

How much our everyday life has changed in the last few weeks.  I pray that you and your loved ones are safe and healthy as we weather this pandemic together.  We over at Stick It Down will continue to provide inspiration with our monthly sketches for cards, single page layouts, and double page layouts.  April's double page layout features a large photo.


My choice was to use a photo I purchased from the professional photographers at my older son's state tournament appearance.  I also went for a really BIG title.  I am happy to report that my son was pleased with the layout.


  • I have a collection of wrestling related papers from Stamping Station AKA Scrapbook Customs.  If you have need for a particular sport this is a great place to purchase theme related papers.
  • I keep the cardstock simple and used school colors of red, black and white.  
  • The smaller team photo is backed with Darice Large Black Dot.  The photo was taken from a distance on a balcony above the event center main floor.  I am still pleased that I captured this moment.
  • The wrestlers and singlet cut files are purchased on Esty from PenAndPosh
  • The white script is from Silhouette Sweet Tea font and the red is a font on my Brother ScanNCut.  
During this time we are all dealing with a myriad of emotions depending on our situation.  For me and my family I am at home on 6 acres with my husband, two sons, and four German Shepherds.  We have plenty of chores and activities to keep us sane and happy.  My husband is able to work from home, but as a substitute teacher my services are not required.  I am the family errand runner, so am taking great care to stay safe and clean! 

Do take some time to be crafty!  For many of us it is an escape and therapy!


Saturday, April 4, 2020

Dog Sympathy Card

On Monday of this week I accompanied my In-laws to the vet to help their beloved Duke cross the Rainbow Bridge.  It was not unexpected, but is still always hard to say goodby to a well loved dog.  Once I found a sketch and the pet patterned paper I was good to go!


  • DCWV The Pets Stack provided the right panel and the "Duke" name.  One sheet had a list of common dog names, conveniently so for Duke!  
  • I used the Three-in-one heart die by Lifestyle Crafts from 2010 to create all the hearts, and fussy cut the aqua around the Duke names.
  • Recently I purchased a Dog Sympathy stamp set from Scrapbook.com and have already used it twice since the beginning of the year.  The sentiment is stamped in Memento Luxe Wedding White and the paw prints in Memenoto Luxe Rhubarb Stalk
  • All the cardstock is from my scrap stash. 
This card was inspired by the following sketch at Freshly Made Sketch 429


Thanks so much for stopping by!  I was happy to have the time to create a special card for my Mother and Father In-Law. 

Tuesday, March 24, 2020

Magic Picture Changer card for Retro Rubber Challenge

We have a super fun challenge that you can use to create Easter cards, or just about any season for Retro Rubber.  One of our DT is in the Southern Hemisphere and she used this challenge to create a fall card.   Do stop by to see all of the wonderful projects.


I ended up using two diagonals: eggs, die cut, pattern paper AND Easter, die cut, baby animals.  One of my favorite things is to create interactive cards, and have been doing it for years, even before cool dies and online instructions are around.  However this time the process went much quicker with the use of a set of Lawn Fawn dies called Magic Picture Changer.  This is the closed position:


I followed the directions from the Lawn Fawn assembly video
  • All my images are from the Chirpy Chirp Chirp set (2/2016) and are stamped in Memento Tuxedo Black then colored with Chameleon pens.  
  • To layer the images they were first stamped on Post-It notes and fussy cut to create mini masks.
  • I used Chameleon NU4 Caramel, YO2 Mellow Yellow, OR4 Seville Orange, PK3 Bubble Gum, and WG3 Warm Gray.   (One of my goals during the social distancing time is to actually sit down and go through the instructions videos about color with Chameleons so I can become a better colorist!)
  • The  grass which is peaking through the frame is Memento Pear Tart.
  • With the masks still in place the sky is sponged in with an Ink Dauber and Memento Summer Sky.
  • The pattern paper is from a very old set of Provocraft papers that I've had for 20 years!  Still have a selection and am glad to see them make an appearance in my crafting.  

This is the card in the open position.  What shows up during the transition is the word: Translation: happy easter.

I hope you enjoyed this project and it will be in an envelop soon for Easter.  Please do play along and join our fun little challenge at Retro Rubber.  We have a few simple rules.  1)  Use a stamp that is older than one year.  2)  Tell us how old the stamp is in your description.  3)  Enter ONLY up to 10 challenges including ours.  

Thursday, March 12, 2020

NW Duals

Wrestling is a sport that I have thousands of photos . . . when the boys were younger I could distill a season down into a layout or two.  For John's senior season I decided to scrap each event in it's own layout.  Even with that I must select down to a few photos of some very intense minutes. 


Mountain View colors are red and black, so an easy choice to stay in that color scheme.  I ordered a batch of Darice papers as I knew with three kids to go through Mountain View I would use them frequently for sports and school events.  
  • Each photo is backed with Bazzill red cardstock and the background is Bazzill black cardstock. 
  • Three patterns of Darice papers are used:  Large Black Dots, Red Plaid, and Red Stripe
  • Since I wanted to layer the patterned papers a frame of grey cardstock helped define and separate the two. 
  • The red stripe is punched with the Paper Studio Pennant punch.
  • Paper Studio Wrestling stickers are backed with the grey cardstock and fussy cut.  They blended into the background too much otherwise.  
  • The title font is Recollections, and stood out much better on the red plaid than on the black back ground.  
  • Journaling was also printed out on the grey cardstock.  
I am happy to have another layout completed.  Sometimes not doing all the wrestling layouts at the same time helps my creativity.  Thanks for stopping by, and know that your comments are always appreciated!  

Wednesday, March 11, 2020

No River Required

I often create layouts in duplicate or triplicate for my kids' albums.  This was the case for this layout, three kids with memories to preserve, so three layouts. 


I found several patterned papers I wanted to use that were great colors for the photos, but I only had one sheet of each.  So the challenge was to create a layout that would use one third each.  I think I accomplished my goal! 

Several years ago I purged all my printed magazines as they were taking up room on my shelves and not being used.  Before I did that though, I salvaged articles and ideas for layouts that appealed to me.  This layout is based on an article from Creating Keepsakes Nov/Dec 2010, about using scraps. 

  • My Minds Eye Lime Twirl collection stripes and darker blue patterned paper, and Creative Imaginations Blue Scroll were used.  Bottom rectangles are 2" x 3".  
  • Top strip is 1" backed by 1 1/2" white cardstock.
  • Four punches were used to created the different size circle.  The punches are fast, compared to die cutting!  EK Succes, Fiskars, Marvy and McGill are all represented.
  • Bazzill green is the background, Darice Persimmon is the orange.
  • The journal strips are inked in Memento Danube Blue and written in Zig Writer Navy.  
  • The title was cut on my Brother Scan N Cut.  
A bit time consuming to create three of the same, but I am very pleased with the results.  Thanks so much for you comments and time to stop by!

Tuesday, March 10, 2020

YOU for Retro Rubber Challenge Blog

The next two weeks we have a great CAS sketch over at Retro Rubber.  Please do come and play along with our challenge, and check out the wonderful cards the Design Team created as well.  We do have several simple rules:  1)  Use at least one stamp that is older than one year and needs some inky love.  2)  Let us know about how old the stamp is  3)  Enter up to ten challenges including ours.


My card took all of 15 minutes, once I decided on the papers and stamps.  I rotated the sketch as the sayings I wanted to put on the card would not fit the other direction!

  • Hot Off The Press has a great set called YOU, the die is die cut from Basic Grey's Granola.  This is a very retro paper from about 2008.  Three more die cuts are made to stack and add dimension.
  • Three sentiments from the You Greetings are stamped in Powder Puff Chalking Ink in Cool Grey.  Each sentiment is trimmed and the edges are inked.  
  • Another selection from the Granola collection is adhered to the front of the card.  
  • The YOU die cut and the sentiments are added with dimension foam adhesive. 
There you have it!  A great masculine card to send to my son.  Please do come by Retro Rubber Challenge Blog and check out this fun sketch challenge.  Thank you so much for stopping by and I enjoy reading all your comments.  

Monday, March 9, 2020

Butterflies for SID March Double Page Reveal

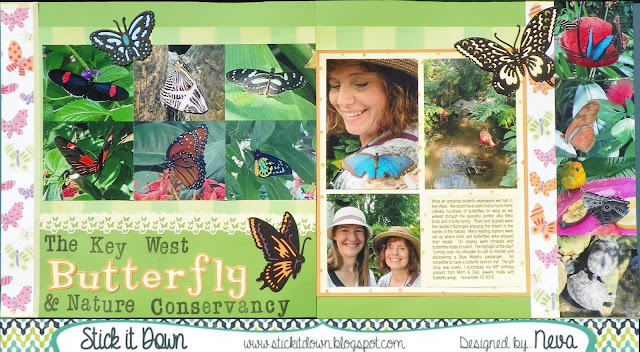
Even though my photos were taken last fall (in Florida) they are perfect for a spring green layout.  We have several fun sketches for you over at Stick It Down.  Not only a double page, but also a single page, and card sketch to play along with for the month.  Check it out!


For my layout I choose to add more photos, by making them smaller.  There are too many wonderful things to share from this experience at The Key West Butterfly and Nature Conservancy.  (At least I had the long title!)


I tried several different colors of background cardstock before I finally decided on the green.  With the bright colors of the butterflies and fun patterned paper I think it holds the layout together.
  • A very old collection by Me & My Big Ideas by Ellen Krans (2006) had all the selections of coordinated paper to make it easy to put together.  
  • Paper Studio light yellow washi adds a dash of pastel to the eges of the butterfly paper.
  • I love butterflies, and sometimes (well often!) will buy a stamp or die just because it is a butterfly.  The Cuttlebug Anna Griffin Butterfly Trio was just such a purchase.  Look how wonderful they are as embellishments for this layout.  If you look closely some of the highlights are colored through the die with Writer Chalk Collection markers.  I also backed each butterfly with a matching die cut by scanning on my Brother Scan N Cut and die cutting coordinating cardstock to put behind the butterflies.
  • Another butterfly tool in my stash is the Tonic Butterfly border punch.  I just had to use it in this layout as an add on embellishment.  The top edge is punched with EK Bubble edge border punch.   
  • The title is a combination of Stampabilities Vintage Type alpha stamped in Tuxedo Black Memento Luxe and Quickutz Tangerine & Shadow.
  • The yellow and orange dot patterned paper is backed with orange cardstock, and the journaling is printed on yellow cardstock that is the exact color of the patterned paper.
Do come and check out the blog and give one of our sketches at Stick It Down a try.  It will be fun!

Thanks for stopping by your comments always make me smile!

Saturday, February 29, 2020

MOPS Play Day

Another layout featuring my younger son in his preschool days.  We had a group over for a time to play and socialize.

 
  • This layout features Echo Park All About a Boy collection kit, the same one as yesterday's layout featured.  The bright colors and boy themed embellishments make for a quick layout.
  • The background is Kraft cardstock which is a nice contrast to the fun colors of the patterned papers.
  • If you look really close you can see that I was able to turn other letters into the "a"s that I needed for the title.  I choose "g" and added the bottom serif from the "z".  
Thanks for stopping by!  I've had a little more time to scrap and am glad to have the opportunity!

Friday, February 28, 2020

Gymnastics

Well not exactly full on gymnastics, but more pre-school time at the gymnastics gym!  I played along with at sketch challenge over at 2PeasRefugees.

  • Dark Blue cardstock creates a base for a layout that features bits and scraps from the Echo Park All About a Boy collection kit.
  • Stickers from the element sheet and die cuts from the spinner patterned paper came in handy as embellishments.
  • Making Memories Dot Style Creative Letters stickers stand out nicely against all the patterns in the layout.
This was fun to put together using as many scraps as I could.  Collections allow me to do this, and Echo Park makes great collections!

Great memories from when my son was small and learning all kinds of new things!

Thursday, February 27, 2020

Kindermusik

It is super fun to scrap photos that are now (yikes) ten years old.  They are good memories that help when parenting a teen gets tough!

 The left side is inspired by the sketch challenge over at Scrap Your Stash.  The sketch is altered for 4 photos on the right side.
.

  • I started with light blue cardstock as a base and added a colorful music patterned paper I have in my stash for who knows how long?  There was no identifying printing on the paper to even know who made it, but it was perfect for this layout!
  • I has some great scraps from Bo Bunny Toy Box, Circles (which I think count as polka dots) and Cheerful.  The small 4 represents how old my son was in the photos, and is from the B side.
  • The yellow strips is also a B side pattern as is the two color small strips.  I think they all coordinate together well.
  • To add both washi tape an follow the idea of the sketch I added lime green washi by Paper Studio.  It did take a few minutes to miter the corners.  
  • The tag was cut with Paper Studio's Tag punch.  A small remnant of ribbon from my stash tops the tag.
  • The Musical die cuts are from the Silhouette store.
  • David Walker Creative Imaginations letter stickers create the two titles. 
  • Journaling was completed with a Zig Writer in Splash.  
 Thanks so much for stopping by!  It is therapeutic to share my crafting with the blogsphere!   
 

Tuesday, February 25, 2020

New Baby card for Retro Rubber Anything Goes

Woops, I am a little late with this post as real life got in the way!  So this go around at Retro Rubber the challenge is everyone's favorite.  Anything Goes!  Remember we have a few simple rules 1)  Use at least one stamp that is more than a year old  2)  Let us know how long it has been around with a date (approximate works too) 3)  Enter up to ten challenges including Retro Rubber.


Some dear friends of our just had a baby girl!  She joins her two big brothers.  The parents waited until her birth to find out her gender, so it is such an awesome time for all of them.  Her biggest brother who is all of 4 1/2 said "It's going to be a girl, I can feel it in my bones!"  Such an old soul little boy!


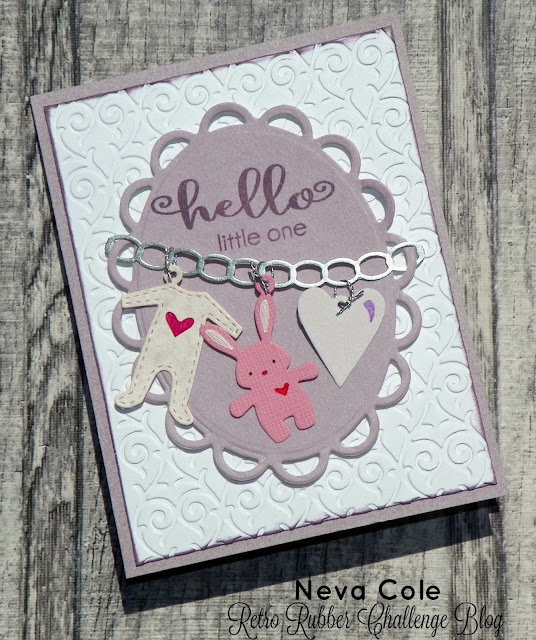
Since I had some really cute baby charm dies, I decided to go that route and include a stamped sentiment.  All of the cardstock is from my stash, some are just little scraps.
  • The rabbit and onesie are from Elizabeth Craft Designs Baby Charms.  There are stencil spots on the dies to easily color in the hearts and other details with pens.  I used Zig Writers in Pure Pink, Pure Red, and black.  A white Gelly Roll pen colored the interior of the rabbit's ears.
  • The heart is from another Elizabeth Craft Designs set, Hanging Charm Pull TabZig Writer in  Hyacinth is used to color the highlight.
  • Elizabeth Craft Designs Chains 1 is die cut from metallic silver cardstock.  The charms are attached with silver craft thread.  It is softer and easier to mail than jump rings!
  • Spellbinders Lacey Ovals is die cut and the placement of the chain allowed me to determine the spot for the sentiment.
  • The sentiment is from Technique Tuesday Chickadess 2.0 and is stamped in Versa Magic Eggplant.  
  • White cardstock is pressure embossed with  Elizabeth Craft Designs Hearts Entwined and the edges are inked with Versa Magic Eggplant.
  • The card is adhered together with the lacey oval adhered with thin foam adhesive. 
Thanks so much for stopping by and we hope to see you in our gallery at Retro Rubber for Challenge #129 Anything Goes!

Friday, February 14, 2020

Monster Valentine

One last Valentine to share . . . this one for our resident 14 year old male child.  Nothing to mushy for for the teenager!

I had a hard time deciding what kind of critter I wanted to use . . . so went looking through my stash and found these fun monsters from The Stamps of Life released in May 2017.
  • Searching through my stash of past mixed media experiments I found a sample of Amplify by Imagine the mixed Radiant Neon Electric Pink and Black.  It was rolled out onto cardstock then heated with a heat tool to have a slightly raised textured surface.  I die cut the three monsters plus a backing of black cardstock with the dies from Monster4Celebrations.  One monster has his features penned in with a Zig marker.  
  • Additional die cut pieces add the tongues inked with Radiant Neon Electric Pink ink, and white for the teeth.  I had three different sizes of googly eyes in my stash that worked perfectly!
  • The sentiment is Hero Arts CL498 Celebrate Every Day stamped on black cardstock and heat embossed with Think Ink Magenta Bright Light embossing powder.  
  • The background is pressure embossed with Sizzix Hearts and Dots and then inked with Radiant Neon Electric Pink ink.  
  • The card base edges are inked with Delicata Black Shimmer.
  • All the layers are adhered together and parts of the monsters are trimmed off so they feel like they are just jumping into the scene. 
Overall I think the card is really fun and conveys the Valentine message well for a teenage boy!  Thanks so much for stopping by and know that I appreciate all your comments!