Showing posts with label Colored Pencils. Show all posts

Tuesday, August 26, 2025

Books books books! at Retro Rubber

If you are a bibliophile this challenge is for you brought to you by Retro Rubber!  I will admit my stash was a bit scant when it came to images for this challenge.  I did go looking for ideas and came across some lovely images . . . but the spirit of this challenge is to use what you have!  So I resisted the urge to find a retro image elsewhere at went with one I already owned.


I will admit my stash was a bit scant when it came to images for this challenge.  I did go looking for ideas and came across some lovely images . . . but the spirit of this challenge is to use what you have!  So I resisted the urge to find a retro image elsewhere and went with one I already owned from TPC Studio released in 2010.  It was a part of a Back to School Set.  It is an image I have used on scrapbook layouts for back to school.


  •  The background is from a Judi-kins Stamp mounted on wood that has a copy right of 2000 printed on it.  An Excerpt of a story from the Book of Kells is the name of the stamp.  It is stamped in Versa Mark on Kraft cardstock.   My Favorite Things Wonky Stitched Rectangles is used to die cut the image.
  • The Books image is stamped in Versa Magic Jumbo Java and colored with Derwent Watercolor pencils.  The panel is cut with a smaller die from the MFT Wonky Stitched Rectangles.  (As a side note I just found out the MFT has closed!  I will miss this fun company!)  
  • The thank you sentiment is a Studio G image from 2009 stamped in Versa Magic Jumbo Java.  
  • Fiber is tie around the front panel and then adhered with dimensional foam adhesive.  The entire panel is then adhered to the card base.   

We have  ton of fun over at Retro Rubber and would like to see how you play with this theme!   We do have a few guidelines:

  • We require stamps older than one year.  If we feel you are using newer stamps, you may be disqualified from the challenge without notification.
  • New papers/dies are OK – but you must use at least one stamp older than a year and describe the age in your blog post.
  • Please note that all challenges require the use of at least one stamp older than a year.
  • Post your new creation to your blog or online gallery.   Use keyword RRCB259.  No backlinking. 
  • Link back to the blog using the Linky Tools by the due date. 
  • Enter as many times as you like. 
  • Feel free to combine our challenge with a maximum of 5 challenges.  Entries linked to more than 5 challenges will be disqualified without notification.
  • If your project is posted on a private group site such as Split Coast Stampers or a photo sharing site not all DT members may be able to comment.   Thank you for understanding.
  • Turn off Word Verification.  We love to comment but word verification can make that difficult.


Tuesday, July 15, 2025

Color Challenge for Retro Rubber #259

 Summer time!  We have a great color challenge for the next two weeks.  Please play along with us at Retro Rubber Challenge Blog.  


Honestly my first impression was of the colors of our rival University in the state of Oregon.  BUT I decided I could work through the rivalry and go with flowers!  
 
  • The flower image is Kind Cosmos from Technique Tuesday released in 2019.  Sadly, Technique Tuesday closed their doors a few years ago.  I am thankful for the smattering of smaller floral images with matching dies.
  • The image is stamped in Memento Luxe Tuxedo Black and heat embossed with black embossing powder.  Derwent Watercour Pencils are used to create the color gradient on the flowers and leaves.  Cosmos have very feathery foliage.   The matching die is used to die cut the image.
  • The Thanks sentiment is from TT Echinacea  set, and is water colored to match the flowers.
  • Pinkfresh Studio Slim Ornate Banner is used to create the shaped background.
  • Elizabeth Craft Designs Stitched Retcangles created the base from patterned paper.
  • All the layers are adhered together.

This card was fairly simple to put together, and the finished product is nice and simple for a thank you for summer time.  Thank you for stopping by!  Please play along with our Retro Rubber challenge!


CHALLENGE GUIDELINES

  • We require stamps older than one year.  If we feel you are using newer stamps, you may be disqualified from the challenge without notification.
  • New papers/dies are OK – but you must use at least one stamp older than a year and describe the age in your blog post.
  • Please note that all challenges require the use of at least one stamp older than a year.
  • Post your new creation to your blog or online gallery.   Use keyword RRCB259.  No backlinking. 
  • Link back to the blog using the Linky Tools by the due date. 
  • Enter as many times as you like. 
  • Feel free to combine our challenge with a maximum of 5 challenges.  Entries linked to more than 5 challenges will be disqualified without notification.
  • If your project is posted on a private group site such as Split Coast Stampers or a photo sharing site not all DT members may be able to comment.   Thank you for understanding.
  • Turn off Word Verification.  We love to comment but word verification can make that difficult.


Tuesday, October 22, 2024

Fall by the Lake

We have just passed the peak of our fall colors here in Northern Minnesota.  This is only my second fall living here, and experiencing a true fall color season.  Last week my husband and I took a drive to see the colors, and discovered that some of the best were right in our backyard, well along the small highway and street we live on!  We also put our boat away for the season and I had to stop driving the boat to take some photos of the colors along the shoreline that were simply amazing.  So blessed!  At Retro Rubber each design team member choose our challenges throughout the year.  This is my theme challenge!  Perfect timing!

I choose a few old school ways to create this fall card to convey the beauty of nature around us.  It was really fun to create and color this card.


  • The image is Stampendous 1995 is stamped on velour paper in Memento Tuxedo Black.  
  • The image is colored with Prisma colored pencils.
  • The image is adhered by using a slot punch to mount to cream cardstork.
  • The edges of the cream cardstock is outlined in a metallic gold pen.
  • Another layer of brown cardstock mounted behind before being mounted to a light green card base.  

Please do come and play along with us at Retro Rubber Challenge Blog!  We do have a few guidelines we ask you follow:

CHALLENGE GUIDELINES

  • We require stamps older than one year.  If we feel you are using newer stamps, you may be disqualified from the challenge without notification.
  • New papers/dies are OK – but you must use at least one stamp older than a year and describe the age in your blog post.
  • Please note that all challenges require the use of at least one stamp older than a year.
  • Post your new creation to your blog or online gallery.   Use keyword RRCB242.  No backlinking. 
  • Link back to the blog using the Linky Tools by the due date. 
  • Enter as many times as you like. 
  • Feel free to combine our challenge with a maximum of 10 challenges.  Entries linked to more than 10 challenges will be disqualified without notification.
  • If your project is posted on a private group site such as Split Coast Stampers or a photo sharing site not all DT members may be able to comment.   Thank you for understanding.
  • Turn off Word Verification.  We love to comment but word verification can make that difficult.

 Thank you for stopping by!

Tuesday, August 27, 2024

The Great Outdoors for Retro Rubber

At Retro Rubber Challenge Blog we have a fun challenge for the next two weeks.  As I sit at my computer and gaze at the wonderful view out my windows of the great outdoors!

My current stamp stash does not contain camping images, but I do have more than a few of the outdoor themed stamps.  I decided to combine two different companies to create the card below.

 
For the background of the card I used Hero Arts Layering Mountains at the Lake released in 2020.  I live on a lake now, but do not have mountains.  The background reminds me a bit of being a Dillon Reservoir in Colorado.   The front images are from Heartfelt Creations Woodsy Wonderland release in 2017.

  • Memento Toffee Crunch and Rich Cocoa were used to stamp the mountains.  
  • Trees are stamped in Versa Magic Tea Leaves and Spanish Olive.
  •  A mask is stamped and fussy cut to allow the sky to be sponged in Versa Magic Sea Breeze.
  • The lake was added by mixing Versa Magic Sea Breeze and Aegean Blue with bristle blending brushes.  The reflection in the water is stamped in Memento Luxe Wedding Dress.
  • Woodsy Treescape and Woodsy Wonderland is stamped in Memento Tuxedo Black.  The images were colored with Prisma Colored pencils from the 48 color set I've had since about 1998! All are die cut with the matching dies.  
  • Dark brown cardstock is trimmed to A-2 card size.  The center is removed with Heartfelt Creations Cut Mat Create Die 2A.  To match the interior of the frame, Fiskars Corner Rounder was used on the card base and frame 
  • The Treescape is adhered to the card front and the frame is adhered over it.
  • The Woodsy Wonderland image is die cut twice more and adhered to the back of the image to create a sturdy layered image.
I've not added a sentiment yet . . . might later depending on the recipient and occasion!  I'm really pleased with the final card.  Not necessarily my typical style of card right now, but I'm glad I have these stamps in my stash! 

CHALLENGE GUIDELINES
  • We require stamps older than one year.  If we feel you are using newer stamps, you may be disqualified from the challenge without notification.
  • New papers/dies are OK – but you must use at least one stamp older than a year and describe the age in your blog post.
  • Please note that all challenges require the use of at least one stamp older than a year.
  • Post your new creation to your blog or online gallery.   Use keyword RRCB238.  No backlinking. 
  • Link back to the blog using the Linky Tools by the due date. 
  • Enter as many times as you like. 
  • Feel free to combine our challenge with a maximum of 10 challenges.  Entries linked to more than 10 challenges will be disqualified without notification.
  • If your project is posted on a private group site such as Split Coast Stampers or a photo sharing site not all DT members may be able to comment.   Thank you for understanding.
  • Turn off Word Verification.  We love to comment but word verification can make that difficult.

Please do join along and add your card or project to our gallery at Retro Rubber Challenge Blog!

Tuesday, May 7, 2024

Retro Rubber Challenge Out to Sea

Retro Rubber Challenge for the next two weeks is a nautical themed card (or project) to go with out to sea!   For me watching the ocean is a mesmerizing peaceful time to just chill.  Sometimes it's wild and foamy, other times it is on a beach with warm sand and gentle waves.  I was fortunate to grow up in a place where I could see the ocean daily from age seven to seventeen.  Now I live far from any ocean but have a wonderful lake for water viewing pleasure.  

There are many wonderful ways to interpret this challenge.  I went with the lighthouse image in my stash.

This is the inspiration image from Retro Rubber, please check out the rest of the Design Team's creations for addition ideas!


To create this card I pulled out an image from Stampendous 1997 labelled Portland Head Lighthouse. That would be the Portland, Maine Portland, not the one in Oregon.

  • The image is stamped in Memento Tuxedo Black and is colored with Derwent Water Color pencils. Some of the colors are colored on paper then moistened with a wet fine brush to allow fine details to be colored.  
  • The focal image is die cut with Elizabeth Craft Designs Stitched Rectangles, then matted on chocolate cardstock.
  • The image is adhered to the card front off center to balance the sentiment.
  • The sentiment is from Heartfelt Creations Thank You from 2018.  It is stamped in Versa Fine Vintage Sepia. (I tested having the image centered and much preferred the final design!)

Please do join us and make your own nautical themed card!  Thank you for stopping by!

 CHALLENGE GUIDELINES

  • We require stamps older than one year.  If we feel you are using newer stamps, you may be disqualified from the challenge without notification.
  • New papers/dies are OK – but you must use at least one stamp older than a year and describe the age in your blog post.
  • Please note that all challenges require the use of at least one stamp older than a year.
  • Post your new creation to your blog or online gallery.   Use keyword RRCB223.  No backlinking. 
  • Link back to the blog using the Linky Tools by the due date. 
  • Enter as many times as you like. 
  • Feel free to combine our challenge with a maximum of 10 challenges.  Entries linked to more than 10 challenges will be disqualified without notification.
  • If your project is posted on a private group site such as Split Coast Stampers or a photo sharing site not all DT members may be able to comment.   Thank you for understanding.
  • Turn off Word Verification.  We love to comment but word verification can make that difficult.

Tuesday, March 26, 2024

Multnomah Falls for Nature, Naturally Retro Rubber Challenge

Our challenge for the next two weeks at Retro Rubber Challenge blog is Nature, Naturally.  With the color suggestions and knowing I had this wonderful stamp in my stash, I knew exacting what I wanted to create.  This is an image of an iconic Multnomah Falls National Recreation Site in Oregon.  It is visited by over 2 million visitors per year.  There is a historic lodge at the base that was nearly destroyed in 2017 by enormous wild fire, but was saved by firefighters dousing the lodge overnight with water from the Columbia River.  This beautiful water fall had all of it's vegetation destroyed by the fire, and the trails to the bridge and the top were deemed unstable for  over three years.  It holds a special place in the hearts of those who have visited this picturesque place including me!


  • The Multnomah Falls image by Stamp Cabana from around 1997 is stamped in Memento Tuxedo Black on craft cardstock.
  • EK Success Color pencils in Wedding White, Chestnut, and Baby Blue are used to color the image.  Coloring on craft cardstock makes for a stunning image.
  • The image is trimmed and mounted on a scrap of blue cardstock.  
  • The sentiment is from Heartfelt Creations Thank You from 2018 and is stamped in Versa Magic Night Sky.
  • Paper Studio flag punch is used to punch the flag shape. 
  • To tie the colors and card together a craft card base in A7 size is stamped with Judikins background stamp  from around 1998 in Versa Color Baby Blue.  Chalk based inks work well on craft cardstock.
  • The layers are adhered together and a card is ready for Father's day which is still a few months away. 
Here is the inspiration image from Retro Rubber, have fun interpreting it in your own way!


 CHALLENGE GUIDELINES

  • We require stamps older than one year.  If we feel you are using newer stamps, you may be disqualified from the challenge without notification.
  • New papers/dies are OK – but you must use at least one stamp older than a year and describe the age in your blog post.
  • Please note that all challenges require the use of at least one stamp older than a year.
  • Post your new creation to your blog or online gallery.   Use keyword RRCB227.  No backlinking. 
  • Link back to the blog using the Linky Tools by the due date. 
  • Enter as many times as you like. 
  • Feel free to combine our challenge with a maximum of 10 challenges.  Entries linked to more than 10 challenges will be disqualified without notification.
  • If your project is posted on a private group site such as Split Coast Stampers or a photo sharing site not all DT members may be able to comment.   Thank you for understanding.
  • Turn off Word Verification.  We love to comment but word verification can make that difficult.

Thank you so much for stopping by!  Your comments are appreciated!


Tuesday, March 29, 2022

Let's Get Groovy with 60's Colors at Retro Rubber Challenge Blog

Our color challenges this year are inspired by the recent decades, this time we are featuring the 60's.  What fun color combos at Retro Rubber Challenge Blog.  Do come see what the design team has come up with this Groovy Challenge!

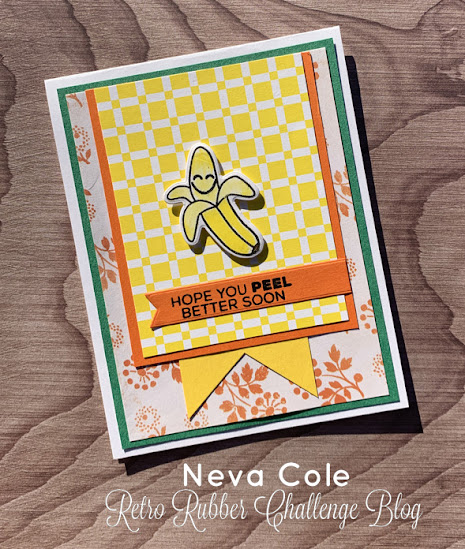
With all the illness going around it was time to for a humorous get well card!  It features a set from Technique Tuesday, Funny Fruits from 2018.  I figured a bright yellow banana would be perfect for the color scheme.  I used a very old sketch from Sheetload of Cards back from June 2019.

  • After searching through my scrap papers for all the layers including the patterned papers I trimmed each to layer to fit the sketch.  I added an extra layer, the green so three colors in the challenge would be represented.
  • The green layer is 4" x 5.25", the orange patterned paper (ancient paper slab by My Mind's Eye) is 3.75"x 5", the orange cardstock is 3.25" x 4", and the yellow patterned paper is 3" x 3.25.  
  • A 2" is trimmed and then punched with the Paper Studio Fish Tail Punch.  
  • The layers are adhered together as  shown.
  • The banana and face is stamped in VersaFine Onyx Blank and heat embossed with iridescent embossing powder.  It is colored with Prisma colored pencils in Canary Yellow, and Deco Yellow for a bit of shading.  The banana is die cut with the coordinating die and adhered with dimensional foam adhesive.
  • The sentiment is stamped in VersaFine Onyx black and heat embossed with iridescent embossing powder.
  • I pulled out my trusty Lawn Fawn Cuts Everyday Sentiment Banners to die cut the sentiment with a fish tail.  The other end was trimmed so to the sentiment would line up under the banana and with the edge of the backing orange cardstock.

To be honest I would not have put these colors together  if it had not been for this challenge.  I believe they all compliment each other nicely!  Please do join our challenge over at Retro Rubber Challenge Blog and have a little fun with 60's themed colors.

 CHALLENGE GUIDELINES

  • We require stamps older than one year.  If we feel you are using newer stamps, you may be disqualified from the challenge without notification.
  • New papers/dies are OK – but you must use at least one stamp older than a year and describe the age in your blog post.
  • Please note that all challenges require the use of at least one stamp older than a year.
  • Post your new creation to your blog or online gallery.   Use keyword RRCB179.  No backlinking. 
  • Link back to the blog using the Linky Tools by the due date. 
  • Enter as many times as you like. 
  • Feel free to combine our challenge with a maximum of 10 challenges.  Entries linked to more than 10 challenges will be disqualified without notification.
  • If your project is posted on a private group site such as Split Coast Stampers or a photo sharing site not all DT members may be able to comment.   Thank you for understanding.
  • Turn off Word Verification.  We love to comment but word verification can make that difficult.

Tuesday, October 26, 2021

Falling for Autumn at Retro Rubber

Hello all, I don't know about you but the leaves are changing and the weather has definitely turned to fall temperatures.  Fall can be tricky in Central Oregon, and getting the garden to bed is important before the hard frosts hit!  We have a season appropriate theme for our Retro Rubber Challenge this two weeks:


My inspiration came from a Sizzix Framelit, Textured Impressions with Stamps set Door Wreath (2016).  It can be used for any season, but I do like the fall version!

  • Ink the embossing folder With VersaFine Sepia and pressure emboss.
  • Stamp the images in Tuxedo Black and color with Prisma colored pencils.
  • Die cut the images.
  • Stamp the sentiment from Thankful Layering Stamp  (2013) in Versa Fine Crimson Red and trim to a banner.
  • Die cut the wreath from brown cardstock.
  • Assemble layers of the card. 

CHALLENGE GUIDELINES

  • We require stamps older than one year.  If we feel you are using newer stamps, you may be disqualified from the challenge without notification.
  • New papers/dies are OK – but you must use at least one stamp older than a year and describe the age in your blog post.
  • Please note that all challenges require the use of at least one stamp older than a year.
  • Post your new creation to your blog or online gallery.   Use keyword RRCB169.  No backlinking. 
  • Link back to the blog using the Linky Tools by the due date. 
  • You may enter no more than 5 times. 
  • Feel free to combine our challenge with a maximum of 10 challenges.  Entries linked to more than 10 challenges will be disqualified without notification.
  • If your project is posted on a private group site such as Split Coast Stampers or a photo sharing site not all DT members may be able to comment.   Thank you for understanding.
  • Turn off Word and Captcha Verification.  We love to comment but verification can make that difficult.  Thanks!

Thank you so much for stopping by, and hope you will check out all the fun cards over at Retro Rubber Challenge Blog.


Thursday, February 13, 2020

For My Sweetheart

As a card maker, every once and awhile I like to make a very special card for my husband.  This card did take some time to plan and create, but the results are really fun!


The front of the card is just a hint of the inside!
  • Dark red cardstock is the base of the card, topped with Me and My Big Ideas patterned paper from 2011.  The base is 4 1/4" x 5 1/2" (or 11" before the fold).
  • Karen Burniston's Twisted Panel Pop-up dies are used to die cut light grey cardstock, dark red cardstock, and black cardstock for the front.
  • Memento Tuxedo Black ink is used through the card for the stamping.  
  • Joy Clair's Hello Sentiments (2017) stamped the "For My" and Studio G's Sweetheart (2006) completes the front sentiment.
  • Red twine decorates the tops of the sentiment's before the entire card front is adhered together.


As you can see the majority of the labor of love was in the interior of the card!  To die cut and assemble the card, please follow Karen Burniston's excellent video HERE!
  • Red, black, grey, pink and green cardstock are used to die cut all the pieces. The center panel with the mechanism is die cut from the same Me and My Big Ideas patterned paper used on the front of the card. 
  • The top panel use's Hero Arts CL498 Celebrate Everyday from 2015.  Using a stamp positioner I stamped each word of the sentiment one at a time, although it is one long sentiment, "Happy Valentine's Day".  
  • "Be Mine" is another 2008 Studio G.  They just happen to be the perfect size!
  • Lawn Fawn's 2014 Hedgehugs was perfect for the two center panels of the card.  The images are stamped and die cut from kraft cardstock and colored with Prisma pencils.  
  • Hero Arts 2013 CL582 XOXO hugs & kisses is stamped on the far right panel.  
  • A combination of Technique Tuesday's So Grateful from 2014 "Love You" and Scrapbook.com's 2019 XOXO "forever & ever" finish the final bottom panel. 
I hope you find this card to be an inspiration of ways to combine stamps, die cuts, and different company's products to create one really fun and fantastic card!  Thanks for stopping by and Happy Valentine's Day!

I am delighted to enter the following challenges:
Aud Sentiments #244 Valentine/Love Sentiment 

Tuesday, March 27, 2018

Hedgehugs for Anything Goes at Retro Rubber


Welcome to the ever popular Anything Goes challenge for our Retro Rubber Challenge for the next two weeks.  Remember that we ask you use a stamp that has been hanging out in your stash for at least a year, and tell us how long you have had the stamp.  We also request that you enter up to 10 challenges including Retro Rubber.

  
This is the card I made for my husband for our last anniversary.  Pretty sweet!


I had always wanted to try colored pencils on Kraft cardstock, and I like the results!  I stamped the Lawn Fawn Hedgehugs from 2014 on Kraft cardstock in memento Tuxedo Black and then used my Prisma colored pencils to add detail to cute little hedgehogs.  I was pleasantly surprised that the white added great dimension.   The coordinating die cut the critters out perfectly.  Next I die cut white cardstock with Elizabeth Craft Designs Stitched Rectangles and added a bit of ribbon from my stash.  The sentiment is from CAS-ual Fridays Heartbeat set (2012) and is stamped in Brilliance Pearlescent Poppy.  I adhered the hedgehogs with dimensional foam adhesive and then added a few tiny stamped hearts from the Hedgehugs set in Pearlescent Poppy. 

Do stop by the Retro Rubber Challenge blog and see the lovely creations by the design team and enter in your own Anything Goes project.  We would love to see what you create!

Wednesday, August 5, 2015

For a Little Girl at Ruby's Rainbow Challenge #110

Our challenge for this fortnight at Ruby's Rainbow Challenge is to create something for a little girl.  I created this card for a sweet baby and her mother who needed to spend some time at Dornbecher Children's Hospital in Portland.  Sweet baby girl had a birth defect, a vascular ring around her trachea also known as a double aortic arch.  Praising God that she is now home and doing well!


I started with Peddlers Pack images that I have owned forever!  The are marked with 1995, wow 20 years ago!  Since I wanted to use my watercolor pencils I used Bristol 100 pound white card stock.   First the mouse was stamped in Tsukineko StazOn Black and then masked with a fussy cut image of the same.  I figured he could sit on the chair arm as I didn't think his little skinny tail or arms would do well otherwise.  The chair is stamped over the mask with Tsukineko StazOn Timber Brown.  The remaining images were stamped Tsukineko StazOn Black and fussy cut after they were colored.  

My Rexel Derwent Watercolor pencils gave me the wonderful soft watercolor feel I wanted for the images.  I used Ivory Black 67, Golden Brown 59, Brown Ochre 57, Rose Pink 18, Deep Cadmium 6, Lemon Cadmium 2, Water Green 44, Grass Green 47, Smalt Blue 30, and Light Violet 26.  I love using my Niji Water pen to finish the watercolor effect.  The images cheeks and paws are finished with Chameleon PK3 Bubble Gum, and the flower's leaves have a bit of YG3 Spring Green.  


The doll, bunny, and bear are mounted to the card with different thicknesses of foam adhesive.  Card stock from my stash that brings out the colors of the images is used to back the card front image.  Martha Stewart Eyelette Lace border and corner punch give the lacy edge to the background layer.  This was a fun card to make and hopefully was a cheerful message for a sweet baby and her mama as they spent more than 2 weeks at the hospital! 

Please come by and join the Little Girl fun at Ruby's Rainbow Challenge #110!

Wednesday, June 24, 2015

By the Seashore at Ruby's Rainbow Challenges


I am pleased to announce that I am now on the design team for Ruby’s Rainbow Challenges.  Our challenge for the next fortnight is By the Seashore.  Come play along and enter your project by July 8th.  Stop by the blog and check out what the DT have created to inspire you!


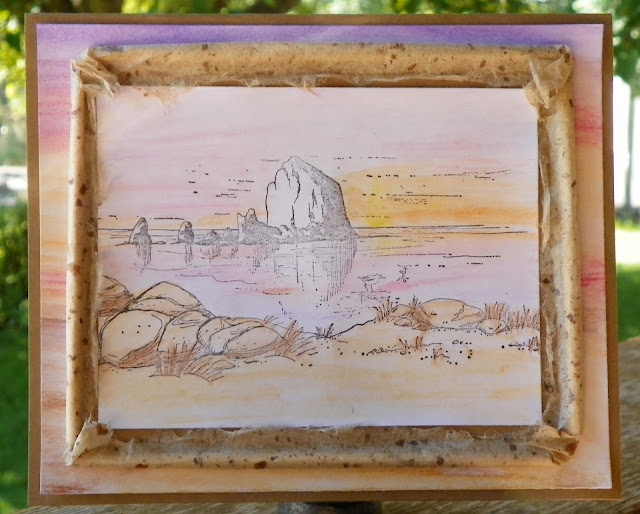
This card features an image of an iconic Oregon Coast landmark, Haystack Rock at Cannon Beach.  It is an amazing monolith very close to the shoreline.  I believe the image is from Stamp Cabana.  The front images are by Art Impressions.  I used a stamp positioner and masking technique shown in this blog post, Tie It on Birthday Card

The images are stamped in Tsukineko StazOn Jet Black on white card stock and then colored with a variety of Rexel Derwent Watercolor pencils: Dark Violet, Crimson Lake, Orange Chrome, Deep Cadmium, Golden Brown, Cooper Beech, and Brown Ochre.  The Niji water pen does a great job blending and finishing the watercolor technique.

The frame is brown molted Mulberry Paper that I have had in my stash for at least 15 years, but perfect for this card!  To get a rolled edge I used wooden skewers from the kitchen trimmed to fit inside the frame.  The Mulberry paper is adhered to Kraft cardstock.  The edges were adhered with Art Institute Dries Clear Adhesive.  Just a thin line goes a long way!  The outer frame is white card stock colored with Rexel Derwent Watercolor pencils to match the interior scene and extend the idea of a sunset at the seashore.   The layers are attached to a Kraft card stock base.

Creating the rolled edge frame
I hope that this has inspired you to make your own By the Seashore project and join us over at Ruby’s Rainbow Challenges!

Wednesday, June 17, 2015

Test of Time Father’s Day Card


This is the second of three cards I will make this year.  I once again used the Heartfelt Creation’s Everyday Heroes.


The background stamp “My Hero” is stamped in Tsukineko StazOn Saddle Brown.  It is colored with Rexel Derwent Watercolor Venetian Red and Deep Cadmium.    Then I blended the colors with a Niji Water Brush.  The laces and seams in the boots didn’t seem to stand out enough so out came the Zig marker in Pure Brown to color in these areas.  I fussy cut both the watch face and the boots.  The die cut edge is Spellbinders Classic Decorative Inserts Two.   To get just the length with out cutting farther on the card I used a piece of removable tape to mark where I wanted the die cut to stop (sorry no photos, it was late!)  then placed this right on the edge of the cutting platforms.  I was glad it worked so neatly!  I selected a few complementary colors from the Everyday Heroes paper set and layered the card together.  The fussy cut images are adhered with dimensional foam adhesive as it the top sentiment layer.  

I would like to enter this card in the following challenges:


Monday, June 15, 2015

My World Father's Day Card


It is time to create and send Father’s Day cards.  This is the first of three I will make this year.  I recently purchased The Everyday Heroes I want It All set, and felt like I could put it to great use for Father’s Day cards.  


The background stamp for this card is “My World” and it is stamped on cream card stock with Tsukineko StazOn Black.  I colored it with Rexel Derwent Watercolor pencils in Smalt Blue, Brown Ocher, and Sap Green.  Then I blended the colors with a Niji Water Brush.  The water brush is so easy to use and put the water to blend right where you want it.  Just a slight squeeze and there is water at the tip to blend.   The edges were torn using the Plaid Deckle Edge ruler.  I selected a few complementary colors from the Everyday Heroes paper set and torn the edges as well.  All the torn edges are inked with Tsukineko StazOn Saddle Brown.  An ornate die from the set was left over from another project so it was cut in half and adhered in with the layers of paper.    

Two more of the globe portions of the image were also stamped and colored then die cut using the Everyday Heroes die set.  Just the globe from one was trimmed and the second was left complete.  An ornate die from the set was also die cut.   I shaped the globe portion with McGill tool set.  The globe was adhered with dimensional foam in the center and Dries Clear adhesive around the edges.

This was a quick and fun card to put together.  It may not be considered CAS, but it was simple to put together using the Everyday Heroes set.

I would like to enter this card in the following challenges:


It is wonderful that this card was selected as a Design Team Favorite for TWO challenges!
Thank you!
Eureka Stamps #145 Father’s Day
Amusing Challenges Father’s Day

Tuesday, April 21, 2015

Pinwheel Birthday Card for Retro Rubber Blog Challenge #12, Use Brads

For the embellishment challenge over at Retro Rubber Blog Challenge I wanted to use my brads in a functional way. 

  
That led me to think of pinwheels and a couple fun retro stamps by Magenta.  I have owned these stamps since the late 90's and they are still fun to play with, especially with this design.


These stamps have designs inside squares that would be perfect for pinwheels.  I wanted to try several different coloring techniques so I stamped my images on Strathmore Bristol 100- pound paper with Tsukineko StazOn Cactus Green.  The images were trimmed to the size square I planned to use.  Using the Stampendous stamp-a-liner and StazOn ink on acrylic sheets to position the image I stamped the reverse side with the same image.  They are not exact, but once the pinwheel is assembled the designs looked great.


Next I went to town with my Rexel Derwent watercolor pencils.  (Deep Cadmium, Rose Pink, Light Violet, Blue Violet, Dark Violet, Smalt Blue, Grass Green, and Sap Green.) They give a nice watercolor blend and bleed when water is applied with a small paintbrush to the colored areas.  The 100-pound Bristol paper works very nicely for this technique, as it does not curl when wet.  After the images were dry I used my Creative Imaginations Centering Ruler to mark from corner to corner at the same distances.  Then I snipped the shapes and punched a hole in the center and each corner with the Cropidile.  Using small glittered brads from my stash I assembled the pinwheels.  I trained the curves in the paper around a pencil.


Looking around my craft table for candidates to serve as a stick I spied a few cotton swabs with paper handles.  Just as an aside I prefer these over the plastic ones, especially when I do flame tests in Chemistry.  Ok back to the card!  After stripping the cotton off the ends of the swabs I sponged StazOn Cactus Green on the stems and the attached the pinwheels with glue dots.


To create the background I used purple card stock (4 1/2" x 6 1/2") and the Spellbinders Fancy Lattice die.  The edge designs were folded back and Recollections double-sided pink tape adhesive was applied.  I left the liner in place until I was ready to adhere it to the card.


Spellbinders Nested Lacey Pennants provided the thin banner that would fit through the brad slots.  This was die cut from the remnant section of the light green card stock from my stash.  The sentiment by Boxer Scrapbooking was stamped in StazOn Cactus Green.  A strip of dark purple card stock is mounted behind the die cut lattice and the brad prongs are poked through and secured.  The whole lattice layer is adhered to the light green card stock base.  The banner is threaded through the brad and secured with a glue dot to the brad.  The banner is secured with a dimensional foam adhesive dot to the front of the card.  The three pinwheels are secured with strategic glue dots.

This was a fun card to make especially the custom colored pinwheels.  I was able to use two types of brads from my stash and created a whimsical birthday card.  Please come play along with us over at Retro Rubber Challenge Blog and show us what you've got with brads!

I would like to enter this card in the following challenges:

Thursday, January 29, 2015

TBT Punches and Stamps

I have always been a Taz fan and it just so happens that my niece celebrated her fourth birthday in Taz style.  I was fun to use my Taz punch and my Taz stamps.

Created in 1999


I used the colors from the invitation and thank you notes and included them in the layout.  The Taz stamps were colored with colored pencils and blended with a Dove Blender pen.  This is a fun memory and a cute layout of my niece who is now 20!

This is one layout that shows how much styles have changed over the years!

Thursday, December 4, 2014

Tis the Season for Angels!

Created in 1997
This wonderful image is from Peddler's Pack Stampworks, a store in Beaverton, Oregon.  It is still open, and back in the 90's I would make the occasional trip across PDX metro area to visit this wonderful store.  This beautiful angel is stamped and colored with colored pencils and blended with a  Dove Blender.  She is fussy cut with scissors and an Xacto knife.  A little bit of water is added with a paint brush around the perimeter on the mulberry paper then it is torn leaving little wisps of fibers.   The backing is a metallic wrapping paper cut with a Fiskars rotary wheel!  Enjoy this little blast from the past!  

Thursday, November 6, 2014

Throw Back Thursday Angel Pin

Created in 1996

I may have mentioned a time or two that I collect angels . . . this is a heat-laminated pin I crafted in 1996.  I was part of the Portland Singing Christmas Tree Choir for a number of years.  Each year I would make a little gift to share with the ladies in my group.  The stamp is from Peddlers Pack and is part of a sweet Nativity set.  The image was stamped in black ink and completed with colored pencils and glitter in the wings, halo, sash and stars.  Cute is not my typical choice, however this is one "cute" image I enjoy using.