Tuesday, March 28, 2017

Enjoy the Journey Retro Rubber Challenge


Hello everyone, it is time for another challenge at Retro Rubber Challenge Blog, and this time it is an easy peasy sketch.  Please check out all the fun takes on this sketch by the Design Team


I’ve had this cool Sizzix Compass Blueprint stamp and die set since April of 2015.  I finally sat down and created a card with this set.  Yeah me!  There are five layers to stamp to use all the dies to add dimension.  So each layer is stamped in Memento Tuxedo Blank on cream cardstock and then colored with Square Pastel Chalks by Koss, a very quick way to color and shade.  The layers are die cut and the compass portion was fussy cut.  The label sentiment is stamped in Memento Pistachio and Nautical Blue and the edges are colored with the chalks.   The bottom layer is adhered directly to the card base and the next layers are adhered with thin dimensional foam adhesive. 

Come join the fun at Retro Rubber Challenge Blog and enter your own card based on the sketch.

I would like to enter the following challenges:


Sunday, March 26, 2017

Spring Time Thank You


We had a rainy weekend here in Central Oregon, which keep us inside . . . and I had time to play in my craft room, yeah!  It was time to practice with my newest color layering stamps set by Hero Arts, Color Layering Bird and Branch.  I created a series of cards with this being my favorite of the bunch.


I discovered through a few practice runs that it is best to use a stamp positioner to create a series of cards with the same image.  I started by stamping the bird and adding the layers, followed by the branch, additional branches, with flowers and leaves. 

Memento Inks were used to stamp the images, ink the backing square, and stamp the sentiment.  Memento inks used—Morocco, Tangelo, Dandelion, Pistachio, Olive Grove, Toffee Crunch, Rich Cocoa.  The Happy Birthday sentiment is by Stampendous.

I delighted enter the following challenges:


Monday, March 20, 2017

Glittery card made with On Point Glue


Love the look of glitter, but not the possible mess it might make for the recipient of a glittery card?  The perfect answer is to use On Point Glue to apply the glitter on the reverse side of an acetate sheet.  This fun card is created with StazOn ink stamped on one side of the acetate sheet and colored with StazOn Studio Glaze and glitter on the reverse.  The fine tip of the On Point Glue allows great precision for applying in tiny spots.

Imagine

Other
Unity Stamp Company Sending Up Something Beautiful
Acetate
Light blue carstock
Paper Pizzaz patterned paper
Creations Unlimited Rainbow Glitter
Art Institute Ultra Fine Glitter—Red Rose, Aquamarine, Purple
Elizabeth Craft Designs Stitched Rectangles die


Joining the fun at the following challenges:

Saturday, March 18, 2017

Great Impressions GDT Sweet Chick


It has been delightful to be a Guest Designer for GreatImpressions this month.  This is my third project for the Spring Challenge.  


I used Sweet Chick G499S and a Sizzix Framelit Step-ups to create a fun spring card ready to say hello!  The image is stamped in Memento Tuxedo Black and colored with a variety of Chameleon pens.  The image is die cut and edged with Memento Angel Pink.  Green and light pink DCWV cardstock is die cut with the Sizzix set.  The green die cuts are pressure embossed with Cuttlebug Kaleidoscope embossing folder.  The embossed green sections and the “oh, hello” sentiment are adhered with Imagine On Point Glue.  The Chick is adhered with thin dimensional adhesive.  


I would like to join the fun at the following challenges!

Thursday, March 16, 2017

Two Hearts Wedding Congratulations


Recently a friend of mine shared her happy news of her impending nuptials.  We are so happy for her and her intended as they look forward to a happy future together.  I wanted to play along with the CAS-ual Fridays’ challenge Off the Edge and used their inspiring Heartbeats and Love Notes stamp sets along with the Fri-die Double Notes.

 
I wanted to craft a multi-hued background and decided to play around with All Purpose Inks (API) and shaving cream to create a swirled background.  First I squirted a small amount of white foam shaving cream on my craft mat (less is better) and then added drops of API with a toothpick. I used Thistle, Sky Mist, and Platinum API.  A little goes a long way when working with API!  I used another toothpick to create the swirled pattern and laid a piece of Strathmore watercolor paper over the top.  After I removed the paper, I used a squeegee to take off the excess shaving cream and ink.  (I repeated these steps with a few more pieces of watercolor paper before cleaning up, I now have these for future projects.) 

The Love Notes music staff was stamped in Delicata Black Shimmer on Canson Silver metallic paper and heat embossed with clear embossing powder.  Using a stamp positioner (We R Precision Press) helped to get it in just the right place.  I repeated the stamping process on the swirled paper.  The sentiments from Heartbeats were added to completed the design.

The Double Notes Fri-Die was die cut three times from watercolor paper and once from the Canson Silver Metallic paper.  The layers are adhered together with On Point Glue and the edges are inked with Delicata Black Shimmer and heat embossed with clear embossing powder.  All the layers are adhered together on an A2 size card base.  I am really pleased with the finished card!

I am delighted to enter the following challenges:


Tuesday, March 14, 2017

Pi Day!


It’s Pi Day!  My husband was really excited . . . he loves it when I make him pies. He convinced me that Sunday was pie day and he got his wish.  He special favorite is Huckleberry pie, but alas there are no Huckleberries this time of year and I didn’t have any in the freezer.  So, he had to settle for a streusel topped apple pie, his second favorite.  I know this pie wouldn’t win any beauty baking contests, but it is really delicious and made from apples that grew in our front yard last summer.  Yeah for freezing apples to bake with! 


In actuality I told him because I wanted to make a card that celebrated Pi day for Imagine Artist in Residence.  Being a science (and sometimes) math geek, it just made sense! 


To create the resist Pi symbol I found and image on the internet and printed it.  The image was traced with Versa Marker using a light box.  Clear embossing powder was added and the process was repeated until the image was covered.  Memento in Dandelion, Lilac Posies and Teal Zeal were sponged onto the card using an Ink Blusher.  The sentiments “Sweet” and as are from a very old set of sentiments by Dream Ink.  The “as” is from another word with the rest of the word masked while the stamp was inked.  The numbers are from a Hero Arts set from 1991, Dot Number set.  The sentiment and numbers are stamped in StazOn Jet Black so they would stamp over the embossed areas. 

Imagine:

Other
White cardstock
Dream Ink sentiments
Hero Arts Dot Number Set

A few challenges for this card!
Rubber Dance Blog March Color Challenge  (I really like this color combo . . . second post today!)
 

Thank You For Your Kindness Retro Rubber Challenge #58


It is always nice to have a thank you card ready to go in the card stash, so for the Anything Goes challenge this fortnight at Retro Rubber Challenge Blog to re-stock my stash. 


Give the challenge a go and make your own Anything Goes project.  Remember to use a stamp older than a year and identify the age, and enter up to 10 challenges including Retro Rubber!


I started with a sketch and color inspiration to get my creative mojo flowing and keep the design fairly clean and simple.  I started by pressure embossing white cardstock with Cuttlebug Devine Swirl and then cut an angled section to match the sketch.  The raised portion and edges are inked with Memento Teal Zeal.  The base card was masked to make a framed area for the textured section and then inked with Memento Dandelion.  Taylored Expressions In and Out Thanks sentiment set from 2014 provided the two stamps for the sentiments.  They are stamped in Memento Lilac Posies.  The textured layer is adhered and the card is finished lickety split! 

I was inspired by the following challenges:


House that Stamps Built M817 Tic-Tac-Toe (Texture, Bright Colors, Off the Edge

Sunday, March 12, 2017

Can you feel me? Texture Challenge with Amplify!


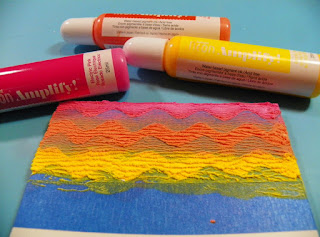
This month our challenge for the Artist in Residence for Imagine was to create texture for the “Can You Feel Me?” concept.  It is hard to tell in a photo, but the texture of the Neon Amplify! ric rac is very soft and cozy.  I thought about ways I could mask sections of the card and came up with the following technique that uses painter’s tape and left-over sticker sheets.  Never to waste product, the excess Neon Amplify! is brayered off on more cardstock then used for the die cut sentiment.  This technique is fun and messy and a great way to create a card that will brighten someone’s day with a colorful smile!

Level:  Intermediate
Time:  45 mintues


Step 1
Apply low-tack painters tape to a section of sticker backing sheet.  The backing from a Xyron X machine is used here.  Run the layer through and die cut ric rac.


Step 2:
Apply painter’s tape to card front and press down for good adhesion.  The tape may be pieced to maximize the use of the die cut pieces.  Strathmore Bristol Board Smooth in 100 pound weight is used for the card as it will hold up to more aggressive techniques such as this and allows the painter’s tape to be removed without damaging the cardstock.


Step 3
Apply Neon Amplify! in various colors in the open sections between the ric rac painter’s tape.  Electric Pink, Electric Orange, and Electric Yellow are used here.  It does not need to cover the space perfectly.


Step 4
Use and acrylic brayer to spread the Neon Amplify! in the open areas.  Notice the extra section of painter’s tape to protect the open section of the card.


Step 5
Brayer excess Neon Amplify! onto a section of cardstock.  Quickly clean the brayer with a baby wipe or warm running water.


Step 6
Heat card front with a heat gun.  When the Neon Amplify! is fully cured and puffed up, remove painter’s tape.


Step 7
Using the cardstock with the extra Neon Amplify! die cut the sentiment.  Adhere the sentiment with On Point Glue.

Supplies

Imagine

Other
Strathmore Bristol Smooth Surface 100 pound cardstock
Low tack painter’s tape
Xyron backing sheet
Sizzix—Loops & Ric Rac
Echo Park—Sentiment Word Die Set
Acrylic Brayer
Heat Gun
Die Cut Machine with extended plates         

Remember I’ve decided to offer a bit of blog candy to my loyal readers and followers.  I will draw a name at the end of March from my followers who comment on any of my posts by March 31st.  Click either method to the left to become a follower or follow Snippets of Time via email.  I have a few things in my stash that need new homes, both new and gently used.  So, hang out with me during March, follow the blog, and comment on your favorite blog posts.  To win the blog candy you must comment and be a follower, or follow via email.  Thanks, and good luck!


I am delighted to enter this card in the following challenges:

The House That Stamps Built M817 Tic Tac Toe (Texture, Bright Colors, Off the Edge)
Cards in Envy Keep it Simple
Alphabet Challenge Blog Zero Embellishments

Worship Him GDT post for Joy Clair


This is my second post as a Guest Designer for Joy Clair and the Color By Faith Bible Journaling stamp sets.  My second choice for the month of March was the Worship Him stamp set.  It reminded me of so many of the old hymns I grew up singing in church.  


I choose to journal Psalm 142 with the Worship Him set.  Psalm 142 was written by David while he was hiding in a cave.  Bible commentaries indicates that it most likely occurred when David was hiding from King Saul.  David felt like a prisoner that no one wanted to help him, a dismal place to be!  It is a prayer to God to send him help.  David is reminded that even though he feels weak, the Lord makes him brave.


My first step was to highlight Psalm 142 and the adjacent area with Imagine Creative Medium in Iridescent Pink.  It is applied in a very thin coat with a foam brush.  I allowed ample dry time before moving on to the next step.  The Creative Medium acts as a gesso and gives a very slight Mother-of-Pearl iridescence to the page.  (It is also a forgiving surface if you accidentally smudge a stamp before the ink dries and allows you to start over!)


Because of David’s prayer in the Psalm, I choose to use four of the sentiments from the Worship Him stamp set.

All of the images are stamped in Brilliance ink—Pearlescent Orchid, Pearlescent Purple, Pearlescent Lavender, Pearlescent Thyme, and Starlight Black.  I placed the clean stamps on the page first to determine placement and then practiced on a scrap paper to determine which colors I wanted to use.  For the final image and the arrow, I stamped in Starlight Black as I felt it was the focus of the passage for me.  The verses are tied to the sentiment stamp by the color matching between the highlighting and stamping.  To highlight the passage, I masked the surrounding area and used an ink blusher to gently tape ink on the page.  The ink was heat set with a heat gun as the Creative Medium slowed down the dry time.  Swirls and hearts are added to tie the section together.  The final touches are hand-written on the page in Memento Dual Marker in Rose Bud.

This is a wonderful Psalm to meditate on when life seems to be surrounding you with enemies and tribulations.  I know that it has brought me peace and joy in the Lord during troubling times. 

Remember I’ve decided to offer a bit of blog candy to my loyal readers and followers.  I will draw a name at the end of March from my followers who comment on any of my posts by March 31st.  Click either method to the left to become a follower or follow Snippets of Time via email.  I have a few things in my stash that need new homes, both new and gently used.  So, hang out with me during March, follow the blog, and comment on your favorite blog posts.  To win the blog candy you must comment and be a follower, or follow via email.  Thanks, and good luck!


Saturday, March 11, 2017

GDT for Great Impressions Jelly Bean Time Sping Card


This is my second project for Great Impressions as the Guest Designer for March.  It is fun to work with these sweet images!  Jelly Bean Time H284S is combined with Life is Sweeter E890S and several layers to create a springy card.  Jelly Bean Time is stamped on white cardstock in Memento Tuxedo Black and then colored with Chameleon Pens.  The sentiment is stamped in Radiant Neon Electric Pink and the panel is die cut with Elizabeth Craft Designs Stitched Rectangles.  Thin pastel pink ribbon is looped around the corners and a small bow is attached in one corner.  A second Stitched Rectangle is die cut from white cardstock and sponged with Radiant Neon Electric Blue.  The bottom layer is white cardstock brayered with Radiant Neon Electric Pink.  Darice Plaid embossing folder is inked with Radiant Neon Electric blue and the layer is pressure embossed creating a blue and pink plaid pattern.  The embossed layer is attached to the card front, and the top two layers are adhered with dimensional foam adhesive. 


 The inside of the card is embellished with Border of Jelly Beans B246S. 


Join along with the Challenge at Great Impressions and you can win a prize!  I promise it is fun!


They have really cute stamps for all seasons! 


Remember I’ve decided to offer a bit of blog candy to my loyal readers and followers.  I will draw a name at the end of March from my followers who comment on any of my posts by March 31st.  Click either method to the left to become a follower or follow Snippets of Time via email.  I have a few things in my stash that need new homes, both new and gently used.  So, hang out with me during March, follow the blog, and comment on your favorite blog posts.  To win the blog candy you must comment and be a follower, or follow via email.  Thanks, and good luck!

I am honored to enter this card in the following challenges!