Tuesday, April 25, 2017

Fun with Buttons!


Wow, it is time for a new challenge at Retro Rubber Blog Challenge, and this time around it is to use buttons on your project.  Do check out the Design Team’s wonderful creations.


I first looked through my button collection and was not inspired by what I had on hand . . . so while I was at Joann’s I checked out their novelty buttons.  Once I saw these cute outdoor themed buttons by Favorite Findings I had the perfect retro stamp in mind to create a fun scene!


First I stamped and masked the tree images from Creations Unlimited from about 1999.  I inked the trees with Memento Pistachio and then added some lowlights on the stamps in Olive Grove before stamping. The stamp of my beloved Mount Hood is most likely from Stamp Cabana and purchased in the early 2000’s at the Portland Stamp Convention.  It is stamped in Tuxedo Black over the masked trees.  The images are lightly chalked with EK Success craft chalks to finish the scene.  To create the look of the snowfields on the mountain I used Imagines’ irRESISTible Pico Embellisher in Wedding Dress.  It added just the right amount of shine to look like snow!  The frame is Kraft cardstock pressure embossed with Theresa Collins woodgrain embossing folder then is inked with Memento Rich Cocoa and Potter’s Clay.  The cute buttons had the hasps removed before they were adhered to the scene.  

Come join the fun at Retro Rubber and create your own project with buttons!  Remember to use at least one stamp that is more than a year old!  Thanks for stopping by!

Sunday, April 23, 2017

McKenzie River Campout with DCWV and Imagine


My layout is featured over at Imagine on the blog today, honoring Earth Day!  Wahoo!

What fun times we had when we stayed a tiny campground along the McKenzie River last fall.  When I received the Die Cuts with a View Adventurer paper collection I knew exactly what event I planned to scrap, it was just a matter of selecting the photos to get started.  I tend scrap events in two-page layouts, so I started with olive green cardstock with the yellow Bright Textured cardstock to back the photos.  Working from the photo colors I choose the plaid blue and green design and two journal cards from the collection.  One of the papers had fun adventurer circles that worked perfectly to die cut and use as additional embellishments.  Once all of my selections were made and the design was decided, I marked off the area for the title and removed all the papers.  The “Campout” was stamped in Memento Northern Pine.  “McKenzie River” was stamped in Versa Mark and heat embossed with Copper Embossing Powder, which matched perfectly with the pre-embossed journal card and the circle embellishments.  An ink blusher was used to ink the edges of all the papers with Memento Northern Pine before the layout was adhered together.

Imagine

Other
DCWV Adventurer Collection and Bright Textured cardstock
Making Memories Foam Stamps Philadelphia
Technique Tuesday Farmhouse Large
Spellbinders Small Circles

Tuesday, April 18, 2017

Bigger is Better AIR challenge for Imagine, COLE


Imagine is featuring this fun project on their blog today along with another really cool BIG word project, go check it out!

This project is a perfect example of buying something with the full intent of completing a project but never actually getting around to working on it . . . I’ve had these letters for about 2 years, maybe even more.  Insert a blush here!  When the challenge to create something Bigger and Better came along it was finally time to decorate these 9 ½ inch tall letters that spell our family name.  The Sierra Pacific Crafts Medium Density Fiberboard (MDF) letters were painted with a mixture of Creative Medium mixed with Versa Magic Jumbo Java ink.  This gives a nice glossy color in one coat that dries quickly.  Several stencils and Creative Medium Metallic in Gold mixed with a small amount of Copper finishes the look.  The stenciling was completed in several steps with drying time in between to avoid smearing.  This fun wall décor was easy to create in an afternoon which included dry time and was ready to hang on the wall with small Velcro hangers.  Our name is now proudly hanging above the coat rack my husband built in the entry way of our home.   


Imagine:

Other:
Sierra Pacific Crafts MDF large letters
Stencil Girl—Compass Rose stencil
ART-C Adhesive Stencils Imagine
Momenta Adhesive Stencils Celebrate
The Crafter’s Workshop TCW 219 stencil

Thursday, April 13, 2017

He is Risen!


Easter season is upon us and I need to get one more card in the mail.  Using the inspiration form Sketch Saturday and The Paper Girls challenges gave me the creative push to get this card done in a few minutes.  (Well not really because I was searching through my stash for an “Hallelujah” sentiment stamp, not to be found!)  


I stamped the Unity Everything Easter sentiment in Memento Luxe Lilac Posies on DCWV Brights cardstock and heat embossed with clear embossing powder.  After I die cut it with Spellbinders Labels Nine and edged it with the same and an ink blusher before heat embossing.  The trick is to do half of the shape and heat emboss, then the second half of the shape.  The background is more of the DCWV Brights that is  pressure embossed with a Darice Crosses embossing folder.  The final touch is the Recollections washi tape to finish the design which is first adhered to cardstock then adhered to the embossed panel.  The little flags are doubled over then cut into shape to embellish the sentiment label which is adhered with dimensional foam adhesive.


The inside is stamped with another sentiment from the Unity Everything Easter set in Memento Luxe Lilac Posies on light pink cardstock.  The edges are inked with an ink blusher before adhering to the inside of the card. 

I would like to join the fun at the following challenges:

Wednesday, April 12, 2017

Lapis Mini Jar for Imagine AIR


The color challenge for April at Imagine is the stunning deep blue color of Lapis Lazuli. With a little research, I discovered that it is semi-precious stone used in ancient mosaics and as a pigment in many well-known paintings.  It most likely is what is referred to as sapphire in Biblical times as the sapphire was not known at that time.  I was inspired to create a mini Lapis jar from a votive candle holder and large glass drop fashioned into a lid.  This simple project is only time consuming due to dry time and the results are very realistic.  This tutorial is featured at Imagine today. 

Level:  Intermediate
Time:  1 hour plus ample dry time


Step 1:
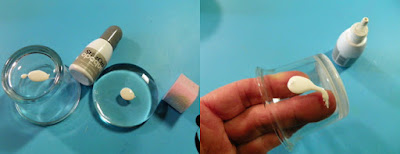
Apply StazOn Opaque Cotton White directly to the surfaces of the votive candle holder and the glass drop. 


Step 2:
Use and Ink Blusher to gently move ink and cover the surface of the glass.  Set aside to dry.


Step 3:
Place StazOn Azure on a plastic surface (for ease of clean-up) and gently apply to the surfaces with an Ink Blusher over the StazOn Cotton White.  Work quickly to prevent picking up the Cotton White, some variation will add to the realistic look of the project.  Set aside to dry.


Step 4:
Add GlazOn Layer Protectant to each surface with an Ink Blusher.  Set aside to dry. 


Step 5:
Apply a second layer of StazOn Azure with an Ink Blusher.  Set aside to dry.  Apply a second layer of GlazOn and set aside to dry, each successive layer requires more drying time.


Step 6:
Place StazOn Metallic Gold on a plastic surface (for ease of clean-up) and apply with crumpled cling wrap to the surfaces to mimic gold flecks in the Lapis stone.  Set aside to dry.  Apply a final coat of GlazOn and set aside to dry.

Step 7:
Stain a small wood bead with StazOn Azure and set aside to dry.  Thread wire through bead and twist into a fixture.  Adhere to the lid with E6000 adhesive.

Imagine:

Other:
Ashland glass votive candle holder
Sierra Pacific Large Glass Drops
Small white wood bead
Crafting wire
Cling wrap
E6000 Adhesive


Tuesday, April 11, 2017

Baby Elephant for New Baby


It is time for a new challenge at Retro Rubber!  So dig out your older stamps (older than a year) and give them some inky love!  This time around we want to see your baby critters . . . loosely defined as something alive that is a baby!


I have some friends who announced recently that they will be blessed with their second child.  They plan on waiting until the birth to find out the gender, so I wanted to create a somewhat gender neutral baby card.


I started by stamping the Fiskars Teeny Tiny (2012) image in Memento Tuxedo Black and coloring the sweet little elephant in Chameleon BL2 Baby Blue and BL4 Cornflower Blue.  The image was die cut with Spellbinders Label 34, which was pressure embossed with Gold Label 34.  The pressure embossed areas are inked with Versa Color in Baby Blue and the edges are inked with Versa Color Pink.  A second Labels 34 is die cut with Gold Label 34 hearts insert.  The area behind the hearts us also inked with Versa Color in pink on the card base.  The edges of the backing die cut are inked in Versa Color in Baby Blue.  The sentiment is stamped on white cardstock then die cut with Spellbinders Ribbon Banners.  It is pressure embossed and inked with Versa Color in Baby Blue and Pink.  The layers are adhered together with dimensional foam adhesive.


I decided to finish off the inside of the card with a sentiment from the set and the sweet little heart!

Thanks for stopping by and consider creating your own card, tag, or project and enter our challenge at Retro Rubber!

I am delighted to enter the following challenges:


Sunday, April 2, 2017

Hugs and Prayers Tulip Card


Last night I sat down to play with my new Penny Black First Waltz tulip set and did a little water color style stamping.  Can’t beat the quickness of the technique when using a stamp positioner like the Precision Press.  Color on the image with Memento Dual Tip markers, spritz with water and stamp the color.  Clean stamp and repeat the process until you are satisfied with the image.  I used Memento Dual Tip Markers in Angel Pink, Rose Bud, Pear Tart, and Bamboo Leaves.  The sentiment is by Paper Smooches from the Spiritual Sampler and is stamped in Memento Bamboo Leaves.  A quick pass around the edges with an Ink Blusher and Rose Bud and then mount to a Kraft card base and the card is done!  Less than 10 minutes and the results are stunning if I do say so myself!

I am delighted to enter the following challenges: