Wednesday, January 31, 2018

Back to School BBQ

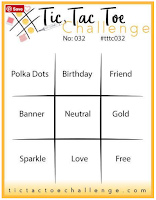
Last weekend the crew at Stick It Down hosted an event on Facebook, Sticking It Down All Weekend.  I had some time to be crafty (due to that flu thing . . . ) and created this for the Tic Tac Toe Challenge.  There is still time to play for prizes at the FB event.  Comment below me if you still need an invite.


I've had these photos on my desk for almost a year, and now they are ready for Peter's Album.  Yeah!  I started with yellow cardstock and used Scenic Park's Appleton Collection.  It is full of fun school related images and embellishments.  I stamped the stars on the grid paper with Versa Color Scarlet and Unity Stamp Company's "Splatter & Stars", it needed a little something!   The title is stamped in the same Scarlet using Technique Tuesday's Farmhouse Capital and Lower Case Large alphabet.  The arrow is inked in Versa Color Mountain Lake.  

This is the inspirational sketch from SID:

The challenge:  I used the diagonal of green, stripes, and stamping.
Please stop by the Stick It Down blog, we have some fun new sketches debuting tomorrow!

Tuesday, January 30, 2018

Racing With Dad featuring Quick Quotes Navigator collection


Hello, Neva here to share with you a jam-packed layout featuring the Navigator paper collection from Quick Quotes.  There were many photos to include in this double page spread, along with an important story about my son’s experiences.


The cardstock weight phrases translated nicely into classic embellishments to complete the page.  Here are a few detail photos.  The sailboat was trimmed from a larger phrase.


I knew ahead of time that the journaling would be rather long, and wanted to plan for ample room to include the important details.  With that in mind I trimmed Navigator 101 to 7 ¾” knowing that it would fit into my printer at that dimension.  The accent of Navigator 100 is ¾” wide, and one sheet of Navigator 104 is used between both sides of the layout and is trimmed to 4 ½” for the left side.


The right-side dimensions are the remainder of Navigator 104 at 7 1/2 ”, Navigator 100 at ¾”, and Navigator 101 at 5”.  All of these dimensions add up to more than 12” but allow for the use of a strong adhesive to hold the page together.


I had the perfect stencil in my stash to use with Tropical Punch to add a pop of color in the lower left corner.  Painter’s tape is my go to removable tape to hold the stencil in place.  An ink dauber is handy to ink through the stencil.


Next I planned my journaling, as I mentioned before it was a long story with a bit of national attention for the event.  In a Word document, I created two text boxes for the two columns of journaling.  It is easier to read and adds symmetry to the design.


I typed my journaling in the box and used the justify text tool to line up the text in the boxes.  Taking measurements from my layout page I determined I needed to be 3 ¾” from the top of the page for the journaling to fit in the spot designated for it and to not overlap the compass rose image.  


I printed the test sheet and used the light-box window method to determine whether I needed to adjust the text boxes.  The reverse side of the paper also shows through as well as the supports in my window!


The banners from the cardstock weight phrases were trimmed and inked with Tropical Punch.  I punched two holes in each with a paper piercer. The Sail with Me phrase  and the small sailboat trimmed from another phrase are also inked with Tropical Punch.  


The easiest method to string bakers twine through the holes is to use a floss threader.  It works like a needle but does not enlarge the hole.  After adjusting the bakers twine I tied knots in each end.


My favorite way to die cut titles is to send a strip Navigator 100 through a Xyron 1.5 X and put the adhesive on the letters first.  Then they are adhered to the layout.  


To finish the photos, I edged them in Deep Sea rather than backing each photo with paper.  It helps to pop them off the page.  The Right and left sides are adhered together and the photos are adhered in place.  The embellishments are adhered with thin dimensional foam adhesive and the sail boat brads are added for the final touch.  

Navigator Cardstock Weight Phrases
Powderpuff Chalk Inks:  Tropical Punch,  Deep Sea

Other Products
Compass Ross stencil M043 by Stencil Girl
Sailboat brads by Eyelet Outlet
Bakers twine from my stash
Xtreme adhesive by Tombow
Dimensional foam adhesive from my stach
Lemon Drop alpha die by LifeStyle Crafts
Xyron X 1.5
Ink Dauber by Tsukineko


A Love Valentine


We have a lovely new challenge for the next two weeks!  Check out the DT cards at Retro Rubber for additional inspiration.


My version is a CAS, and pretty quick to put together.  I started by inking the Elizabeth Craft Designs Hearts Entwined embossing folder with Memento Angel Pink then pressure embossing a section of white cardstock.  The edges were inked with Angel Pink as well.  Another small section repeated the above steps and then one heart was fussy cut and inked again in Delicata Golden Glitz.  A strip is inked with Angel Pink and then stamped in Golden Glitz with the sentiment from Technique Tuesday’s All You Need is Love from 2008.  It is heat embossed with gold embossing powder.  The outside edges of the backing base card are inked with Golden Glitz before the card is adhered together with the top layer added with dimensional foam adhesive.

Please join us in this fun challenge at Retro Rubber Challenge Blog.


I would like to enter my card in the following challenges:

Monday, January 29, 2018

Favorite Game

I am on a mission to get more scrapping done, especially as I have a senior and want to have a few layouts done before he graduates!  This layout commemorates a game that he and his best friend will play for hours, in the garage, at school on the Physics lab tables . . . and so on!  I participated in an online FaceBook Crop with Stick It Down this weekend around my lingering flu symptoms.  I am glad I have a quiet calming activity to do during times like these!  The inspiration came from a challenge at the crop, to use an old single page sketch.  I used this one:


I have an old paper collection by Doodlebug Design aptly named Teen Boy that I pulled out along with green and yellow cardstock.  No fresh papers were trimmed, just ones that were scraps in the collection.  I love when I get multiple layouts from one collection!


This layout flew together in about 20 minutes!  The Quickutz font in Frankie mini created the title, and I purposefully ordered some Karen Foster Ping Pong brads a few months ago knowing I wanted to scrap this photo. 

All of the challenges have been posted in the Sticking It Down All Weekend crop, but if you are still interested in participating let me know in the comments!  I won't publish your interest or information, just let me know!

Thanks for stopping by and stay tune for more fun layouts through-out the week.  The deadline for most challenges in Feb 5th so you have time!  Oh, did I say there were prizes?  Both for the US, Australia, and the UK.  Just saying' if you need some inspiration to get your crafting mojo going this is a great way!


Friday, January 26, 2018

A Special Sympathy Card


My husband and I are at the age where our friends are starting to lose their parents.  Today’s card is for a friend who stood up with us at our wedding.  The design of this card holds special significance because his father owned an orange glider built by my husband and our friend, his son.  This is a tribute to a glider pilot flying off into the sunset. 


To create the horizon and sunset line I used a deckled edge ruler to tear a paper mask.  I first sponged in Delicata Emerald Green and Black Shimmer for the landscape.  Then I used the opposite side to cover the landscape and sponged in the sunset in Golden Glitz, Champange, Pink Shimmer and Sapphire Blue.  The circle die cut is inked with Golden Glitz, and the sentiment strip is inked with Pink Shimmer.  The sentiment is by Unity Stamp Company from the “ . . . beautiful life, blessed memories” and is stamped in Sapphire Blue heat embossed with iridescent embossing powder.  To create the glider I printed a very small photo of the glider at ¾” size on plain paper and used an exacto knife to carefully create a stencil.  Using a brush tip Fantastix and VersaFine in Habanero I inked in the orange glider.  The backing card is inked with Memento Luxe Tuxedo Black.  The card is adhered together and the sentiment is mounted with dimensional foam adhesive.  A few bits of bling complete the card. 

To all of those who are missing their parents, our prayers go out to you!

I would like to share this card with:


Wednesday, January 24, 2018

Special Valentine


As I have had some forced down time . . . due to a case of the flu, I decided to do a little Valentine card making and play along with a few challenges.  I don’t recommend getting the flu at all to allow yourself time to craft, it's kinda yucky.  But I guess I am making lemonade (actually Tazo Wild Sweet Orange Tea is my beverage of choice right now) out of lemons!


Here is the front of the card, using Heartfelt Creations Coffee Talk stamp and die sets.  The cup is stamped in the new Pine cone VersaFine Clair by Tsukineko, then water colored with Delicata in Pink Shimmer and Champagne, and Memento Peanut Brittle.  I used a little Ink Potion No. 9 on my mat and picked up the color with a brush tip Fantastix.  Delicata Dark Brown Shimmer is used for the sentiment, and Silvery Shimmer for the spoon. 


To create this slider card from cardstock is actually pretty quick and simple, even though there are dies out there that work well too!  All it takes is two 4 ¼ x 5 ½ sections of cardstock and a third that is 3 ¼ x 4 ¾.  The front is cut ¾’ from the edge from ¾’ to 4 ¾” on each side.  The bottom is trimmed open and score lines at 1 ¼’, 3”, and 4 ¾” from the bottom allow you to make the working mechanism.  Using a circle punch the tab hole is cut through both the top and bottom layers at the same time so they will line up perfectly.  I choose to ink the front with Pink Shimmer and the inside tag and base in Champagne, in real life the entire card has a faint shimmer and is very pretty!

The smaller card is adhered to the bottom tab before assembling the card together on three sides.  The spoon is adhered with dimensional foam adhesive so the slider will move easily underneath it.  The inside sentiment is a very old PSX wood mounted stamp stamped in Dark Brown Shimmer.   The final touch is adding a few fibers and ribbons from my stash to assist in working the pull mechanism. 

I am playing along with the following challenges:

Joy Clair Pop-up Challenge *Didn’t follow the color prompt, oops!


Thanks for stopping by today!  Stay tuned for a fun Stick It Down Crop event happening this weekend on Facebook!  Prizes will be given and fun will be had.  Please leave a comment if you would like a FB invite, as it was started as a private group.  Hope you can join us!

Monday, January 22, 2018

Quick Quotes Debut Spring Showers

Today I am being introduced on the Quick Quotes blog as a new Design Team Member.  Wahoo!

I am so excited to share my first Design Team project with you using the fabulous Quick Quotes products.  Spring Showers is newly released and is oh so pretty!  I was drawn to create a quick card using two sheets from the collection.


Spring Showers QQP-SG100 has lovely flowers on one side and a calming teal blue on the reverse.  After fussy cutting a set of flowers from one side I used the center area that looks like white-washed boards for the front of the card.  From the reverse of the same sheet I trimmed a backing sheet and the sentiment strip.  QQP-SG101 with multi-colored stripes creates the perfect accent to back the sentiment.     
Quick Quotes QQP-SG100 and QQP-SG101

Left overs after designing card layered over B side.


The sentiment by Inkadinkado from the Thank you words set is stamped in Powder Puff Tropical Punch and heat embossed with iridescent embossing powder..  The top layers are also edged in Tropical punch, and the backing layer is edged in Capri Blue.  The layers are adhered together and the focal flower image is adhered with foam adhesive.   Viola, a clean simple card made in just a few minutes!

Sunday, January 21, 2018

Battle Ready


My scrapping mojo is back and is on a roll!  Good thing too, like many of you I have lots of photos hanging out on my computer and not enough in my scrapbooks!  This fabulous photo was taken on New Years Eve 2014, but just begged to be in each kiddos album, so I created this layout in triplicate!  I was inspired by  Rochelle Spears January Sketch. 


The papers are all from Fancy Pants Rough & Tough line, several years old along with coordinating cardstock from my stash.  The title is Quick Kutz Blossom outlined in Memento Dual Tip marker in Lady Bug to help it stand out a bit more.  To add the circle from the sketch I mixed a bit of StazOn Studio Glaze with Radiant Neon Amplify! in Electric Blue and dotted it through The Crafters Workshop Circles stencil with a cotton swab.  After heat setting the mixture it puffed up and matched the color scheme.  To make the targets I used Spellbinders Standard Circles in small along with red and cream cardstock, recycled packaging and red fun foam.  At first I wanted to include the actual airsoft ammo, but it turned out to be more than ¼” thick, a little too lumpy bumpy for my tastes!  I settled with using Liquid Pearls in White Opal and Silver Pearl.  The little bit of fun foam to create a shaker box will protect the dimensionality of the “ammo” once it is in an album.   

I would like to enter the following challenges:


Tuesday, January 16, 2018

White Out! for Retro Rubber


White Out!  AKA white on white with one other color is our challenge at Retro Rubber to start out 2018. 


One of my new favorite colors is Rose Gold, not quite copper, but more of a pint tinge.  A childhood friend recently lost her mother to Alzheimer’s and I decided to make a sympathy card for this challenge.


I started with Spellbinders Mystical Embrace and die cut two layers of white card stock.  The card base is gently inked with Delicata Rose Gold to add just a hint of color.  The center of the large die cut is more thoroughly inked.  The sentiment by Unity Stamp Company “. . . a beautiful life, blessed memories” set from February 2015 is stamped with Delicata Rose Gold and heat embossed with clear embossing powder. Heartfelt Creations Open Vintage Floret stamps and die created the flowers.  I used their new 3D Rose Mold Shaping kit to quickly shape all the layers.  One hint here, let the flowers dry completely before adhering them together, you will be frustrated if you don’t wait!  The card is adhered together and pearl accents are added to the centers of the flowers and to strategic points on the die cuts.  I think this makes an elegant sympathy card and it is on its way to my friend who was her mother’s care giver for 10 years. 

Please do join along with us at Retro Rubber and create your own project.  Remember to use a stamp that is older than a year and let us know how long it has been in your stash.  We also ask that you enter only 10 challenges including Retro Rubber. 

Sunday, January 14, 2018

Seasons Giving winners and a few more fun things!


Wow, I have to say I’ve a busy few weeks since Christmas!  Here in Central Oregon we did not go back to school until January 8th, so the first week was doing fun family things and taking my time putting away Christmas.  This entire week has been packed full, I taught Monday through Thursday finishing a maternity leave for a friend in science then the last two days have been spent watching High School wrestling.  For my loyal blog readers and new followers I thank you for your patience as real life has been too hectic to tend to my blog!

So the first of the announcements is the winners of my Seasons Giving blog hop prizes.  I thankful for all of my new blog followers and those who now follow by email.  Thank you!  If was fun to read through your crafting goals for 2018.  Most of us want to craft more, share more, learn new techniques, and get organized.  All excellent goals to work towards, but remember that crafting is our hobby and it should bring us joy along the way!  Now for the winners!

The winner of the US give away is
kReN K

and the winner of the international give away is
Dr Sonia

Besides announcing the winners of the blog hop I have a fun surprise to share with you as well! I was recently selected as a new Design Team Member for Quick Quotes.  A company I have long admired for their colorful papers and embellishments has asked me to create with their wonderful line of products!  Here is the announcement on the Quick Quotes blog.

Finally here is a little crafty inspiration! 


I like playing with my layering stamps and trying out different color combinations!  These sweet butterflies are from the Hero Arts CL867 Color Layering Butterflies & Frame Cuts.  The butterflies are stamped in Memento Lulu Lavendaer, Grape Jelly, Elderberry, Angel Pink, Lilac Posies, Pear Tart and Bamboo Leaves.  I added Versa Mark over the top and heat embossed with Iridescent embossing powder.  The background is Crafter’s Workshop Mini Flutterby TCS 206s the and Fireworks Lilac Posies and Lulu Lavender.  The sentiment and card edges use Elderberry Memento Luxe which is heat embossed with Iridescent embossing powder.  Thanks so much for stopping by!

Monday, January 8, 2018

Snowmaggedon for SID Double Page

What a great sketch to use for our snowstorm of the Century here in Central Oregon!  Stick It Down's January sketch features a few less photos, but I wanted to tell a story about the beauty and work of the months of December, January and into February and our 60 inches of snowfall!


 The icicles were created with Amplify! by Imagine, the title is Spellbinders Donna's Alpha, and a few miscellaneous brads were the final embellishment.  I really wanted the beautiful photos to shine.  Thanks for stopping by, and do check out the other layouts created by the Double Page Design Team at Stick it Down!