Tuesday, December 7, 2021

Christmas Inspiration for Retro Rubber

 Here we are the last challenge of the year at Retro Rubber!  Add another card to your Christmas stack to be shared with others!  Wonderful Christmas colors with a rustic theme.  Enjoy and hope to see you in our gallery!

I ordered some fun new dies from Crafter's companion and they have been a blast to decorate.


  • I started by centering the Sprig of Holly Die on the front of a 6.25" x 9" card base and die cut and pressure embossed the design.
  • With an ink dauber I inked Versa Color in Lime through the die.
  • Inakadinkado's Christmas greetings snowflake swirl from 2011 was used to stamp sparkly swirls in Delicata Golden Glitz on the rest of the front of the card.  The die was left in place.
  • A section of light green cardstock 6.25" x 2.75" was also stamped with Inakadinkado's swirls used to stamp sparkly swirls in Delicata Golden Glitz. 
  • The red ribbon and berries are drawn in with Nuvo Crystal Drops in Autumn Red.
  • The sentiment from Unity 2014 is stamped and embossed with Delicata Golden Glitz and Gold embossing powder on a red scrap.  The corners are rounded and the edges are heat embossed to match the sentiment.
  • the sentiment is backed with matching light green cardstock and then adhered to the front of the card.  The rest of the card is assembled, including a white cardstock liner.

 Thanks so much for stopping by and enjoy the season!  We have a few simple rules at Retro Rubber:   

CHALLENGE GUIDELINES

  • We require stamps older than one year.  If we feel you are using newer stamps, you may be disqualified from the challenge without notification.
  • New papers/dies are OK – but you must use at least one stamp older than a year and describe the age in your blog post.
  • Please note that all challenges require the use of at least one stamp older than a year.
  • Post your new creation to your blog or online gallery.   Use keyword RRCB173.  No backlinking. 
  • Link back to the blog using the Linky Tools by the due date. 
  • Enter as many times as you like. 
  • Feel free to combine our challenge with a maximum of 10 challenges.  Entries linked to more than 10 challenges will be disqualified without notification.
  • If your project is posted on a private group site such as Split Coast Stampers or a photo sharing site not all DT members may be able to comment.   Thank you for understanding.
  • Turn off Word Verification.  We love to comment but word verification can make that difficult.

Christmas Blessings to you and yours!


Monday, December 6, 2021

Create a Stunning Christmas Card for Imagine Crafts


Today’s tutorial will feature several Imagine products, Delicata, StazOn, and Vertigo.  Using silhouette style die cut creates a stunning yet quick and easy Christmas Card.

Skill:  Beginning

Time:  30 minutes

Directions:


Step 1

Trim black cardstock to 6 ½” x 9” and fold in half.  Center die on the front panel of the card base and die cut.


Step 2


Leave the die in place and stamp the starry background with Delicata Golden Glitz.


Step 3


Use a Fantastix Brush Tip to brush in details left open in the die.  Photo shows the die removed after this step.


Step 4


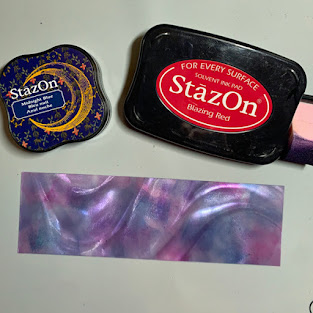
Trim a section of Tafetta Vertigo to 2” x 6 3/8”.  Use an Ink Blusher to build layers of color in StazOn Blazing Red and Midnight Blue.  As the color layers blend, the red, purple, and blue along with the Tafetta Vertigo creates a stunning night sky.


Step 5


Adhere Vertigo behind the opening in the die with small dots of OnPoint Glue.  I glued around the edge and behind each small portion of the die scene.  Trim white cardstock to 6 3/8” x 8 ¾” and fold in half.  Adhere to the inside back of the card with TearIt! Tape.


Step 6


Apply TearIt! Tape to the front inside of the card and fold card closed.  This allows the card to compensate for the two layers of cardstock. 


Step 7


Stamp Oh Holy Night sentiment in Delicata Golden Glitz and heat emboss with Gold Embossing Powder.


Art Supplies


Imagine

·      Delicata—Golden Glitz

·      Vertigo—Taffeta (12” x 12” sheet)

·      StazOn—Blazing Red, Midnight Blue

·      Ink Blusher

·      Embossing Powder—Gold

·      Fantastix Brush Tip

·      Tear It! tape


Other

·      Gemini Follow the Star Die

·      Neto Stuff Star stamp

·      Recollections Christmas Sentiments

·      Black and White cardstock

Tuesday, November 23, 2021

Sketch Time for Retro Rubber Christmas Card

 We have a great sketch at Retro Rubber for the challenge for the next two weeks!  Super easy to put together a CAS Christmas card!


This year I have been creating Christmas cards throughout the year . . . and often from scraps from completed layouts!  The patterned paper I used is My Mind's Eye I Believe from 2010!  So the paper is older than my stamp set, Recollections Christmas words and die set purchased last December, 2020.


  • I simply followed the sketch for a A2 sized card.  The base is 4 1/4" x 5 1/2", the red print backing is 4 1/8" x 5 3/8".
  • Three strips of coordinating patterned paper are trimmed to 4" x 1 1/4" and adhered.
  • The sentiment is stamped in Memento Luxe Rhubarb Stalk and heat embossed with iridescent embossing powder.  (The candy cane strip also has some glitter that is hard to see in the photo.)
  • The sentiment is die cut with the matching die.  To be honest, next time I will use my Scan N Cut as the dies and stamps do not seem to match up well.  the sentiment is adhered with dimensional foam adhesive.  
  • Two wood stag deer are adhered for embellishment.  They are from a set of Christmas embellishments made by Docrafts that I have had in my stash for about 4 years!

Easy Peasy and ready to post for Christmas!  We do have a few guidelines for Retro Rubber:

  • We require stamps older than one year.  If we feel you are using newer stamps, you may be disqualified from the challenge without notification.
  • New papers/dies are OK – but you must use at least one stamp older than a year and describe the age in your blog post.
  • Please note that all challenges require the use of at least one stamp older than a year.
  • Post your new creation to your blog or online gallery.   Use keyword RRCB171.  No backlinking. 
  • Link back to the blog using the Linky Tools by the due date. 
  • Enter as many times as you like. 
  • Feel free to combine our challenge with a maximum of 10 challenges.  Entries linked to more than 10 challenges will be disqualified without notification.
  • If your project is posted on a private group site such as Split Coast Stampers or a photo sharing site not all DT members may be able to comment.   Thank you for understanding.
  • Turn off Word Verification.  We love to comment but word verification can make that difficult.

Do come and check out what the design team has created and enter you own card based in the sketch!  Thanks for stopping by!

Tuesday, November 2, 2021

A Clean and Simple Fall Card for Imagine


In today’s tutorial I will demonstrate how to use both VersaMark and Kaleidacolor ink to create a layered background for a clean and simple design fall card.  VersaMark is a beautiful watermark ink especially on dark cardstock.

Skill:  Beginning

Time:  30 minutes

Directions:


Step 1

Trim a cream cardstock base to 8.5” x 5.5”, score and fold in half.  Trim a dark brown cardstock to 4.25” x 5.5”.


Step 2

Use a stamp platform and stamp the leaf images in VersaMark Dazzle Champagne on the dark brown cardstock.  Any VersaMark ink will work, but there is a bit of Champagne shimmer with the Dazzle ink.  With the stamps in the same position on the stamp platform, stamp in Kaleidacolor Cappuccino Delight.  The Oak leaf is stamped on the darker brown end and the maple leaf is stamped on the lighter orange end of the Kaleidacolor Cappuccino Delight pad.


Step 3

Continue stamping the base cardstock and dark brown cardstock.  Clean stamps between the Kaleidacolor ink and VersaMark ink.  It is not necessary to clean after the VersaMark ink as it will not affect the color of the Kaleidacolor ink.


Step 4

Trim 0.5” from each edge of the brown cardstock.


Step 5

Stamp the leaves in Kaleidacolor Cappuccino Delight.  The sentiment is stamped in the darkest color of the ink pad.  (I choose and another sentiment for the finished card.)  Die cut the leaves and the sentiment.  Edge the banner sentiment with a Brush Tip Fanstix using the orange from the Kaleidacolor Cappuccino Delight. 


Step 6

Line up the dark brown cardstock with the base layer.  Adhere with Tear It! Tape.  Adhere the oak leaves with Tear It! Tape and the maple leaf and sentiment with dimensional foam adhesive. 


Art Supplies


Imagine

·      VersaMark Dazzle--Champagne

·      Kaleidacolor—Cappuccino Delight

·      Fantastix Brush Tip

·      Tear It! tape


Other

·      Technique Tuesday I Give Thanks Stamp and Die

·      Lawn Cuts Everyday Sentiments Banners


Thanks for stopping by and have a wonderful Thanksgiving!

Tuesday, October 26, 2021

Falling for Autumn at Retro Rubber

Hello all, I don't know about you but the leaves are changing and the weather has definitely turned to fall temperatures.  Fall can be tricky in Central Oregon, and getting the garden to bed is important before the hard frosts hit!  We have a season appropriate theme for our Retro Rubber Challenge this two weeks:


My inspiration came from a Sizzix Framelit, Textured Impressions with Stamps set Door Wreath (2016).  It can be used for any season, but I do like the fall version!

  • Ink the embossing folder With VersaFine Sepia and pressure emboss.
  • Stamp the images in Tuxedo Black and color with Prisma colored pencils.
  • Die cut the images.
  • Stamp the sentiment from Thankful Layering Stamp  (2013) in Versa Fine Crimson Red and trim to a banner.
  • Die cut the wreath from brown cardstock.
  • Assemble layers of the card. 

CHALLENGE GUIDELINES

  • We require stamps older than one year.  If we feel you are using newer stamps, you may be disqualified from the challenge without notification.
  • New papers/dies are OK – but you must use at least one stamp older than a year and describe the age in your blog post.
  • Please note that all challenges require the use of at least one stamp older than a year.
  • Post your new creation to your blog or online gallery.   Use keyword RRCB169.  No backlinking. 
  • Link back to the blog using the Linky Tools by the due date. 
  • You may enter no more than 5 times. 
  • Feel free to combine our challenge with a maximum of 10 challenges.  Entries linked to more than 10 challenges will be disqualified without notification.
  • If your project is posted on a private group site such as Split Coast Stampers or a photo sharing site not all DT members may be able to comment.   Thank you for understanding.
  • Turn off Word and Captcha Verification.  We love to comment but verification can make that difficult.  Thanks!

Thank you so much for stopping by, and hope you will check out all the fun cards over at Retro Rubber Challenge Blog.


Wednesday, October 13, 2021

Fun Halloween Cards with Imagine

Make a quick batch of Halloween cards with a few fun techniques using Imagine products.  See the blog post, and then go shopping!  Halloween is not far away, and here is an idea for cute cards to celebrate


In today’s tutorial I will show you how to put together a quick set of Halloween cards ready to send out.  Ink resist and coloring with Fantastix and Kaleidacolor pads makes for quick images to place on a card.  The background is another Kaleidacolor brayered onto glossy cardstock.

Skill:  Intermediate

Time:  1.5  hours 

Directions:


Step 1

Stamp pumpkin images in VersaFine Clair three times each on white cardstock.  VersaFine Clair is a perfect ink for this technique as there is no smear when coloring over with other dye based inks.   


Step 2

Stamp pumpkin carving in Radiant Neon Electric Yellow and heat emboss with Iridescent Embossing Powder.


Step 3

Fussy cut or die cut pumpkins.  Use a Fantastix brush tip to color pumpkins using ink from Kaleidacolor Desert Heat and Cappuccino Delight.  The spectrum of colors allows a quick selection to shade different areas of the pumpkins.  Use a paper towel or soft cloth and remove ink from the embossed area so the images pop.


Step 4

Stamp sentiment on Glossy cardstock in Radiant Neon Electric Yellow and heat emboss with Iridescent Embossing Powder.


Step 5

Use a soft rubber brayer to ink cardstock with Kaleidacolor in Vineyard.  Remove ink from the embossed area with a paper towel or soft cloth. 


Step 6

Die cut 4 bats from black cardstock.  Use Radiant Neon Amplify! in White to add big white eyes.  The Amplify! was not heated.


Step 7

Die cut four fence die cuts from black cardstock.  (Not shown.)


Step 8

Adhere background to A2 grey card base with Tear It! Tape. Adhere the fence and bat die cuts with OnPoint Glue.  Adhere center pumpkin with Tear It! Tape.  Adhere side pumpkins with dimensional foam adhesive.  


Art Supplies


Imagine

·      VersaFine Clair-- Nocturne

·      Radiant Neon-- Electric Yellow

·      Kaleidacolor—Desert Heat, Cappuccino Delight, Vineyard

·      Fantastix Brush Tip

·      Radiant Neon Amplify-- White

·      On Point Glue

·      Tear It! tape


Other

·      Joy Clair Trick or Treat Stamps

·      Heidi Grace Designs Halloween Stamps

·      Echo Park Going Batty die

·      Heartfelt Creations Lattice Flourish Gateway Die

·      Rubber Brayer

·      Dimensional Foam Adhesive

·      Brother Scan-N-Cut