Thursday, January 27, 2022

New Techniques to add Texture for a Handsome Anniversary Card


Today’s tutorial will demonstrate how to create multi layers of texture for a dramatic Anniversary Card.  StazOn, Delicata, and Mboss will add amazing levels of metallic shimmer.

Skill:  Advanced

Time:  60 minutes

Directions:


Step 1


Trim white piece of sturdy cardstock to 4 1/8” x 5 3/8”.  I used the backing of a paper pack, that had one shiny white side.  First, I pressure embossed with Sizzix 3-D Textured Impressions Doodle Triangles.  A makeup sponge was used to spread StazOn Metallic inks from re-inkers in Platinum, Silver and Gold randomly around the surface of the card front.  StazOn dries on the sponge and makes it a one-time use tool. StazOn Jet Black ink is gently tapped over the raised portions of the card panel.  Set aside to dry or heat with a heat gun.


Step 2


Using a stamp from my stash (manufacturer unknown) small hearts were stamped randomly in VersaMark ink and heat embossed in Mboss in Valentine.


Step 3


Memento Luxe in Tuxedo Black is used to stamp Taylored Expressions Simple Strips Background sentiments followed by heat embossing with black embossing powder.  The matching die is used to die cut the entire set and five sentiments are selected for the front of the card.

Step 4


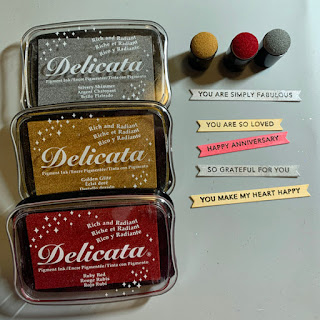
Each sentiment strip is inked with Delicata in Silvery Shimmer, Golden Glitz or Ruby Red with an ink dauber.  Since the sentiment is embossed, the ink will not change the color.


Step 5


The sentiment strips are backed with white cardstock with the matching backer die.  The edges are inked with Memento Tuxedo Black and an ink blusher to add definition.


Step 6


A Scribble Heart die by Impression Obsession is die cut from white cardstock.  The die is then inked with Versa Mark ink and heat embossed with Mboss in Valentine.


Step 7


A white card base is trimmed to 5 ½” x 8 ½”.  The edges are inked with Memento Tuxedo Black and an ink blusher.


Step 8


The card base is adhered to textured front with TearIt! Tape.  The Heart is adhered with OnPoint Glue.  The sentiment strips are adhered with dimension foam tape.  A striking masculine anniversary card goal achieved!


Art Supplies


Imagine

·      StazOn Re-inkers—Platinum, Silver, Gold

·      StazOn Jet Black ink pad

·      VersaMark ink pad

·      Mboss—Valentine

·      Memento Luxe—Tuxedo Black

·      Embossing Powder--Black

·      Delicata—Silvery Shimmer, Golden Glitz, Ruby Red

·      Memento Tuxedo Black

·      Ink Blusher

·      Ink Dauber

·      Tear It! Tape

·      OnPoint Glue


Other

·      Sizzix 3-D Textured Impressions Doodle Triangles

·      Make up sponge

·      Background heart stamp (manufacturer unknown)

·      Taylored Expressions Simple Strips Background Sentiments, Die, and Backer Die

·      Impression Obsession Scribble Heart die

·      Dimensional foam adhesive

·      Black and White cardstock

Tuesday, January 18, 2022

dig it . . . like the 50's Chickadee Birthday Card for Retro Rubber

Welcome back to a new year of challenges with us here at Retro Rubber Challenge Blog.   We have a great new color challenge to honor the colors of the 50's.  I personally just barely made it into the 50's by being born in 1959, the same year Barbie doll was introduced.  So I don't have many memories of this color scheme.

I've had this set from Technique Tuesday Chickadee 2.0 from 2017 and thought it would be perfect to use the color scheme.  They are cute little Chickadees!

  • The card base and backing banners are pastel yellow cardstock.  
  • The card front is pastel soft turquoise die cut with Kat Scrapiness Stitched Slimline frame.
  • The card front is stamped in VersaColor Turquoise with the sentiment from the set, "Smile".
  • The chickadees are stamped in Memento Luxe Tuxedo Black and heat embossed in Iridescent embossing powder.  Makes it easier to color inside the lines!
  • The chickadees are colored with a brush point Fantastix in Memento Angel Pink, VersaColor Seafoam, VersaMagic Thatched Straw, and VersaColor Turquoise.  They are die cut with the matching die.
  • The sentiments are stamped in VersaColor Turquoise and die cut with Lawn Fawn Sentiment banners.  The backing banners are cut from one side larger.  To get the banners the right length I die cut each of them twice for the fish tail ends.
  • The card is adhered together and is ready to send to a friend!

Please do join us at Retro Rubber Challenge Blog!  Do come see all the pretty creations of the design team!  We would love to see your work in our gallery! 

 CHALLENGE GUIDELINES

  • We require stamps older than one year.  If we feel you are using newer stamps, you may be disqualified from the challenge without notification.
  • New papers/dies are OK – but you must use at least one stamp older than a year and describe the age in your blog post.
  • Please note that all challenges require the use of at least one stamp older than a year.
  • Post your new creation to your blog or online gallery.   Use keyword RRCB173.  No backlinking. 
  • Link back to the blog using the Linky Tools by the due date. 
  • Enter as many times as you like. 
  • Feel free to combine our challenge with a maximum of 10 challenges.  Entries linked to more than 10 challenges will be disqualified without notification.
  • If your project is posted on a private group site such as Split Coast Stampers or a photo sharing site not all DT members may be able to comment.   Thank you for understanding.
  • Turn off Word Verification.  We love to comment but word verification can make that difficult.

Thanks so much for stopping by!