Friday, February 25, 2022

Triple-Step Stamped card made simple with Memento Ink

See how to use the Memento ink line to created a cohesive matching layered card in just a few steps.  The beauty of this particular method is you may make a number of cards depending on your needs in more than one color scheme as shown in the bonus step.  Finishing touches use irRESISTible Pico Embellisher, VersaMark Clear ink, and embossing powder.

Skill:  Beginner

Time:  One card 30 minutes plus dry time, multiples add additional time

Directions:


Step 1

Trim white cardstock to 4.25" x 5.5", this will allow a quicker placement in step 2 on the stamp platform.  Center Image "A" from the Concord & 9th Triple-Step Floral Frame Stamp on the white cardstock and then adhere to the stamp platform.  Ink Image "A" with Memento Bamboo Leaves.  Double or triple stamp the image to create even darker images.  (If doing multiple cards, continue stamping Image "A" until you have your desired quantity.)

Step 2

Place Image "B" from the Concord & 9th Triple-Step Floral Frame Stamp on the white cardstock so the small tulip shaped flowers line up with the stems.  Look directly down through the stamp to judge the placement of the stamp.  In this version Memento Cantaloupe is stamped first.  Turn the image 180 degrees and double check image placement, then stamp in Memento Tangelo.  (If doing multiple cards, continue stamping Image "B" until you have your desired quantity.)


 Step 3

The stamp set has two stamps that will add the center of the roses and an additional layer to the small tulip shaped flowers.  Use the same method as Step 2 for placement.  If the center of the rose is slightly off, stamp again until the white area is inked.

Step 4--Bonus Step

Shown are the additional card fronts stamped during my session of triple-stamping.  Once the layering stamps were in place I like to make multiple stampings for future use.


 Step 5

Stamp "So Kind of You" in Memento Tangelo using a stamp platform.  Stamp over the image with VersaMark Clear ink and heat emboss with clear embossing powder.  Use an ink blusher with a light hand to color around the image, the embossed sentiment will resist the ink.  This sentiment has a matching die to allow you to die cut before adhering to your card front. 


Step 6

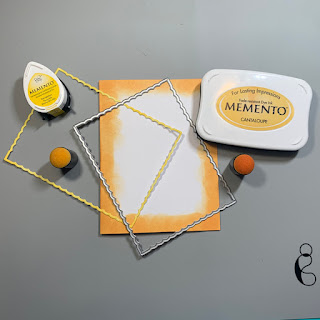
Trim white cardstock to 5.5" x 8.5" and fold in half to create an A2 card base.  Ink the edges using an ink dauber with Memento Cantaloupe.  The card front die also creates a very narrow border, this one is inked with Memento Dandelion using an ink dauber.  


Step 7

Place the card front face down and align the Dandelion border to the card front.  Carefully place Tear It! tape around all four edges of the card front.  Take time to "catch" the border without having the Tear It! tape show on the front.  


Step 8

Adhere card front to card base and add the die cut sentiment with dimensional foam adhesive.

Step 9

Learn from my mistake!  Add the irRESISTible Pico Embellisher in Dandelion AFTER the card is assembled to the center of the flowers besides the roses.  The irRESISTible Pico Embellisher will retain the rounded shape after drying.  When I die cut the card front after adding the irRESISTible Pico Embellisher the dots were flattened.  However it was an easy rescue as another layer of the irRESISTible Pico Embellisher added the rounded dimension back to the flower centers!

Art Supplies

Imagine

  • Memento--Bamboo Leaves, Cantaloupe, Tangelo, Dandelion (bonus cards--Pear Tart, Lilac Posies, Sweet Plum, Rose Bud)
  • VersaMark Clear
  • Embossing Powder Clear
  • irRESISTible Pico Embellisher--Dandelion (Bonus cards--Lilac Posies)
  • Ink Daubers 
  • Tear It! Tape

Other

  • Concord & 9th Triple-Step Floral Frame stamp and die
  • White cardstock
  • Dimensional foam adhesive
  • Stamp platform

Tuesday, February 15, 2022

Sketchy Time at Retro Rubber

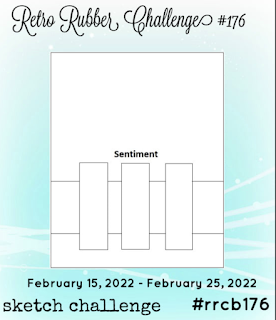
 Sketches are a great way to get a card quickly put together.  This sketch is no exception.  Stop by Retro Rubber Challenge Blog and check out all the cool ways the design team used this sketch.  


For my version I went with scraps laying on my table, and water color paper that I had tried a little experiment with to create this card.

  • The background base white cardstock has Fireworks! in Danube Blue gently tapped on the background.  (Honestly I though of this after the card was finished, and had to dismantle gently and then reattach after the Fireworks! dried.)  
  • The watercolor paper has Bahama Blue and Teal Zeal Memento inks applied directly to the paper, and then spritzed with water so the colors would blend a bit.  Water color paper has a fun finish texture.
  • The scraps that were already trimmed to 1 1/8" were trimmed down to 3" long.  
  • After the layers were attached to the card base the Happy Birthday Sentiment from Taylored Expressions from September 2014 In and Out Birthday was stamped in Memento Luxe Danube Blue and heat embossed with iridescent embossing powder.  

My definition of a quick card!  I actually made three in less than 20 minutes!  Please do join us over at Retro Rubber and have some quick fun with this simple sketch!

CHALLENGE GUIDELINES

  • We require stamps older than one year.  If we feel you are using newer stamps, you may be disqualified from the challenge without notification.
  • New papers/dies are OK – but you must use at least one stamp older than a year and describe the age in your blog post.
  • Please note that all challenges require the use of at least one stamp older than a year.
  • Post your new creation to your blog or online gallery.   Use keyword RRCB176.  No backlinking. 
  • Link back to the blog using the Linky Tools by the due date. 
  • Enter as many times as you like. 
  • Feel free to combine our challenge with a maximum of 10 challenges.  Entries linked to more than 10 challenges will be disqualified without notification.
  • If your project is posted on a private group site such as Split Coast Stampers or a photo sharing site not all DT members may be able to comment.   Thank you for understanding.
  • Turn off Word Verification.  We love to comment but word verification can make that difficult.

Tuesday, February 1, 2022

Love, Love, Love for Retro Rubber

 It is time to make Valentines or a card that celebrates love!  Come join us at Retro Rubber Challenge blog and get inspired!

I've had this stamp from Pink Fresh since 2019 and have only inked it once.  I thought it gave the vibe of the sentiment I choose to embellish the card.

  • Card base is Kraft Cardstock in A-2 size.  The remainder of the sheet was used to stamp the focal image.
  • The image is stamped in Memento Luxe Wedding Dress and heat embossed in Creations Unlimited Silver Satin Pearl.  A subtle color over the Kraft cardstock, but really shimmery in person.  The image is trimmed to 3.75" x 5"
  • A bit of red glitter cardstock is trimmed to 4" x 5.25".  From the center  of the glitter panel The Stamps of Life Love You Circle die is die cut to created the x o circle.  A Spellbinders Small circle was used to remove the center of the circle.
  • Scrapbook.com's XOXO sentiment set from January 2019 is used to stamp the sentiment in Memento Luxe Wedding Dress and heat embossed in Creations Unlimited Silver Satin Pearl.  Paper Studio Fish Tail punch is used to finish the banner.
  • Since the red glitter cardstock showed a bit of white when trimmed with a paper trimmer, so the edges were inked in StazOn Jet Black.
  • The layers are adhered together with the sentiment added with dimensional foam adhesive.

I do hope you will stop by the Retro Rubber Challenge Blog and join our challenge.  We would enjoy seeing your creations in our gallery!  Thanks for stopping by!

 CHALLENGE GUIDELINES

  • We require stamps older than one year.  If we feel you are using newer stamps, you may be disqualified from the challenge without notification.
  • New papers/dies are OK – but you must use at least one stamp older than a year and describe the age in your blog post.
  • Please note that all challenges require the use of at least one stamp older than a year.
  • Post your new creation to your blog or online gallery.   Use keyword RRCB175.  No backlinking. 
  • Link back to the blog using the Linky Tools by the due date. Enter as many times as you like. 
  • Feel free to combine our challenge with a maximum of 10 challenges.  Entries linked to more than 10 challenges will be disqualified without notification.
  • If your project is posted on a __private group site such as Split Coast Stampers or a photo sharing site not all DT members may be able to comment.   Thank you for understanding.
  • Turn off Word Verification.  We love to comment but word verification can make that difficult.