Saturday, November 25, 2017

Chocolate Donuts for Imagine's color of the month

Cocoa is the color of the month over at Imagine.  Instagram your own creation for the opportunity to be featured by Imagine! 


Chocolate donuts are simply the best, even better if they have Cocoa flavored frosting as well!  I used a new set of The Stamps of Life to create a few yummy looking donuts with different types of frosting.  Delicata Dark Brown Shimmer is embossed to create a shiny frosting on one donut.  The other donuts are stamped and embossed to create Radiant Neon Electric Pink sprinkles, and white frosting from white embossing powder.  Delicata Dark Brown Shimmer is applied with an ink blusher to give a shimmery frosting look. 

Imagine

Other
White cardstock
The Stamps of Life—Donut2stamp stamp and die sets
Sizzix Framelits Drop-Ins 560147

Friday, November 24, 2017

Take Ten Rooting for Succulents!

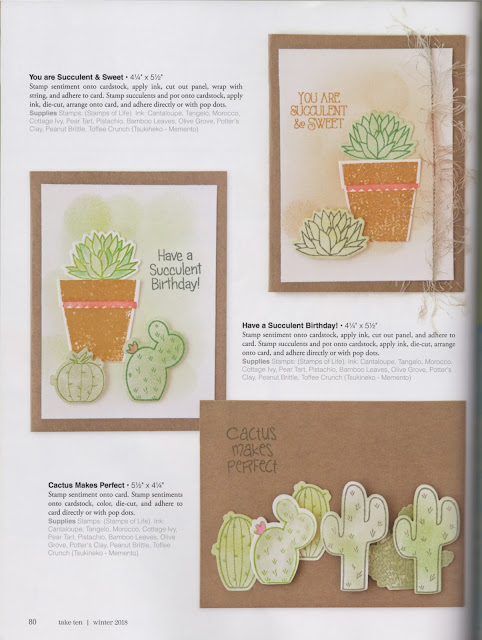
Can I just say I am over the moon excited to share that I have a THREE page spread in the newest issue of Take Ten!  One of my goals for 2017 was to submit for consideration of publication.  I followed through during the early months of 2017, and am very happy to have a series of cards published in the Dec/Jan/Feb issue of Stampington & Company's Take Ten.  I received my complimentary copy in the mail today.


All of the cards are made with The Stamps of Life Succulents2stamp and Imagine products.  I am so pleased to see these fun cards on the pages of a magazine!

Tuesday, November 21, 2017

CAS Thank you for Anything Goes


Time for the ever-popular theme at Retro Rubber . . . Anything Goes!  So drag out your stamps (at least a year or more older) and show us your creativity!


I have a need for thank you cards, so I went for a quick and easy fall themed version.  I was inspired by CAS(E) this sketch challenge, and this card came together in less than 10 minutes.


First the cream cardstock is pressure embossed with Darice Fall Leaves Swirl then inked with Memento Peanut Brittle in to highlight the design.  A strip of cream vellum is stamped with a very old Stamp Out Art from at least 1999 in Delicata Dark Brown Shimmer and heat embossed with clear embossing powder.  The sentiment is Studio Calico from 2009 and it is stamped in Delicata Celestial Copper and heat embossed with clear embossing powder.  The leaf is colored in with Delicata Celestial Copper and brush tip Fantastix.  Since the ink is pigment based it will not dry on the vellum and thus it can be heat embossed with clear embossing powder.  The vellum is wrapped around the pressure embossed baking and everything is adhered to the Kraft cardstock card base. 

Have some fun and join us at Retro Rubber with your Anything Goes project.  Just remember to use your stamps from the past and to enter only up to 10 challenges.

I would like to enter my card in the following challenges:


Saturday, November 18, 2017

Textured Heartfelt Sympathy Card


My card along with another AIR is displayed on Imagine's blog today, both in honor of Heartfelt sympathy.
 
Sympathy cards are a gift given to comfort the bereaved, in this instance it is for a family member who now lives overseas.  I wanted to create something soft and beautiful to deliver a message of condolences and love.  The textured background is created with Amplify! and the shimmer of Brilliance Graphite Black sets of the Radiant Neon Electric Pink. 

Level:  Intermediate
Time:  45 minutes

 
Step 1
Apply Radiant Neon Electric Pink Amplify around card base.  Add drops of Amplify! in white and smaller drops of Amplify! in black.

 
Step2
Use a rubber brayer to move the Amplify! around on the card base.  Clean brayer with water.

 
Step 3
Heat Amplify! with a heat gun until the surface is cured and the texture puffs up.  Trim to a finished size of 5 ¼” x 4”.  Use the scraps to die cut mini hearts with Lawn Fawn’s Stitched Journaling Card set.

Step 4
Die cut Spellbinders Labels 54 Decorative Elements outer and inner portions from white cardstock.  Apply Brilliance Graphite Black ink with an Ink Blusher.

Step 5
Die cut the center square from the Amplify! textured card base. (not shown)

 
Step 6
Use a Post-It note to mask the center of the inner Decorative element and apply Brilliance Graphite Black ink with an Ink Blusher.
 
Step 7
Stamp sentiment in Radiant Neon Electric Pink.  I had forgotten to totally clean the stamp before this step . . . so step 8 made the “mistake” a creative choice instead and matched the card base!


Step 8
Gently ink the sentiment with Brilliance Graphite Black to add a bit more black low-lights to the image.

Step 9
Use Brilliance Graphite Black to ink the edges of the card front.  Adhere the Ampllfy! textured card base.  Adhere a section of DeNami Design white ribbon around the Decorative Element outer frame and adhere with dimensional foam adhesive to the card.  Adhere the Ampllfy! textured square over the ribbon and add the inner decorative frame.  Tie a double bow from DeNami Design white ribbon with Bows-It-All v2 and adhere into position.  Add the mini hearts on the ribbon and the inner decorative frame. 

Imagine

Other
White cardstock
Spellbinders--Labels 54 Decorative Elements
Unity Stamp Company--Heartfelt Sympathy
Lawn Fawn—Stitched Journaling Card die
DeNami Design—white ribbon
Rubber Brayer
Heat Gun

Saturday, November 11, 2017

Vertigo Window Clings

Our challenge for November was to create something children would enjoy making at home.  My version is live on the Imagine Blog today.


What a fun challenge this month, a children’s craft project.  Vertigo Leaf Sun Catchers are a fun way to spend some quality time with the child in your life.  Simply place a leaf under a Vertigo Sheet and trace with a complementary color Fabrico pen.  Younger children can make simpler leaf shapes which are easy to cut out with scissors and older children who are more competent with scissors can complete the more complex maple leaf shapes.  After the leaves are cut out, StazOn inks can be added with ink blushers.  I would recommend gloves to keep fingers from becoming too inky!  Additional veins can be traced with Fabrico Pens.  Apply a few glue dots and adhere to your window for eye catching fall décor!

Imagine

Other
Leaf
Scissors
Glue dots


Tuesday, November 7, 2017

Colorful Autumn Thank You


We have a colorful challenge at Retro Rubber BlogChallenge.  A few lovely autumn colors.  Go check out the fantastic cards the Design Team has created!


I decided to resurrect an old technique to incorporate all these colors into fall inspired Thank You Card.


I inked a section of glossy white cardstock with a series of dye-based Memento inks in Dandelion, Cantaloupe, Tangelo, Lady Bug, Bamboo Leaves, and Elderberry.  After letting the ink dry I stamped the Judikens Fall Leaves Maple Leaf from 1995 in VersaMark ink and heat embossed with clear embossing powder.  The final step was inking over the entire surface in Memento Expresso Truffle and then buffing the ink off the embossed areas with a paper towel.  This creates a beautiful multicolored background don’t you think?

After inking up another section of glossy white cardstock it is die cut with Sizzix Thinlits 3-D Drop-Ins Thank You sentiment.  The background is a green vellum.  A strip of grosgrain ribbon with a knot adhered under the sentiment ties the whole card together.

Please do join us over at Retro Rubber and play along with this fun challenge. 

I played along with the following challenges!


Saturday, November 4, 2017

Delightful Birthday Card


We recently had a birthday at our house!  My husband Greg is another year older.  Here is the card I created for him!


 I decided to play along with Your Next Stamp’s Sketch and Color Challenge with their delightful Perfect Chemistry stamp and die set.  (Pun intended!)

I started by stamping the light bulb image in Memento Luxe Tuxedo Black and heat embossing it with clear embossing powder.  A bit of Memento Luxe Gray Flannel colored the metallic portion of the light bulb.  His tongue is colored with Memento Dual Tip markers in Lady Bug.  Fireworks in Dandelion was perfect to color the rest of the image.  I scored a starburst pattern into a section of white cardstock then used a small paintbrush to highlight the scored lines with the same Fireworks Dandelion.

The back section is the plus sign stamped in Delicata Ruby Red.  The sentiment is also stamped in Delicata Ruby Red on a hand trimmed banner.  All three sections are edged in Delicata Sapphire Blue.  The light blue is Fireworks Summer Sky sponged onto the cardstock with an Ink Blusher. 


Wednesday, November 1, 2017

Stick It Down Double Page CHA Friends

Stick It Down has a really fun sketch for November!
Add caption
I had the great fortune to go to CHA last January and met several of my online friend In Real Life.  Seeing all the new releases for so many companies was incredible.  It was creativity on overload!


There were so many bright colors at CHA (Craft and Hobby Association) annual winter show.  When I looked through my photos of my friends I remembered a very old paper collection by Basic Grey named Lucky.  All the colors coordinate beautifully and I was able to use up a bunch of scraps to make the strips of the design.  My vendor badge made a great embellishment!