Sunday, October 28, 2018

Harvest Party

I had a little more time to craft last week and finished up this fun layout.  I had a few sheets left of a collection and wanted to use it up on a double page sketch from Let's Scrap.


I had two sheets left of the Night Light collection by My Minds Eye plus a few scraps to make the tags.  Sugar Dots and Candy Time are featured here and are a great color complement to my photos.  I used Dotted Corn and orange cardstock create the tags with my tried and true Coluzzle tag template.  The tags are topped with We R Memory Keepers grommets and fibers from my stash.  My favorite border punch for all things Halloween is the Martha Stewart Drippy Goo, here black cardstock is makes a great addition.  I had a few of the pumpkins left from another layout that are also by Martha Stewart, they looked much better with a fussy cut black cardstock backing.  Frankie Classic by Quickutz die cuts the title.  I am very pleased with the finished layout.

Entering the following challenges

Tuesday, October 23, 2018

Sending Warm Thoughts

Wow, the fall is just zipping by!  We have wonderful colors in the trees and it is time to think about harvest!  Retro Rubber's challenge for the next two weeks is just that.


I was inspired by the colors and leaves to create my fall themed card, soon to be on it's way as a birthday card to a dear friend.


I started with Kraft card stock trimmed to 4" x 5 1/4" and pressure embossed it with Darice's Leaves embossing folder.  To bring out the design I gently rubbed the top of the embossed areas with Kaleidacolor in Cappuccino Delight.  This is such a great color palette to use for the fall!  Using Hero Arts Color Layering Fall Trees (2016) I stamped the tree image in several layers.  The lightest color of the Kaleidacolor palette is used to edge the torn edges of the image and the sentiment.  The sentiment is form the same set in the darkest color from the set.  Using a sponge dauber I inked the base card, around the image, and the sentiment strip.  Searching through my fibers I found the perfect orange fiber in the exact length I needed for the final touch for this card.  The fiber is adhered with glue dots to the back of the Kraft cardstock and all the layers are adhered together using thin foam dimensional adhesive. 

Please do come and play with us at Retro Rubber.  You can use any part of the image to create your Harvest themed project or card.  We ask that you enter up to 10 challenges included Retro Rubber and use at least one stamp that is a year or more older.  Let us know how long that stamp has been in your stash too.  Thanks so much for stopping by, and have some fun with this challenge!

Monday, October 22, 2018

Welcome Fall Card for Quick Quotes

Hello to Quick Quotes lovers.  Neva here to share a card inspired by the wonderful crisp fall weather we are having here in Central Oregon.  Our altitude causes early fall frosts and the colors of the trees are amazing!  I created a quick card that could be anyone's front door this time of year.


A few sheets of cardstock and several colors of Powder Puff Chalking Ink combine together for this fun card.

  • Adventure Awaits 104 is trimmed to 4 1/4" x 5 1/2" and is pressure embossed.
  • Mocha Mama Powder Puff Chalking Ink is gently rubbed over the surface where the design is raised.  (The embossed panel before inking is shown above.)
  • The images are stamped in Milk Chocolate Powder Puff Chalking Ink on Adventure Awaits 105.
  • The images are colored with a brush tip Fanastix and a rubber tipped tool using Powder Puff Chalking Ink in Rusty Nail, Biscotti, Desert Sun, Barn Board, and Lipstick. 
  • The Fall sentiment is stamped in Barn Board Powder Puff Chalking Ink and the small banner.
  • The twig wreath is die cut from Kraft cardstock and inked with Powder Puff Chalking Ink in Milk Chocolate.
  • The embossed door is adhered to 4 1/4" x 5 1/2" card base.
  • The edges of the card base are inked with Powder Puff Chalking Ink in Mocha Mama.
  • The twig wreath is adhered to the front of the door with wet adhesive.
  • The pumpkin, leaf and foliage swag are adhered with glue dots and dimensional foam adhesive.  
  • Orange craft thread is threaded through the small yellow button and tied into a bow.
  • The banner is adhered with glue dots with the button at one end.  
 Quick Quotes Products
Adventure Awaits 104
Adventure Awaits 105
Powder Puff Chalking Ink Mocha Mama, Desert Sun, Barn Board, Lipstick, Rusty Nail, Biscotti, Milk Chocolate

Other Products
Cream and Kraft cardstock by Recollections
Door Wreath stamp, die, embossing folder set by Katelyn Lizardi by Sizzix
Brush tip Fantastix by Tsukineko

Thanks so much for joining us at Quick Quotes today!
~Neva

Thursday, October 11, 2018

Carving Pumpkins for Quick Quotes

Hello Quick Quote friends!  Neva here to share a memory from a few years back that features a few Halloween pumpkins!


There are several collections that feature orange, which I thought would be a good backdrop for my layout.
  • Two sheets of Secret Garden 104 with the orange flowered pattern is a great background.
  • Two sheets of Navigator 100 are trimmed to 7 1/2" x 9" and 7 1/2" x 12" and inked with Powder Puff Chalking Ink in Coal Miner.
  • The background is outlined with washi tape.
  • The title is die cut from black cardstock.

The two pumpkin borders are easily created using stamps and ink on Navigator 100.
  • Two sections are trimmed to 9" x 2" and 2" x 12".
  • The pumpkin images are first stamped in Powder Puff Chalking Ink in Coal Miner.
  • A brush tip applicator is used to color the pumpkins with Powder Puff Chalking Ink in Biscotti on the stems and Rusty Nail on the pumpkins.  I like how this particular stamp set let me mix and match.
  • Both sections are backed with Navigator 104 trimmed to 7" x 2 5/8" and 2 5/8" x 12". 
  • All the sections are edged in Powder Puff Chalking Ink in Coal Miner,

This saying from Farmhouse 500 is not only orange, but is also fun to use!
  • The saying is trimmed and inked with Powder Puff Chalking Ink in Coal Miner.
  • Navigator 104 backs the saying.
  • Washi tape ribbons are created by layering washi tape on both sides of white cardstock.  
  • The "ribbons" are trimmed, folded, and adhered to the back of the sentiment. 
Quick Quotes Products
Secret Garden Paper Pack coming soon
Navigator Paper Pack
Farmhouse 500
Powder Puff Chalking Ink in Coal Miner, Biscotti, and Rusty Nail (Both from the Retired Colors Set)

Other Products
Washi tape by Recollections
Black Cardstock by Darice
Trick or Treat by Joy Clair Stamps
Brush Tip Fantastix by Tsukineko
Olivia Upper and Lower Case by Echo Park

It was so much fun to relive these moments from a few years back.  Thanks for joining us here at Quick Quotes!
~Neva

Tuesday, October 9, 2018

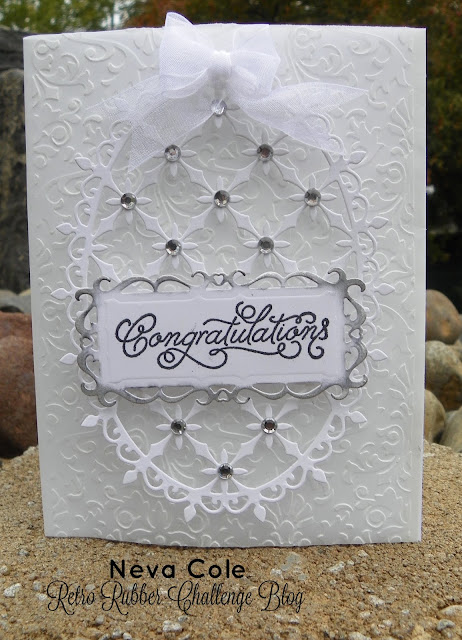
Congratulations for Retro Rubber

We have a fantastic Tic Tac Toe board for our challenge these next two weeks at Retro Rubber Challenge Blog.


I decided to use the neutrals, texture, and ribbon to inspire my card that will be given to my parents for their 60th Anniversary.


The traditional gift for a Sixtieth Anniversary is the diamond, which  determined my color choices.  I started with a section of white vellum and pressure embossed it with Damask by Darice.  The edges are folded on both sides and the right side is adhered with wet adhesive directly to the front of the card.  The left side is adhered to the back of the card.  So the embossed vellum "floats" a little above the surface of the card.  The Decorative Oval by Heartfelt Creations is die cut from white cardstock and adhered with dimensional foam adhesive at each of the little intersections.  Spellbinders Resplendent Rectangles die is used for the sentiment.  It was the perfect size for the Congratulations that is from Sincere Sentiments by SC Design a freebie from Cardmaking and Papercrafting released in February 2017.  This set has seen a great deal of use in the last few weeks!  The sentiment is stamped in Memento Tuxedo Black.  The edges of the sentiment die cut needed a little ink to help it stand out against the rest of the white card, so at first I inked it in Tuxedo Black . . . that was too dark!  So a bit of Encore Ultimate Metallic in Silver softened the look.  It is adhered with a double layer of dimensional foam adhesive.  To finish the card I topped each of the intersections with some "diamond" bling and topped the oval with a sheer ribbon double looped bow.

Please come join the fun at Retro Rubber Challenge Blog.  We ask that you use at least one stamp that is more than a year old, give it some inky love!  We also ask that you enter only up to 10 challenges including ours.  Thanks for stopping by!

Sunday, October 7, 2018

Ouch!

I've been sick with a cold recently and have been laying low and doing quiet sorts of things the last few days.  The garden doesn't need as much attention, and my craft room was calling.  I decided to play along with a challenge and scrap this layout from 2012.


My son broke a tooth during wrestling practice and it took three visits to the dentist to get it to seal.  Unfortunately several years later the tooth also needed a root canal, which was not unexpected.  I went through my stash and found these fun patterned cardstock sheets by Li'l Davis Designs from 2001.  A few scraps of blue and some olive green cardstock complete sketch.  The top blue is distressed with a emery block as the cardstock was white core, the bottom blue is distressed with Wedding White Memento Luxe ink as it was a solid core cardstock.  The vertical ribbon didn't have the right amount of punch . . . so I punched white cardstock with a Martha Steward border punch.  The title is Moxie Classic by Quickutz, and a Zig writer in Navy is used to do the brief journaling. 

Sketch~N~Scrap is the inspiration for this layout.

Thanks for stopping by!  I need to spend more time just having fun in my craft space, and this was much needed.

Monday, October 1, 2018

New Glasses for Quick Quotes

Welcome Quick Quote fans to the first day of October.  Neva here to share with you a layout about my son and his first pair of glasses.  Not always a momentous occasion but being able to see well is a good thing!  I combined papers and sayings from several collections to create this page.  I only had one sheet of Harmony 104 left in my stash so I designed the page to maximize the patterns on both sides.


  •  The background is Spring Showers 103.
  • The section across the middle of the layout is Harmony 104, it was the best color match to my son's shirt.  It is trimmed to 6" x 12", then the diagonal is trimmed down 1 1/2" on both edges.
  •  The edges are inked with Powder Puff Chalking Ink in Blue Moon.

  •  Two pieces are trimmed to 1 1/2" x 4 3/4" from Navigator 103 
  • The edges are inked with Powder Puff Chalking Ink in Rusty Nail.  
  • The photo is adhered to the diagonal strip.
  • The two pieces of Navigator are adhered behind the photo and the diagonal strip.  Looks like the entire photo is matted doesn't it?
  • The reverse side of Harmony 104 is trimmed to 2" x 6".
  • The edges are inked with Powder Puff Chalking Ink in Blue Moon.
  •  The page is laid out to determine the placing of the sections.  
  • Use a straight edge like a ruler to line up the sections to create the illusion of a 7 3/4" x 6" piece of cardstock.  
  • The diagonal section is adhered over the top.   
  • Three saying are trimmed from Farmhouse 500 and inked with Powder Puff Chalking Ink in Blue Moon.
  • Two sections are backed with Navigator 103 and inked with Powder Puff Chalking Ink in Rusty Nail.
  • The remaining saying is backed with Harmony 104 and inked with Powder Puff Chalking Ink in Blue Moon.
  • I love this saying from Farmhouse 500, which is inked Powder Puff Chalking Ink in Blue Moon.
  • It is backed with  Navigator 103 and inked with Powder Puff Chalking Ink in Rusty Nail.
  • The title is die cut from Navigator 103 and inked with Powder Puff Chalking Ink in Rusty Nail.  I used a brush tip applicator to get in the tight corners of the letters.
  • The journal block is stamped in Powder Puff Chalking Ink in Rusty Nail.  It is edged with Powder Puff Chalking Ink Blue Moon.
  • It is then backed with Harmony 104 and inked with Powder Puff Chalking Ink in Blue Moon.
My son enjoys looking at his layouts and declared this one to be fantastic!  I enjoy documenting times like these and little moments in life, don't you?

Quick Quotes Products
Harmony 104
Spring Showers Paper Pack
Navigator Paper Pack
Farmhouse 500
Powder Puff Chalking Ink Retired Colors Set Rusty Nail and Blue Moon

Other Products
Honey and Honeybee by Quickutz
Journaling Blocks by Scrappy Cat
Fantastix Brush Point by Tsukineko
Denim Writer by Zig

Thanks so much for stopping by here at the Quick Quotes Blog. 
~Neva


Stick It Down Double Page Halloween Version

We have a fantastic sketch for you this month at Stick It Down.   Check out what the design team did with this fun sketch and notice that we are collaborating with the White with One challenge, which features Grey as the plus one color.


You will notice that I mirrored the sketch and replaced the two smaller photos with one 4" x 6" photo.  This fit the sequence of my photos much better!


As the White + One challenges suggests 70% white, I did choose to use white as my background.  Two different designs of Grey patterned paper, Core'dinations Grey plaid and Darice Grey Small Dot, complete the main elements of the sketch.  The photos are actually trimmed to 3 3/4" x 5 3/4" so that one sheet of Bazzill Ash was used to back the phots.  The scrap of Bazzill Ash is die cut with Quickutz Abigail to create the title.  This font is great when you are short on space but still want to make large title.  The bats are die cut from black cardstock with Echo Park's Going Batty die.  The eyes are colored in with a white Gelly Roll pen.  The spider web washi tape is from Paper Studio and was a killer deal over at Hobby Lobby last month.  (A box with 50 different washi tapes that cover the four seasons of the year on clearance for $7.50!)  To add the last element of the sketch I stamped spider webs in Memento Tuxedo Black.  The stamp comes from a really old Halloween set by Heidi Grace Designs.  A fairly clean and simple design that came together quickly!

Please do stop by and check out the double page, single page, and card sketches for this month over at Stick It Down.  Lots of fun to be had!  Play along with White With One as well.

Thanks for stopping by and taking a peak!