Monday, December 24, 2018

Christmas Greetings for Quick Quotes

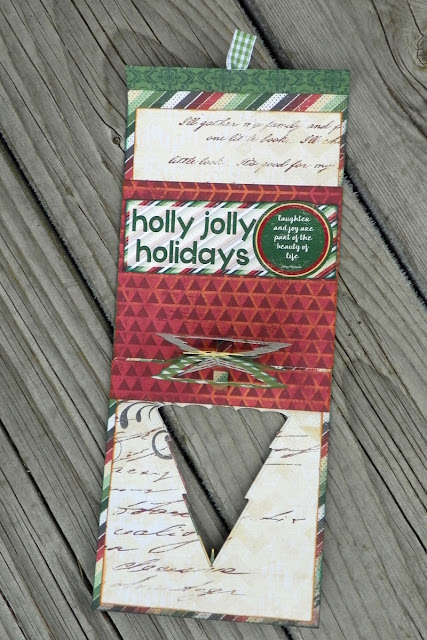
Merry Christmas Eve to one and all!  Neva here to share some Christmas cheer and a few cards I enjoyed creating to give to family and friends for this holiday season.  All of the cards feature Holly Jolly Holiday collection.  My first card is an interactive pop-up card inspired by one of my favorite Three Dimensional artists, Karen Burniston.


I used several different papers to create my version of the card.  Karen has a great how-to video that will help assemble the card.  I used just the die set that creates the pop-up tree, and trimmed the accent papers with my trimmer.  All the dark papers are inked with Evergreen Powder Puff Chalking Ink and the light papers with Kokomo Powder Puff Chalking Ink.  The key dimensions are as follows:


  • The base of the card uses 103 trimmed to 4 1/4 x 11".  It is scored at 4 3/4", 9 3/4", and 10 1/2". 
  • The front panel is 100 trimmed to 4" x 4 1/2".  (I had originally chosen a different paper, but didn't like the lack of contrast, so revised my decision.) 
  • The inside top and bottoms panels are 104 trimmed to 4" x 4" and 1 3/4" x 4".
  • The pop-up mechanism panel is originally 4 1/4" x 4 1/2", with the bottom 3/4" trimmed and re-assembled with the removable tape to create the center fold.

All of the tree parts were die cut from various papers in the collection.
  • The frames are one side of 105, and the center floating trees are the reverse side.
  • The slotted center tree is 103.
  • The decorations are die cut from 102.
  • The tree topping star is die cut from 100.
For accents I used the following:
  • A saying from Holly Jolly Holidays 600 Quotes and Phrases is trimmed to the inside frame to fit into the card.
  • A small piece of green gingham ribbon serves the small tab to open the top opening card.
  • I do suggest the magnets linked under Karen's video as the ones I found locally did not hold the card together through the paper layers.
 I made a few more cards using Holly Jolly Holiday 500 and 600 Quotes and Phrases along with the scraps and bits left on my craft table from my Christmas related layouts featured earlier in the month.  All of the cards can be created from the Club Q Altered Kit with a few additions from your stash.


  • I had many strips of paper in widths between 3/8" and 1/2".  I laid the strips diagonally across the card base. and trimmed the excess from around the edges.  
  • The entire card front is inked in Evergreen Powder Puff Chalking Ink.
  • A saying from 600 is matted with 103 and layered over the top.

  •  A greeting from 500 is trimmed and inked.
  • Small strips of 100 are placed behind the saying.
  • The panel is matted with 104.
  • Brads are placed in each of the four corners to anchor the card together before adhering to a card base.

  • A greeting from 500 is trimmed and inked.  
  • It is matted with 104.
  • Strips left-over from the "Lefse" layout is placed behind the saying and adhered to the card base.
  • A small raffia bow is adhered to the top.  

  • I really liked the rustic look of this saying so a small jute bow and jute cord decorate the front of the greeting from 500.
  • Burlap ribbon is placed behind the greeting.
  • The panel is backed with 101 and adhered to a card base.  

  • The Noel greeting is trimmed and inked.
  • A small angel is die cut from vellum and cream card stock and adhered to the front of the card.
  • The panel is backed with 101 and adhered to the card base.
  • Small gems from the December Club Q kit are adhered randomly to the card front.
Quick Quotes Products
December Club Q Altered Kit
OR
Holly Jolly Holiday Paper Pack 
Holly Jolly Holiday 500 12" x 12" Quotes and Phrases
Holly Jolly Holiday 600 Quotes and Phrases
Powder Puff Chalking Ink in Kokomo and Evergreen

Other Products
Christmas Trees Pop Stand by Karen Burniston in cahoots with Riley and Company
Jute cord by Darice
Burlap Ribbon from my stash
Angel die by Quickutz
Vellum
Cream Cardstock
Raffia from my stash

My cards are in the mail to bring holiday cheer to my loved ones.  If you are sending greeting late (yes some of us do that!) or if you are planning ahead for the holiday season of 2019 I hope you are inspired to make a few quick cards!  

Thursday, December 13, 2018

Quick Quotes Club Q Christmas Version

Happy Holidays friends of Quick Quotes from Neva!  Have you seen the beautiful Club Q layouts this month?  I enjoyed using both kits to create layouts to commemorate last year's Christmas memories.  My first layout used one kit as designed with a few tweaks.


The design of the background paper is hard to cover up because it is so pretty!  I had very few photos of Christmas Eve and Christmas Day for 2017 so this layout was perfect.  My photos were landscape rather than portrait orientation thus a few changes were made to accommodate the direction of my photos.


  • The left side uses the laser cut mat from the design for the right side trimmed to 4 1/2" x 6 1/2".  My photo was on the darkish side so the B-side white background created a more balanced color scheme.  The edges are inked in Kokomo Powder Puff Chalking Ink.
  • The green mat is from the original right side as well and is trimmed to 4 3/4" x 6 3/4".
  • All the green mats are inked in Evergreen Powder Puff Chalking Ink for the entire layout.
  • The frames, pennant, and red mats are inked in Kokomo Powder Puff Chalking Ink.
  • The journaling is done Holly Jolly Holidays 100 before being mounted behind the frame and matted with the coordinating laser cut. 

  • The larger mats for the two landscape photos are trimmed from the papers in the small altered kit.
  • The red mat is 6 1/2" x 8 1/4.  The green mat is 6 3/4" x 8 1/2".   
  • The sentiment is trimmed from Holly Jolly Holidays 600 Phrases and Sayings then inked in Evergreen Powder Puff Chalking Ink.  
  • I borrowed the tree from the small altered kit as well, as it balanced the embellishments on the ride side of the photo mat.
Next up is another layout that documents my love of decorating for the Christmas holidays.  I have a few Nativities to display as well as several Christmas Trees from large to small!  I hope you enjoy the small tour through my Christmas Decor!


This layout is significantly different from the design, however the background paper is a great foundation for both layouts.  The papers supplied in the kit were easily altered to fit the design for my layout.  

  • All of the dark red mats and accents came from the sheet of laser cut shapes and are inked in Kokomo Powder Puff Chalking Ink.
  • The borders on the looped accents are also from this sheet trimmed to 3/8" x 11 3/8".  
  • Shhhh, a little secret here, the red mat is actually two of the punched mats butted up together to create on mat behind the Nativities.  You can't even tell can you?
  • To go behind the red mat, Holly Jolly Holidays 103 is trimmed to 5" x 12" for the left side.
  • The focal photo is framed with both sides of 101 trimmed to 4 1/2" x 6 1/2", and 4 3/4" x 6 3/4".
  • All green accents are inked in Evergreen Powder Puff Chalking Ink.
  • All the other accents are inked in Kokomo Powder Puff Chalking Ink. 
  • On my second try I die cut the title from 101.  My first choice didn't show up as well as this version!
  • I wanted a few more snowflakes to add as embellishments, so I die cut them from the scraps from the laser cut snowflakes and border edges. 
  •  
  •  The mats for the photos of my collections are trimmed from 101 and 5 3/4" x 8 and 6 1/4" x 8 1/2".
  • The red mat is the laser cut mat.
  • To go behind the red mat, Holly Jolly Holidays 103 is trimmed to 4" x 12" for the right side
  • The journaling is printed on Holly Jolly Holidays 100 and is inked in Kokomo Powder Puff Chalking Ink.
  • The numbers are punched from 1Holly Jolly Holidays 100 as well. 

Quick Quotes Products
Ultimate Combo Club Q Kit 
Powder Puff Chalking Ink-- Kokomo and Evergreen

Other Products
Sonja and Olivia fonts by Quickutz
Create A Flake One and Create A Flake Three by Spellbinders.

The lovely colors of the Holly Jolly Holiday papers matched my Christmas photos so well.  Christmas is my favorite time of the year and documenting our memories brings me joy!  Thanks for the opportunity to share this joy!  ~Neva

Saturday, December 8, 2018

Quick Quotes featuring Holly Jolly Holidays

It is December, Quick Quote friends and time to share a holiday themed layout featuring a tasty Norwegian treat, Lefsa.  Neva here to document our family tradition of making lefsa.


Several papers from the Holly Jolly collection worked fantastically to showcase our baking adventures.
  • The background is side B of Holly Jolly 103.
  • The side dots are side A of Holly Jolly 103.  The left side is trimmed to 3" and the right side is trimmed to 1 1/2". 
  • Holly Jolly 105 is used along the side and is trimmed to 3/4".  All the vertical sections are inked with Powder Puff Chalking Ink in Barn Board.  
  • The side sections are adhered together then adhered to the layout.
  • The vertical paper is Holly Jolly 101.  Four sections are trimmed to 1 3/4" and 4 sections are trimmed to 1".
  • The bottom uses the stripes over the green pattern, then it is reversed for the top sections.  All edges are inked in Powder Puff Chalking Ink in Evergreen before adhering together.
  • The title is die cut from Holly Jolly 105.
  • Since this was a longish story to journal, I printed it up on a section of Holly Jolly 100 then inked the edges in Powder Puff Chalking Ink in Evergreen.


  • I selected the Good Cheer section from Holly Jolly 500 and trimmed it down to just the banner.  
  • The edges are inked in Powder Puff Chalking Ink in Barn Board. 
  • Two green brads are used to accent the corners before attaching to the layout with dimensional foam adhesive.
  • The "HOME" was trimmed down to just the sweet little house.
  • The edges are inked in Powder Puff Chalking Ink in Evergreen. 
  • The home is adhered with dimensional foam adhesive.
  • The close-ups show the slightly distressed design of the papers, which is just lovely!
I think the festive colors of the Holly Jolly collection is great for all of your fun holiday themed layouts this time of year.  The card fronts from 500 can also be used in different ways as shown above.  Have a little fun and create a layout about a family tradition too!

Quick Quotes Products
Holly Jolly Paper Pack
Holly Jolly 500
Powder Puff Chalking Ink--Barn Board and Evergreen

Other Products
Green brads

Thank you so much for stopping by, and enjoy the preparations for your holiday season!  ~Neva

Tuesday, December 4, 2018

Retro Rubber Holidays Challenge

December already, can you believe it?  This is the last challenge of the 2018 for Retro Rubber Challenge Blog.  We are also announcing our winners from a fun blog hop with prizes from our Celebration Challenge 100 last go around.  The winner of my retro goody is Denise Bryant!  Congrats!  As soon as we connect some crafty goodness will be on your way!  Now for the challenge:


My card is inspired by the snow, the hat on the snowman, and the wood accents.  It's not exactly a Christmas card, but we have a niece with a December birthday, so still a holiday!


My images are from the Winter Warmers set that came with a magazine from late 2017.  I love the little stitched bear and his cute sweater and hat.  All the images were stamped in Delicata Shimmer Black and heat embossed with Iridescent Embossing Powder.  I did a little water coloring with Fireworks! sprays in Angel Pink London Fog, Lady Bug, and Cottage Ivy.  There haven't been any sun shiny days since I have made the card, so you can't see any of the pretty shimmer!  The bear and his accents were all fussy cut before adhering them together with dimensional foam adhesive.  The sentiment has a few splatters of Fireworks! in Lady Bug and Cottage Ivy, and the edge is inked with Delicata Ruby Red.  The background is pressure embossed with Darice's Snowflake background then edged with Delicata Emerald Green.  I decided the card needed a bit more to add in the wood accents so I added Entwined Circles die cuts by Elizabeth Craft Design.  A few gems finished off the card.  I think he is pretty sweet!

Do come play along with us for our last challenge of the year.  Don't worry, we will be back in January, but everyone needs a break around the holidays!  We have a few simple rules at Retro Rubber.  You must use at least one stamp that is older than a year and let us know how old it is, and to enter up to ten challenges including ours.  Thanks and enjoy the holiday season!


Monday, December 3, 2018

Christmas for Stick It Down Double Page Team

It is almost hard to believe that it is already December and time for one last sketch for the year at Stick It Down!  This one is great for a Christmas layout with the bow in the design, and I took full advantage!


Here is my version using bells instead of holly. Once I decided how to make the bow the layout went together very quickly.


Like many scrapbookers I have a huge stash that goes back years . . . this is collection is from My Minds Eye called "I believe" from 2010.  I used Wreaths and the b side of Candy Cane Stripes.  My first bow idea didn't match the size I wanted, so I tried layering several bows from the Bow-tied Sizzlets Decorative Strip for Tim Holtz.  Using two each of the two larger bows I got the look I wanted to achieve.  Then I used the smaller bows to attach the bells.  The bells are stamped from the Altenew Bells and Bows stamp and die set.  Memento Pistachio, Olive Grove, and Northern Pine inks were colors that matched perfectly.  The title is Spellbinders Etched Alphabet backed by vellum that was inked with Brilliance Pearlescent Poppy.

Using the sketch exactly as it was designed makes for a wonderful Christmas layout.  Thanks so much for stopping by and come join the fun at Stick It Down with your own layout inspired by this sketch!