Saturday, March 31, 2018

John is 15 layout


Just to be clear, I did ask my son if it was okay to scrap these photos with purple and aqua!  I had this great patterned paper from DCWV from early 2000’s and it was perfect for the Studio Challenge for March!


I started with DCWV cardstock topped with “Happy Birthday Cream Green” patterned paper.  A few sheets coordinated well from the Provo Craft Slab II.  I tried my hand at melting Pony Beads to create the enamel dots, but next time I will try the paper + UTEE.  Studio Calico wood verneer hearts and arrow are inked with Brilliance Pearlescent Sky Blue.  The title is also stamped in this ink using Autumn Leaves Cutsie Alpha.  Fireworks Grape Jelly and Bahama Blue (aqua colour) add interest to the background and fulfilled the mists in the recipe.  The stamped stitches are Technique Tuesday’s Hanging by a Thread and stamped in Memento Grape Jelly.  I journaled in Zig Pure Violet.  I found a great match for the layout in my ribbon stash.  The only item I didn’t use was flowers in the recipe . . . and that is one thing my son probably is glad I left off!

I would like to enter into the Studio Recipe Challenge for March.  Thanks for the lovely inspiration!


Friday, March 30, 2018

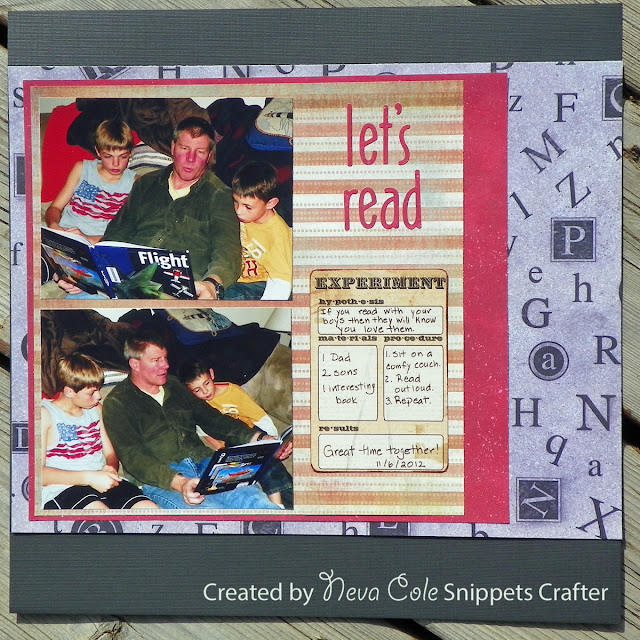
Let's Read layout


While scrolling through my years of photos I want to scrap I came across these precious shots of my husband reading to our sons.  A great moment to scrap!  I was inspired by the Sketch~N~Scrap March 15th sketch. 


Once I selected the papers these two layouts (one for each son's scrapbook) came together really quickly!  Some very old Provo Craft Slabs from the late 90’s came in handy, Slab II and Slab V.  My Mind’s Eye Daily Dose “Experiment” journal card matched perfectly, and VersaFine Crimson Red edges the card to add a bit more depth.  Everything is mounted on DCWV cardstock.  The title is Quickutz Santa’s Workshop. 

Thanks for stopping by!  I would like to enter the challenge at Sketch~N~Scrap.

Thursday, March 29, 2018

14th Birthday Layout


Yes, another birthday for my son . . . I’m a bit behind and am currently on a birthday scrapbooking roll!  This layout is inspired by the sketch over at Scrap the Boys.  It has been fun to see his growth over the years, and these photos show a true 14 year-old!


Cosmo Cricket’s Halfway CafĂ© Flagstaff is a great base for this layout.  I trimmed the tag from behind the star to incorporate the b-side of the paper.  The star and bottom section are Core-dinations Kraft Core cardstock.  The sanding brings out the Kraft nicely don’t you agree?  The bottom strip is pressure embossed with Darice Assorted Stars embossing folder that is 12” x 2 ¼”.  The tag hole cover is die cut from the Kraft side scrap and a Quickutz die.  The stars are red cardstock die cut with Spellbinders stars which is a staple for scrapbooking for boys!  Searching through my stash I found Idea-ology’s Grunge Board Harlequin Digits and Punctuation, just perfect!  To cover the gray grunge board I experimented a bit to get the color just right . . . .  Versa Magic Cloud White, Wheat, and Sahara Sand created the color match.  Memnto Luxe in Rhubarb Stalk and Northern Pine are used to edge a few elements as well.  The bit of thread is We R Memory Keepers Sew Easy from the red collection.  The tiny folder tab is Quickutz and Zig pen in red.  Raffia from my stash adds the circle element of the sketch, and wahoo another layout finished!

I would like to enter the following Challenge:

Wednesday, March 28, 2018

Drive layout featuring Powder Puff Chalking Inks


Neva here to share a layout that uses part of the March Club Q kit as well as features Powder Puff Chalking inks to create a boy-centric layout.  The base layer, frames, journal tag, button, and banner from the kit worked perfectly!


The strips are from Spring Showers 103, which were left-over from layouts I made earlier this month. 


To make the tire track embellishments:
o   Four 4 ¼” x 5 ½” sections of gray cardstock are trimmed 
o   I gently rubbed Deep Sea across the raised tire track surface of the embossing folder, then pressure embossed each one. 
o   Each set is trimmed with scissors and an Exacto Knife in between the tracks. 
o   After the placement of photos was determined I selectively trimmed the tracks to make a complete pattern across the bottom of the layout.

The left side features two photos that showcase the event and the journaling tag.  A small bit of raffia is threaded through the button before it is adhered to the layout.


The right side features the title stamped in Deep Sea on the banner.  Rather clever of me to come up with a spot-on title with five letters, don’t you think?  Brads from the kit anchor the banner to the layout so it doesn’t seem to float off the page. 
  
My husband really liked the simplicity of this layout as it allowed the photos about the event to really shine.  Watching your children enjoy life is always a pleasure!  Thanks for stopping by, Neva

Quick Quotes Products:
Spring Showers 103 Coming Soon
March Club Q Ultimate Kit
Powder Puff Chalking Inks:  Deep Sea

Other Products:
Tire Track embossing folder by Darice
Farmhouse Capitals Large by Technique Tuesday
White cardstock from my stash
Gray cardstock from my stash
Raffia from my stash

Tuesday, March 27, 2018

Happy 17th Birthday


You will notice that I am back in the scrapbooking mode!  AND I am having some fun too!  I’ve decided to play along with the Stuck?! sketch for March for this layout.  I don’t always get a ton of photos for birthdays as the kids get older, this is my son’s 17th birthday.  Yes, he has candles on his pie as he prefers Apple Pie over cake, homemade of course!


I started with Fancy Pants Designs Carefree and Easy Going cardstock from 2013.  (Yeah using my stash!)  The notebook page is cream cardstock punched with an EK Success punch and stamped with Illustrated Faith’s date stamp in Brilliance Coffee Bean ink.  The background numbers are created with a Hero Arts Plan stencil and Brilliance ink as well.  The title is Quickutz Khaki Mini with the background fussy cut from cream cardstock, thought it balanced the color better and helped it stand out more.  A bit of red cardstock and cork by DCWV are die cut with the Spellbinders Stars dies.  Peeking out from behind the banner is a bit of burlap to complete the sketch elements.  I did add a few extra stars to (ahem) cover a few ink blunders. 

I would like to enter the following challenge:

Hedgehugs for Anything Goes at Retro Rubber


Welcome to the ever popular Anything Goes challenge for our Retro Rubber Challenge for the next two weeks.  Remember that we ask you use a stamp that has been hanging out in your stash for at least a year, and tell us how long you have had the stamp.  We also request that you enter up to 10 challenges including Retro Rubber.

  
This is the card I made for my husband for our last anniversary.  Pretty sweet!


I had always wanted to try colored pencils on Kraft cardstock, and I like the results!  I stamped the Lawn Fawn Hedgehugs from 2014 on Kraft cardstock in memento Tuxedo Black and then used my Prisma colored pencils to add detail to cute little hedgehogs.  I was pleasantly surprised that the white added great dimension.   The coordinating die cut the critters out perfectly.  Next I die cut white cardstock with Elizabeth Craft Designs Stitched Rectangles and added a bit of ribbon from my stash.  The sentiment is from CAS-ual Fridays Heartbeat set (2012) and is stamped in Brilliance Pearlescent Poppy.  I adhered the hedgehogs with dimensional foam adhesive and then added a few tiny stamped hearts from the Hedgehugs set in Pearlescent Poppy. 

Do stop by the Retro Rubber Challenge blog and see the lovely creations by the design team and enter in your own Anything Goes project.  We would love to see what you create!

Monday, March 19, 2018

March Club Q creates multiple Layouts


Hello Club Q fans, I can totally see why you would fall in love with March’s Club Q.  Neva here today to share with you how I stretched the contents of the March Ultimate Combo kit into seven layouts!  When I opened my kit, I was delighted that it featured the new Spring Showers, as the coordinating side not shown in the Club offering is all these lovely floral motifs.  Along with the more masculine diamond pattern, I planned to make coordinating Mother and Father Day layouts.

First up is the layout that will go in my album for Mother’s Day.


o   The centers of the blue sheet and floral sheet have been trimmed to be used as the center mat.  With the double mat layout, it is all hidden! 
o   Smaller accent photos are matted with the center of the die cut circles as well as circle die cuts from additional paper in the kit.
o   The title is stamped in Capri Blue on vellum timmed to the banner shape, and heat embossed with iridescent embossing powder.   
o   Capri Blue and Island Orange are used to ink the layers. 
o   The flowers are shaped slightly before adhering to the layout.
o   The vellum adhered with glue behind the stamped area and the right edge under the circle. 
o   All the photos are journaled on the frame edges. 

A close up of a floral arrangement:

Next I created layouts that will go into my boys’ albums.  As you can see, even though they feature different Spring Showers papers they coordinate beautifully.  The design and colors are similar, a great feature of scrapping with a kit!
 
o   Again, the centers are trimmed and used in the layouts.
o   The Mother’s Day photos are journaled on the frames.
o   The Father’s Day photos are matted and have small journaling strips.


 A close up of the title for the one page Mother’s Day layout:


o   A shaped frame from the kit is trimmed into two sections.
o   The sentiment is stamped in Capri Blue on vellum and is placed over the center tag. 
o   The shaped frame is adhered over the top.
o   The fabric flower base is formed over a large glue dot with die cut flowers added to the center.  (The fabric was cut into two sections, one for each layout.)
o   A die cut butterfly is inked in Capri Blue and Island Orange. 
o   I think these two elements hide the “unfinished look” of the top edge of the title and add a nice balance to the layout.

 A close up of the floral arrangement:


The Father’s Day title is less involved and decidedly more masculine!


o   The sentiment is stamped in Capri Blue.
o   Raffia is wrapped around the top of the banner. 
o   Thin sections of raffia are threaded through the button and it is adhered over onto the banner.

Yes, I did scrap three identical layouts for Father's Day, one for my album and one for each of the boys' albums.   With careful trimming I was able to use the two layout kits and the mini album kit to have enough matching papers! 


Here are the two single page Mother's Day layouts I created for my boys' albums.  They may not appreciate girly layouts in their scrapbooks right now . . . but I know they will appreciate having these photos in years to come


I have one more layout that I will share in a future post, to finish off the Ultimate Combo kit.  This is what I have left over . . . perhaps a card or two?  It is fun to finish off a kit, and know that you really spent your money well!


My favorite part of the March Ultimate kit was the altered Canvas.  I  used the photo from our photo Christmas card greeting sent out for 2017 and the colors for the canvas were perfect!


I swiped the large blue paper for the layouts above, but center section trimmed from behind is large enough to make the canvas.  The photo mats were adjusted to fit the photo I choose for the canvas.  I also used up the rest of the pearl embellishments to add a little extra bling.  This is now proudly hanging in my home!

By mix and matching from all four kits I was able to create duplicate layouts in record time.  Thanks for stopping by today and see what you can create from the B side of the Club Q kits!

Quick Quote Supplies:

Club Q Ultimate Kit
Powder Puff Chalking Ink:  Capri Blue, Island Orange , Deep Sea, Cactus

Other Supplies:
Vellum by Glama Natural
Hello Sentiments by Joy Clair
Date Stamp by Illustrated Faith
Celebration Sentiments by Hero Arts
Happy Birthday by Ms. Sparkle & Co.
Chili Pepper and Ocean pens by Zig
Standard Circle Large by Spellbinders 
Raffia from my stash
F is for Family, Home is stamp sets by Technique Tuesday