Friday, November 30, 2018

Coffee Lovers Blog Hop with Quick Quotes

It is so much fun to be a part of blog hop, and here we are with another Quick Quotes Coffee Lovers Blog hop in kahoots with others!


Neva here to show case the awesome Autumn Brilliance paper collection.  I recently completed a layout with this collection and used the scraps to create this fun flip card.  Each section is die cut out of the coordinating patterns and inked with Mocha Mama Powder Puff Chalking Ink.  The images are a VERY old Stamping Up set dated 1999 that I found in a thrift store!  I believe the set is named "What's Brewin'?"  The images are stamped in Rusty Nail Powder Puff Chalking Ink.


Here is the inside view.  The hemp cord is adhered to the patterned cardstock before it is adhered to the base card.  What a quick cut card!  

Thanks for stopping by!  ~Neva

Quick Quotes Products
Powder Puff Chalking Ink--Mocha Mama and Rusty Nail

Other Products
Framelits Flip-Its Circle 66022 by Stephanie Barnard by Sizzix
Stitched Circles by Elizabeth Craft Designs
What's Brewin'? stamp set by Stamping Up 
Hemp Cord by Darice
 

Wednesday, November 21, 2018

Happy Thanksgiving card for Quick Quotes

Hello friends of Quick Quotes, Neva here to share a three-dimensional Thanksgiving card.  I used the lovely Autumn Brilliance collection to create this festive fall card.


This card folds flat for mailing, and stands up and holds it shape by clever tabs and slits in the design of the card.


  • I started with Autumn Brilliance 102 and 105 for the base sections of the card.  Using a template I traced and cut out the sections.  
  • The sections are inked in Powder Puff Chalking Ink in Milk Chocolate.  (Which, by the way, will hide the small imperfections of hand cutting a card panel, yeah!)
  • Autumn Brilliance 100 is used to create the front panels on each section of the card.  I used parts of the design that would highlight the leaves and show the fun zig zag pattern.
  • The edges are inked in Powder Puff Chalking Ink in Kokomo.
  • Using a stamp positioner, the sentiments are stamped on the sections before assembly.  This allowed me to stamp multiple layers of ink to create nice dark impressions without smudging.


  • Three sets of the leaves are die cut from 100 and 102.
  • Using ink daubers each type of leaf was inked in a variety of Powder Puff Chalking Ink Colors.  I used Barn Board, Desert Sun, Banana Bliss, Biscotti, Rusty Nail, Milk Chocolate, and Kokomo to create fall colored foliage. 
  • The card is assembled using strong adhesive and glue dots to hold the leaves in place.  The leaves will stand out a bit from the card when it is in the displayed "bendi" position.  
This card was so much fun to assemble from the wonderful Autumn Brilliance collection.  I think it is a fabulous autumn card to celebrate Thanksgiving!

Quick Quotes Products
Autumn Brilliance Paper Pack 100, 102, 105 
Powder Puff Chalking Ink--Milk Chocolate, KokomoBarn Board, Desert Sun, Banana Bliss, Biscotti, Rusty Nail.

Other Products
Bendi Card Template by Hot Off the Press
. . . today, I am thankful by Unity Stamp Company
Four Seasons die by Spellbinders

Thanks so much for stopping by and do enjoy your time with family and friends during this Thanksgiving holiday!  ~Neva

Tuesday, November 20, 2018

Celebration Time at Retro Rubber!


Welcome to the first ever blog hop for the Retro Rubber Challenge!  We are changing things up a bit to celebrate our 100th challenge!

Here’s the scoop…play along with our celebration themed tic tac toe challenge!

Then hop around to all of the design team blogs and leave a comment!  Each team member is offering up some surprise retro (new but older than a year) goodies to one lucky person who leaves a comment on their blog.  That means there will be seven winners!
As always, we will be listing the five top picks with the winning pick receiving a prize for this challenge only.

*You do not have to enter the challenge to win but you must leave a comment on the design team blogs in order to have a chance to win!

Ok . . .here we go:


Help us celebrate 100 challenges!!


I had a blast creating my card, one that used the diagonal "glitter or sparkle, confetti, and metallics".  I started with a very old confetti image from 1997 by Distinctive Impressions.  I stamped using the four cube set of Delicata that included Golden Glitz, Silvery Shimmer, Bronze Burst, and Celestial Copper.  To add a bit more sparkle I used iridescent clear embossing powder to heat emboss the images.  The edges are inked in Delicata Black Shimmer to add a bit of definition and tie the elements together.  The tag is Sheet Metal by Imagine, and the sentiment is stamped in StazOn Jet Black.  The StazOn is is also used to edge around the perimeter of the tag.  I found a really neat bit of mesh ribbon to attach the tag to the front of the card.  After searching through my stash I found a sheet of silver glitter card stock to back the confetti stamped panel.  The photo shows a tiny bit of the fun shimmer of this celebratory card.

Do play along with us at Retro Rubber, and make sure to comment by November 30th to win a great little prize from each of our blogs.  I would also appreciate new followers either via email or by the button on the left.  Remember to enter the challenge with a stamp that is at least one year or older and tell us how old it might be and to enter up to ten challenges including ours!  Have some fun hopping around all the design teams blogs.  Next up is:


Or you can find the entire list up above.  Thanks for stopping by!  

Monday, November 19, 2018

In my Prayers

The father of a dear friend of mine passed away last week.  He lived a wonderful 104 years!  It is time to support my friend through the journey of grief, and a sympathy card is just the beginning!


With a little inspiration from Sketch Saturday I created her card last night.  I was glad to have the Encouraging Words stamp set from Stampendous with is simple and elegant sentiments and leaves designs in my stash.  I stamped the leaf stems and the sentiment in memento Luxe Rich Cocoa and heat embossed the images with clear embossing powder.  A second set of leaves were stamped then water colored with VersaFine Habanero and Ink Potion No. 9.  The leaves are then fussy cut.  The Stitched Ovals die from Elizabeth Craft Designs was used to die cut the oval shape.  The leaves are adhered with glue dots and dimensional foam adhesive to add a bit of dimension.  A very old sheet of Double Mates in coffee brown is used to create the panel and the backing.  The light side is trimmed and stamped with additional sentiments in VersaFine Habanero.  The dark side is pressure embossed with Basket Weave background by Darice.  A section of ribbon from my stash completes the sketch.


The interior of the card features another sentiment and a few more leaves from the set.  I am very pleased with the final card, it is elegant and fall like.

I would like to enter this card in the following challenges:
Sketch Saturday #540

Addicted to Stamps #168 AG with the option of ribbon

Monday, November 12, 2018

Giving Thanks for Quick Quotes

Blessings to all of you who follow us here on the Quick Quotes blog.  Neva here to share with you a layout using the beautiful new papers of Autumn Brilliance and the BRAND NEW digital downloads now available at Quick Quotes.  The colors are simply gorgeous for your fall and Thanksgiving layouts, even my husband agreed when he proofed my pages.


  • The gray background is the reverse side of Autumn Brilliance 102.  This is a great base color for the many hues found in the photos.
  • The off-set center is the patterned side of 102.  It is trimmed and then inked with Powder Puff Chalking Ink in Rusty Nail.
  • Autumn Brilliance 105 is trimmed to 2 1/2" x 12" and 1" x 12" and inked Powder Puff Chalking Ink in Rusty Nail.
  • Two sections each of Autumn Brilliance 101 are trimmed to 1/2" x 12" and 3/4" x 12".  The lighter narrow section is inked with Powder Puff Chalking Ink in Rusty Nail.  The red side is inked with Powder Puff Chalking Ink in Cool Gray.
  • The corners of the photos are rounded then they are inked with Powder Puff Chalking Ink in Cool Gray.
  • The journaling block is printed on cream cardstock and is inked with Powder Puff Chalking Ink in Rusty Nail.
  • You many notice that the two 4" x 6" photos span the divide between the left and right sides of the layout.  I wanted to have a sequence to the photos that matched the day and meal, fortunately both photos could be trimmed without going through an important part of the photo like someone's face!
  • A little selective trimming behind the mat on the right side of the layout provided the gray portion of 102 to die cut letters for the title.  I didn't want to cut into another sheet of this really pretty paper!
  • The red side of 101 is used to die cut the shadow for the title.  
  • One design principle is to consider in creating layouts is the the Gallon, Quart, and Ounce analogy.  In this layout the gallon is grey, the quart is the sandy yellow and the ounce is the red.  
  • I was also thinking about the principle of using colors in a visual triangle for placement of the "ounce" of red in the shadow of the title and the shadow in the vertical strips of cardstock.  Thankfully the colors of Quick Quote collections give you ample options within one line to use these design ideas.
 

Part of the exciting news of new products is the digital collections now available at Quick Quotes to use in digital scrapbooking OR to print.
  • I selected three png files from the Heritage digital collection and imported them into a word document.  It was as simple as drag and drop!  Heritage_12.png, Heritage_14.png, and Heritage_53.png
  • The png files are resized to 1.33" x 2" as shown.  
  • I printed two of each as I was creating a duplicate layouts for my sons.
  • The document was printed on cream cardstock.
  • To barely round the corners I used a very old decorative corner scissor to nip the corners.
  • Each sentiment is inked in Powder Puff Chalking Ink in Rusty Nail.
  • Wooden shapes were inked by placing them directly on the ink pad.  Fine tip tweezers come in handy to handle the shapes and to keep from getting inky fingers.
  • The hearts were inked with Powder Puff Chalking Ink in Rusty Nail.
  • The arrows were inked with Powder Puff Chalking Ink in Cool Gray.
  • Let the shapes dry for an ample amount of time to avoid finger prints and smudges on your papers.
  • The wood shapes are adhered with glue dots.
  • The sentient is adhered to obscure some bright distracting lights in the photo.

  •  Both the sentiment and shapes anchor the design together.
  • The three sentiments are also in a visual triangle to guide your eye through the layout.
Autumn Brilliance Paper Pack
Heritage Quotes Digital Collection
Powder Puff Chalking Ink--Rusty Nail and Cool Gray

Other Products
Frankie Classic and Shadow, Frankie Mini by Quickutz
Wood hearts and arrows by Studio Calico
Scallop Square Custom Cutting System by Creative Memories
Decorative corner scissors by Fiskars
Corner Rounder by Creative Memories

Thanks so much for stopping by today!  I hope you go check out the new offerings at Quick Quotes as they are amazing for your fall layouts!   Enjoy! ~Neva

Tuesday, November 6, 2018

Foundry Birthday for Retro Rubber

It is time for a new challenge over at Retro Rubber, and this one is everyone's favorite, Anything Goes!


I needed to make a birthday card for my husband a few weeks back and went with a grunge theme courtesy of Tim Holtz products.


To start I pressure embossed a piece of metallic copper cardstock with the Foundry 3-D Texture Fade by Tim Holtz and Sizzix.  I used a Versa Mark Ink and Verdigris embossing powder both by Tsukineko to grunge it up a bit.  Verdigris is perfect on a copper color is that is the natural patina copper gets when it is oxidized.  (A little Chemistry tidbit here!)  The sentiment is by Hero Arts from 2013 "It's Your Day".  The sentiment is stamped on black cardstock and heat embossed with the Verdigris EP.  The edges are inked with Celestial Copper Delicata ink.  A Remnant Rubs Elements is used to decorate a Fragment.  It is attached with a bit of gold cord looped through the hole and knotted.  The glue dot is behind the knot.  The gears are added around the sentiment which is mounted with dimensional foam adhesive.  I went to mount the card on a Kraft card base and it looked a little unfinished.  So using Heartfelt Creations Cogs and Gear from 2014 I stamped around the perimeter with Memento Tuxedo Black.  DH really liked his card, he doesn't like super fussy ones anyway!  I am please that it came out so "grungy",  not a style I typically dabble in!

Please do come and play along with us at Retro Rubber!  We would love to see what you create for the Anything Goes Challenge.  We have a few rules, first you must use at least one stamp that is older than a year and tell us it's approximate age, and second please enter up to ten challenges including ours.  Easy Peasy!

Monday, November 5, 2018

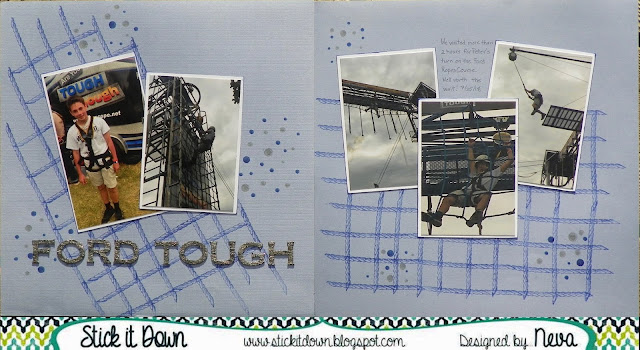
Ford Tough for Stick It Down Double Page

We have a great double page sketch for the month of November at Stick It Down, it can be very seasonal like the sketch or altered to fit your theme like I did!


Here is my version that captures an exhilarating event for my son from last summer's trip to EAA Airventure in Oshkosh Wisconsin.


I wanted to represent the ropes for the embellishments behind the photos, and the easiest way to do that was to stamp a design using Technique Tuesday's Borderline Industry stamps and Delicata Mediterranean Blue ink by Tsukineko.  Since I was going with a bit more of a grunge look I dug out some really old pens that Zig made about 20 years ago called Dotta Riffic, you can make different size dots depending on how hard you push on the flexible rubber tip.  The photos seemed to blend into the background cardstock, so I backed them with white cardstock and barely inked the edges of the cardstock.  The finishing touch was the Recollections stickers in masculine font that were an industrial silver finish.  A fairly clean and simple version of this easy to use sketch. 

FYI, the Ford reference is because Ford Motor Company is a huge sponsor of EAA AirVenture and has a ginormous display and activity area right off the main drag at the show.  This is the first year that my son tried the big ropes course.  I am glad I have a layout for his scrapbook of this endeavor!

Thanks for stopping by! 

Thursday, November 1, 2018

More Travel Fun with Quick Quotes

Hello to all our friends in blogland, Neva here to share a layout featuring a few Powder Puff Chalking Inks and Far and Away papers and quotes.  I have demolished a major part of this collection but still had a few sheets that featured the postmarks that I thought would be great for a layout from our visit to Berlin.


This layout came together rather quickly by using a clean design and a few embellishments from the Far and Away collection.
  • Far and Away 105 is trimmed to get the orange postmark strip.  It is 1 1/8" x 8 1/2" on the left side and 1 1/8" x 12 on the right side of the layout.  Powder Puff Chalking Ink in Barn Board inks the edges. 
  • Far and Away 105 is trimmed to 6" x 8 1/2" and 6" x 12".  Powder Puff Chalking Ink in Blue Moon inks the edges. 
  • Far and Away 104 is trimmed to 2" x 8 1/2" and 2" x 12".   Powder Puff Chalking Ink in Barn Board inks the edges.  
  • A little secret here, originally I had the papers extend across the entire double page layout, but decided I wanted to add the inked globe, so I trimmed the papers back a few inches. 
  • Far and Away 100 is trimmed to 4 1/2" x 11".  Powder Puff Chalking Ink in Barn Board inks the edges.  
  • Fiber is adhered to the back of the bottom section before it is adhered to the cardstock base. 
  • The title is die cut and inked with Blue Moon Powder Puff Chalking Ink.  I debated between using the German name or the English name . . . and went with the version that we can understand!
  • To add the globe, I first die cut a circle in a sheet of paper and placed as a reverse mask around the area I wanted to ink.  The opening is slightly larger than the globe stencil.
  • Using Powder Puff Chalking Ink in Blue Moon I and an Ink Blusher I gently blended the ink onto the white cardstock base through the stencil.
  • A saying from Far and Away 500 is trimmed and inked with Blue Moon Powder Puff Chalking Ink.
  • I still had a few small scraps of Far and Away 101, so it is used to back embellishments and inked with Barn Board Powder Puff Chalking Ink.
  • The same is done with the tourist card I collected while in Berlin, and with the journaling block.


  •  The pennants are trimmed from Far and Away 600 and inked with Barn Board Powder Puff Chalking Ink.
  •  The pennants are adhered directly below the fiber.
  • Wet adhesive secures the fiber in place so it appears that the pennants are attached.
Quick Quotes Products
Far and Away Paper Pack
Far and Away Quotes and Phrases 12" x 12"
Far and Away Quotes and Phrases
Powder Puff Chalking Ink in Blue Moon and Barn Board

Other Products
White Cardstock
Globe Stencil by Stencil Girl
Ink Blusher by Tsukineko
Fiber from my stash
Just a Note--Jen Long by Sizzix   

It was a wonderful stop during our city tour of Berlin, and this layout brings back great memories.  Thank you for joining us at Quick Quotes today!  
~Neva