Tuesday, November 2, 2021

A Clean and Simple Fall Card for Imagine


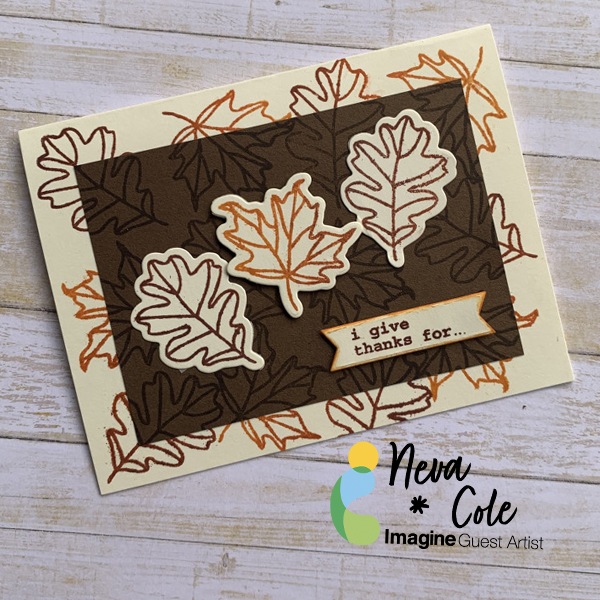
In today’s tutorial I will demonstrate how to use both VersaMark and Kaleidacolor ink to create a layered background for a clean and simple design fall card.  VersaMark is a beautiful watermark ink especially on dark cardstock.

Skill:  Beginning

Time:  30 minutes

Directions:


Step 1

Trim a cream cardstock base to 8.5” x 5.5”, score and fold in half.  Trim a dark brown cardstock to 4.25” x 5.5”.


Step 2

Use a stamp platform and stamp the leaf images in VersaMark Dazzle Champagne on the dark brown cardstock.  Any VersaMark ink will work, but there is a bit of Champagne shimmer with the Dazzle ink.  With the stamps in the same position on the stamp platform, stamp in Kaleidacolor Cappuccino Delight.  The Oak leaf is stamped on the darker brown end and the maple leaf is stamped on the lighter orange end of the Kaleidacolor Cappuccino Delight pad.


Step 3

Continue stamping the base cardstock and dark brown cardstock.  Clean stamps between the Kaleidacolor ink and VersaMark ink.  It is not necessary to clean after the VersaMark ink as it will not affect the color of the Kaleidacolor ink.


Step 4

Trim 0.5” from each edge of the brown cardstock.


Step 5

Stamp the leaves in Kaleidacolor Cappuccino Delight.  The sentiment is stamped in the darkest color of the ink pad.  (I choose and another sentiment for the finished card.)  Die cut the leaves and the sentiment.  Edge the banner sentiment with a Brush Tip Fanstix using the orange from the Kaleidacolor Cappuccino Delight. 


Step 6

Line up the dark brown cardstock with the base layer.  Adhere with Tear It! Tape.  Adhere the oak leaves with Tear It! Tape and the maple leaf and sentiment with dimensional foam adhesive. 


Art Supplies


Imagine

·      VersaMark Dazzle--Champagne

·      Kaleidacolor—Cappuccino Delight

·      Fantastix Brush Tip

·      Tear It! tape


Other

·      Technique Tuesday I Give Thanks Stamp and Die

·      Lawn Cuts Everyday Sentiments Banners


Thanks for stopping by and have a wonderful Thanksgiving!

Tuesday, October 26, 2021

Falling for Autumn at Retro Rubber

Hello all, I don't know about you but the leaves are changing and the weather has definitely turned to fall temperatures.  Fall can be tricky in Central Oregon, and getting the garden to bed is important before the hard frosts hit!  We have a season appropriate theme for our Retro Rubber Challenge this two weeks:


My inspiration came from a Sizzix Framelit, Textured Impressions with Stamps set Door Wreath (2016).  It can be used for any season, but I do like the fall version!

  • Ink the embossing folder With VersaFine Sepia and pressure emboss.
  • Stamp the images in Tuxedo Black and color with Prisma colored pencils.
  • Die cut the images.
  • Stamp the sentiment from Thankful Layering Stamp  (2013) in Versa Fine Crimson Red and trim to a banner.
  • Die cut the wreath from brown cardstock.
  • Assemble layers of the card. 

CHALLENGE GUIDELINES

  • We require stamps older than one year.  If we feel you are using newer stamps, you may be disqualified from the challenge without notification.
  • New papers/dies are OK – but you must use at least one stamp older than a year and describe the age in your blog post.
  • Please note that all challenges require the use of at least one stamp older than a year.
  • Post your new creation to your blog or online gallery.   Use keyword RRCB169.  No backlinking. 
  • Link back to the blog using the Linky Tools by the due date. 
  • You may enter no more than 5 times. 
  • Feel free to combine our challenge with a maximum of 10 challenges.  Entries linked to more than 10 challenges will be disqualified without notification.
  • If your project is posted on a private group site such as Split Coast Stampers or a photo sharing site not all DT members may be able to comment.   Thank you for understanding.
  • Turn off Word and Captcha Verification.  We love to comment but verification can make that difficult.  Thanks!

Thank you so much for stopping by, and hope you will check out all the fun cards over at Retro Rubber Challenge Blog.


Wednesday, October 13, 2021

Fun Halloween Cards with Imagine

Make a quick batch of Halloween cards with a few fun techniques using Imagine products.  See the blog post, and then go shopping!  Halloween is not far away, and here is an idea for cute cards to celebrate! 


In today’s tutorial I will show you how to put together a quick set of Halloween cards ready to send out.  Ink resist and coloring with Fantastix and Kaleidacolor pads makes for quick images to place on a card.  The background is another Kaleidacolor brayered onto glossy cardstock.

Skill:  Intermediate

Time:  1.5  hours 

Directions:


Step 1

Stamp pumpkin images in VersaFine Clair three times each on white cardstock.  VersaFine Clair is a perfect ink for this technique as there is no smear when coloring over with other dye based inks.   


Step 2

Stamp pumpkin carving in Radiant Neon Electric Yellow and heat emboss with Iridescent Embossing Powder.


Step 3

Fussy cut or die cut pumpkins.  Use a Fantastix brush tip to color pumpkins using ink from Kaleidacolor Desert Heat and Cappuccino Delight.  The spectrum of colors allows a quick selection to shade different areas of the pumpkins.  Use a paper towel or soft cloth and remove ink from the embossed area so the images pop.


Step 4

Stamp sentiment on Glossy cardstock in Radiant Neon Electric Yellow and heat emboss with Iridescent Embossing Powder.


Step 5

Use a soft rubber brayer to ink cardstock with Kaleidacolor in Vineyard.  Remove ink from the embossed area with a paper towel or soft cloth. 


Step 6

Die cut 4 bats from black cardstock.  Use Radiant Neon Amplify! in White to add big white eyes.  The Amplify! was not heated.


Step 7

Die cut four fence die cuts from black cardstock.  (Not shown.)


Step 8

Adhere background to A2 grey card base with Tear It! Tape. Adhere the fence and bat die cuts with OnPoint Glue.  Adhere center pumpkin with Tear It! Tape.  Adhere side pumpkins with dimensional foam adhesive.  


Art Supplies


Imagine

·      VersaFine Clair-- Nocturne

·      Radiant Neon-- Electric Yellow

·      Kaleidacolor—Desert Heat, Cappuccino Delight, Vineyard

·      Fantastix Brush Tip

·      Radiant Neon Amplify-- White

·      On Point Glue

·      Tear It! tape


Other

·      Joy Clair Trick or Treat Stamps

·      Heidi Grace Designs Halloween Stamps

·      Echo Park Going Batty die

·      Heartfelt Creations Lattice Flourish Gateway Die

·      Rubber Brayer

·      Dimensional Foam Adhesive

·      Brother Scan-N-Cut


Tuesday, October 12, 2021

Anything Goes for Retro Rubber

 It's time for a new challenge at Retro Rubber and it is one of everyone's favorites!  Anything goes!


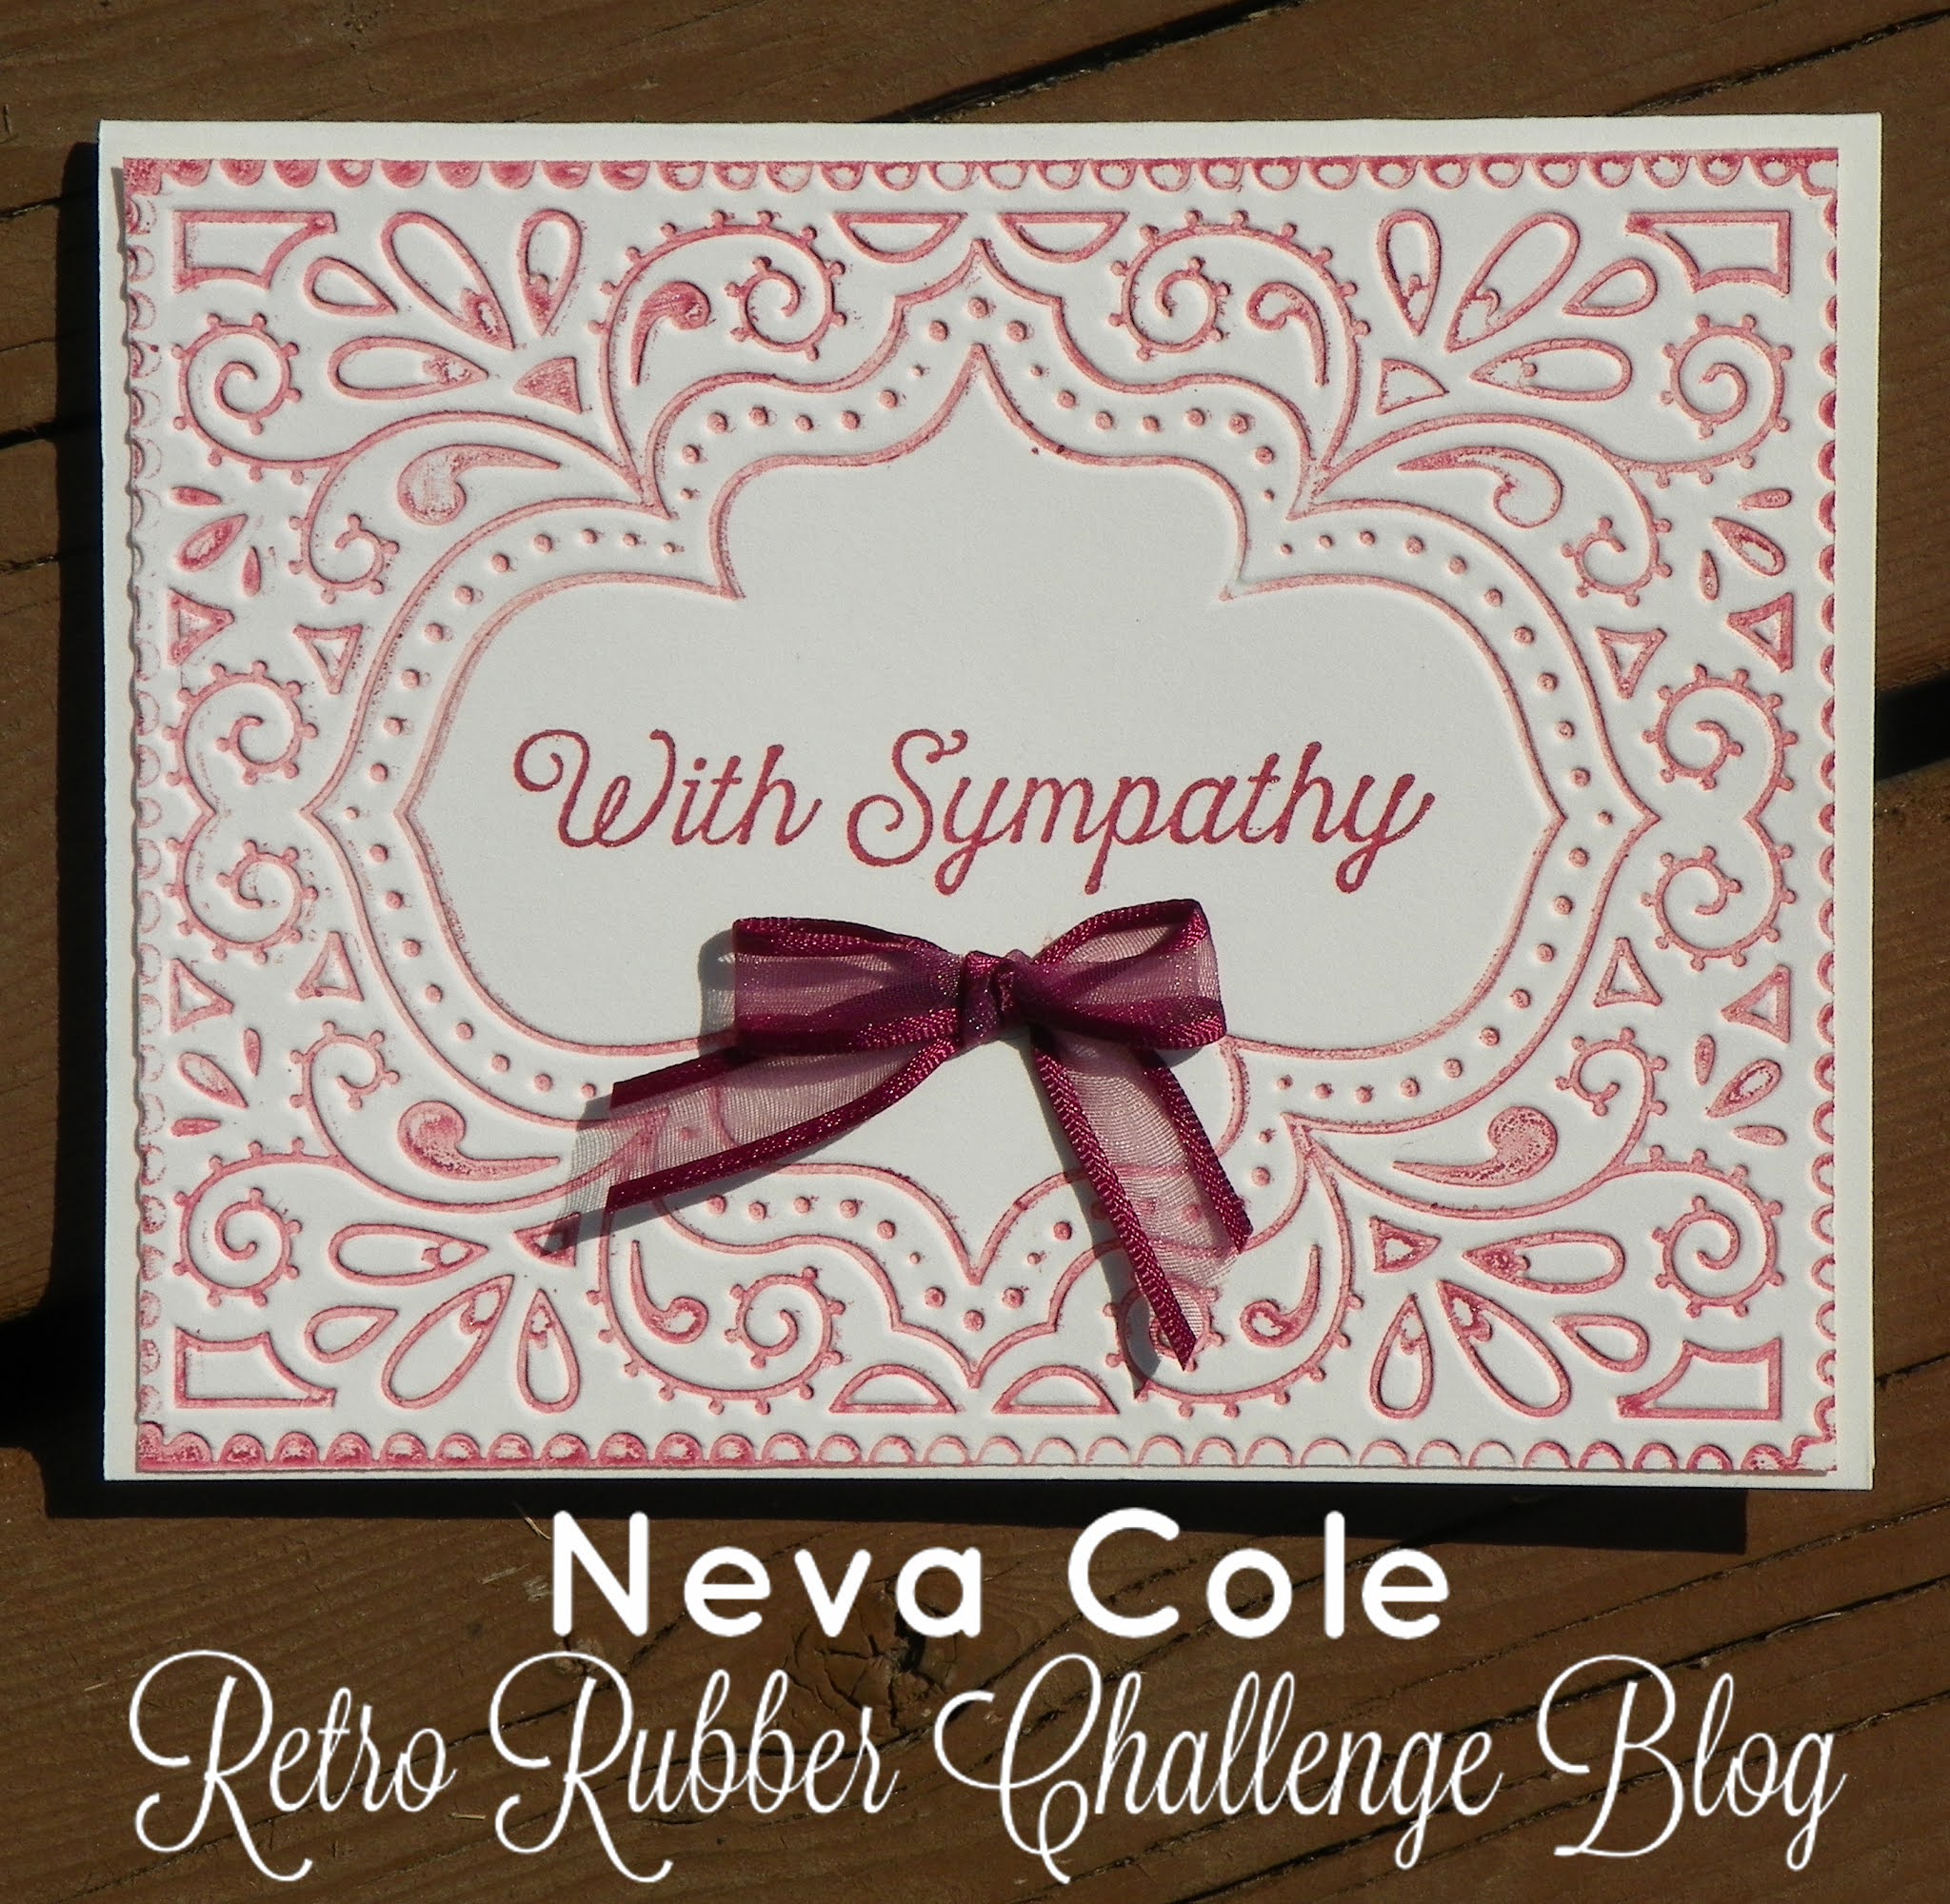
Today I have a CAS sympathy card that you can have in the mail in no time!  I use one of my favorite techniques with embossing folders, and then added a ribbon touch.


  • To achieve the inlaid embossed look I inked up the raised portion of Sizzix Embossing Folder Moroccan with Brilliance Pearlescent Poppy.  Then pressure embossed and trimmed the card front down the the inked edges.
  • The sentiment is from Unity Stamp Co. . . . beautiful life, blessed memories set.  It is stamped in Pearlescent Poppy.
  • A simple bow is tied and mounted with a glue dot below the sentiment.
  • The card front is adhered to a matching A2 card base.  

 CHALLENGE GUIDELINES

  • We require stamps older than one year.  If we feel you are using newer stamps, you may be disqualified from the challenge without notification.
  • New papers/dies are OK – but you must use at least one stamp older than a year and describe the age in your blog post.
  • Please note that all challenges require the use of at least one stamp older than a year.
  • Post your new creation to your blog or online gallery.   Use keyword RRCB169.  No backlinking. 
  • Link back to the blog using the Linky Tools by the due date. 
  • You may enter no more than 5 times. 
  • Feel free to combine our challenge with a maximum of 10 challenges.  Entries linked to more than 10 challenges will be disqualified without notification.
  • If your project is posted on a private group site such as Split Coast Stampers or a photo sharing site not all DT members may be able to comment.   Thank you for understanding.
  • Turn off Word Verification.  We love to comment but word verification can make that difficult.

Thanks so much for stopping by, and do come and play with us at Retro Rubber!

Tuesday, September 28, 2021

Play Tic Tac Toe with Retro Rubber!

 We have such a variety of cards when a Tic Tac Toe is posted over at Retro Rubber.  Design Team's samples are all unique, do come check them out!


I choose the bottom row:  Something that flies, Die or Punch, Add a Bow for my inspiration.  After a quick search of Dragonfly colors I decided on this very autumn palette!


  • Black cardstock is misted with Fireworks! in Dandelion and Tangelo.  I was impatient so I used my heat gun to dry the cardstock.
  • Kaliedacolor in Cappuccino Delight and a rubber brayer is used to ink up glossy card stock.  It is hard to tell in the photo, but the tail portion and back wings have a darker ombre tone.  The Dragonfly is die cut with Technique Tuesday's 2016 Inspired Dragonfly die.  The overlay is die cut from black and carefully glued into place.
  • The sentiment is from the same set and is stamped in Versafine Habanero.  After a quick trim, the edges are inked in the same.
  • Sheer orange ribbon is wrapped around the card front and adhered.  A double looped bow is added to fit the challenge.
  • The sentiment and dragonfly are adhered with dimensional foam adhesive.
  • A few sequins from my stash add the finishing touch!

Thanks so much for joining me, I hope you will play along at Retro Rubber! 

 CHALLENGE GUIDELINES

  • We require stamps older than one year.  If we feel you are using newer stamps, you may be disqualified from the challenge without notification.
  • New papers/dies are OK – but you must use at least one stamp older than a year and describe the age in your blog post.
  • Please note that all challenges require the use of at least one stamp older than a year.
  • Post your new creation to your blog or online gallery.   Use keyword RRCB167.  No backlinking. 
  • Link back to the blog using the Linky Tools by the due date. 
  • Enter as many times as you like. 
  • Feel free to combine our challenge with a maximum of 10 challenges.  Entries linked to more than 10 challenges will be disqualified without notification.
  • If your project is posted on a private group site such as Split Coast Stampers or a photo sharing site not all DT members may be able to comment.   Thank you for understanding.
  • Turn off Word Verification.  We love to comment but word verification can make that difficult.

Tuesday, September 14, 2021

A sketch for Retro Rubber

 Another fun sketch to play along with a Retro Rubber.  Please do join us with your interpretation!

A fall birthday card was in my to-do list and I had the perfect papers and idea to work with this sketch.  Heartfelt Creations Blazing Poppy released in June of 2015 fit the ticket of being both "fallish" and Retro.  I've used this stamp and die a number of times, and love the results.  


  • The flower images are stamped on coral paper in VersaFine Clair Nocturn and shaped in the 3-D Basics Floral mold from Heartfelt Creations.  A quick mist of water and a run through a die cut machine before inking with Memento Morocco and the flower layers are ready to adhere together.  A little black glitter is added with Art Institute glue after the flowers are glued together.
  • Papers for the Blazing Poppy collection are trimmed and die cut with Elizabeth Craft Designs Stitched circles.  The border is punched with Martha Stewart's double looped punch.
  • Heartfelt Creations Ticket and Tag die is used to die cut the sentiment label, and Heartfelt Creations Inspire Me sentiments from 2012 is stamped in Memento Morocco.
  • Edges are inked in both Memento Olive Grove and Morocco before the layers are adhered together.

 CHALLENGE GUIDELINES

  • We require stamps older than one year.  If we feel you are using newer stamps, you may be disqualified from the challenge without notification.
  • New papers/dies are OK – but you must use at least one stamp older than a year and describe the age in your blog post.
  • Please note that all challenges require the use of at least one stamp older than a year.
  • Post your new creation to your blog or online gallery.   Use keyword RRCB167.  No backlinking. 
  • Link back to the blog using the Linky Tools by the due date. 
  • Enter as many times as you like. 
  • Feel free to combine our challenge with a maximum of 10 challenges.  Entries linked to more than 10 challenges will be disqualified without notification.
  • If your project is posted on a private group site such as Split Coast Stampers or a photo sharing site not all DT members may be able to comment.   Thank you for understanding.
  • Turn off Word Verification.  We love to comment but word verification can make that difficult.
 Thanks so much for stopping by!

Friday, September 10, 2021

Fall leaves Thanks for Imagine


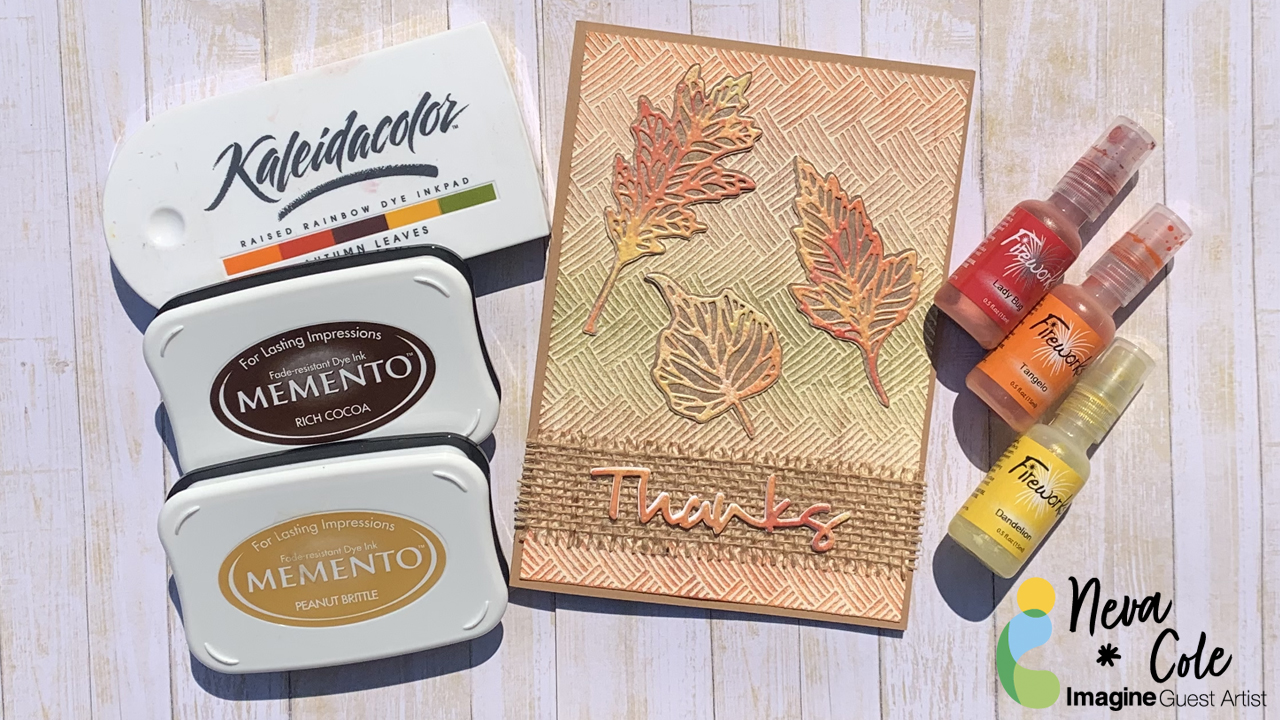
In today's card making tutorial I will show you how to create fall themed Thanks card using three different inks from Imagine.  The autumn colors are vibrant and blend well with kraft card stock and burlap ribbon.  I hope this card inspires you to think of all things pumpkin spice and apple cider as we head into fall!

Skill:  Intermediate

Time:  1.5  hours 

Directions:


Step 1

Spritz white cardstock with Fireworks! Lady Bug, Tangelo, and Dandelion.  I like to start with the darkest color first working to the lighter color to fill in the last areas of white.  Set aside to dry. 


Step 2

Use Memento Peanut Brittle and Ricch Cocoa to ink white cardstock.  I used the ink pad directly on the cardstock as I wanted a splotchy look.


Step 3

Die cut the Fireworks! colored cardstock with Skeleton Leaves dies.  Cut an outline to back the skeleton leaves either by hand or with an electronic die cutting machine.  Adhere the layers together with On Point Glue.  Small dots in the thicker areas of the leaves works best.


Step 4

Die cut one “Thanks” sentiment from the Fireworks! colored cardstock and three from white cardstock.  Layer together with On Point Glue to create a dimensional sentiment.  To avoid glue from leaking out from between the layers use small dots of glue on the outside edges.


Step 5

Use a soft rubber brayer to ink cardstock trimmed to 4.74” x 5.75”.  Kaleidacolor in Autumn Leaves was used with the green portion in the middle and the light orange on either end of the cardstock.  Flip the cardstock to achieve this look.


Step 6

Pressure emboss the cardstock with Basket Weave embossing folder.  Use a sanding block to remove color and allow the embossed design to pop.


Step 7

Adhere background to A7 kraft card base with Tear It! Tape.  Adhere burlap ribbon with Tear It! Tape, it is translucent enough that it does not show through the burlap, and will hold the card together.  Adhere Thanks sentiment with On Point Glue.  Adhere the leaves with Tear It! Tape.


Art Supplies


Imagine


·      Fireworks!—Lady Bug, Tangelo, Dandelion

·      Memento—Peanut Brittle, Rich Cocoa

·      Kaleidacolor—Autumn Leaves

·      On Point Glue

·      Tear It! tape


Other

·      Sizzix Thinlets Skeleton Leaves

·      Spellbinders Phrase Set One

·      Darice Basket Weave embossing folder A7 size

·      Recollections A7 card Base

·      Burlap Ribbon

·      Sanding Block

·      Dimensional Foam Adhesive

·      Brother Scan-N-Cut


Thanks for stopping by!