Tuesday, April 26, 2022

Tic Tac Toe Mother's Day Card

We have a new challenge at Retro Rubber for the next two weeks. It is always fun to see how each project turns out with the Tic Tac Toe board.

I've been playing around with layering stamps and this set is from Altenew Build a Flower Snapdragon released in 2019.  I sat for an afternoon and choose several different color combos once I had my stamps positioned on a stamp platform.  There are two different Snapdragon stems in the set that could be inked up at the same time.  For the Tic Tac Toe I choose the horizontal line: flowers, dry embossing, bling (as a spray). 


  • All stems, leaves, and buds are stamped in Memento Pear Tart and Bamboo Leaves.
  • The Orange Snapdragon is Memento Cantaloupe, Tangelo, and Morocco.
  • The Pink Snapdragon is Memento Angel Pink, Versa Color Orchid, and Versa Color Peony.
  • The Purple Snapdragon is Versa Color Misty Mauve, Heliotrope, and Grape.
  • The A-7 card base (5" x 6 1/2 ") is spritzed with Fireworks! Bamboo Leaves, as well as a section of cardstock used to create the sentiment banner.  
  • White cardstock trimmed to 4" x 5 1/2" is spritzed with Sheer Shimmer Spray in Sparkle and then pressure embossed with Cuttlebug's Basket Weave embossing folder.  After is it dry Memento Bamboo Leaves ink is applied directly to the raised portions of the cardstock.
  • The sentiment banner is die cut with Lawn Cuts Everyday Sentiment Banners and then stamped with Unity Stamp Company's . . . . mama's and grandma's Happy Mother's Day sentiment in Memento Bamboo Leaves.  The edges are inked in the same.
  • the layers are adhered together to finish the card.

It has a real shimmery look in real life, that is difficult to capture in even well light photos.  It was fun to play around with the Snapdragons, even though the placement of the layering stamps were a bit fussy.

Please do join us at Retro Rubber!  We would love to see your projects in our Gallery!

  CHALLENGE GUIDELINES

  • We require stamps older than one year.  If we feel you are using newer stamps, you may be disqualified from the challenge without notification.
  • New papers/dies are OK – but you must use at least one stamp older than a year and describe the age in your blog post.
  • Please note that all challenges require the use of at least one stamp older than a year.
  • Post your new creation to your blog or online gallery.   Use keyword RRCB181.  No backlinking. 
  • Link back to the blog using the Linky Tools by the due date. 
  • Enter as many times as you like. 
  • Feel free to combine our challenge with a maximum of 10 challenges.  Entries linked to more than 10 challenges will be disqualified without notification.
  • If your project is posted on a private group site such as Split Coast Stampers or a photo sharing site not all DT members may be able to comment.   Thank you for understanding.
  • Turn off Word Verification.  We love to comment but word verification can make that difficult.

Thanks for stopping by, and remember your comments are always appreciated!

Tuesday, April 12, 2022

Sketchy Time at Retro Rubber Easter Card

 It is time for a new challenge over at Retro Rubber Challenge Blog.  This is a beautiful clean and simple sketch that can be adapted in many ways.

Since Easter is coming up I choose a very classic scene for this sketch using Joy Clair's My Redeemer from March 2017.  

  • I do not have a sunburst stencil or die in my stash (gasp!), so I found one as a card design at the Silhouette Design Store and made my own from 60 lb Bristol Board vellum finish.
  • Using my DIY stencil I blended Memento Dandelion, Cantaloupe, and Tangelo to create a background.  
  • The cross is stamped in the center and on another section of cardstock in VersaFine Onyx Black and heat embossed with iridescent embossing powder.  After tapping VersaFine Crimson Red and Vintage Sepia I used a spritz of Ink Potion No. 9 and a fine paint brush to color both crosses.  The second cross is fussy cut with scissors.
  • In my stash of ancient Provo Craft Slabs I found the perfect multi-colored paper to finish the sketch.  A 4" strip was cut and then Lawn Fawn Cuts Stitched Hillside Borders to die cut the two different shades from the paper.  They were purposefully cut a little long so I could overlap the edges in a way that fit the sketch.  After they were adhered I trimmed the excess with scissors.
  • The fussy cut cross was added with dimensional foam adhesive.
  • Taylored Expressions Simple Strips Easter from February 2021 added the sentiment.  It is stamped in VersaFine Onyx Black and heat embossed with iridescent embossing powder.  Memento Cantaloupe is inked over the sentiment that was die cut with the matching die.  A backer die cut was added to finished the sentiment then adhered with dimensional foam adhesive.
A CAS Easter Card, I plan on making a few more as I still have plenty of the multi colored paper to make contrasting hills!  Please do come join us at Retro Rubber Challenge blog and have a little fun creating with the sketch!  

CHALLENGE GUIDELINES

  • We require stamps older than one year.  If we feel you are using newer stamps, you may be disqualified from the challenge without notification.
  • New papers/dies are OK – but you must use at least one stamp older than a year and describe the age in your blog post.
  • Please note that all challenges require the use of at least one stamp older than a year.
  • Post your new creation to your blog or online gallery.   Use keyword RRCB180.  No backlinking. 
  • Link back to the blog using the Linky Tools by the due date. 
  • Enter as many times as you like. 
  • Feel free to combine our challenge with a maximum of 10 challenges.  Entries linked to more than 10 challenges will be disqualified without notification.
  • If your project is posted on a private group site such as Split Coast Stampers or a photo sharing site not all DT members may be able to comment.   Thank you for understanding.
  • Turn off Word Verification.  We love to comment but word verification can make that difficult.

Tuesday, March 29, 2022

Let's Get Groovy with 60's Colors at Retro Rubber Challenge Blog

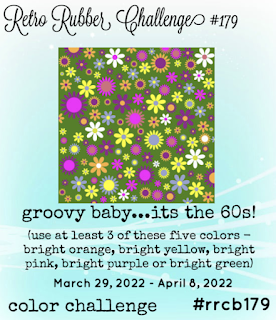
Our color challenges this year are inspired by the recent decades, this time we are featuring the 60's.  What fun color combos at Retro Rubber Challenge Blog.  Do come see what the design team has come up with this Groovy Challenge!

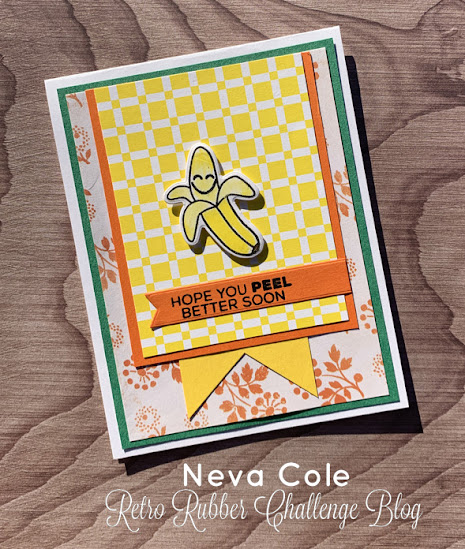
With all the illness going around it was time to for a humorous get well card!  It features a set from Technique Tuesday, Funny Fruits from 2018.  I figured a bright yellow banana would be perfect for the color scheme.  I used a very old sketch from Sheetload of Cards back from June 2019.

  • After searching through my scrap papers for all the layers including the patterned papers I trimmed each to layer to fit the sketch.  I added an extra layer, the green so three colors in the challenge would be represented.
  • The green layer is 4" x 5.25", the orange patterned paper (ancient paper slab by My Mind's Eye) is 3.75"x 5", the orange cardstock is 3.25" x 4", and the yellow patterned paper is 3" x 3.25.  
  • A 2" is trimmed and then punched with the Paper Studio Fish Tail Punch.  
  • The layers are adhered together as  shown.
  • The banana and face is stamped in VersaFine Onyx Blank and heat embossed with iridescent embossing powder.  It is colored with Prisma colored pencils in Canary Yellow, and Deco Yellow for a bit of shading.  The banana is die cut with the coordinating die and adhered with dimensional foam adhesive.
  • The sentiment is stamped in VersaFine Onyx black and heat embossed with iridescent embossing powder.
  • I pulled out my trusty Lawn Fawn Cuts Everyday Sentiment Banners to die cut the sentiment with a fish tail.  The other end was trimmed so to the sentiment would line up under the banana and with the edge of the backing orange cardstock.

To be honest I would not have put these colors together  if it had not been for this challenge.  I believe they all compliment each other nicely!  Please do join our challenge over at Retro Rubber Challenge Blog and have a little fun with 60's themed colors.

 CHALLENGE GUIDELINES

  • We require stamps older than one year.  If we feel you are using newer stamps, you may be disqualified from the challenge without notification.
  • New papers/dies are OK – but you must use at least one stamp older than a year and describe the age in your blog post.
  • Please note that all challenges require the use of at least one stamp older than a year.
  • Post your new creation to your blog or online gallery.   Use keyword RRCB179.  No backlinking. 
  • Link back to the blog using the Linky Tools by the due date. 
  • Enter as many times as you like. 
  • Feel free to combine our challenge with a maximum of 10 challenges.  Entries linked to more than 10 challenges will be disqualified without notification.
  • If your project is posted on a private group site such as Split Coast Stampers or a photo sharing site not all DT members may be able to comment.   Thank you for understanding.
  • Turn off Word Verification.  We love to comment but word verification can make that difficult.

Friday, March 18, 2022

Pastel Easter Card Made Easy with Kaleidacolor


See how to use the Kaleidacolor ink pad to create a pastel Easter Card with subtle style that can be completed in a short amount of time.  Layering with contrasting cardstock and texture added with embossing folders gives this card great dimension. 

Skill:  Beginner

Time: 30 minutes

Directions:

 
Step 1

Trim white cardstock to 8.5" x 5.5" to make card base.  Fold in half and use a rubber brayer to ink the front of the card with Kaleidacolor in Baby Powder.  Move the brayer to fully cover the card and re-ink brayer as needed to create a well inked surface.  Pay attention to direction of ink pad and brayer to avoid mixing the ink colors beyond the ombre look.

Step 2

Trace the outside of a cross die on craft cardstock to create a matching layering piece.  Fussy cut the layer three time or use a electronic die cut machine to cut three layers.  Glue the layers together with OnPoint Glue.  Using a wet glue allows a little time to wiggle the layers into perfect position. 


 Step 3

Place die on white cardstock and die cut and pressure emboss with rubber mat.  Use a make-up sponge rolled to pick up ink in the same ombre of the Kaleidacolor ink pad and ink through the die onto the raised embossed areas.  Die cut two more layers and glue the colored die cut to the top of the first two white layers.  


Step 4

Ink the raised portion of the embossing folder with Kaleidacolor Baby Powder in the same color direction as the card base.  Pressure emboss a 3.75" x 5" section of white cardstock.  The ink will transfer to the indentations of the design.


 Step 5

Trim a section of Kraft cardstock to 4" x 5.25".  Layer the assembled parts of the card without adhering them together to determine the placement of the sentiment.  I choose the appropriate size circle die to die cut the corner of the pressure embossed white cardstock.


Step 6

Using the next size smaller circle die and pressure embossed white cardstock to determine placement of the smaller circle die on the Kraft cardstock and die cut. 


Step 7

Determine placement of sentiment and remove the layers.


Step 8

Stamp the sentiment in Delicata Sapphire Blue.

Step 9

Adhere the layers of the card together.  The Kraft cardstock layer is adhered with dimensional foam adhesive.  All the other layers used Tear It! Tape for best adhesion.

Art Supplies

Imagine

  • Kaleidacolor--Baby Powder
  • Delicata Sapphire Blue
  • OnPoint Glue
  • Tear It! Tape

Other

  • Brayer
  • Spellbinders Crosses Two, Standard Circles Large and Small
  • Darice Crosses Embossing Folder
  • Scan n Cut
  • Taylored Expressions Inside Scoop Easter Blessings
  • Dimensional Foam Adhesive
  • Make-up sponge

Tuesday, March 15, 2022

CAS Sympathy Card for Anything Goes at Retro Rubber

 Everyone's favorite for a challenge!  Anything Goes at Retro Rubber Challenge Blog!  Come and play along with us!


For my card I created a Clean and Simple Sympathy Card.  It is an A2 sized card at 4.25" x 5.5"


  • I trimmed a card front to 4" x 5.25" and used the Crafter's Companion Rose Garden die to die cut the pattern of roses and leaves.
  • With an ink dauber I colored the leaves in Encore Green and the roses in Encore Pink.  The open edge was inked in Encore Green.
  • The sentiment from Great Impressions Jan 2015 was stamped in Encore Green.
  • The base card was inked in Encore Pink.
All in all this card took about 10 minutes to create.  It is a design I will use again when I need a quick but elegant design!  Thanks so much for stopping by and do join us at Retro Rubber Challenge Blog.

CHALLENGE GUIDELINES

  • We require stamps older than one year.  If we feel you are using newer stamps, you may be disqualified from the challenge without notification.
  • New papers/dies are OK – but you must use at least one stamp older than a year and describe the age in your blog post.
  • Please note that all challenges require the use of at least one stamp older than a year.
  • Post your new creation to your blog or online gallery.   Use keyword RRCB178.  No backlinking. 
  • Link back to the blog using the Linky Tools by the due date. 
  • Enter as many times as you like. 
  • Feel free to combine our challenge with a maximum of 10 challenges.  Entries linked to more than 10 challenges will be disqualified without notification.
  • If your project is posted on a private group site such as Split Coast Stampers or a photo sharing site not all DT members may be able to comment.   Thank you for understanding.
  • Turn off Word Verification.  We love to comment but word verification can make that difficult.

Thanks so much for stopping by, your comments are always appreciated!

Tuesday, March 1, 2022

Tic Tac Toe for Retro Rubber

 Tic Tac Toe challenges are always fun as we see so many different variations in the submissions.  I went with the bottom row of birthday, confetti, and twine and made a shaker card.  Come join us at Retro Rubber Challenge Blog.

The base of the card is from the Sizzix Impresslits Happy Birthday set.


  • The card front is trimmed to 4" x 5.25" and centered in the embossing folder that includes the happy birthday center die.
  • The middle of the circle is die cut with the matching die in the set.
  • The raised dots are gently inked with Versa Color Baby Blue.
  • The overlay is die cut with the embossing folder die and then both matching circles in the die set then inked in VersaColor Baby Blue.
  • Two sets of balloons were die cut, three were used as embellishments.  The balloons were inked directly with VersaColor in Baby Blue or Red Magic, then heat embossed with iridescent embossing powder.  I held the balloons with a binder clip and tied a small circle in the twine before placing it on the balloon to add the strings.  Actually to get twine at the correct scale I used crafting thread and teased apart a length so each string was two fibers.
  • The sentiment is from My Favorite Things Birthday Greeting set from January 2017.  It is stamped on white cardstock in VersaColor Magic Red and heat embossed in iridescent embossing powder.  Once cool the fish tail was die cut with Lawn Fawn Sentiment banners on one end and trimmed on the other.  The entire banner was then inked in VersaColor Baby Blue.
  • To create the shaker portion I first marked small pencil lines around the outside edge of the sentiment circle.  Two layers of thin line foam adhesive were added to the card base outside the pencil lines.  The pencil lines were erased.
  • The outside edge of the card base was inked in VersaColor Baby Blue and two layers of foam adhesive were added just inside the inked area.
  • The clear acetate window was trimmed and added to the back of the card front.
  • Confetti sequins were added to the inner circle.  
  • The card front was then adhered to the card base with the already placed foam adhesive.
  • The Happy Birthday overlay was glued into place with small dots of On Point Glue.
  • A piece of foam adhesive was added to all three balloons, then using the binder clip to hold the balloons I tied a small knot to place behind the sentiment banner.
  • The sentiment banner is adhered with dimension foam adhesive, making sure to hold the balloon strings in place.
Thanks so much for checking in with me here, and please do go check out all the beautiful cards the Design Team has made over at Retro Rubber Challenge Blog.

CHALLENGE GUIDELINES

  • We require stamps older than one year.  If we feel you are using newer stamps, you may be disqualified from the challenge without notification.
  • New papers/dies are OK – but you must use at least one stamp older than a year and describe the age in your blog post.
  • Please note that all challenges require the use of at least one stamp older than a year.
  • Post your new creation to your blog or online gallery.   Use keyword RRCB177.  No backlinking. 
  • Link back to the blog using the Linky Tools by the due date. 
  • Enter as many times as you like. 
  • Feel free to combine our challenge with a maximum of 10 challenges.  Entries linked to more than 10 challenges will be disqualified without notification.
  • If your project is posted on a private group site such as Split Coast Stampers or a photo sharing site not all DT members may be able to comment.   Thank you for understanding.
  • Turn off Word Verification.  We love to comment but word verification can make that difficult.

Friday, February 25, 2022

Triple-Step Stamped card made simple with Memento Ink

See how to use the Memento ink line to created a cohesive matching layered card in just a few steps.  The beauty of this particular method is you may make a number of cards depending on your needs in more than one color scheme as shown in the bonus step.  Finishing touches use irRESISTible Pico Embellisher, VersaMark Clear ink, and embossing powder.

Skill:  Beginner

Time:  One card 30 minutes plus dry time, multiples add additional time

Directions:


Step 1

Trim white cardstock to 4.25" x 5.5", this will allow a quicker placement in step 2 on the stamp platform.  Center Image "A" from the Concord & 9th Triple-Step Floral Frame Stamp on the white cardstock and then adhere to the stamp platform.  Ink Image "A" with Memento Bamboo Leaves.  Double or triple stamp the image to create even darker images.  (If doing multiple cards, continue stamping Image "A" until you have your desired quantity.)

Step 2

Place Image "B" from the Concord & 9th Triple-Step Floral Frame Stamp on the white cardstock so the small tulip shaped flowers line up with the stems.  Look directly down through the stamp to judge the placement of the stamp.  In this version Memento Cantaloupe is stamped first.  Turn the image 180 degrees and double check image placement, then stamp in Memento Tangelo.  (If doing multiple cards, continue stamping Image "B" until you have your desired quantity.)


 Step 3

The stamp set has two stamps that will add the center of the roses and an additional layer to the small tulip shaped flowers.  Use the same method as Step 2 for placement.  If the center of the rose is slightly off, stamp again until the white area is inked.

Step 4--Bonus Step

Shown are the additional card fronts stamped during my session of triple-stamping.  Once the layering stamps were in place I like to make multiple stampings for future use.


 Step 5

Stamp "So Kind of You" in Memento Tangelo using a stamp platform.  Stamp over the image with VersaMark Clear ink and heat emboss with clear embossing powder.  Use an ink blusher with a light hand to color around the image, the embossed sentiment will resist the ink.  This sentiment has a matching die to allow you to die cut before adhering to your card front. 


Step 6

Trim white cardstock to 5.5" x 8.5" and fold in half to create an A2 card base.  Ink the edges using an ink dauber with Memento Cantaloupe.  The card front die also creates a very narrow border, this one is inked with Memento Dandelion using an ink dauber.  


Step 7

Place the card front face down and align the Dandelion border to the card front.  Carefully place Tear It! tape around all four edges of the card front.  Take time to "catch" the border without having the Tear It! tape show on the front.  


Step 8

Adhere card front to card base and add the die cut sentiment with dimensional foam adhesive.

Step 9

Learn from my mistake!  Add the irRESISTible Pico Embellisher in Dandelion AFTER the card is assembled to the center of the flowers besides the roses.  The irRESISTible Pico Embellisher will retain the rounded shape after drying.  When I die cut the card front after adding the irRESISTible Pico Embellisher the dots were flattened.  However it was an easy rescue as another layer of the irRESISTible Pico Embellisher added the rounded dimension back to the flower centers!

Art Supplies

Imagine

  • Memento--Bamboo Leaves, Cantaloupe, Tangelo, Dandelion (bonus cards--Pear Tart, Lilac Posies, Sweet Plum, Rose Bud)
  • VersaMark Clear
  • Embossing Powder Clear
  • irRESISTible Pico Embellisher--Dandelion (Bonus cards--Lilac Posies)
  • Ink Daubers 
  • Tear It! Tape

Other

  • Concord & 9th Triple-Step Floral Frame stamp and die
  • White cardstock
  • Dimensional foam adhesive
  • Stamp platform