Wednesday, November 2, 2022

Fall Welcome Home Wooden Sign with Versa Fine Clair


In today's tutorial you will learn to create a super easy wood sign using the ever versatile Versa Fine Clair inks.  The Versa Fine Clair worked beautifully for this project that took just under and hour from design concept to completion!  The ink pads are nice and juicy, so the first stamp image was perfect every time, which is helpful when free hand stamping with out a stamp platform.

Skill:  Beginner

Time:  1 hour

 Directions:

Step 1:


Remove twine from the sign so it will lay flat on your work surface.  With lines on the sign already in place it was easy to line up the sentiment and acrylic stamp block.  Once the stamps are aligned, place a large acrylic block over the stamps lining up the edges to allow perfect positioning.

Step 2:

Stamp the sentiment in Versa Fine Clair Pinecone and heat emboss with clear embossing powder.  Gives the sentiment a bit of shine and keeps it from smearing!

 
Step 3:
 

Using and ink blusher ink the edges of the sign with Versa Fine Clair Cheerful.  Start from the outside edge and blend toward the center to create a slight ombre look.

Step 4:

Using and ink blusher ink the edges of the sign with Versa Fine Clair Summertime.  Start from the outside edge and blend toward the center but not as far as the Cheerful layer.
 
Step 5:
The leaf images are stamped using a very old stamp that features fall leaves.  The Oak leaf is stamped in Versa Fine Clair Acorn, the Aspen leaf in Summertime, and the Maple leaf in Tulip Red.  The sign can be heated with a heat gun, or set aside until the ink drys.

Step 6:


Replace twine through holes in the sign and display! 

Art Supplies

Imagine:

Versa Fine Clair--Pinecone, Acorn, Cheerful, Summertime, Tulip Red

Embossing Powder--Clear

Ink Blusher

Other:

Sqaure 7" x 7" wood sign

Recollections Clear stamps sentiments from 2020

Judi-kins Fall Leaves Cube

Tuesday, October 25, 2022

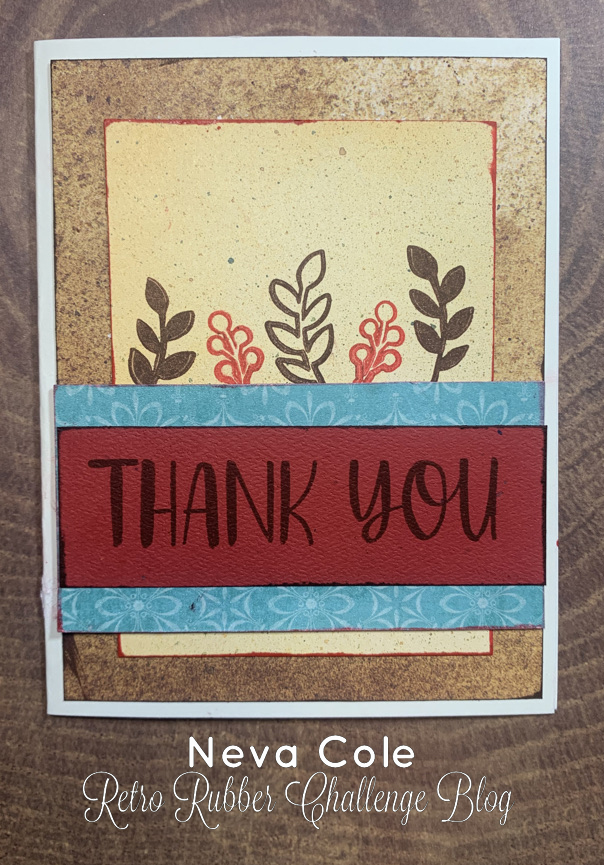
A 90's Thank You

We have been working through the decades at Retro Rubber Challenge Blog during the challenges of the year, now up for your crafting pleasure, the 90's.


I went to my card kit scraps that I keep from finished projects and found a few that would fit the 90's color scheme.

  • Trim brown cardstock to 4" x 5 1/4".  Edge with Versa Fine Clair in Pinecone.
  • Trim gold cardstock to 3" x 4 1/4" and edge with Delicata Ruby Red.
  • Trim patterned teal paper to 2" x 4" and edge with Delicata Ruby Red.
  • Trim red cardtock to 1 1/4" x 4 and stamp sentiment from Recollections Clear Thank You Stamps form 2019 in Versa Fine Clair in Pinecone.  The edges are also inked in Versa Fine Clair in Pinecone.
  • Determine placement of sentiment strips and stamp leaf and berry images from Recollections Clear Thank You Stamps form 2019.  Delicata Red for the berries, and Versa Fine Clair Pinecone for the leaves.
CHALLENGE GUIDELINES
  • We require stamps older than one year.  If we feel you are using newer stamps, you may be disqualified from the challenge without notification.
  • New papers/dies are OK – but you must use at least one stamp older than a year and describe the age in your blog post.
  • Please note that all challenges require the use of at least one stamp older than a year.
  • Post your new creation to your blog or online gallery.   Use keyword RRCB193.  No backlinking. 
  • Link back to the blog using the Linky Tools by the due date. 
  • You may enter no more than 5 times. 
  • Feel free to combine our challenge with a maximum of 10 challenges.  Entries linked to more than 10 challenges will be disqualified without notification.
  • If your project is posted on a private group site such as Split Coast Stampers or a photo sharing site not all DT members may be able to comment.   Thank you for understanding.
  • Turn off Word Verification.  We love to comment but word verification can make that difficult.

This was a very fun to create from the scraps in my card making file.  Please join us at Retro Rubber Challenge Blog and show us your 90's booyah style!

Friday, October 21, 2022

Versa Clair Fine creates a beautifully Stamped Sunflower


Versa Clair Fine is now my favorite pigment ink!  So versatile and allowed me to create a beautifully colored card in just a few steps.  This is one of the few cards that my husband has asked me to specifically make for a friend, it was easy to do with just a few inks, stamps, and dies!

Skill:  Intermediate

Time:  2 hours

 Directions:

Step 1:

 
Stamp sunflower images on yellow cardstock with Versa Fine Clair Cheerful and heat emboss with clear embossing powder.  Stamp leaf images on light green paper in Versa Fine Clair Green Oasis and heat emboss with clear embossing powder.  Die cut with matching dies.

Step 2:

Place flowers and leaves face down in matching shaping mold and mist lightly with water.  As the images are heat embossed, they will stay sharp and crisp.  Close mold and pressure emboss.

 
Step 3:
Remove flowers and leaves from mold and set aside to dry.  Once dry assemble flowers with On Point Glue, adding black glitter to centers.  (Not shown)  Set aside to dry.

Step 4:

Ink the edges of an A7 size card with and ink dauber and Versa Fine Clair Green Oasis.  Set aside to dry, as the ink is very juicy.

Step 5:

Sunflowers are a rustic flower, so corrugated cardstock seemed to be a good choice for a background.  Versa Fine Clair in Cheerful and Summertime are inked randomly on the corrugated cardstock with ink daubers.

Step 6:

 Ink the sentiment with Versa Fine Clair in Green Oasis and heat emboss with clear embossing powder.  Die cut with die from the Eyelet Frame Gateway set.  I trimmed off a portion of the sentiment, then edged the sentiment with Versa Fine Clair in Summertime.

Step 7:


Die cut a Border from the Regal Boarder set using light orange paper.  Gently shade the edges with Versa Fine Clair Summertime and an ink dauber.   
 
Step 8:
Adhere corrugated cardstock to base card with Tear It Tape!  Adhere border with On Point Glue  Adhere flowers with Tear It Tape!

Art Supplies

Imagine:

Versa Fine Clair--Cheerful, Green Oasis, Summertime

Embossing Powder--Clear

On Point Glue

Tear It! Tape
 
Ink Dauber

Other:

Light yellow, light orange and light green cardstock

Corrugated kraft cardstock   

Heartfelt Creations--Rustic Sunflower Stamp/Die/Shaping Mold, Regal Borders and Pockets Die, Eyelet Frame Gateway Die, Heartfelt Expressions stamp

Black Glitter

Die Cut machine

Stamp Platform

Thanks for stopping by!  The post from Oct. 11 you can see another way that I used these beautiful sunflowers, and the card looks totally different!

Tuesday, October 11, 2022

Anything Goes at Retro Rubber

 Everyone's favorite, Anything Goes for the next two weeks at Retro rubber.

I had a need for a quick birthday card for my mother-in-law.  Since we still have sunflowers blooming, I went with that theme.  I also had a few spares from another card that will publish on Oct. 21 for Imagine Crafts Design Team.  If you are interested in the tutorial to make the flowers you can check back later!

  • Heartfelt Creations Sunflowers stamps, dies, and shaping mold are used to create the flowers.  VersaFine Clair in Cheerful is used for the flowers and Green Oasis for the leaves, both on complementary colored cardstock.  A quick heat emboss with clear embossing powder allows a mist of water in the shaping process.
  • The background is stamped with the leaves in VersaFine Green Oasis, then pressure embossed with xxxx die.
  • The Sentiment is from Heartfelt Creations and is stamped in VersaFine Cheerful on white cardstock and heat embossed before being die cut with a Spellbinders Standard Circle Large.  The edges are inked slightly with an ink dauber in VersaFine Clair Cheerful as is the card base.  
  • After the flowers are dry, they are layered together, and wet glue is added to the center along with some black glitter.  
  • The card is assembled using dimensional foam tape and glue dots to hold the flowers and leaves in place.
Thanks so much for stopping by!

CHALLENGE GUIDELINES

  • We require stamps older than one year.  If we feel you are using newer stamps, you may be disqualified from the challenge without notification.
  • New papers/dies are OK – but you must use at least one stamp older than a year and describe the age in your blog post.
  • Please note that all challenges require the use of at least one stamp older than a year.
  • Post your new creation to your blog or online gallery.   Use keyword RRCB193.  No backlinking. 
  • Link back to the blog using the Linky Tools by the due date. 
  • You may enter no more than 5 times. 
  • Feel free to combine our challenge with a maximum of 10 challenges.  Entries linked to more than 10 challenges will be disqualified without notification.
  • If your project is posted on a private group site such as Split Coast Stampers or a photo sharing site not all DT members may be able to comment.   Thank you for understanding.
  • Turn off Word Verification.  We love to comment but word verification can make that difficult.


Tuesday, September 27, 2022

Tic Tac Toe Challenge for Retro Rubber

Tic Tac Toe boards are so much fun for creating cards, there is so much variety in the interpretations of the choices!  This is the board for Retro Rubber's Challenge:

I went with the diagonal of Stars, Pattern Paper, and Bling.  Technically I could also claim Stars, Die Cut, and Blue as well!

  • The Patterned Paper is ancient, maybe over 20 years old, found in my 8.5" x 11" folders, it was made by Paper Patch.  It is trimmed to fit the front of an A7 size card 4.75" x 6.75".
  • I have a favorite Spellbinders Cascading Stars die that was perfect, die cut in both white card stock and red glitter cardstock.  The red glitter covers the bling corner of the board!  It is a bit hard to see in the photo.
  • A Double Fish Tail banner was trimmed from 1.5" cardstock.
  • The Superstar is part of a stamp that says Superstar kid.  I masked the kid portion and stamped the image in Versa Clair Fine Glamorous.  It is made by Autumn Leaves Golden Moments by Maryanne Wise from 2006.
  • Happy Birthday is from 2013 Hero Arts "It's Your Day", also stamped in Versa Clair Fine Glamorous.  Then the image is heat embossed with clear embossing powder.
  • The edges of the banner are inked with a blusher in Versa Clair Fine Blue Bell.
  • The die cuts are adhered with liquid Zig glue, and the banner with dimension foam adhesive.

Once I made my decision to use stars and bling the card came together quickly.   Please join us at Retro Rubber and play along with this quick and easy sketch!

CHALLENGE GUIDELINEs

  • We require stamps older than one year.  If we feel you are using newer stamps, you may be disqualified from the challenge without notification.
  • New papers/dies are OK – but you must use at least one stamp older than a year and describe the age in your blog post.
  • Please note that all challenges require the use of at least one stamp older than a year.
  • Post your new creation to your blog or online gallery.   Use keyword RRCB186.  No backlinking. 
  • Link back to the blog using the Linky Tools by the due date. 
  • Enter as many times as you like. 
  • Feel free to combine our challenge with a maximum of 10 challenges.  Entries linked to more than 10 challenges will be disqualified without notification.
  • If your project is posted on a private group site such as Split Coast Stampers or a photo sharing site not all DT members may be able to comment.   Thank you for understanding.
  • Turn off Word Verification.  We love to comment but word verification can make that difficult.

Thanks so much for stopping by, your comments are always appreciated!


Tuesday, September 13, 2022

Kaleidacolor Fall Thank You


Learn how to make a vividly fall colored Thank You Card using Kaleidacolor ink pads.  There are many Kaleidacolor pads that are in the autumn themed pallet.  Even though this card is multi-layered it comes together in a short amount of time considering all of the inked embellishments!

Skill:  Intermediate

Time:  2 hours

 Directions:

Step 1:


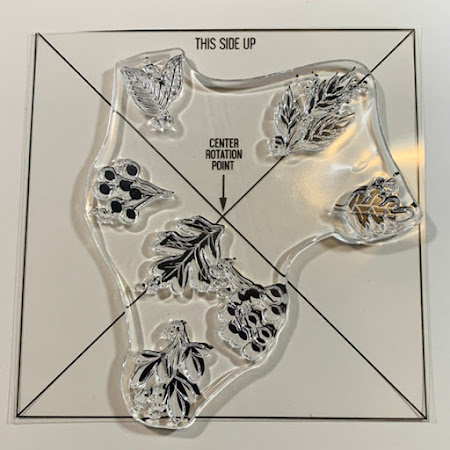
Trim cream cardstock to 5" x 5" and center the overlay and stamp on the center rotation point of the Turn About Stamp.  Place on stamp platform to pick up stamp, and remove overlay.

Step 2:


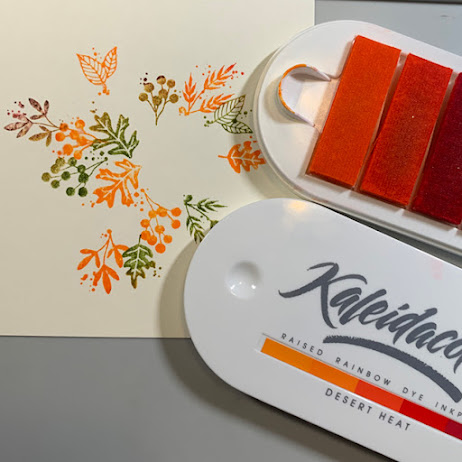
Ink up the stamp with Kaleidacolor in Autumn Leaves with the green end of the pad and stamp the image.  Rotate the paper 90 degree to the right.
 
Step 3:


Ink up the stamp with Kaleidacolor in Desert Heat with the orange end of the pad and stamp the image.  Rotate the paper 90 degree to the right.

Step 4:


Ink up the stamp with Kaleidacolor in Cappuccino Delight with the brown end of the pad and stamp the image.  Rotate the paper 90 degree to the right.

Step 5:

 
Ink up the stamp with Kaleidacolor in Desert Heat with the red end of the pad and stamp the image.  Rotate the paper 90 degree to the right.  After I started the card I realized it can also be completed with two complementary Kaleidacolor pads, just by using opposite ends to ink the image.  Die cut the completed wreath with a circle die cut.

Step 6:


Ink the sentiment from the red end of the Kaleidacolor Desert Heat pad and stamp.

Step 7:


Die cut the sentiment.  The edges are then blended in with an Ink Dauber and the yellow end of the Kaleidacolor Desert Heat pad.  
 
Step 8:


More embellishment is added with included stamps from the set from various sections of all three Kaleidacolor pads.

Step 9:

Spritz a section of cream cardstock with Ink Potion No. 9.  This will allow the ink to spread more uniformly on the cardstock.  Generally glossy cardstock works best, but the rest of the card was regular cream cardstock, this is a good work around.

Step 10:


Using a 2" rubber brayer add ink liberally to the white cardstock until fairly well blended.  All three Kaleidacolor ink pads are used on one piece of cardstock with the intention to have several colors to die cut the coordinating leave dies.

Step 11:


Decorate the front of the 5" x 7" card front in the same way the sentiment die is inked and stamped in Step 8.  

Step 12:


Arrange die cuts from the brayered section of cardstock on the card base.  Use repositionable adhesive to pick up the edges of the die cuts and flip over the entire front circle wreath.  Add dimensional foam adhesive to secure die cuts in place.  (You will notice that the reverse side was the first try, however it wasn't the best, so it is simply flipped over and the other side was used.  You only see the mistake in the demonstration step!)

Step 13:


Adhere stamped wreath to card front.  Adhere the sentiment to the center of the stamped wreath with dimensional foam adhesive.

Art Supplies

Imagine:

Kaleidacolor--Autumn Leaves, Desert Heat, Cappuccino Delight
 
Ink Potion No. 9
 
Ink Dauber

Other:

Cream  Cardstock

Concord & 9th--Harvest Wreath Turnabout Set and Dies

Elizabeth Craft Designs--Stitched Circles

2" Rubber brayer

Temporary repositionable adhesive

Dimension Foam adhesive

Die Cut machine

Stamp Platform

Sketch Time for a Halloween Birthday

Sketches are great way to  a quick start on a card.  The challenge at  Retro Rubber for the next two weeks is to use this sketch!


My sister-in-law has a Halloween birthday, so I typically make her an appropriate themed card.  This year I used the sketch for my inspiration.

I used all scraps from my color bins to create this card, it went together really quickly!

  • Darice Crackle Embossing Folder is used on yellow-orange card stock then the texture is popped with a direct inking of VersaFine Vintage Sepia.
  • A mat is trimmed from darker orange card stock.  The sentiment by Hero Arts It's Your Day 3/2015 is stamped in Memento Tuxedo Black.
  • The witch's hat is die cut with a Cheery Lynn Design die, Witch Hunt.  
  • Pumpkins are stamped on lighter orange cardstock in Memento Tuxedo Black with Joy Clair Trick or Treat stamp set from 2016.  They are die cut using a Brother ScanNCut.
  • The stems are colored with Chameleon Burnt Umber.
  • The layers are adhered together with the sentiment and pumpkins with dimensional foam tape.

I also wanted to share the interior of the card:


  •  The witch is from the Cheery Lynn Design Witch Hunt, die cut at the same time as the hat on the front of the card.
  • Silhouette Design Store font BIC Trick or Treat Regular is the fun sentiment on the inside of the card.
I am really pleased with the final result, and it was super fun create a card I know my sister-in-law will enjoy!  Please join us at Retro Rubber and play along with this quick and easy sketch!

CHALLENGE GUIDELINEs

  • We require stamps older than one year.  If we feel you are using newer stamps, you may be disqualified from the challenge without notification.
  • New papers/dies are OK – but you must use at least one stamp older than a year and describe the age in your blog post.
  • Please note that all challenges require the use of at least one stamp older than a year.
  • Post your new creation to your blog or online gallery.   Use keyword RRCB186.  No backlinking. 
  • Link back to the blog using the Linky Tools by the due date. 
  • Enter as many times as you like. 
  • Feel free to combine our challenge with a maximum of 10 challenges.  Entries linked to more than 10 challenges will be disqualified without notification.
  • If your project is posted on a private group site such as Split Coast Stampers or a photo sharing site not all DT members may be able to comment.   Thank you for understanding.
  • Turn off Word Verification.  We love to comment but word verification can make that difficult.

Thanks so much for stopping by, your comments are always appreciated!