Thursday, June 23, 2022

Fourth of July Layout Made Easy with Memento inks and Fireworks!

Today I will share how easy it is to create a very cohesive layout using just two ink colors and the matching Fireworks! colors for an amazing Fourth of July scrapbook layout.  With just white cardstock, an embossing folder, a large die cut, and stamps this layout is perfect for Independence Day.

Skill:  Beginner

Time:  2 hours

 Directions:

Step 1:


Trim white cardstock to 1" on each edge larger than the photos.  Pressure emboss with Star Blanket.  Ink raised portion of embossed areas and edges with Memento Danube Blue or Lady Bug.  For my layout I trimmed two sections 5" x 7", three sections 4" x 5", and one section by 4" x 4" to back my phtotos.

Step 2:


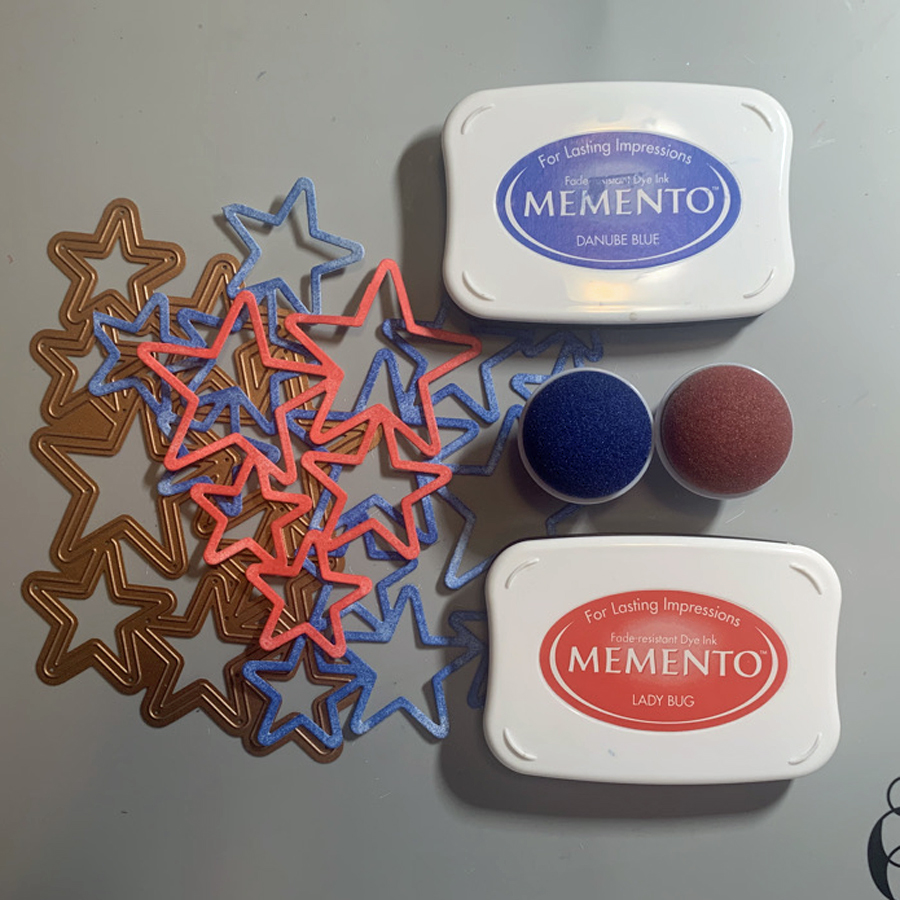
Die cut two sets from Spellbinders Cascading Stars die and remove the stars.  Trim one outline die cut into a section of five stars, with the other being four stars.  Use Jumbo Dauber to tap Memento Danube Blue over one die cut and the smaller portion of the trimmed die cut.  Tapping the ink onto the paper keeps from damaging the die cut, which can occur if a rubbing motion is used.  The larger portion of the trimmed die cut is inked in Memento Lady Bug.  Continue to add ink until it is the desired hue. 

Step 3:


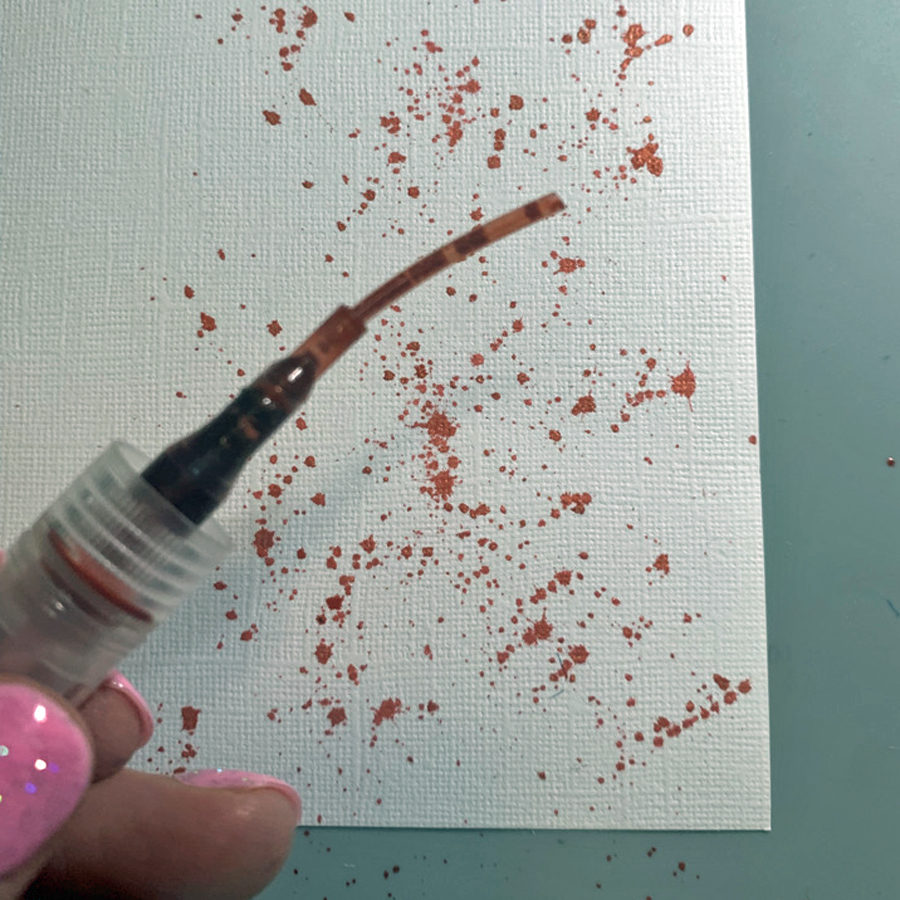
The splatter method is used with Fireworks! to add some interest to the white background.  Shake the bottle to distribute glimmer and then remove spritzer nozzle and gently tap the top to splatter ink from the outside of the spray tube.  Continue to tap until the desired amount of ink is on the paper.  I choose sections where the die cuts would be eventually placed.  I alternated the color choices from the die cut color.  This is the lower right corner of the right page.  

Step 4:


The left side of the layout shown completed with splattered Fireworks! in Memento Lady Bug and Danube Blue.

Step 5:


Determine placement placement of elements to add stamped sentiments.  Place on layout and remove other elements.  Use a stamp platform to stamp sentiments in proper position.

Step 6:

On the right page the stamped elements are determined, then half are removed before stamping to allow for clean stamping of correct colors.  The remaining elements are added and stamped.  It was easier to stamp all the images Memento Lady Bug at one time, then follow with images in Memento Danube Blue.

Step 7:


Spritz Fireworks! into a plastic tray or surface.  Place die cut stars from step 2 face down on the Fireworks! ink to add color.  Use tweezers to move around in the ink and add more ink to tray as needed.  About a third of the stars were inked with Fireworks! in Lady Bug the remaining in Fireworks! Danube Blue.

Step 8:
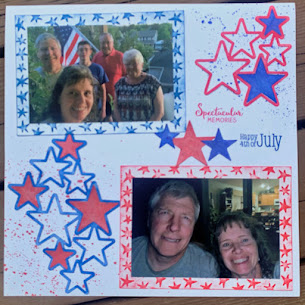
 

Determine correct placement of Fireworks! stars in the die cut.  I rotated the star until it fit properly into the die cut area.  Not all the stars are identical, so taking the time to find the right one was worth the effort for a seamless look.   

Step 9:

Adhere elements to layout.  Tear It! tape was used to adhere the photos to the textured mats.  The die cuts are adhered with On Point! glue.  The small dots around the star frames keep the layout clean and smudge free.  


Art Supplies

Imagine:

Memento--Lady Bug and Danube Blue

Fireworks!--Lady Bug and Danube Blue

Jumbo Dauber

Tear It! Tape

On Point Glue

Other:

White Cardstock

Cuttlebug Star Blanket embossing folder

Spellbinders Cascading Stars

Technique Tuesday Spectacular Memories

Hero Arts CL493 Holiday Sentiments

Tweezers

Die Cut machine

Stamp Platform

Tuesday, June 21, 2022

Mod Circles for Retro Rubber

 Our challenge for the next two weeks at Retro Rubber is to use circles in your project.  I took the "mod" part and decided that bright fluorescent colors would also be appropriate!  Hope you have as much with your Mod Circles as I did!

I decided to start with all my colors of Radiant Neon ink and an ancient Fiskars stamp stamp from at least 2005, Layer Away Variety.  This project was a bit of an experiment and turned into making a total of eight cards!

  • A different color of Radiant Neon was chosen for each size of circle.  Electric Blue, Electric Green, Electric Orange, Electric Yellow, Electric Pink, and Electric Purple.  The different stamps were stamped randomly around a sheet of 8.5" x 1".  Subsequently this was trimmed into 4" x 2.5" sections.
  • Another sheet of white cardstock was trimmed into four sections of 4" x 5" and pressure embossed with Cuttlebug Spots and Dots embossing folder.  The Radiant Neon Electric Orange ink pad was rubbed over the raised portions of the embossed cardstock.  Each section was trimmed to 4" x 2.5"
  • Scraps of white cardstock were inked with an ink blusher and Radiant Neon Electric Green then pressure embossed with Cuttlebug Polka Dots.  Sections were trimmed to .75" x 4.25".
  • Stamping Up!'s Think Happy Thoughts from about 2007 was stamped in Radiant Neon Electric Purple, with the flower stamped in Radiant Neon Electric Pink.  The sentiment was die cut with Spellbinder Standard Circles Large.
  • Cardstock was die cut with Spellbinder Classic Scallops then the edges inked in Radiant Neon Electric Pink.
  • The A-2 card base egdes are inked with an ink blusher and Radiant Neon Electric Blue.
  • The card is adhered together with the sentiment circle raised with dimensional foam adhesive.
After a little experimentation I came up with a design that highlighted the bright color and fit the theme.  Please do join us at Retro Rubber and create something with circles!

CHALLENGE GUIDELINES

  • We require stamps older than one year.  If we feel you are using newer stamps, you may be disqualified from the challenge without notification.
  • New papers/dies are OK – but you must use at least one stamp older than a year and describe the age in your blog post.
  • Please note that all challenges require the use of at least one stamp older than a year.
  • Post your new creation to your blog or online gallery.   Use keyword RRCB185.  No backlinking. 
  • Link back to the blog using the Linky Tools by the due date. 
  • Enter as many times as you like. 
  • Feel free to combine our challenge with a maximum of 10 challenges.  Entries linked to more than 10 challenges will be disqualified without notification.
  • If your project is posted on a private group site such as Split Coast Stampers or a photo sharing site not all DT members may be able to comment.   Thank you for understanding.
  • Turn off Word Verification.  We love to comment but word verification can make that difficult.

Thanks so much for stopping by, your comments are always appreciated!

Tuesday, June 7, 2022

The 70's Color Challenge at Retro Rubber

 What fun, time to revisit the 70's color scheme at Retro Rubber.  I actually do remember the Avocado Green shag carpet in our home and the Harvest Gold appliances in our kitchen.   

For my card I used the color scheme to designed a birthday card for my niece who enjoys succulents.  A quick search through my scraps I found a great patterned paper of orange and brown and jumped off from there.  All of the cardstock was also from the scrap folders.  Economy in card making!


  • Brown cardstock is trimmed to 5.25" x 3", the patterned paper is trimmed to 2.75' x 5.125" and adhered to the left edge of an A-2 size card base.
  • Gold cardstock is trimmed 4.125" x 3.125", and cream cardstock is trimmed to 3.875" x 2.875".  Both layers are adhered to the card base offset from the patterned paper layer.
  • The Stamps of Life Succulents2stamp from 2008 is used to stamp the sentiment in the upper right corner in Memento Luxe Olive Grove.  
  • The flower pot is die cut with the die from the set Succulents2stamp set.  Brown, gold, and cream cardstock.  The pattern on the rim is stamped in Memento Luxe Olive Grove and the edges are inked.  
  • The round succulent is stamped in Memento Luxe Olive Grove and shaded with Memento Dual Tip Marker in Pear Tart.  The flower is colored with Memento Dual Tip Marker in Cantaloupe.  The additional die cut is from the coordinating Succulents 2 set.
  • The succulents are adhered to the back of the pot, and the layers of the pot are adhered together before adding it to the card.  

Thanks so much for stopping by and do join us at Retro Rubber Challenge Blog.  This was a fun card to create, and the color scheme worked perfectly!

CHALLENGE GUIDELINES

  • We require stamps older than one year.  If we feel you are using newer stamps, you may be disqualified from the challenge without notification.
  • New papers/dies are OK – but you must use at least one stamp older than a year and describe the age in your blog post.
  • Please note that all challenges require the use of at least one stamp older than a year.
  • Post your new creation to your blog or online gallery.   Use keyword RRCB184.  No backlinking. 
  • Link back to the blog using the Linky Tools by the due date. 
  • Enter as many times as you like. 
  • Feel free to combine our challenge with a maximum of 10 challenges.  Entries linked to more than 10 challenges will be disqualified without notification.
  • If your project is posted on a private group site such as Split Coast Stampers or a photo sharing site not all DT members may be able to comment.   Thank you for understanding.
  • Turn off Word Verification.  We love to comment but word verification can make that difficult.

Thanks so much for stopping by, your comments are always appreciated!

Friday, May 27, 2022

Use Creative Medium Background for a Stunning card

Use Creative Medium Background for a Stunning Card


I am always searching for new ways to use supplies and tools.  Creative Medium comes in many colors, but the Iridescent Green creates stunning results on black paper.  The use of an Embossing Folder helps the layers of the iridescent effect really shine.  A few layered stamped images and I have a beautiful sympathy card to send to a dear friend.  
 

Skill: Beginner


Time: 1 hour plus dry time


Directions:


Step 1:


Cover a section of black paper (with or without texture) with a thin layer of Creative Medium in Iridescent Green.  I used Imagine's Squeegee to spread the layer across the paper.  The rubber edge was very helpful to get a thin even layer.  Set aside to dry, possibly overnight.  After it is dry it will still have a slightly rubbery texture.


Step 2:


Trim a section of the paper to 4" x 5 1/4" and pressure emboss with Sizzix Tropical Paisley Embossing Folder.  You can really see the detail in this photo.


Step 3:


Layer stamp the Hero Arts Hibiscus and leaves images.  Start with the lightest ink first.  For the Hibiscus--Radiant Neon Electric Yellow, Memento Cantaloupe, Memento Tangelo, and Versa Fine Habanero.  The leaves are stamped in Memento Bamboo Leaves and Northern Pine.  The images are die cut twice more from white and layered under matching die cuts with OnPoint glue.


Step 4:


The sentiment from Unity Stamp Company is stamped in Versa Fine Habanero then heat embossed with Iridescent Embossing powder.  (Not shown) The image is die cut with Lawn Cuts Everyday Sentiments die.  One end is trimmed off square.  The banner is inked with an ink dauber and Radiant Neon Electric Yellow.  The edges are inked with Memento Cantaloupe. 


Step 5:


Ink the edges of a 4 1/4" x 5 1/2" card with Radiant Neon Electric Yellow ink with an ink dauber.


Step 6:


The layers are adhered together with Tear It! Tape.  It adheres well with the textured layers of the card.  The two Hibiscus flower are lifted a bit with dimensional foam adhesive.


Imagine

  • Creative Medium Iridescent Green
  • Imagine Squeegee
  • Radiant Neon Electric Yellow
  • Memento--Cantaloupe, Tangelo, Bamboo Leaves, Northern Pines
  • Versa Fine Habenero
  • Tear It! Tape
  • Ink Dauber

Other

  • Black and white cardstock
  • Sizzix Tropical Paisley Embossing Folder
  • Stamp Platform
  • Heat Embossing Gun
  • Hero Arts Hibiscus C1868
  • Unity Stamp Company "beautiful life, blessed memories"
  • Lawn Cuts Die Everyday Sentiments
  • Dimensional Foam Adhesive

Tuesday, May 24, 2022

A quick Birthday Card for Anything Goes at Retro Rubber

Time for another Anything Goes! Challenge at Retro Rubber, always a fan favorite.  I decided to make a quick card, not necessary clean, but simple!

My son recently had a birthday, and this challenge was perfect to make a quick card to help him celebrate!  Actually the only stamps used on this card are Stampabilities Vintage Type 96 pc from 2019, as they were the perfect size to fit the balloons which are very retro!

  • The birthday background is created with white cardstock that is pressure embossed with Darice's Birthday Collage embossing folder.
  • A brayer is inked up with ink from the Kaleidacolor Blue Breeze pad and then inked over the raised areas of the card background.  Using a brayer helps avoid getting ink in the "valley" parts of the background.
  • The balloons are die cut from white cardstock using Quickutz balloon dies from about 2000!  I kept the white highlight piece and placed it back in the balloon later on.
  • The numbers are stamped in Memento Luxe Wedding White and heat embossed with white embossing powder.  I selected a color from the hues on the Kaleidacolor Blue Breeze and used an ink dauber to ink up the balloons to match the background.
  • The card base inked with an ink dauber from the same hues of the card background from the Kaleidacolor Blue Breeze iink pad.
  • The balloons are assembled with foam adhesive on the back to hold the white sections in place.  Before removing the adhesive to place the balloons on the card, craft thread is tied to the balloons for strings.  The tails of the strings are adhered to the back of the card background.
  • The card background is adhered to the card base.  

The is a super quick card to put together, and still was fun to coordinate all the blues using one ink pad!

 CHALLENGE GUIDELINES

  • We require stamps older than one year.  If we feel you are using newer stamps, you may be disqualified from the challenge without notification.
  • New papers/dies are OK – but you must use at least one stamp older than a year and describe the age in your blog post.
  • Please note that all challenges require the use of at least one stamp older than a year.
  • Post your new creation to your blog or online gallery.   Use keyword RRCB183.  No backlinking. 
  • Link back to the blog using the Linky Tools by the due date. 
  • Enter as many times as you like. 
  • Feel free to combine our challenge with a maximum of 10 challenges.  Entries linked to more than 10 challenges will be disqualified without notification.
  • If your project is posted on a private group site such as Split Coast Stampers or a photo sharing site not all DT members may be able to comment.   Thank you for understanding.
  • Turn off Word Verification.  We love to comment but word verification can make that difficult.

 Thanks so much for stopping by, remember your comments are always appreciated!


Tuesday, May 10, 2022

Flower Power

Spring should be fully sprung in most areas of the Northern Hemisphere.  We are at a higher altitude so it takes a bit longer for my spring flowers to really bloom.  I do have a Wild Rose Bush (more like a tree) that inspired my Flower Power card for Retro Rubber Challenge.  Please do stop by the blog and see the beautiful cards the team has created!  


I choose a favorite set, Technique Tuesday's Wild Rose from 2016 to create my card.  I have used it in many ways, but my favorite way is to heat emboss and then water color the roses.


  • Using a smaller rubber brayer the background is inked on an A-2 size (4 1/4 x 5 1/2") card base.  Memento Angel Pink was inked first using the brayer in different directions on the card.  The brayer was cleaned then Memento Pear Tart was inked in the white spaces, allowing for a little bit of blending.
  • The Scalloped oval is die cut with Spellbinders Scalloped Ovals large and the outer edge is inked in Memento Luxe Pear Tart with an ink blusher.
  • Spellbinders Ovals Large is used to back the flowers.  White cardstock is die cut, then Darice Basket Weave Embossing Folder raised areas was inked with Memento Angel Pink to pressure emboss the design into the cardstock.  Cutting the die shape before pressure embossing keeps the design crisp and clean.
  • The flowers are stamped in Versa Clair Nocturne and heat embossed with clear embossing powder.  Memento Dual Tip Marker in Angel Pink, Rose Bud, and Pear Tart are scribbled on the craft mat.  Ink Potion #9 dilutes the ink to allow a shaded watercolor effect on the flowers and leaves.
  • The sentiment Get Well Wishes is stamped in Versa Clair Nocturne and heat embossed with clear embossing powder. Memento Luxe Rose Bud is used ink the sentiment.
  • The layers are adhered together, with the sentiment popped up with dimension foam adhesive.  

Thanks so much for stopping by!  Do join us and ink up a beloved stamp OR one that needs some inky love and create your own Flower Power project. 

CHALLENGE GUIDELINES

  • We require stamps older than one year.  If we feel you are using newer stamps, you may be disqualified from the challenge without notification.
  • New papers/dies are OK – but you must use at least one stamp older than a year and describe the age in your blog post.
  • Please note that all challenges require the use of at least one stamp older than a year.
  • Post your new creation to your blog or online gallery.   Use keyword RRCB182.  No backlinking. 
  • Link back to the blog using the Linky Tools by the due date. 
  • Enter as many times as you like. 
  • Feel free to combine our challenge with a maximum of 10 challenges.  Entries linked to more than 10 challenges will be disqualified without notification.
  • If your project is posted on a private group site such as Split Coast Stampers or a photo sharing site not all DT members may be able to comment.   Thank you for understanding.
  • Turn off Word Verification.  We love to comment but word verification can make that difficult.

Friday, April 29, 2022

Colorful Peonies Created with Ink and Stencil Birthday Card


See how to use a variety of inks to create a stunning card using layering stencils and Fireworks as an embellishment.  Layering stamps have been around for a few years, but recently a few companies have come out with layering stencils that match stamp sets.  It takes a bit more time, but the results are phenomenal and I find that the placement is just a tiny bit easier.  For a finishing touch The Essential Glue Pad produces the look of foil without the need for heated plates or a laminating machine, a win in my book!


Skill: Intermediate


Time: 1 hour


Directions:


Step 1:


Stamp Pink Fresh Painted Peony Mix in Delicata Golden Glitz and heat emboss with Iridescent Embossing Powder.  I placed the stamp at a 45 degree angle on my stamp platform, as the stamped image is longer than most platforms.  This technique creates enough images for at least three cards!


Step 2:


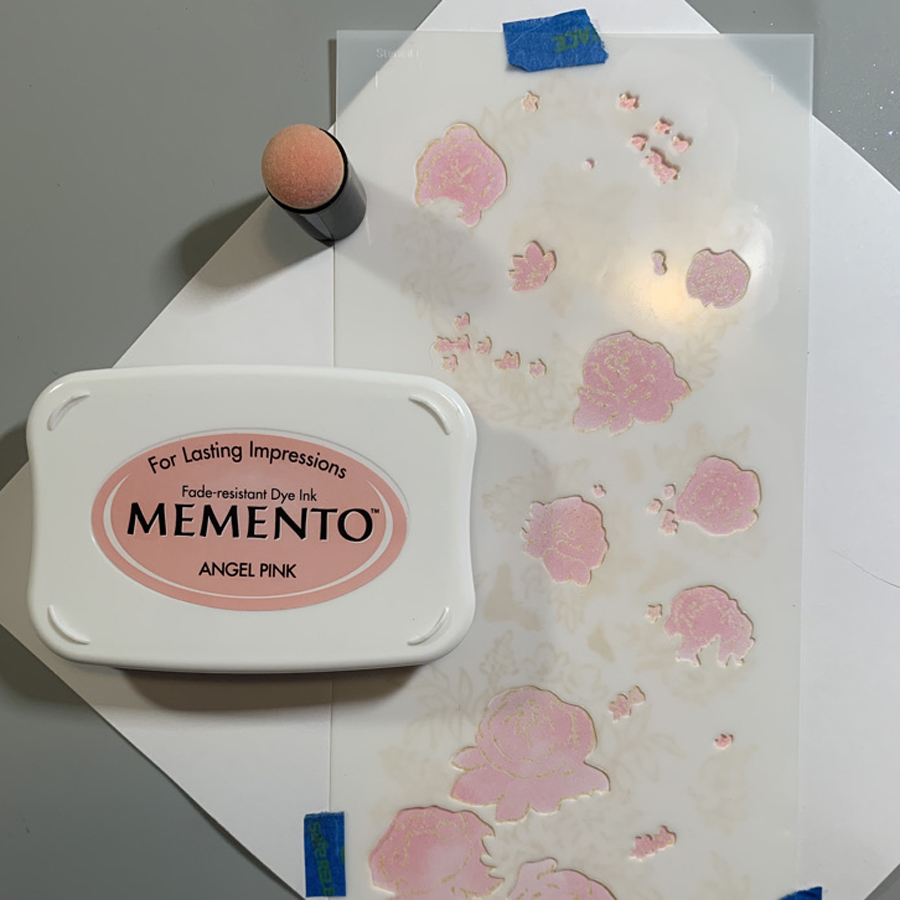
 Most Peonies are white or light pink.  I choose Memento Angel Pink and used a heavy hand with the ink dauber to ink the first stencil.  Using an ink dauber allows for a bit of shading in the process as well.  Each stencil has registration marks to allow precise placement. 


Step 3:


The next stencil in the series colors the complementary flowers in the design.  Memento Dandelion Yellow is inked with an ink dauber, again with a heavy hand.  


Step 4:


The next layer creates the leafy background.  It is inked with Memento New Sprout.  


Step 5:


To shade in the fourth layer of color I used Versa Color Orchid.  As you can see the images are coming together.


Step 6:


Each successive layer adds more dimension, so pretty!
Memento Rose Bud is added in this layer.


Step 7:


Small pieces of removable tape are placed on the flowers that I preferred to accent with something other than the Memento Cottage Ivy used on the leaves.


Step 8


To finish the flowers, Memento Sweet Plum was inked through the previously covered sections of the stencil.


Step 9


Die cut with the matching die.  All nine pieces cut at the same time!


Step 10


Trim a section of white linen textured cardstock to 4" x 5.25".  Shake each Fireworks! and Shimmer spray until the fine shimmer particles are dispersed in the bottle.  Remove sprayer nozzle and tap gently to add color sprays around the white cardstock.  This method produces larger droplets that are not as closely placed together as compared to using the direct spray technique.  


Step 11


Stamp the sentiment on a piece of black cardstock with The Essential Glue Pad and gently place Metallic Flakes over the glue.  Use a brush to remove larger pieces of Metallic Flakes and return to the jar.  A paper towel will clean up the rest of the image.  Trim to desired shape, in this case a fishtail banner. 


Step 12


Trim black cardstock to 5 3/8" x 4 1/8".  Adhere layers together on a A-2 size card base with Tear It! tape.  The flower bouquet is adhere with dimensional foam adhesive. 


Art Supplies


Imagine

  • Delicate Golden Glitz
  • Iridescent Embossing Powder  
  • Memento--Angel Pink, Dandelion, New Sprout, Rose Bud, Cottage Ivy
  • Versa Color:  Orchid
  • Fireworks!--Rose Bud, New Sprout
  • Shimmer Spray Gold
  • The Essential Glue Pad
  • Tear It! Tape
  • Ink Daubers

Other

  • Pink Fresh--Painted Peony Mix Stamp, Stencil Set, Die
  • Black and white cardstock
  • Stamp Platform
  • Heat Embossing Gun
  • Paper Studio Fish Tail punch
  • Painter’s tape
  • Prima Art Ingredients Metallic Flakes Vintage
  • Small paint brush
  • Dimensional Foam Adhesive